Search Knowledge Base by Keyword
Client Area Tutorial
SUMMARY:
LabCollector’s ![]() client area offers a variety of options to enhance your user experience. From convenient add-on downloads to seamless access to support and upgrades, dashboard management, ticket creation for issue resolution, access to storage accessories, and newsletter services, you’ll find a wide array of features at your disposal.
client area offers a variety of options to enhance your user experience. From convenient add-on downloads to seamless access to support and upgrades, dashboard management, ticket creation for issue resolution, access to storage accessories, and newsletter services, you’ll find a wide array of features at your disposal.
1. Connecting to the client area
2. Dashboard
3. Downloads
4. My services (obtaining services and licenses)
![]()
1. Connecting to the client area
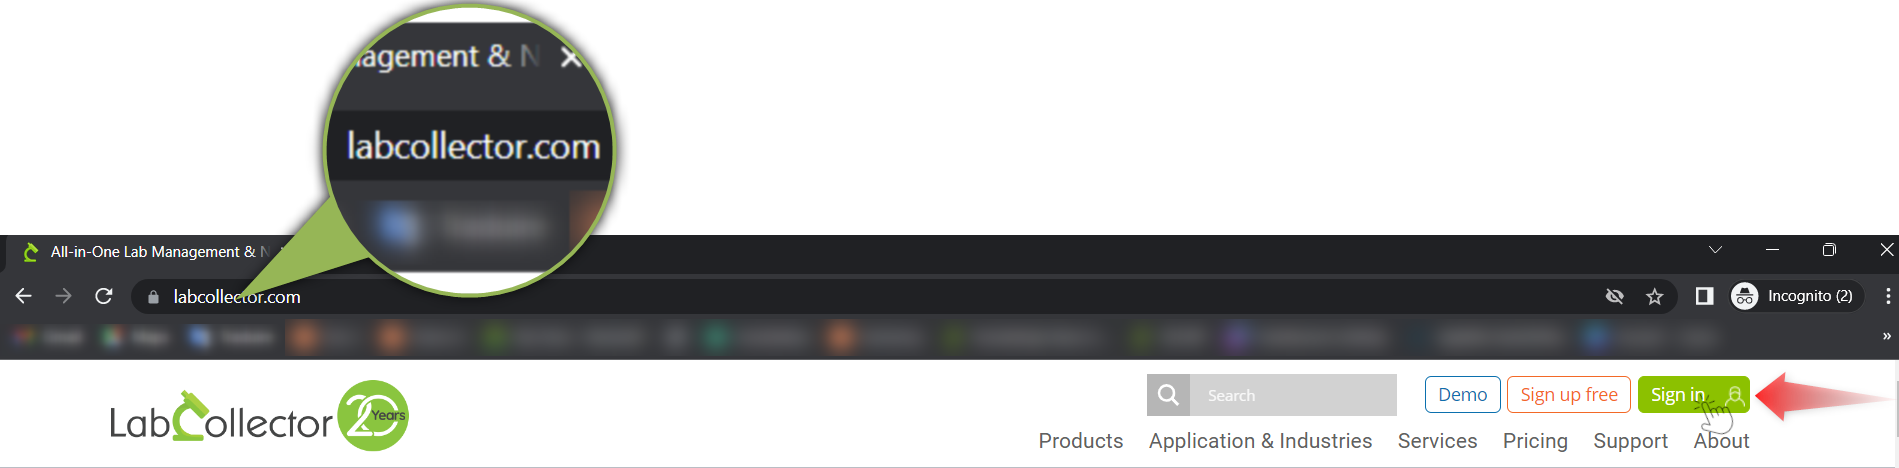
- You can access your client area by clicking on the following link: labcollector.com

- You will then need to click on the sign-in button, located on the top right-hand corner (as shown in the screenshot below).
- A new window will open, where you can select between the following two options:
- Option 1: if you already have an account on labcollector.com and have credentials (even if it’s for the older system), you can use the same login and password to connect to the Client Area.

-
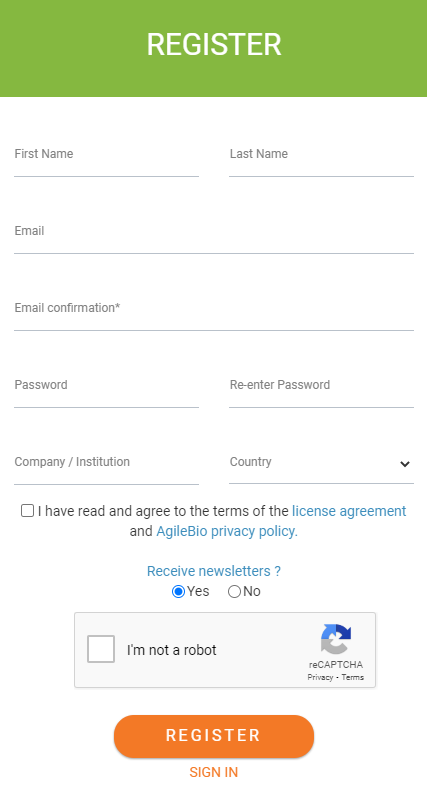
- Option 2: if you don’t have an account, click on REGISTER (located on the bottom) and fill in the form.
![]()
2. Dashboard
- Once you access your client area (by either signing-in or registering), you will be redirected to the main dashboard (as shown in the screenshot below).

- Here is a description of what each section correspond to (please refer to the letters displayed on the screenshot above):
- A. Active Services – In this section, you can add multiple online instances to accommodate different labs and maintain separate data for each of them.
- B. E-training – Take advantage of this option to receive expert training on how to effectively use LabCollector and familiarize yourself with its functions.
- C. Newsletters – Stay up to date with the latest LabCollector features, new versions, modules, and add-ons by subscribing to our newsletters.
- D. Support assistance – Access the ticket center in this section to raise any issues you encounter. Our dedicated support team will promptly assist you. Additionally, you can explore our knowledge base and manuals for comprehensive guidance on LabCollector.
- E. Accessories – Visit our storage lab accessories website to explore and purchase compatible barcode scanners, cables, printers, and other essential items for use with LabCollector.
- F. LabCollector – Navigate to the LabCollector official website through this option to find detailed information about LabCollector modules, add-ons, and other available services.
- G. RSS direct – Receive real-time news updates directly from LabCollector through this feature.
- H. Administrative menu – Access your client area account through this menu. Here, you can manage and update your account information such as address and email. You can also create teams, handle billing-related matters, and manage your login credentials.
- I. General menu – This menu provides easy access to various essential sections, including services, downloads, support, storage accessories, and an archive of newsletters.
- J. What can I do? – Utilize the options presented in this section to either download LabCollector or create a new online instance, depending on your specific needs.
- As mentioned above, you can access the “Team” option by navigating to “H. Administrative menu“, you will then be redirected to the below page:
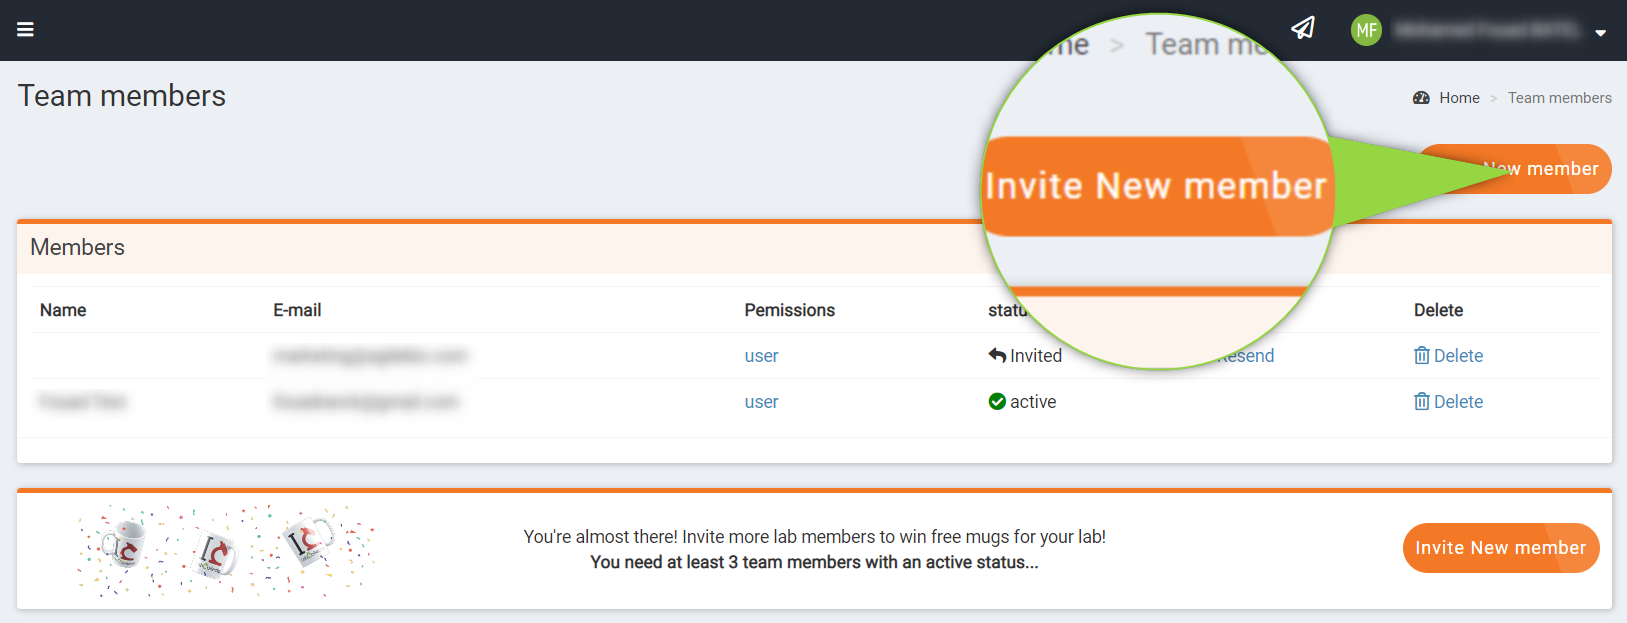
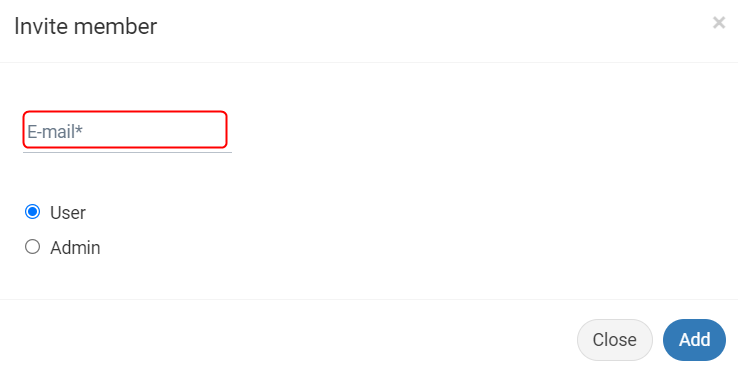
- If you need several members to have access to the client area of your lab, you have the option to add colleagues as team members (by clicking on the “Invite New member” button), in doing so you will make it easier for AgileBio staff to provide support to your colleagues as well, since they will be associated with the same account. Please note that you can either add them as a user or admin.
- Then, simply fill-in the form by inputting the member’s email address.
- The newly added member will then appear in the list. The status will remain as “Waiting” until the person has accepted the email request.
- You also have the option to delete members, simply click on the corresponding button (as shown in the screenshot below).
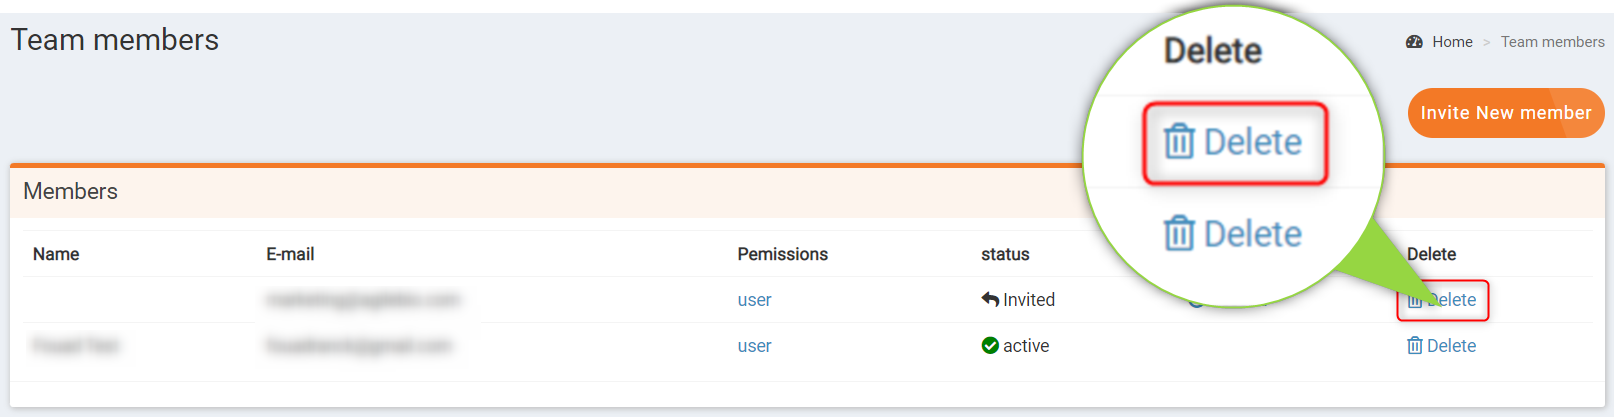
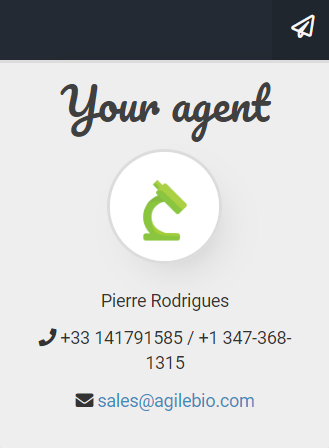
- You can also see the contact information of your agent, simply click on the paper airplane icon, located next to your name.
![]()
3. Downloads
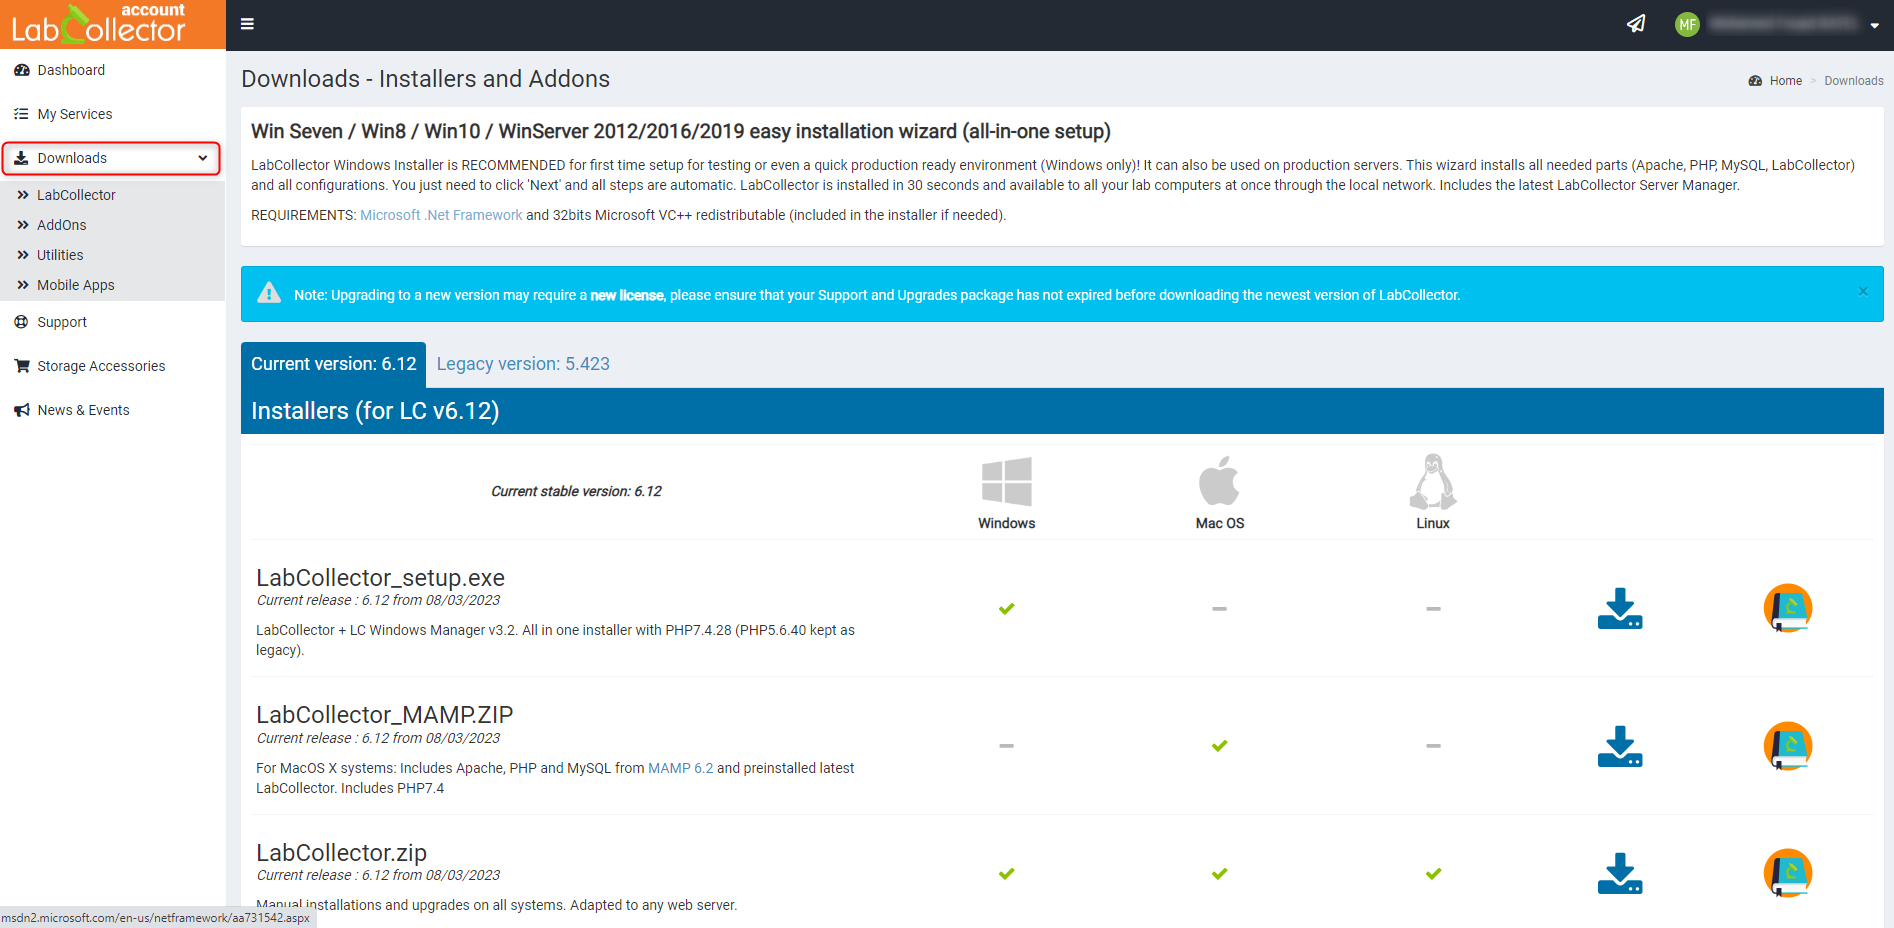
- To install LabCollector on your computer or server, you will first need to download the OS-dependent version.
- You also have access to the list of add-ons for the self-hosted and online versions, as well as utilities (e.g. Zebra Network Bridge, AgileBio Scan server).
- Once you have downloaded LabCollector, you can start creating your services (see chapter 4).
*For more information about installation, please check our KB “How do I install LabCollector?” & “How do I install Add-ons?“
![]()
4. My services (obtaining services and licenses)
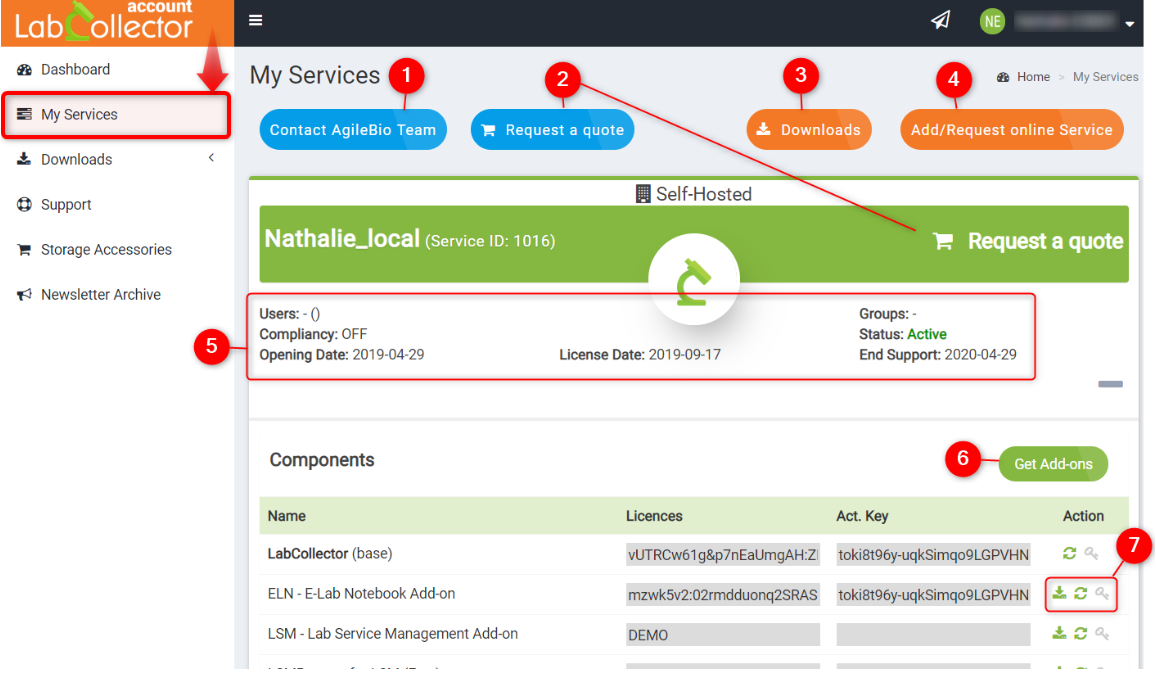
1. For any inquiries or questions you may have, don’t hesitate to reach out to the AgileBio team. They are readily available to assist you and provide guidance.
2. If you require additional add-ons or any other supplementary services, you can easily request a personalized quote. Simply communicate your requirements, and our team will provide you with the necessary information and pricing details.
3. By selecting this option, you will be directed to the download section within the general menu. From there, you can conveniently access and download various add-ons, utilities, and mobile applications that align with your specific needs and preferences.
4. This option allows you to create a new service tailored to your requirements. Whether you prefer an “On-premise” self-hosted solution or an “online” deployment of LabCollector, you have the flexibility to choose the hosting method that suits your needs best. Upon clicking this option, you will be redirected to a dedicated page providing you with various services that you can choose from (as shown in the screenshot below).
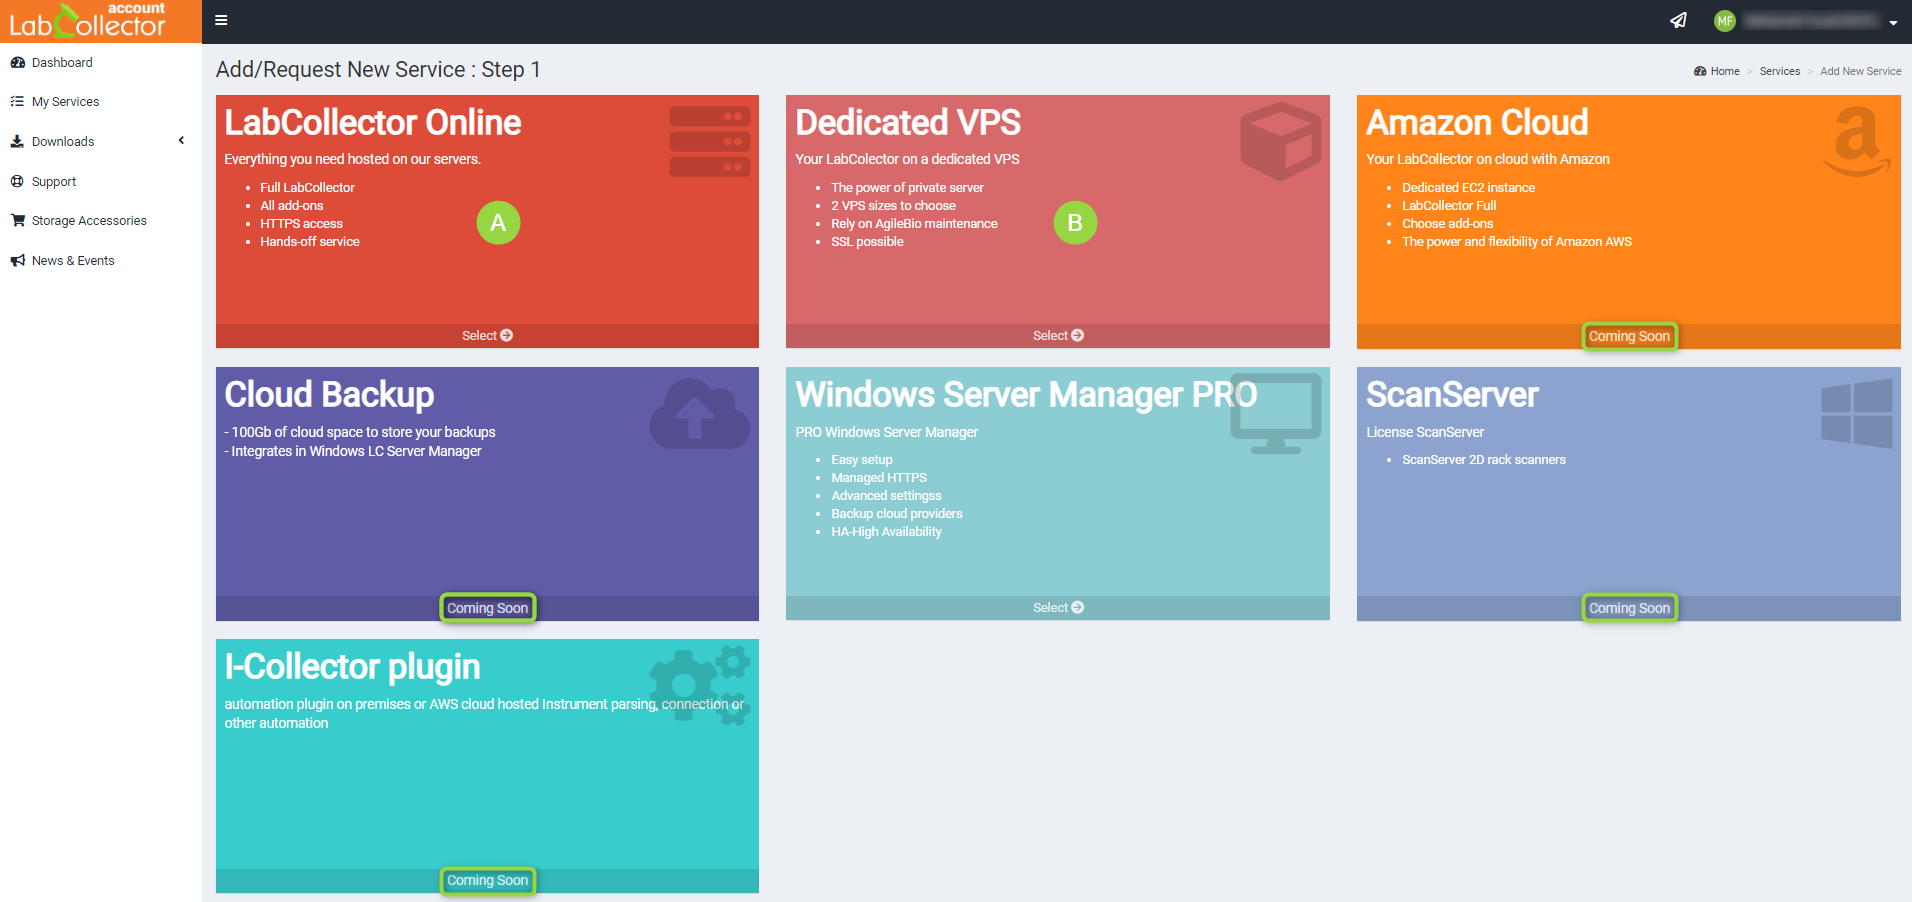
A. LabCollector Online:
- When you click on “LabCollector online” option, you will see the below form:
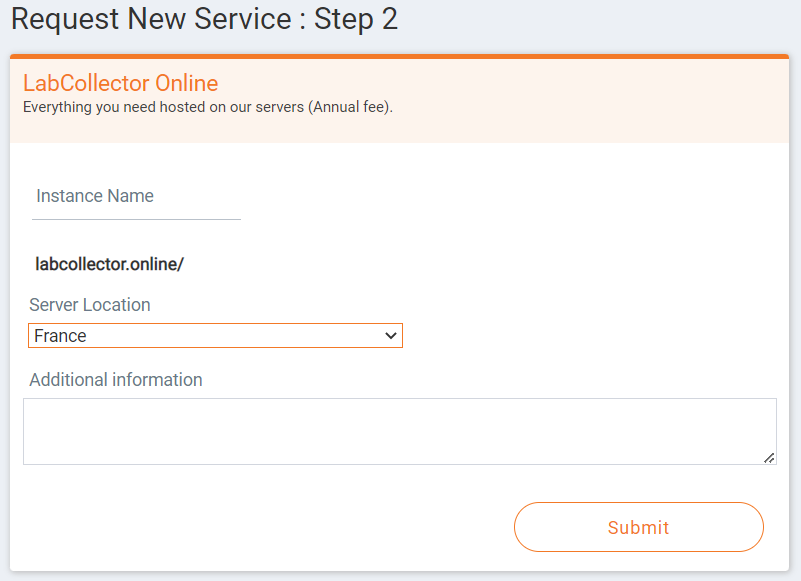
- You will then need to fill-in the name of your instance which comes after the URL: http://labcollector.online/ or http://us.labcollector.online/ depending on the server location (France or US).
.
It is recommended that you put your institution name/acronym first, followed by the name of your instance. For example, an instance named “mylab” would have the URL: http://labcollector.online/institutionName_mylab.
.
- Any additional information that you add will be sent to your agent (such as any options/features that you want to test).
- Once you create your service, its status is set to REQUESTED until our staff create your online instance in the demo version. You can also request a quote by following the link in step 2.

- Once LabCollector has been purchased, you can request a full license using the green key icon (see above). You can also request to test out one or more Add-ons (our staff will install them for you), and if you’re happy with the product, as for LabCollector, you can choose to obtain an active license.
B. Dedicated VPS:
- LabCollector provides an extensive range of services through its client area, including the option to add a dedicated Virtual Private Server (VPS) to enhance your LabCollector experience. A dedicated VPS offers the power and flexibility of a private server environment, ensuring optimal performance and security for your LabCollector instance.
- When you click on “Dedicated VPS” option, you will see the form below.
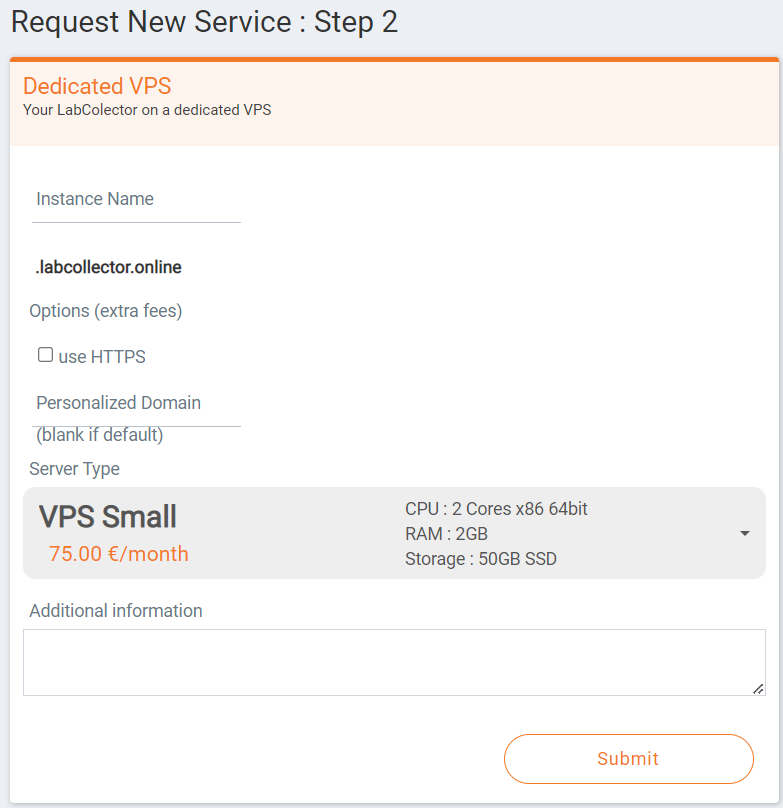
- You have two VPS sizes to choose from, depending on your requirements:
-
- Option 1: CPU: 2 cores x86 64bit, RAM: 2GB, Storage: 50GB SSD, Monthly cost: 75 euros/month
- Option 2: CPU: 2 cores x86 64bit, RAM: 8GB, Storage: 200GB SSD, Monthly cost: 125 euros/month
- When you opt for a dedicated VPS service, you can rely on AgileBio’s maintenance and support expertise. We ensure that your VPS environment remains secure, up-to-date, and well-maintained. Additionally, SSL (Secure Sockets Layer) encryption is available to establish a secure connection between your LabCollector instance and your users, safeguarding sensitive data.
- Here’s a breakdown of the form fields:
-
- Instance Name: Enter a unique name for your VPS instance. The name should end with “.labcollector.online” to ensure proper identification. Example: mylabinstance.labcollector.online
- HTTPS and Personalized Domain: Choose whether you want to enable HTTPS for secure connections. If desired, you can also specify a personalized domain for your VPS.
- Additional Information: This section allows you to include any relevant details or requirements specific to your VPS setup.
- Once you have filled in the necessary information, click “Submit” to proceed with the request.
- By adding a dedicated VPS to your LabCollector instance through the client area, you can enjoy the benefits of enhanced performance and security. With options for different CPU, RAM, and storage capacities, along with AgileBio maintenance and the option for SSL encryption, LabCollector ensures a reliable and customizable VPS experience. Follow the steps outlined in this guide to easily configure and add a dedicated VPS to your LabCollector setup.
5. Once you click on submit, your service is created, and you can then see it in the “My Service” area.
- Generally, when you install LabCollector for the first time, it comes in a demo mode which is available for 30 days.
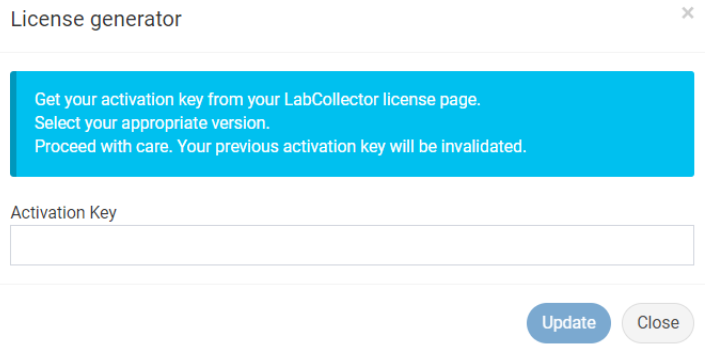
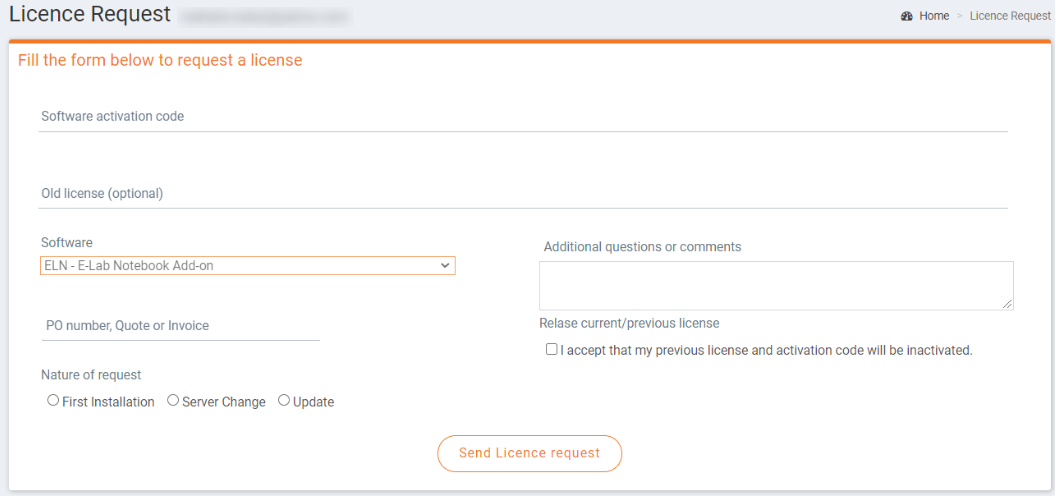
- Once you want to purchase the license you can request a perpetual license using the key icon which opens the form below.

6. As explained above, add-ons can also be added to your self-hosted service and you can request perpetual licenses for each one of them.
7. The action column provides you with various options
 : Download the selected add-on.
 : Update your license.
 : Request a perpetual license.
![]()
Related topics:
- Check our KB on how do I obtain my license.
- See our LabCollector’s guide for new clients.
- Check how to install and configure I-Collector client app.
