Search Knowledge Base by Keyword
How to import CSV with samples and tests in LSM?
SUMMARY:
With the LSM ad-on allows you to add a job and import multiple samples and test with CSV/text file. You can update the CSV/text file with information about multiple samples and tests related to it in LSM while adding a job. However, there are some rules you must follow to import certain types of data fields, such as multiple tests, multiple choice, check boxes, etc.
1. Create a job
2. Export CSV/Text file with samples & test column headers
3. Import CSV/Text file with samples & test details
- 3a. SAMPLES
- 3b. DEFAULT PARAMAETERS
- 3c. CUSTOM PARAMTERS
4. Save & Execute the job
![]()
1. Create a job
- You can create a job in LSM by going to ADMIN -> JOB -> ADD JOB
Please read our Knowledge Base on how to create and execute a job in LSM. - You can add job details such as requester, job priority, etc.
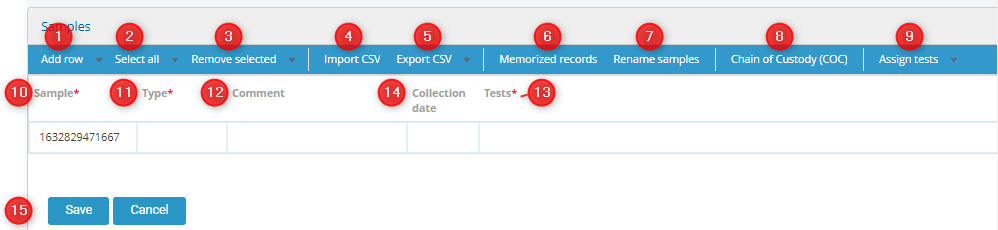
- You can also add information about the sample name and other sample-related parameters, as well as the tests.
- However, if you want to import multiple samples and tests, you can do so by importing a CSV/text file.
- All the options in sample level are explained in the LSM manual.
![]()
2. OPTIONAL: Export CSV/Text file with samples & test column headers
- You can create your CSV/text file to import the sample and test details directly in the “Add Job” section by adding the name of the parameters.
- However, if you have many parameters or need a template to help you with the column headings, then you can use this option to export the CSV file.
- To import the CSV/text file, you can export the template with all the pattern level parameters by clicking Export CSV.
- You can use this as a template to enter all the required information.
Note
To customize the columns you wish to export, follow these simple steps:
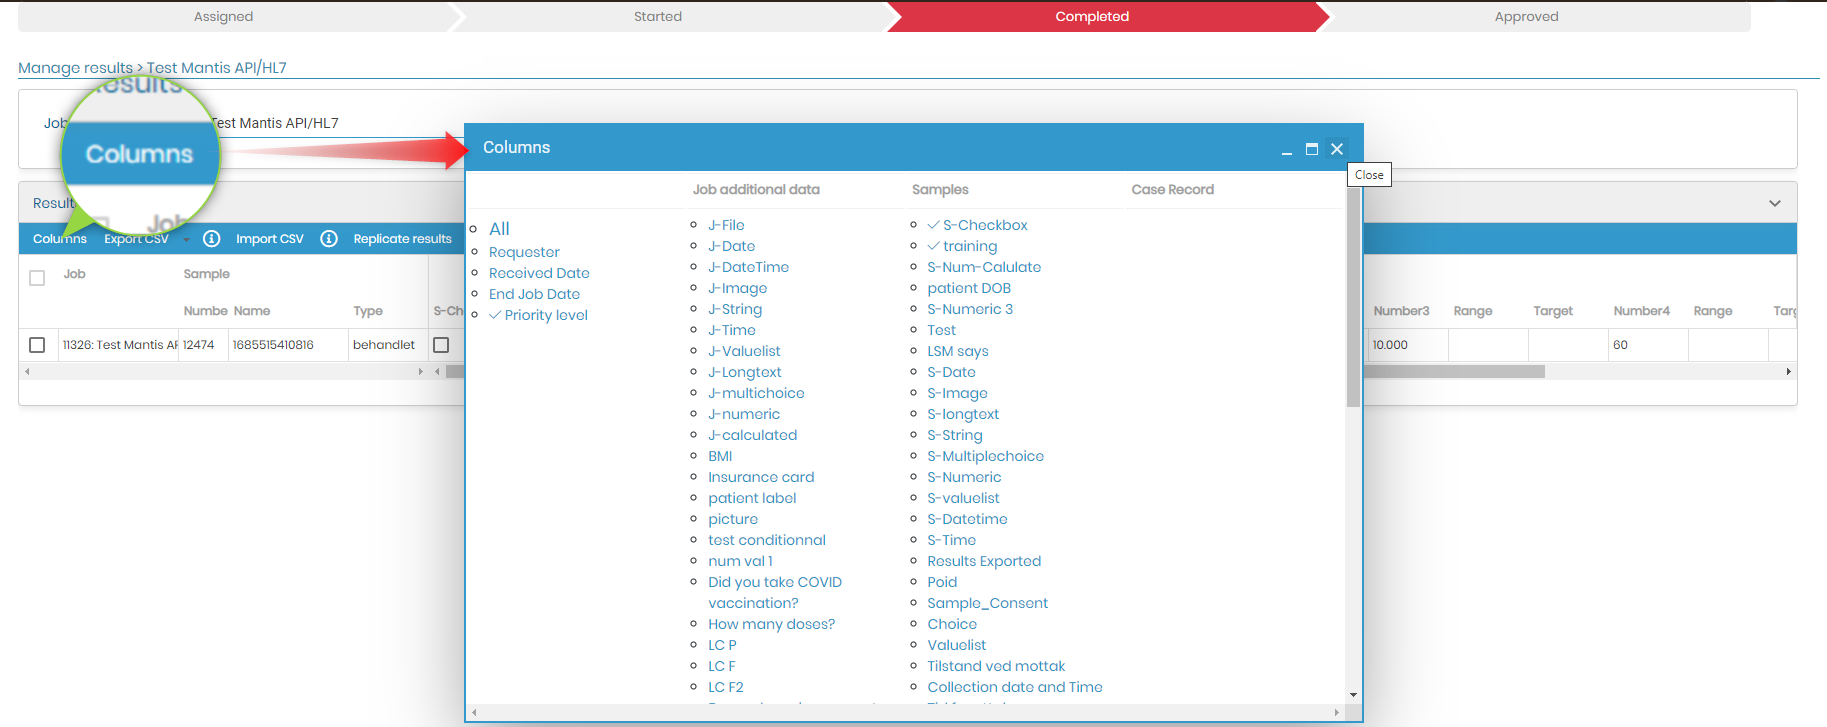
- Navigate to the “Results” tab of your job.
- Click on the “Columns” button.
- A pop-up will appear, allowing you to select the columns you want to include in your report. To add a column, click on its corresponding name. To remove a column, simply click on it again to deselect it.
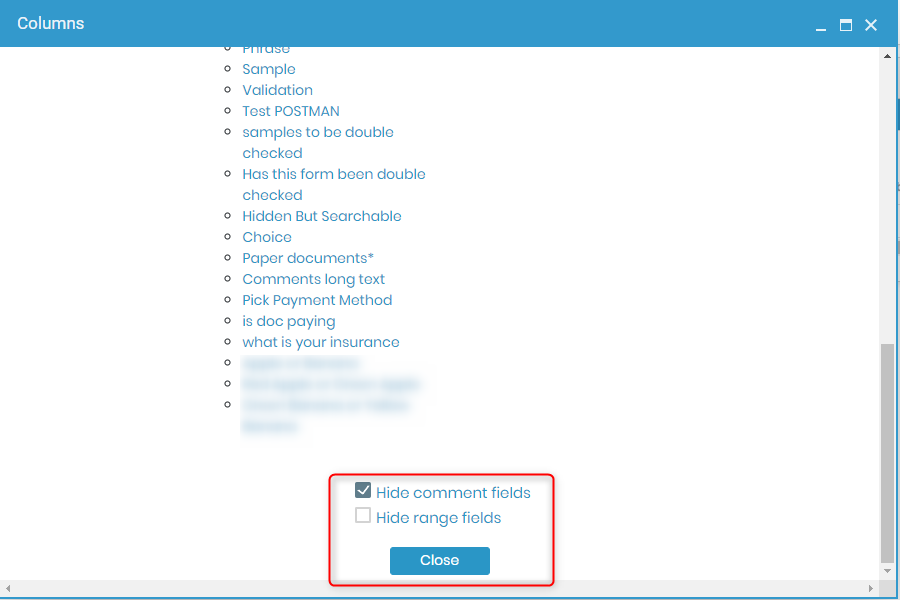
- At the bottom of the pop-up tab, you’ll find two checkboxes: a. “Hide comment fields“: Selecting this option will hide all comment fields from the exported data. b. “Hide range fields“: Choosing this option will hide the range fields from the exported data.
![]()
3. Import CSV/Text file with samples & test details
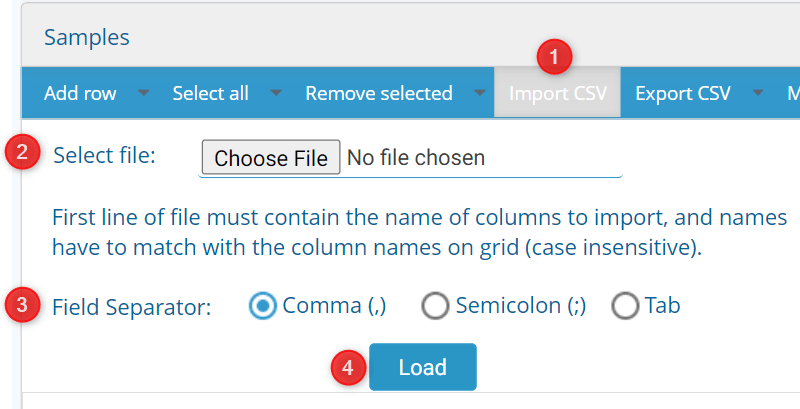
- If you want to upload the CSV/text file, you will see the following options that you can use.
- Click on “Select file option” & upload a CSV/text file.
- Use the correct delimiters: Comma (,), Semicolon (;) and Tab (|).
Please read our Knowledge Base on how to how to delimit data in CSV - Finally, click on “Load” to upload the details from the CSV/text file.
- You need to go to ADMIN -> JOB -> ADD JOB -> SAMPLE TAB
Tips/Hints
- The below section can help you to prepare better the CSV/Text file for the import.
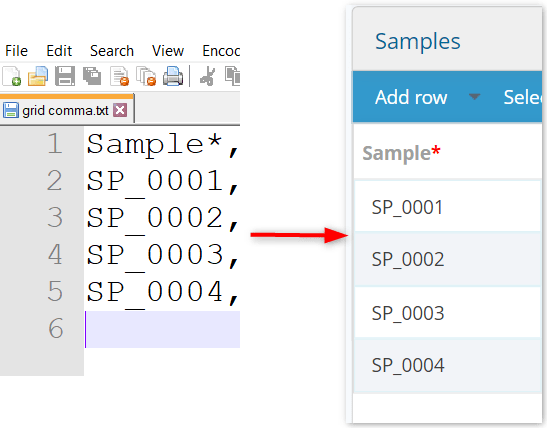
3a. SAMPLES
- You can add the names of the samples in each row of Excel.
- Remember that you are adding the samples for one job, so it will be an order with several samples.
- Each row in the CSV/text file is a sample.
- The name of the sample can be alphanumeric.
*It is better to avoid special characters in the sample name.
- In scenario where you have choose automatic sample naming , then the sample default parameter will not be visible, nor will be exported in the CSV file.
- This is because in automatic setting the sample names are autogenerated by the LSM.
- You can do this setting by going to ADMIN -> JOB -> SETUP -> JOBS & SAMPLES NAMING

- Therefore, you can import the sample information without the sample name.
3b. DEFAULT PARAMETERS
-
SAMPLES:
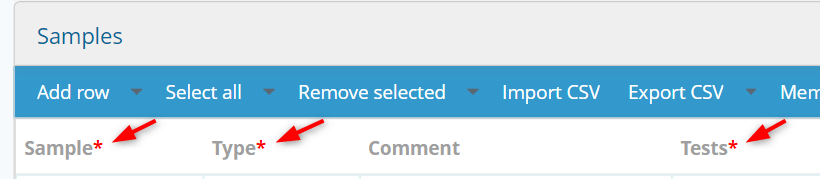
- In the LSM Sample tab, there are default parameters such as sample name, sample type, comments and tests.
- Some of the default parameters are mandatory and must therefore be filled in the CSV/text file.
- Mandatory default parameters are marked with a red asterisk.
-
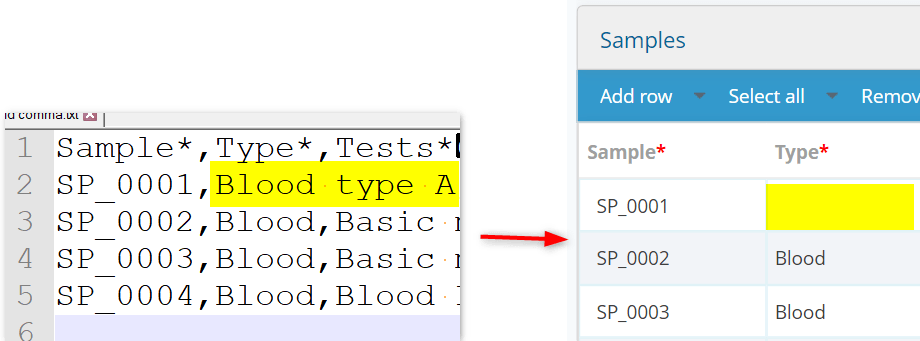
SAMPLE TYPE:
- For the sample type, it is important to remember that the type should already be present in the ADMIN -> PREFERENCES -> SAMPLE TYPE
- A new sample type that does not yet exist in the LSM will not be imported. For example, like below:
- For the sample type, it is important to remember that the type should already be present in the ADMIN -> PREFERENCES -> SAMPLE TYPE
-
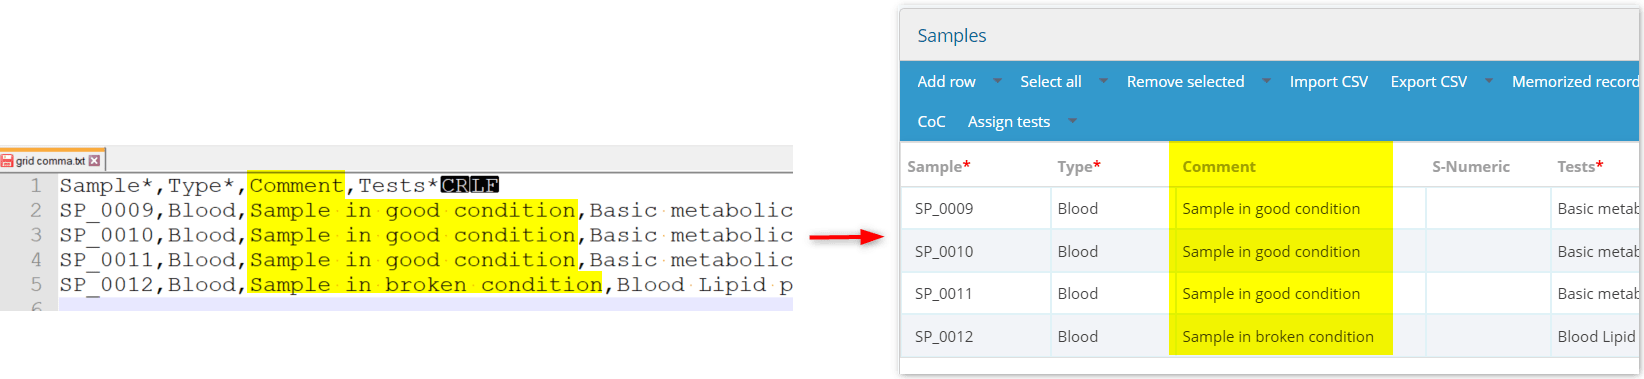
COMMENT:
- This field is not mandatory and can therefore be skipped if you do not wish to provide any information here.
- If you would like to make a comment, you can simply enter the desired text in CSV/text file..
-
-
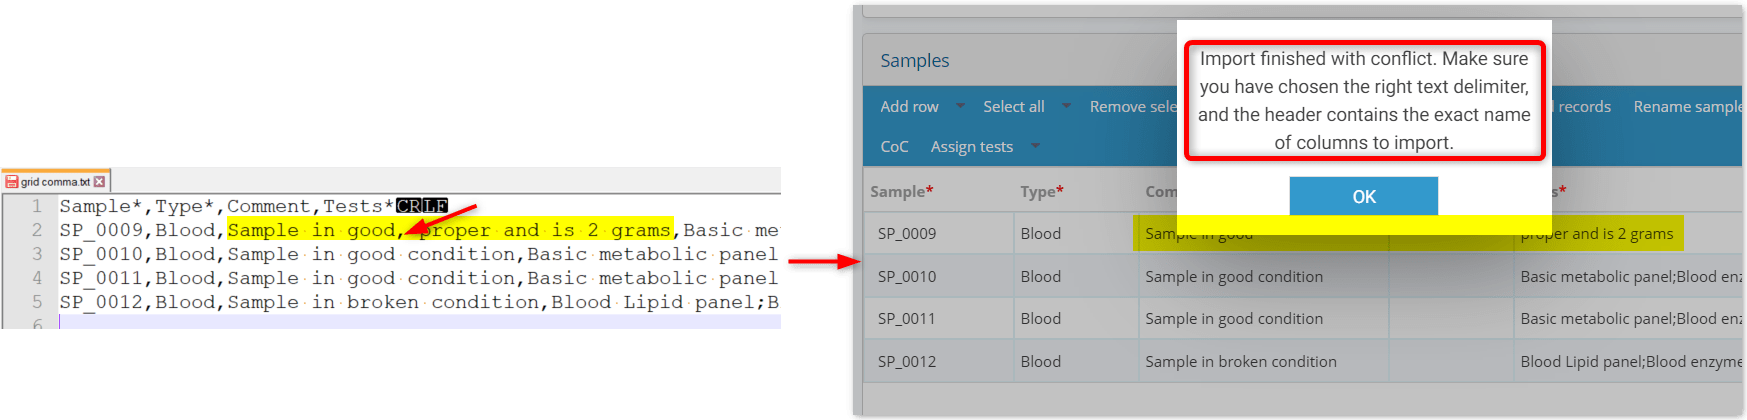
WarningMake sure you dont use any separators like comma, semicolon or tab in the text that you write otherwise, it will create conflict and the data will not be imported correctly.
-
TESTS:
- You can fill in all the details about tests.
- The tests name should match the name mentioned in ADMIN -> JOB -> PREFERENCES -> TESTS
Be Careful noteYou need to follow rules with separator when importin multiple tests. (Please read below)
- You need to follow some rules if you want to upload multiple tests for one sample.
-
- RULE 1- Same separator:
-
- If you use the same separator (highlighted in yellow) for columns and multiple tests, then add the test name in double quotes (highlighted in blue and arrow)
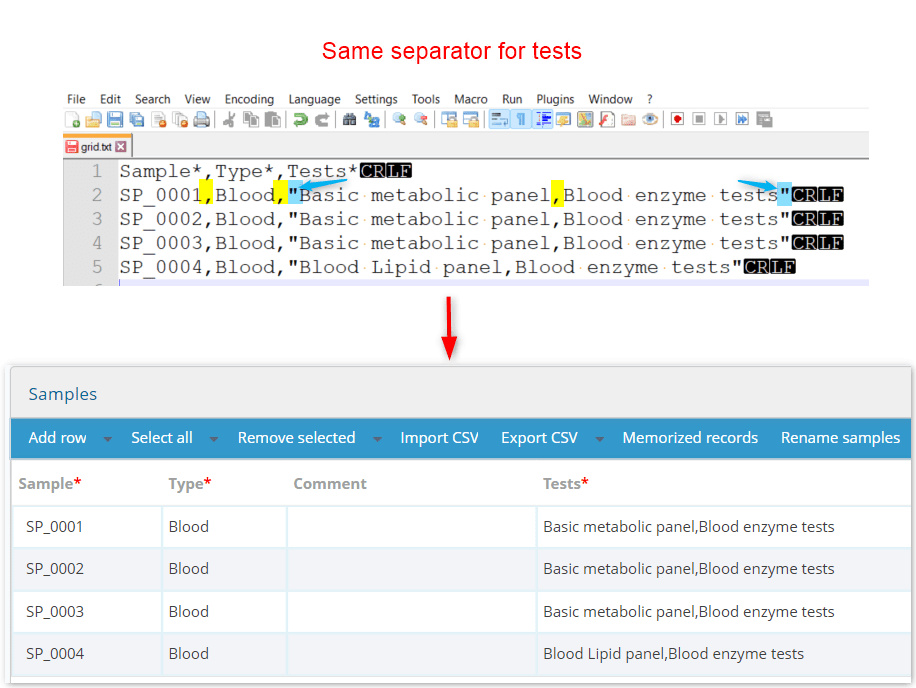
- If you use the same separator (highlighted in yellow) for columns and multiple tests, then add the test name in double quotes (highlighted in blue and arrow)
-
- RULE 1- Same separator:
-
- RULE 2- different separator:
-
- Use a different separator (blue highlighted and arrow) for separating just the multiple tests than the one used to separate columns (yellow highlighted)
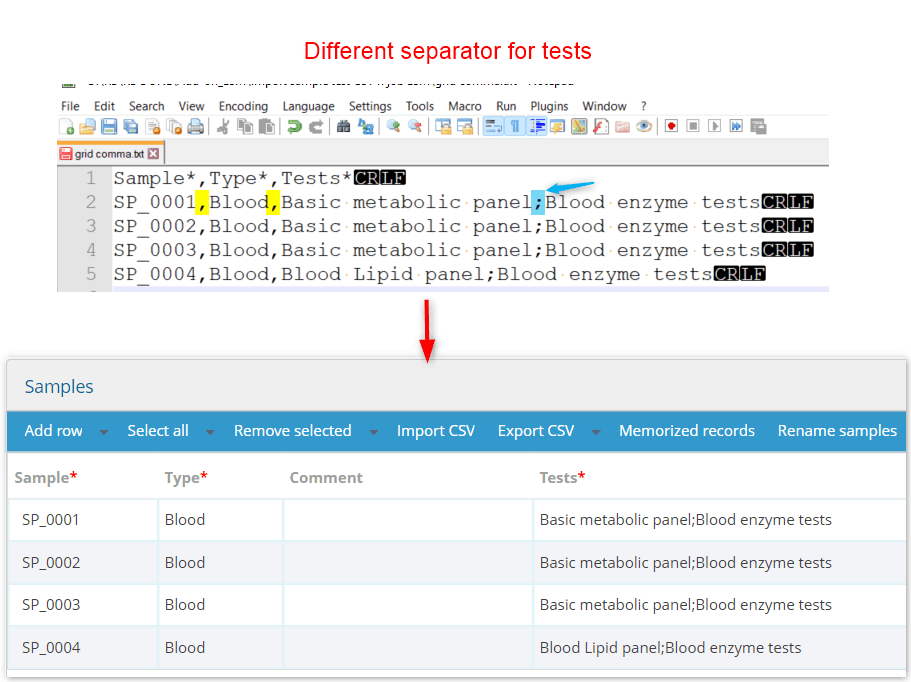
- Use a different separator (blue highlighted and arrow) for separating just the multiple tests than the one used to separate columns (yellow highlighted)
-
- RULE 2- different separator:
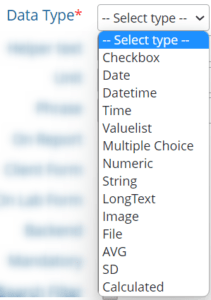
3c. CUSTOM PARAMETERS
- These are the parameters that you create at the sample level by going to ADMIN -> PREFERENCES -> PARAMETERS
- There can be different types of custom parameters at the sample level, they are described in LSM manual
-
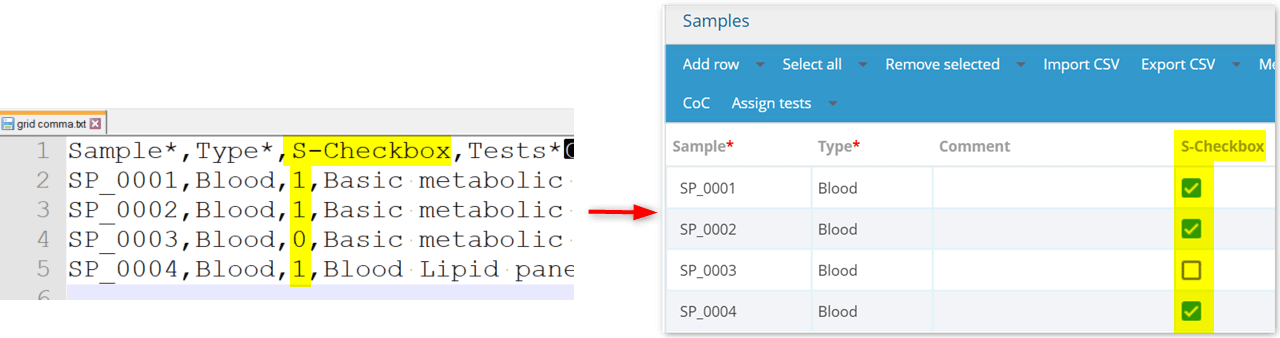
CHECKBOX:
- Here you need to use
- 0 = to not tick mark check box
- 1 = to tick mark check box
-
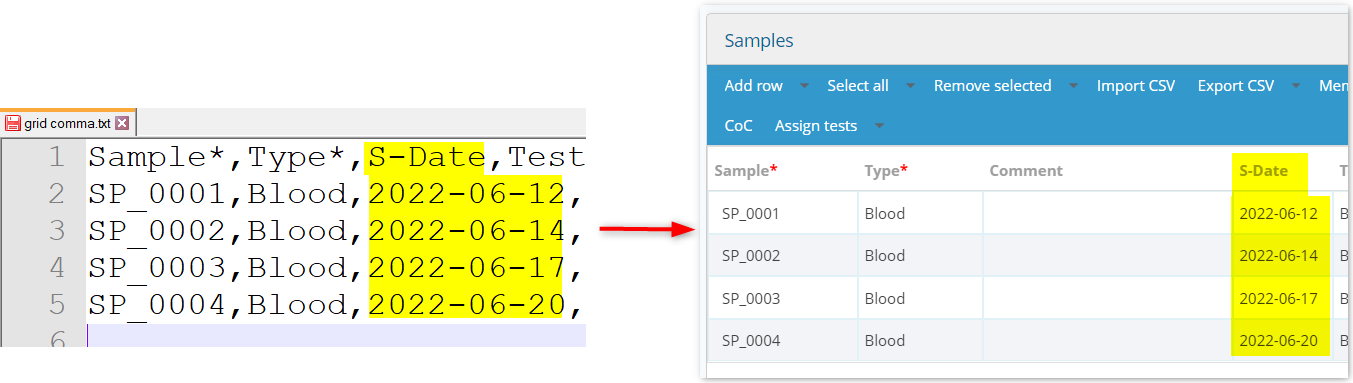
DATE:
- Here you must follow the LSM date format and make sure it is identical in your CSV/text file. Otherwise, the wrong format will not be imported.
- You can check the format of the date by going to LSM and creating an example.
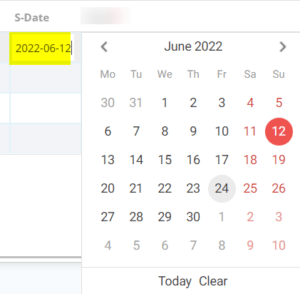
- You can then import the date accordingly.
-
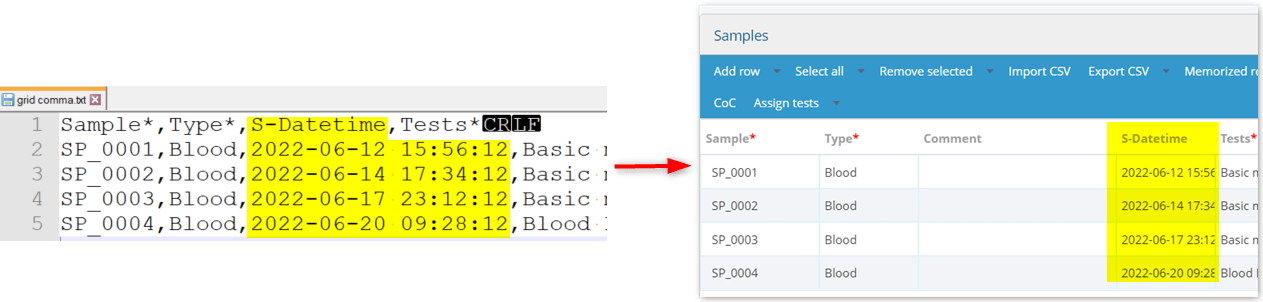
DATETIME:
- Here you must follow the LSM date & time format and make sure it is identical in your CSV/text file. Otherwise, the wrong format will not be imported.
- You can check the format of the date & time by going to LSM and creating an example.
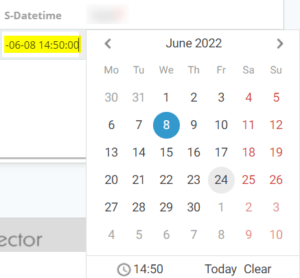
- You can then import the date & time accordingly.
-
TIME:
- You can follow the same steps the date and time mentioned above.
-
VALUELIST:
- You must ensure that the values match the values defined in the valuelist parameter.
- For example, if your valuelist contains the values ‘yes’ and ‘no’, you only need to add these values.
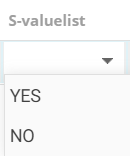
- Values that do not match the existing values are not uploaded.

-
MULTIPLE CHOICE:
- You need to make sure that the values match those that already exist.
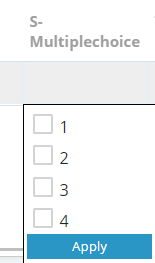
- Values that do not match the existing values are not uploaded.
-
- RULE 1- Same separator:
- If you use the same separator for columns and multiple choice options, then code the name of the test in double quotes.

- RULE 2- different separator:
- Use a different separator for separating multiple tests than for separating columns

-
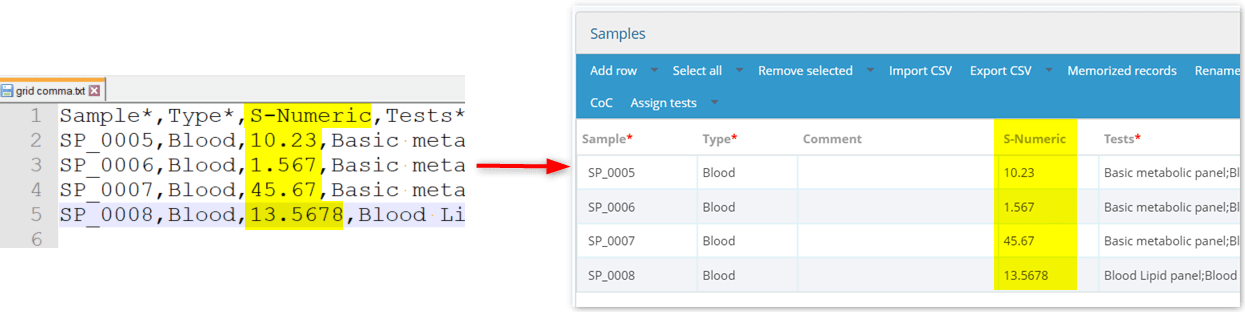
NUMERIC:
- You can add values in decimals as well.
-
STRING & LONGTEXT:
- You can enter text here, just as you do with the default comment field described above.
WarningMake sure you dont use any separators like comma, semicolon or tab in the text that you write otherwise, it will create conflict and the data will not be imported correctly.
-
IMAGE & FILE:
- You CANNOT import a file or image using CSV/Text file in LSM job, sample parameter tab.
-
AVERAGE, SD (STANDARD DEVIATION) & CALCULATED
- These fields are automatically calculated based on other fields, so you do not need to fill them in when importing fields.
- However, you must upload the other fields whose values are to be calculated in these fields.
- The other fields are numeric fields as explained above.
![]()
4. Save & Execute the job
- Once the information on the job is imported and completed now you can save the job and execute it.
Please read our Knowledge Base on how to create and execute a job in LSM.
Related topics:
- Please see the KB on how to create & execute job.
- See our KB on how to create/import reagents & equipment.
- See our KB on how to create protocols & sample types.
- See our KB on how to create parameters for a test.
- See our KB on how to create results & invoice templates.
- See our KB on how to create a test.
- Read our manual on LSM.
