Search Knowledge Base by Keyword
Introduction to LabCollector API
SUMMARY:
API is the Application Programming Interface a computing interface that defines interactions between multiple software intermediaries. In simple words it allows two applications to talk to each other. For example, when you use any application on your mobile to see Facebook, Instagram, or the weather app, you are using the API. Similarly, if you are using LabCollector LIMS and you want to connect to third-party software, you can connect via API.
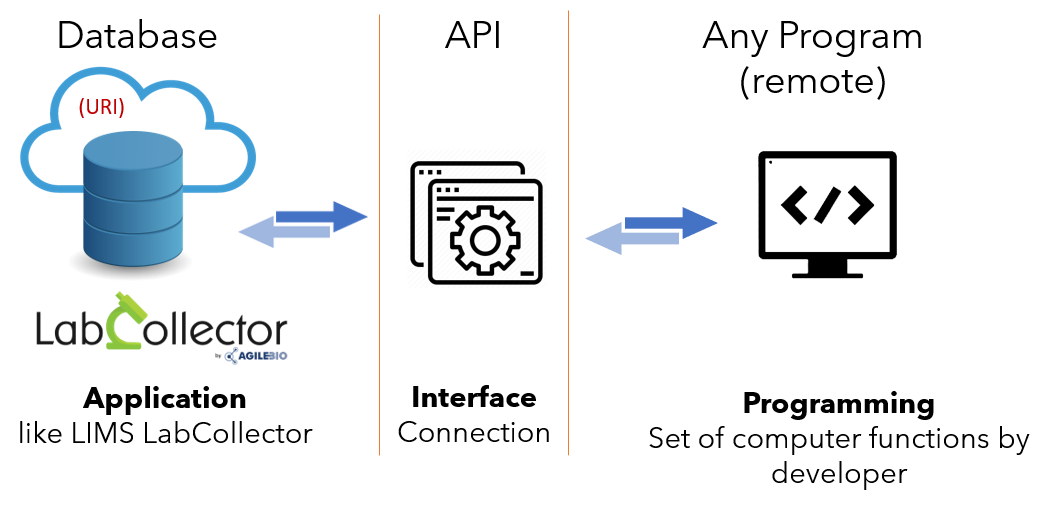
The LabCollector Web Service Application Programming Interface (API) allows third-party applications to interact with both LabCollector’s database (modules) and LabCollector add-ons (ELN and LSM).
AgileBio offers API for (they are explain in below sections):-
- Main LC API: Using this you can work/extract modules data (samples..), storage, get/put files…
- ELN API: This helps you to work on books/pages (get/add), upload files/images
- LSM API: With this you can work on analytical / services (add jobs, update results, get results…)
- WF API (New!): This can help trigger new workflows, change status
The API is based on a Representational State Transfer (REST) architecture allowing access to resources through Uniform Resource Identifier (URI) and actions on them.
API also provides security in terms of data integrity. For example, when two applications are talking with API, they are only talking in terms of small packets of data only which is necessary. For example, when you order an item from amazon. You just convey the items you want and then they are delivered to you. You don’t come across the entire process of item manufacturing or packing or transporting, etc. The same data in LabCollector is only visible in some parts (resources) that can be modified with the help of API.
Follow these steps to configure the LabCollector API:-
1. API general setup
2. How to use API
3. API for LabCollector: Uniform Resource Identifier (URI)
4. Examples of API
5. LSM API
6. ELN API
7. Workflow API *NEW
8. Troubleshooting (error messages)
9. Annex-Web service API
![]()
1. API general setup
- To configure API in LabCollector you have to declare your application in LabCollector.
- To do so please log in to LabCollector as a superadmin.
* Please read our KB to see what are superadmin permissions in LabCollector. - In the LabCollector when you log in go to ADMIN -> SETUP -> WEB SERVICES API
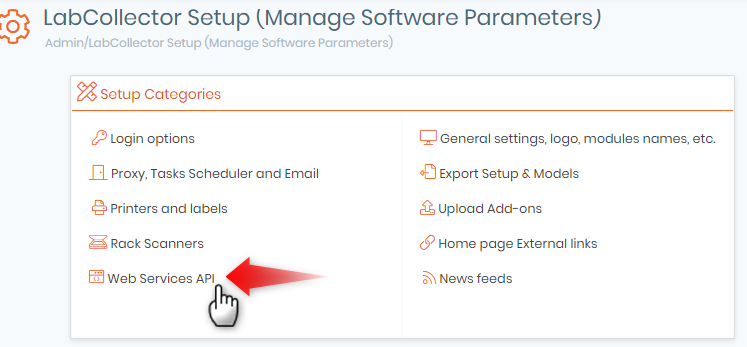
- You will see the below page where you can define a new application that you want to connect to LabCollector via API.

- 1. NAME: Here you can add the name of your application. For example purpose, we have added the name of our add-on which is sample receiving.
- 2. DEFAULT OPERATOR: Here you can enter the person whom you want to be the operator for this API. If you don’t add the operator here, then you will have to add it during each request that you will make through API.
- 3. IP RESTRICTION: This option allows you a layer of security as you can define here which IP (internet protocol) addresses are allowed to work on the API you are defining. Remember that if you choose “yes” then the box to enter IP address will appear only after you save your setting.
- 4. MODULES CONNECTED TO THIS APPLICATION: There are 12 by default modules present in LabCollector. Apart from this, you can also create new custom add-ons as per your requirements. All the defaults and custom modules and the add-ons will be present here and you can choose which modules you want to interact with the API.
- 5. ADD: once you have defined your settings you can click on add and you API will look like below.
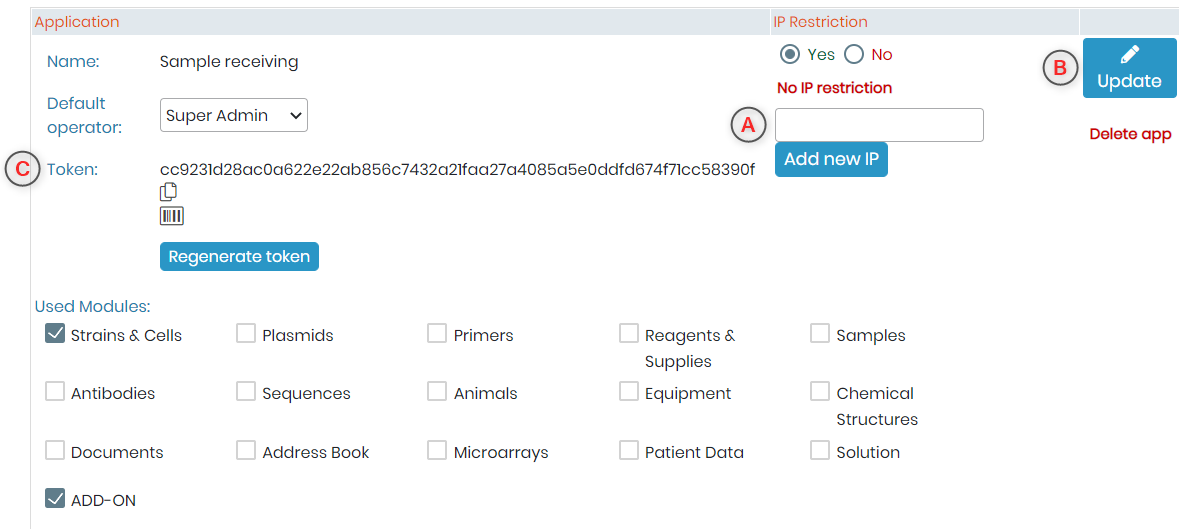
- A. Now you can add the IP address and click on “Add new IP”.
- B. By click the update icon you can edit your API settings.
- C. This is your token number which can be used for connecting to API. You can even create a barcode for it and copy it by clicking on
 icon.
icon.
![]()
2. How to use API
- The communication dialogue between remote (third party) applications and LabCollector is based on HTTP 1.1 protocol. (*To check what is resource see above image)
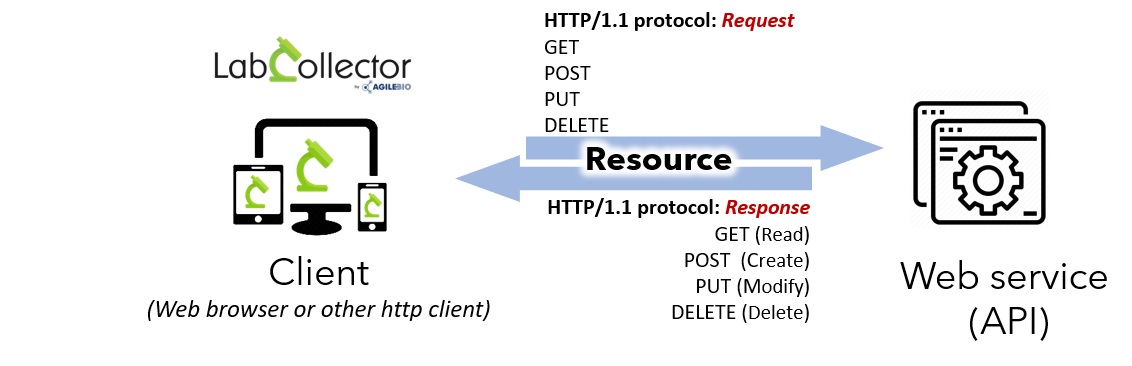
- You can modify, read, create, or delete a resource using the GET, POST, PUT, and DELETE method as shown in the above image.
- You can request for a modification and then receive the response for the modification as explained below.
- For example purpose, we used the POSTMAN application Tool for API and the interface looks like below.
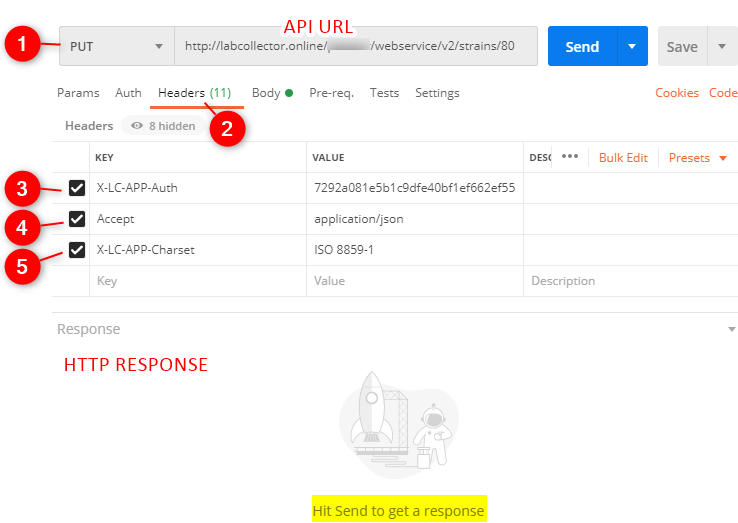
- As you can see in the above image you can type the API URL (for example link to LabCollector’s Strains & Cells module) and after you finish the modifications and hit send you will get a response.
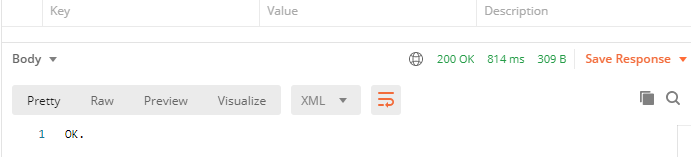
If everything is correct and the request has been performed then the response will look like below in the Postman application.
- 1. Here you can choose the method of your request. (GET, POST, PUT, and DELETE)
- 2. A request to API requires some specific HTTP/HTTPS headers.
- 3. The Accept header defines the desired response format of your request, text/XML (default), or application/JSON.
- 4. The X-LC-APP-Auth header where you put your application token which is necessary to authorize your request to the API.
- 5. The X-LC-APP-Charset header defines the character encoding of your application. It allows the API to send back the response with the appropriate encoding and to correctly convert your POST and PUT requests to the LabCollector’s character encoding (ISO 8859-1).
![]()
3. API for LabCollector: Uniform Resource Identifier (URI)
- A Uniform Resource Identifier (URI) is a string of characters that unambiguously identifies a particular resource.
-
URL Rewrite ON (mod_rewrite)
Note: You have to do this in your apache file.
[PATH_TO_LABCOLLECTOR]/webservice/v2/[MODULE]
-
Normal URLs:
[PATH_TO_LABCOLLECTOR]/webservice/v2/[MODULE]?name=[KEYWORD]
- To know more about the URI and how to use it with LabCollector, please read our manual on LabCollector API page 7-17.
![]()
4. Examples of API
- Example of codes in C#
string url = _Url.Replace("{id}", txtDataID.Text); var client = new RestSharp.RestClient(url); client.Timeout = 900000; var request = new RestSharp.RestRequest(); request.Timeout = 900000; request.Method = Method.GET; request.AddHeader("X-LC-APP-Auth", token); request.AddHeader("Accept", "text/xml"); //////////////////// IRestResponse response = client.Execute(request); string result = response.Content; - Example of codes in PHP:
<?php $url = "https://xxxxxxxxxxxxxxxxxxx/webservice/index.php?v=2&module=abook"; $curl = curl_init(); curl_setopt($curl, CURLOPT_HTTPHEADER, array('X-LC-APP-Auth: TOKEN_VALUE', 'Accept: application/json')); curl_setopt($curl, CURLOPT_URL, $url); curl_setopt($curl, CURLOPT_RETURNTRANSFER, 1); //curl_setopt($curl, CURLOPT_HEADER, true); //OPTIONAL -> TO RECEIVE HEADER INFO FROM THE API $API_response = curl_exec($curl); curl_close($curl); echo $API_response; ?> - Example of API to send a file:
<?php
set_time_limit(0);
$url = "http://xxxxxxxxxxx/webservice/index.php?v=2&module=plasmids&data_id=3";
$file_path = 'zz_labcollector.rar';
$file_info = getimagesize($file_path);
$file_size = filesize($file_path);
$update = array(
'health_report_file[0]' => '@'.$file_path.";filename=zz_labcollector.rar;type=application/x-rar-compressed",
'health_report_file[1]' => '@'.$file_path2.";filename=zz_labcollector2.rar;type=application/x-rar-compressed",
'upload_mode' => 'add'
);
$curl = curl_init();
curl_setopt($curl, CURLOPT_HTTPHEADER, array('X-LC-APP-Auth: TOKEN', 'Content-Type: '.$file_info['mime']));
curl_setopt($curl, CURLOPT_URL, $url);
curl_setopt($curl, CURLOPT_RETURNTRANSFER, true);
curl_setopt($curl, CURLOPT_POST, true);
curl_setopt($curl, CURLOPT_CUSTOMREQUEST, "PUT");
curl_setopt($curl, CURLOPT_POSTFIELDS, $update);
curl_setopt($curl, CURLOPT_CONNECTTIMEOUT ,0);
curl_setopt($curl, CURLOPT_TIMEOUT, 0);
curl_setopt($curl, CURLOPT_HEADER, true); //OPTIONAL -> TO RECEIVE HEADER INFO FROM THE API
$API_response = curl_exec($curl);
curl_close($curl);
echo($API_response);
![]()
5. LSM API
- Lab Service Manager (LSM) is our add-on for service core/test labs.
- As explained before you can configure to connect to the LSM add-on (by checking the box in front of add-ons) as shown in section 1 above.
- You can use API to use the GET method to read/retrieve information about various parameters that you use in a test like a sample name, assay status, batch information, job id, etc,
- Please our KB on LSM API.
- To know more about the LSM API and how to use it with LabCollector, please read our manual on API page 18-28.
![]()
6. ELN API
- Electronic Lab Notebook (ELN) add-on is the replacement of a paper lab notebook.
- As explained before you can configure to connect to the ELN add-on (by checking the box in front of add-ons as shown in section 1 above.
- You can use API to use the GET and POST method to read/retrieve information about data of books, experiments, and pages.
- Please our KB on ELN API.
- To know more about the ELN API and how to use it with LabCollector, please read our manual on ELN API page 29-30.
![]()
7. Workflow API *NEW
- Workflow add-on can be utilized by institutes who want to follow a strict step by step validation protocol.
- LabCollector now offers to connect to workflow add-on with the help of API.
- With the help of workflow API you can now execute a given job or complete a node. (a node is a process or step in workflow add-on)
- To know more about the workflow API and how to use it with LabCollector, please read our manual on Workflow API.
![]()
8. Troubleshooting (error messages)
- One might encounter errors while executing API functions.
- You can troubleshoot these errors with the help of our KB on API error messages.
- To know more about the LSM API and how to use it with LabCollector, please read our manual on LSM API.
![]()
9. Annex-Web service API
- The annex describes the clean URLs to be used to function properly.
- The annex describes all the URIs to be used with the related module and description and also informs you about the method (PUT, POST, etc) to be used for the same.
- You need to enable the apache engine to use the URI described in the Annex. Read or KB on webservice/apache setup.
- To know more about the LSM API and how to use it with LabCollector, please read our manual on API page 33-37.
Related topics:
- Read our manual on LabCollector.
- Read our manual on API.
- Check our KB on LSM API.
- Check our KB on ELN API.
- Read our KB on Workflow API.
- Read our KB on webservice/apache setup.
- Read our KB on API error messages.
- Check how to create storage boxes/plates with API.
