Search Knowledge Base by Keyword
What’s Gantty Project Manager add-on? And how to use it?
![]() Gantty Project Manager is an add-on within LabCollector
Gantty Project Manager is an add-on within LabCollector ![]() , it is designed to help you keep track of your projects and ensure they stay on budget. With its user-friendly interface, Gantty makes it easy to manage your projects, allocate resources, and keep your team members informed and engaged. Whether you’re a researcher working on cutting-edge science or a company project manager trying to keep your projects running smoothly, Gantty is the perfect solution.
, it is designed to help you keep track of your projects and ensure they stay on budget. With its user-friendly interface, Gantty makes it easy to manage your projects, allocate resources, and keep your team members informed and engaged. Whether you’re a researcher working on cutting-edge science or a company project manager trying to keep your projects running smoothly, Gantty is the perfect solution.
In this knowledge base, you’ll find all the information you need to get started with Gantty and take your projects to the next level. So let’s get started and discover the many benefits of Gantty Project Manager!
![]()
The screenshot below provides a comprehensive visual representation of the main interface of the Gantty Project Manager add-on.
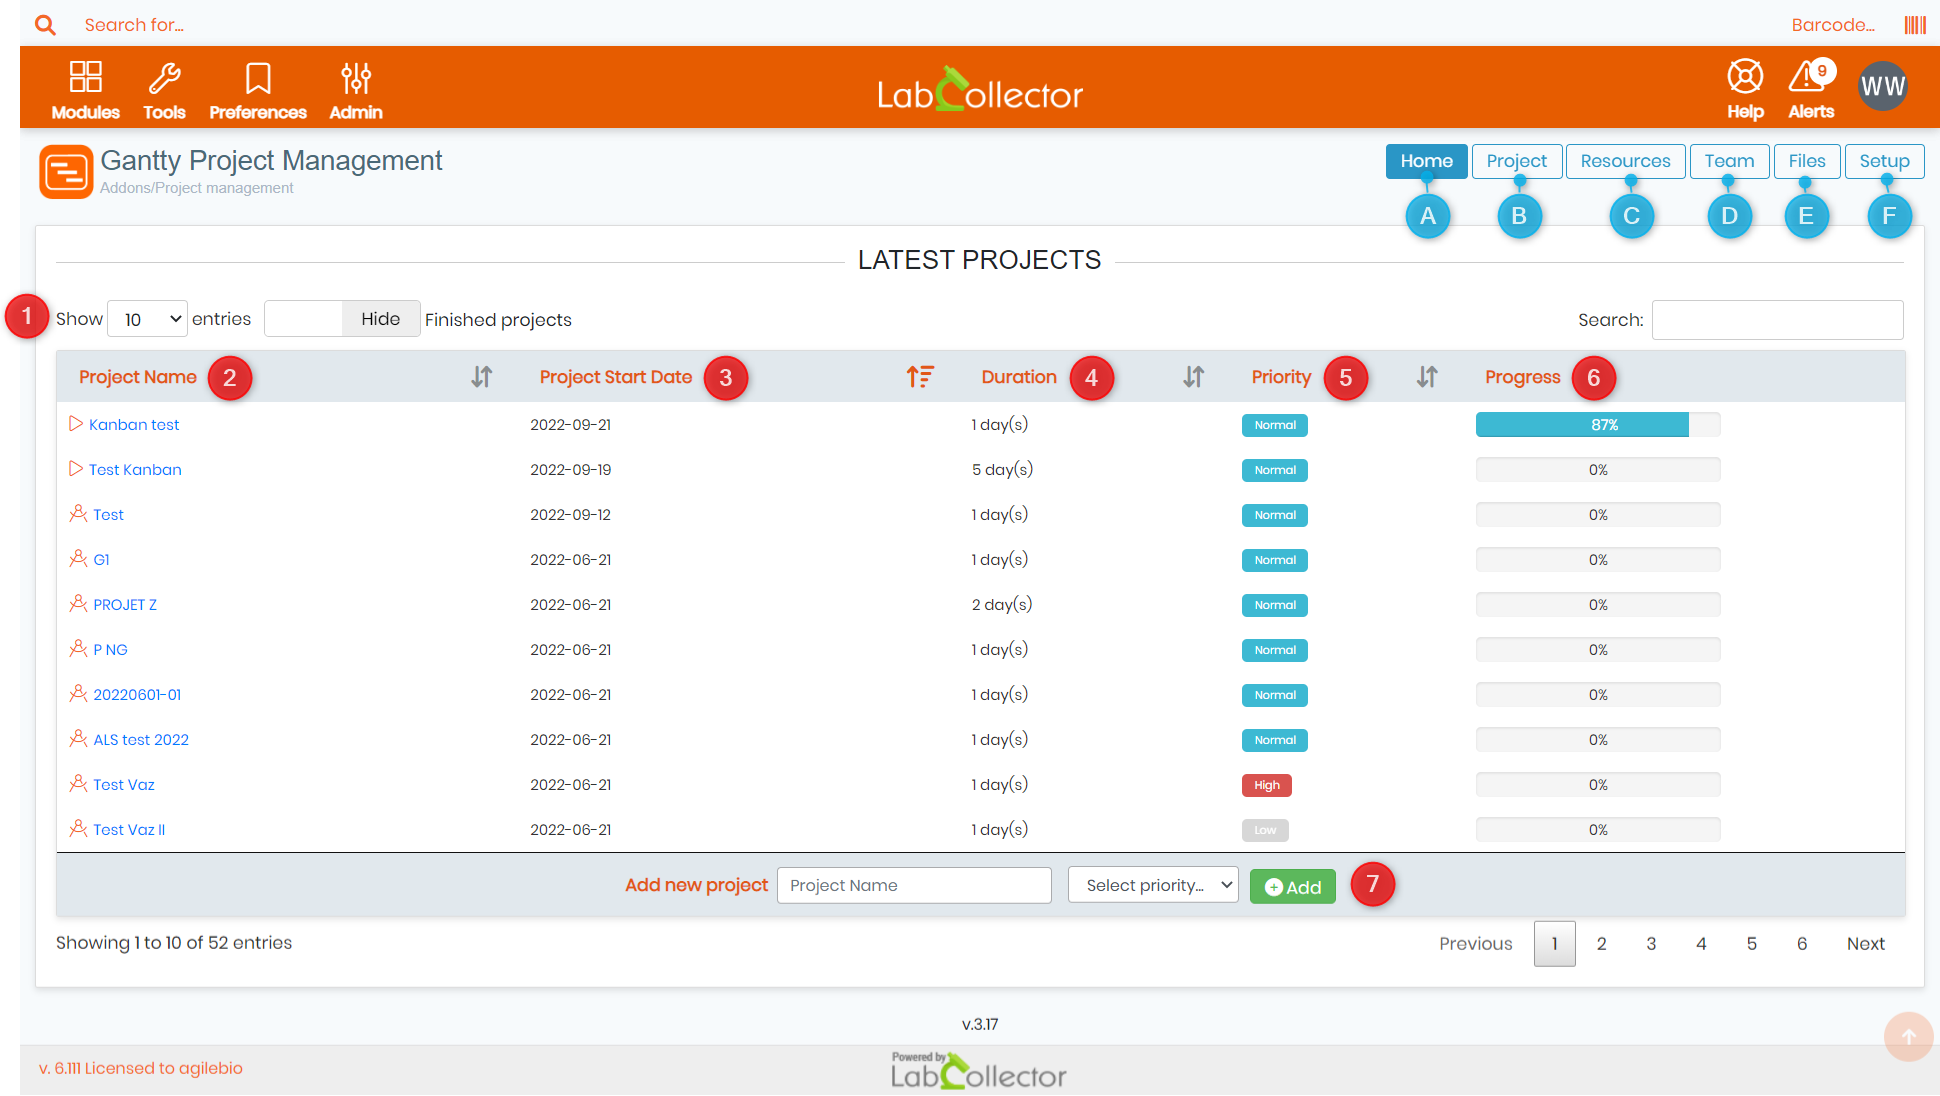
- A: When you click on the “Home” button, you’ll be taken to the main page (as shown in the screenshot above), which is our default landing page when you first access the add-on. To help you make the most of it, let’s take a closer look at each section:
- 1: Search with Ease: Looking for specific projects? You can search for them by utilizing the project name or keyword for quick results, and select the desired number of entries to view at a time. You may also choose to display or conceal completed projects within the results list.
- 2: Project Name: this first column displays the distinct project name, providing a comprehensive overview at a glance. This fundamental aspect of project management ensures proper identification and organization of each project.
- 3: Project Start Date: this column is an integral part of project management, displaying the initiation date of each project. This information is necessary for determining the timeline for task completion and milestone attainment.
- 4: Duration: this column displays the estimated time required to complete a project. This information is vital for proper resource allocation and project planning, allowing for a thorough understanding of the project’s scope and magnitude.
- 5: Priority: this one enables the prioritization of projects based on their importance. Whether deadlines must be met or high-priority projects need to be addressed, you can see three different priority levels : low, normal and high.
- 6: Progress: the Progress column displays the current status of each project in real-time, with an easy-to-interpret visual representation. Stay informed on the progress of each project and determine the next steps with ease.
- 7: Add new project: this function is simple and straightforward, allowing for the creation of new projects with just a few clicks. All you need is input the project name and its priority.
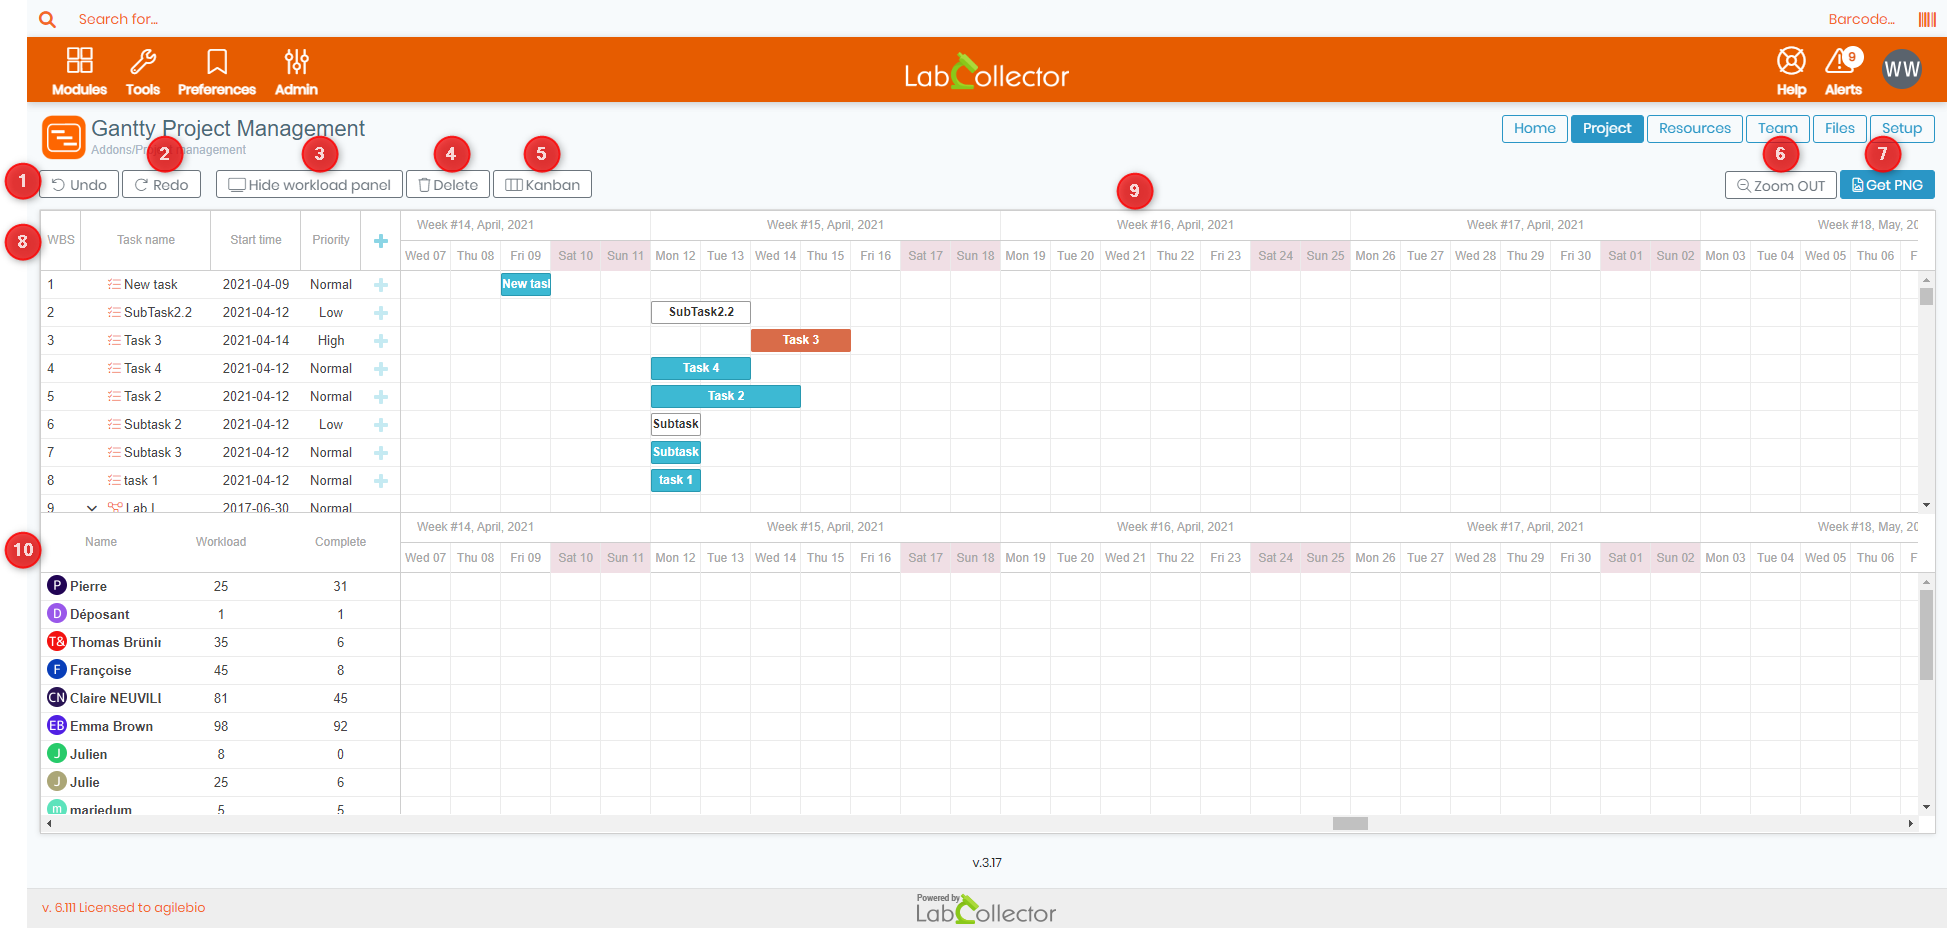
- B: When you click on the “Project” button, you’ll be taken to the below page. Here, you can view a fully detailed project table, alongside all the necessary information:
-
- 1: Undo: you can reverse an action, ensuring that mistakes can be corrected with ease. Whether accidentally deleting a task or modifying project information, the Undo function offers a quick solution to rectify errors.
- 2: Redo: repeat an action that was previously undone. Whether a mistake was made or you simply wish to repeat a step.
- 3: Hide/Show workload panel: Whether you prefer a minimalist view or a comprehensive display, this feature provides the option to show or hide the workload panel.
- 4: Delete: you can remove unwanted or unnecessary information with ease. Whether the project has been completed or a task is no longer relevant.
- 5: Kanban: The Kanban view provides a visual representation of project progress and tasks. This feature allows for a comprehensive understanding of project status, with the ability to easily categorize and prioritize tasks, it shows 3 different columns as follows:

- 6: Zoom OUT: it provides the ability to expand or reduce the view of project information. Whether you need a closer look at a specific task or an overview of the entire project.
- 7: Get PNG: it offers the capability to export project information as a Portable Network Graphics (PNG) file. This feature is ideal for presentations, reports, or for sharing project information with other members.
- 8: Tasks table: it displays a comprehensive list of project tasks, with information such as task name, start date, and priority level.
- 9: Project table: it shows a calendar view for all projects and the corresponding tasks, with information such as task name, due date, and a specific color for each priority level.
-
- 10: Project members: this table displays a list of team members assigned to each project. This feature offers transparency and accountability, with the ability to assign and monitor task progress for each team member. You can also view the corresponding workload and number of tasks completed by each member.
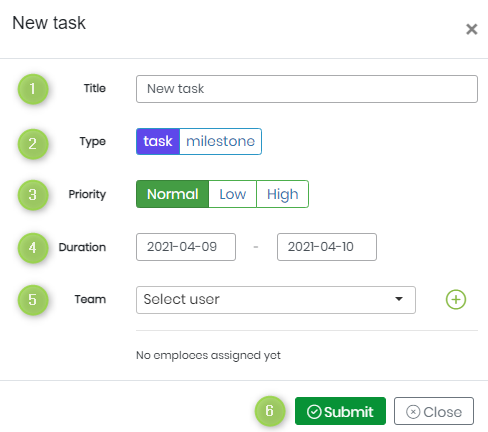
- When you click on the plus sign
 you can add new sub-tasks to your already existing tasks list, a new tab will open up, prompting you to add corresponding information about the task:
-
- 1: Title: enter a descriptive name for the task.
- 2: Type: categorize it as either a “Task” or a “Milestone.”
- 3: Priority: assign a priority level to the task, ranging from low to high.
- 4: Duration: specify the estimated time required to complete the task.
- 5: Team: assign the task to a specific team member or group of members.
- 6: Submit: once you finish, save and submit the task information, adding it to the project’s task list.
.
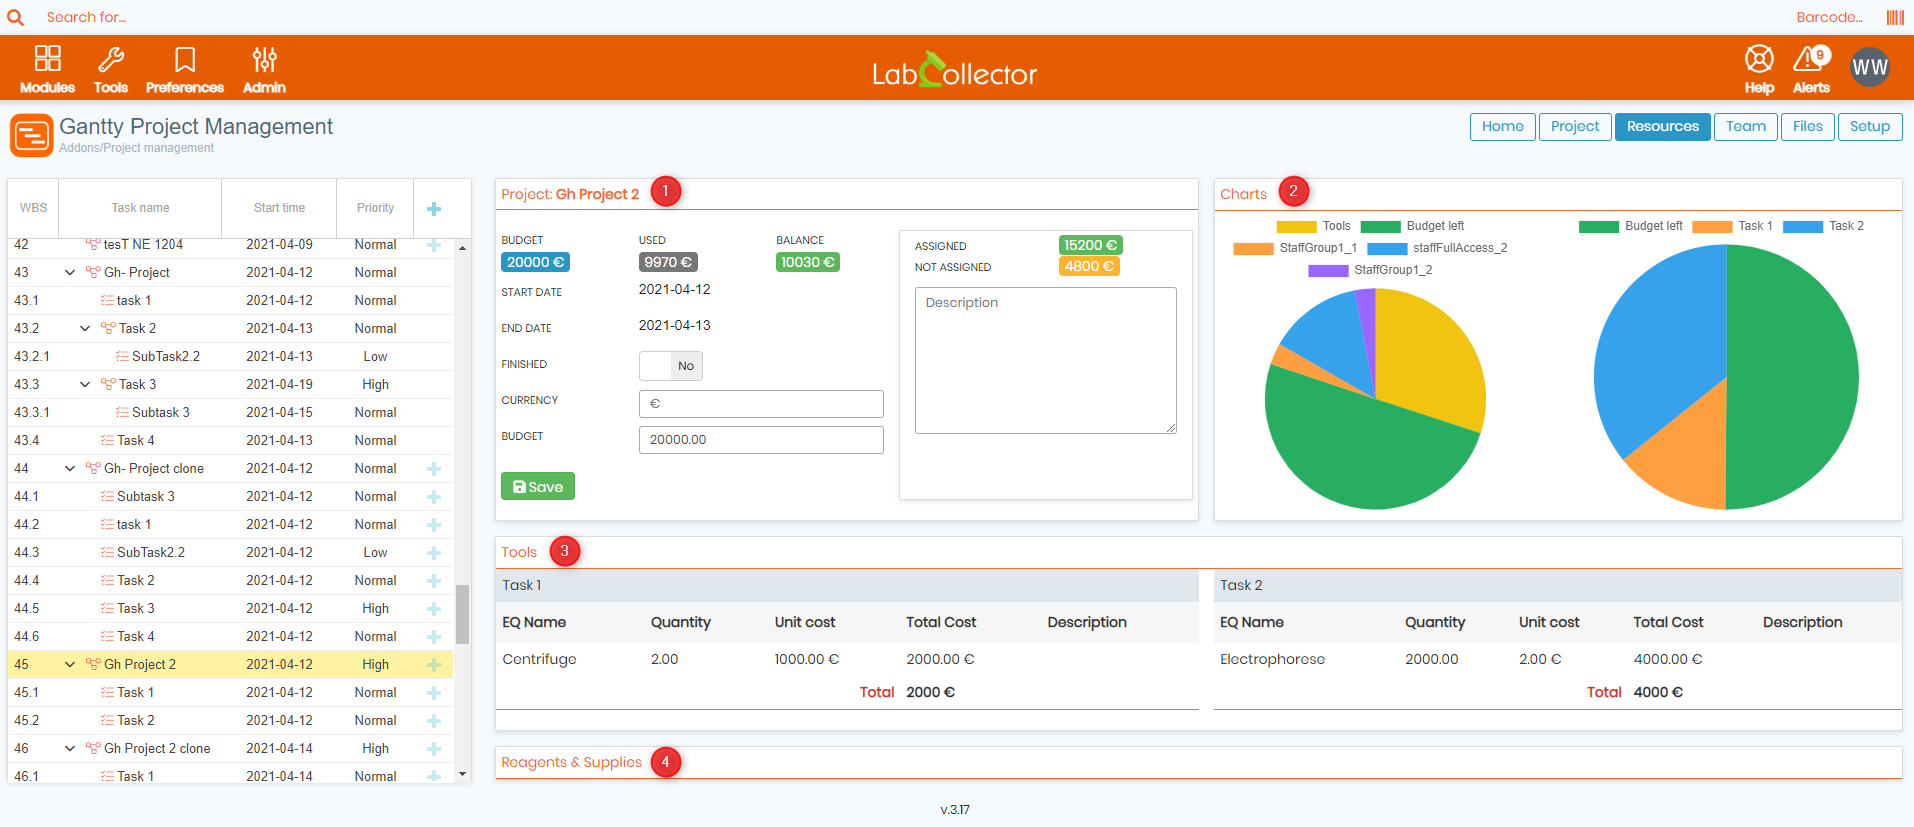
- C: When you click on the “Resources” button, you’ll be taken to the below page, where you can organize and allocate the resources for the selected project:
-
- 1: Task: this section displays the budget allocated for the task, how much was already used and the remaining balance, alongside other important information, such as the start date, end date and a brief description.
- 2: Charts: this section provides a visual representation of the task progress, resource allocation, and budget utilization. This allows you to quickly assess the overall project status and identify any potential bottlenecks or areas that need improvement.
- 3: Tools: it’s where you can manage the various tools and equipment required to complete each task. You can add, edit, or remove tools, and keep track of their availability and usage.
- 4: Reagents & Supplies: The “Reagents & Supplies” section is where you can manage the various reagents and supplies needed for each task. You can add, edit, or remove reagents, and keep track of their availability and usage.
.
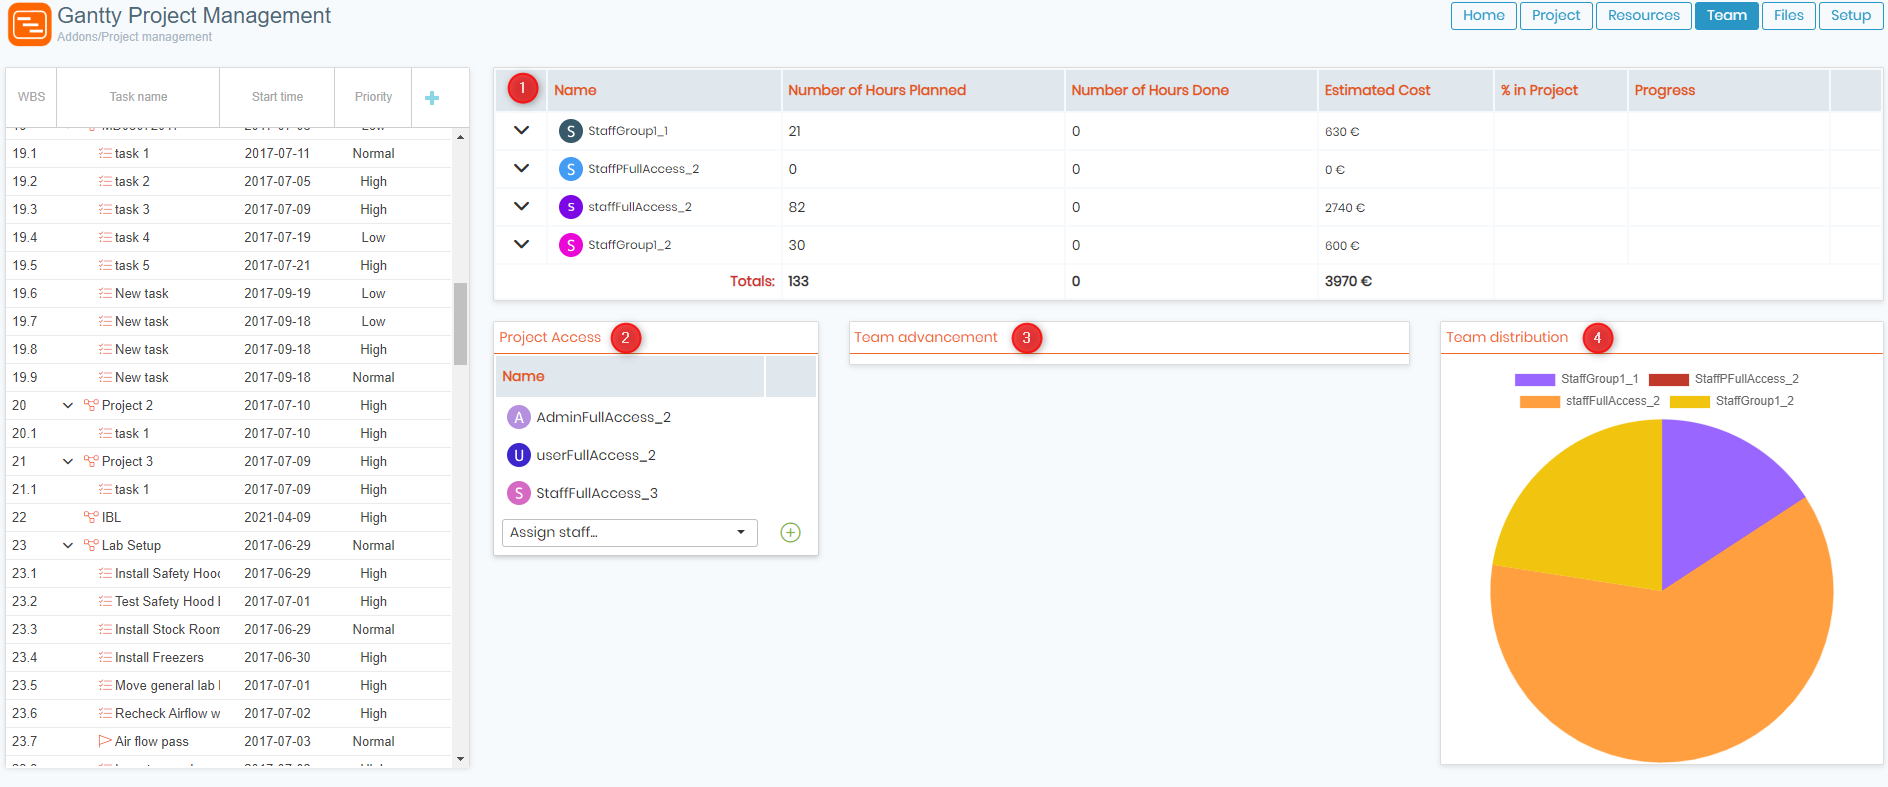
- D: When you click on the “Team” button, you’ll be taken to the below tab, where you can define team distribution per task:
-
- 1: Employees list: this section displays a comprehensive list of all the team members associated with the project, along with the number of hours planned, estimated cost and total number of hours done.
- 2: Project Access: this section allows you to manage the level of access that each team member has to the project, ensuring that sensitive information is only shared with those who need it. You can grant or revoke access, assign or reassign roles, and keep track of who has access to what.
- 3: Team advancement: this section provides a visual representation of the progress of each team member, helping you to monitor their individual performance and identify areas where they may need additional support. This allows you to make informed decisions about your team’s development and ensure that everyone is on track to meet your project goals.
- 4: Team distribution: this section provides a visual representation of the distribution of tasks among your team members, allowing you to quickly assess how workloads are being shared and identify areas where you may need to make adjustments. This helps you to ensure that your team is working efficiently and effectively, and that everyone is contributing equally to the project’s success.
.
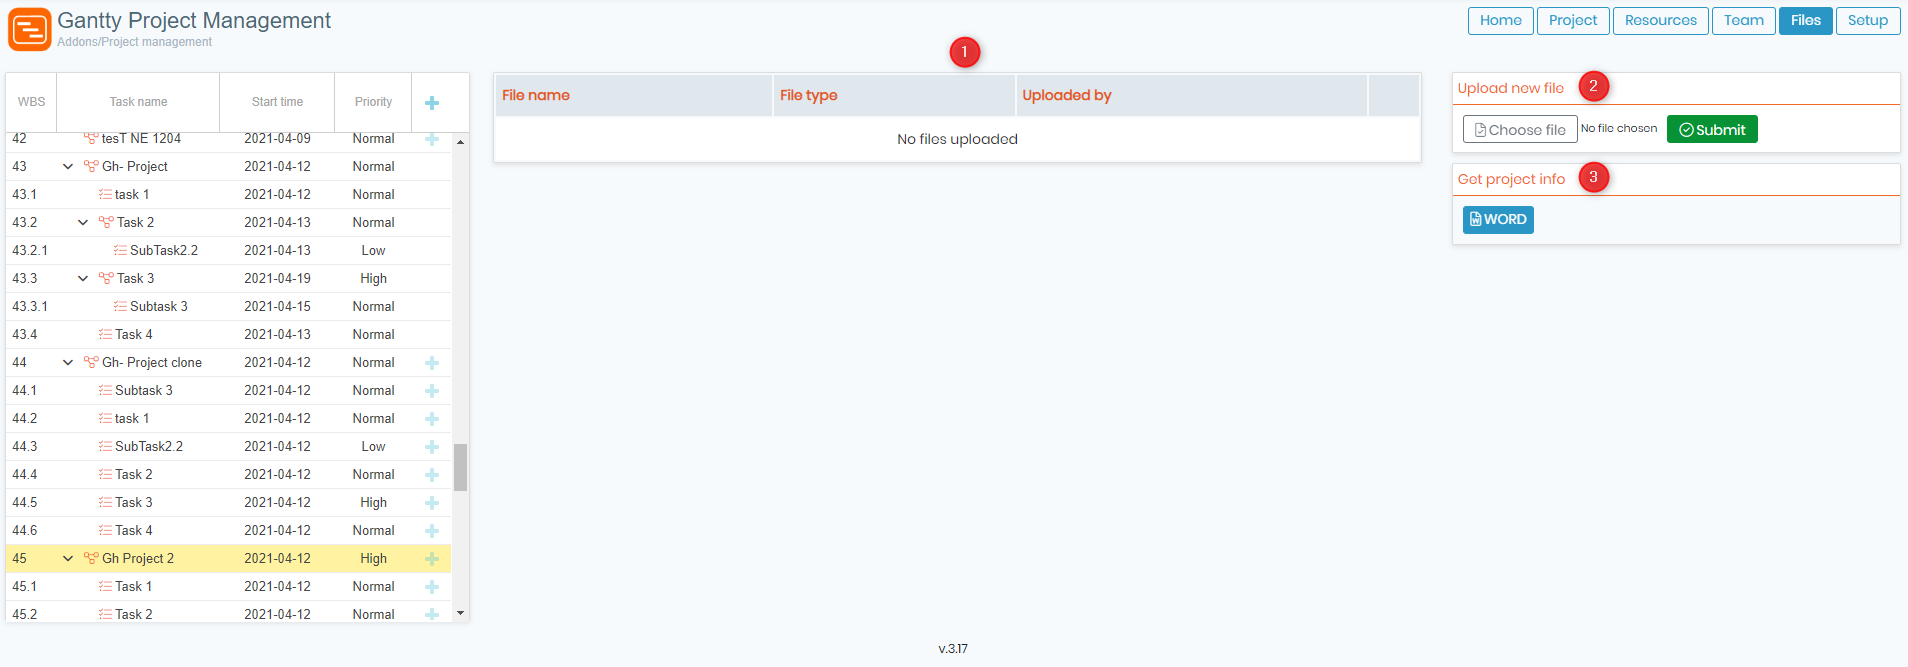
- E: When you click on the “Files” button, you’ll be taken to below tab, where you’ll be able to centralize all the documents, reports concerning your project or a particular task of your project:
-
- 1: Files list: this section provides an organized and easily accessible repository of all the files associated with your project. You can view a comprehensive list of all files, including their names, creation dates, and file types.
- 2: Upload new file: this section allows you to upload new files to the project’s file repository, making it easy for you to keep your team members up to date on the latest project developments. You can select files from your local drive.
- 3: Get project info: this section allows you to download a Word document with a snapshot of the most important details about your project, including its name, start date, duration, priority, and progress. This makes it easy for you to quickly check in on your project’s status and identify areas where you may need to focus your attention.
.
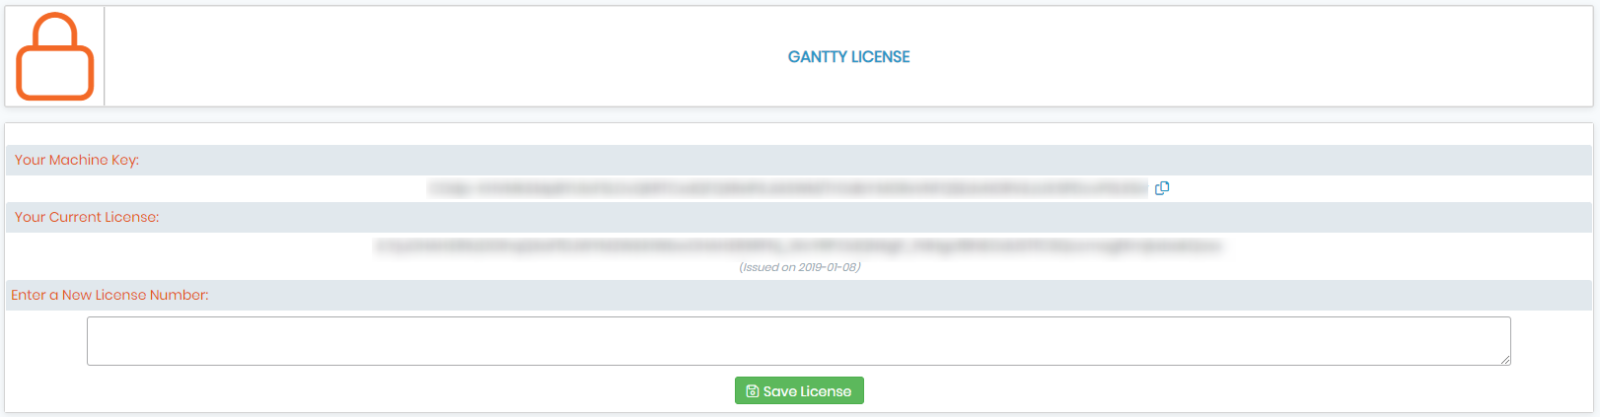
- F: When you click on the “Setup” button, you’ll be taken to your add-on license page. Here, you can view and manage your Gantty’s license information, such as the activation key and license number, you also have the option to input a new one in order to renew your old license.
-
-
- Check our Gantty Project Manager manual.
- Read our KB on How to change parameters in I-Collector.
- Read our KB on How to connect Parser to I-Collector.
-
