| NO. |
OPTION NAME |
DEFAULT VALUES |
DESCRIPTION |
VALID VALUES |
| 1 |
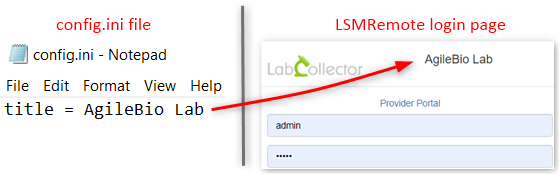
Title |
none |
It will appear as a superscript above your logo in LSMRemote |
free text |
| |
|
| 2. |
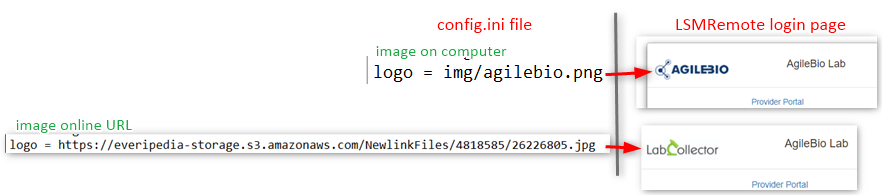
logo |
none |
It will be the logo for your lsmremote website |
image URL |
| |
- It will be the logo you add for the lsmremote website.
- For the image on the computer, you can save the image inside the “img” folder in the lsmremote folder (path shown above). Then for the logo, you can add in front of the logo = img/name of the image.file type
- For an image on a URL, just add the https://……..
- *NOTE: Please use HTTPS for more secure protocols.
|
| 3. |
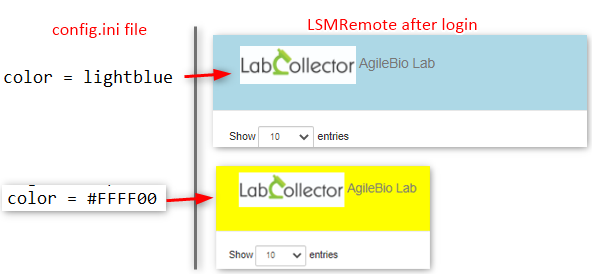
color |
none |
Optional background-color |
web color |
| |
- To see which colors you can put, check this link & scroll down to the table of RGB colors.
- You can either put the color name. *Remember not to put spaces between the name (lightblue NOT light blue).
- You can also put the color code with the hashtag
- After logging in the lsmremote you will see the color like below:
|
| 4. |
wsurl |
none |
connection to LSM add-on |
web color |
| |
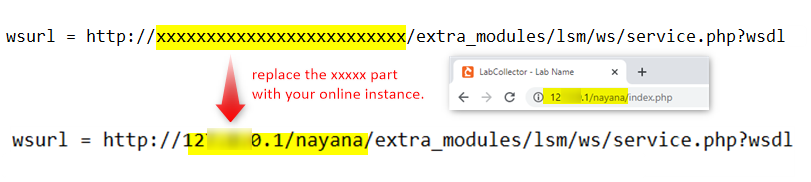
- This option will connect your LSMRemote to your LSM (Lab Service Manager) add-on.
- It is an important step during the installation of LSMRemote.
- *Please check our KB on how to install LSMRemote.
|
| 5 |
autogenerate_job_number |
true |
connected to the generation of job number |
true | false |
| |
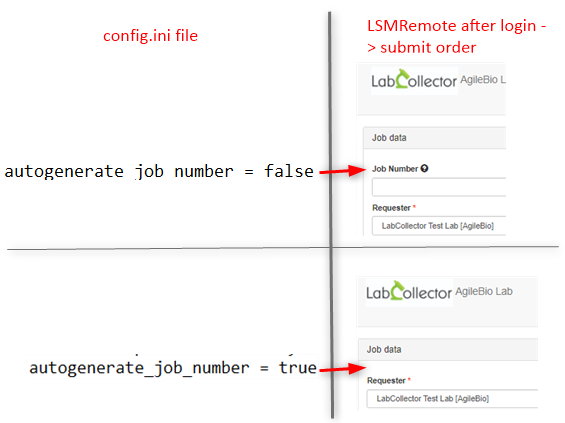
- The job number is generated when you submit a job. * Read our KB on how to submit a job.
- If “false” then the Job Number field is displayed in the form (the user can enter manually a text or leave it blank to autogenerate.)
- If “true” then the Job Number field is not displayed, so it always is generated automatically after the job is submitted.
|
| 6 |
autogenerate_sample_name |
true |
connected to the generation of sample name |
true | false |
| |
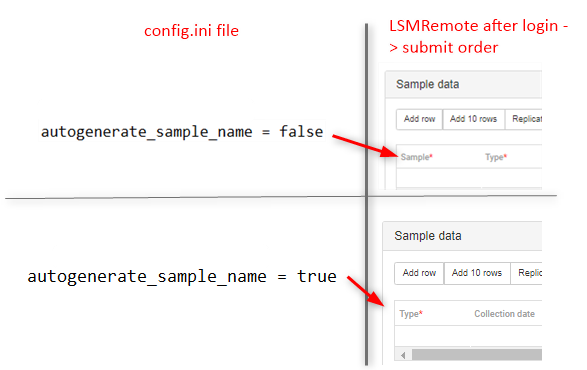
- If “false”, a ‘Sample name’ field is displayed in the form (the user can enter manually a text or leave it blank to autogenerate.)
- If “true” ‘Sample name’ field is generated automatically after the job is submitted.
|
| 7 |
allow_quote |
false |
connected to the creation of a quote |
true | false |
| |
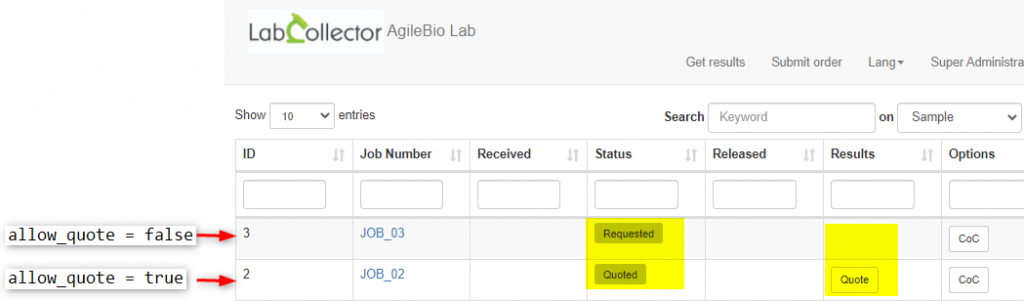
- If “false”, the job status will be seen as requested and no quote will be present.
- If “true” then the job status will be visible as quote & quoted. (a new Boolean field is added to the form, to allow order just a quote instead of a job.)
|
| 8 |
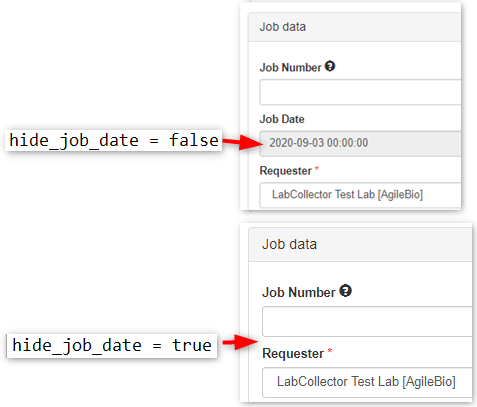
hide_job_date |
true |
connected to the job date |
true | false |
| |
- If “false”, the job date is displayed
- If “true” then the job date is not displayed.
|
| 9 |
hide_expected_date |
true |
connected to the expected date of job finishing |
true | false |
| |
- If “false”, the expected date is displayed. The expected date is when the job needs to be finished.
- If “true” then the expected date is not displayed.

|
| 10 |
report_html_button |
– |
Obsolete functions. Please delete them in case you find them in your config.ini file |
– |
| 11 |
report_html_label |
– |
– |
| 12 |
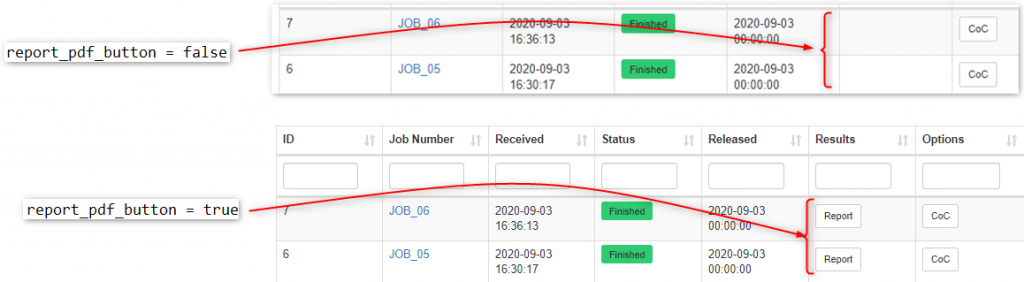
report_pdf_button |
true |
connected to the report button for results |
true | false |
| |
- If “false”, the report button is displayed. This button will show the result report of a finished (validated) job in LSM add-on.
- If “true” the report button is not displayed.
|
| 13 |
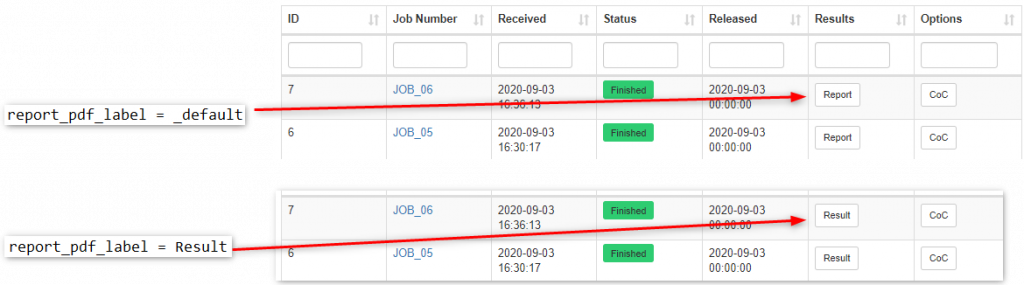
report_pdf_label |
_default |
connected to the report button label text |
_default | free text |
| |
- If “_default”, the report pdf button shows “report” text.
- If “free text” the report pdf button shows pre-configured text. As in the below image.
|
| 14 |
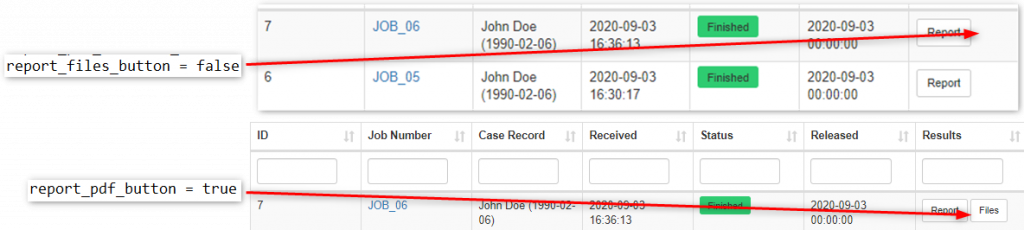
report_files_button |
true |
connected to the attached files with results |
true | false |
| |
- If “false”, the file button is not displayed. These files can be image files or pdf, etc that are attached before finishing the job in the LSM add-on.
- If “true” the file button is displayed.
|
| 15 |
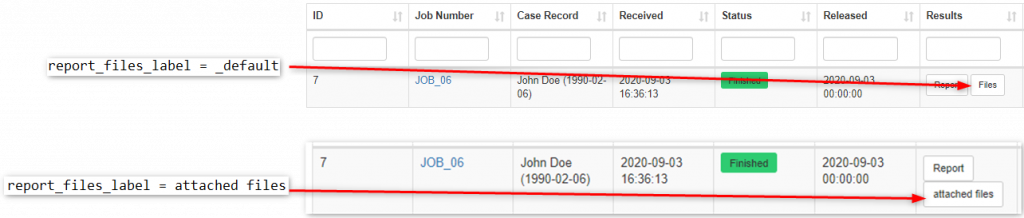
report_files_label |
_default |
connected to the attached files with the results button text |
_default | free text |
| |
- If “_default”, the file button shows text “files”
- If “free text” the file button shows the text pre-configured text as below.
|
| 16 |
quote_pdf_button |
true |
connected to the quote button |
true | false |
| |
- If “false”, the quote button is not displayed.
- If “true” then the quote button is displayed.

|
| 17 |
quote_pdf_label |
_default |
connected to the text on the quote button |
_default | free text |
| |
- If “_default”, the quote button shows the text “Quote”
- If “free text” then the quote button shows the pre-configured text, like in the below example image.

|
| 18 |
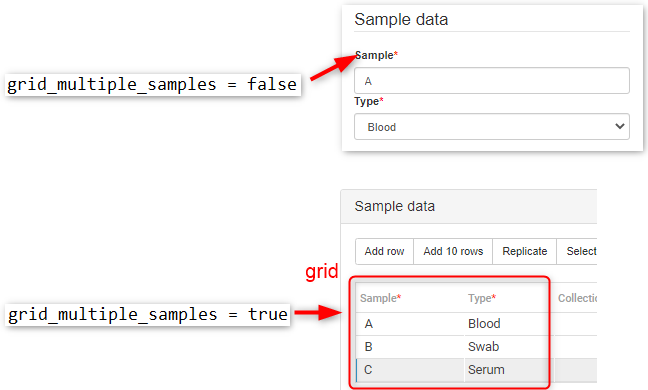
grid_multiple_samples |
false |
connected to the number of samples/job |
true | false |
| |
- If “false”, only one sample per job is supported and the grid of sample data is not visible like in the “true” situation.
- If “true” many samples per job are supported, like in the example image below.
|
| 19 |
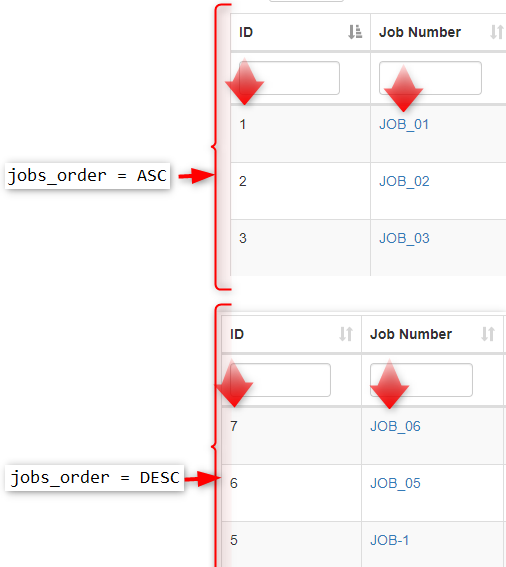
Jobs_order |
DESC |
connected to the number of samples/job |
DESC | ASC |
| |
- If “ASC”, jobs are arranged from low to high
- If “DESC” jobs are arranged from high to low
|
| 20 |
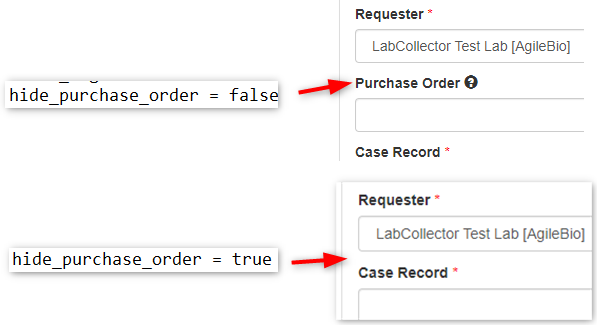
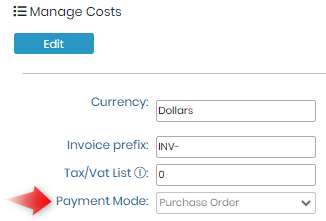
hide_purchase_order |
true |
connected to ‘purchase order’ option |
true | false |
| |
- If “false”, Purchase order option appears
- If the “true” Purchase order option disappears
 IMPORTANT: IMPORTANT:
The purchase order option will not show in either true/false property if it is not selected in the LSM ADD-ON -> ADMIN -> PREFERENCES -> COSTS -> PAYMENT MODE
 |
| 21 |
purchase_order_helper_text |
free text |
connected to helper text of purchase order |
free text |
| |
- You can add the text as you prefer.

|
| 22 |
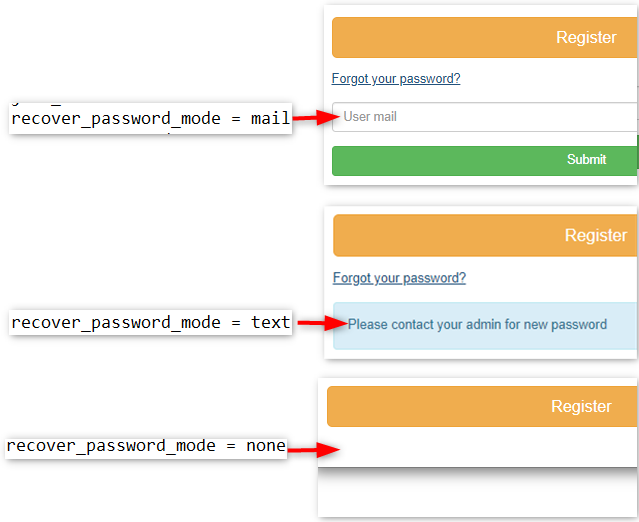
recover_password_mode |
none |
connected to recover password option |
mail | text | none |
| |
- If “none”, the “forgot your password” option doesn’t appear
- If “mail” the password will be recovered by email
- If “text” the password can be recovered by contacting your administrator
|
| 23 |
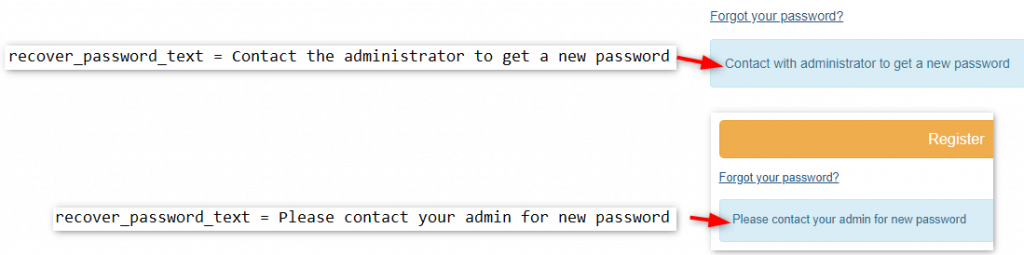
recover_password_text |
text |
connected to recover password option text |
text |
| |
- If “text”, the password text can be changed as per your choice, for example, like below.
|
| 24 |
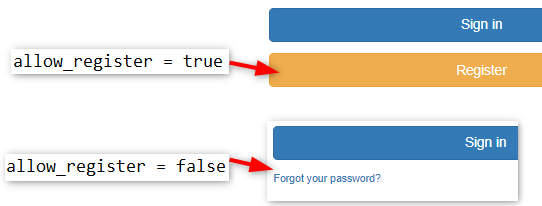
allow_register |
true |
connected to register option |
true | false |
| |
- If “true”, the register option appears
- If “false” the register option doesn’t appear
|
| 25 |
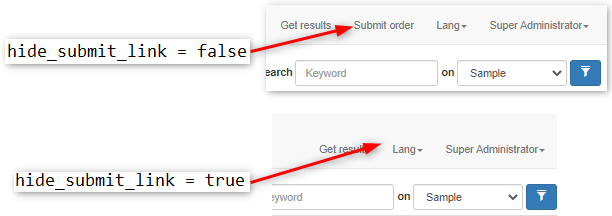
hide_submit_link |
false |
connected to ‘submit order’ option for job |
true | false |
| |
- If “true”, the submit order button does not appear
- If “false” the submit order button appears
|
| 26 |
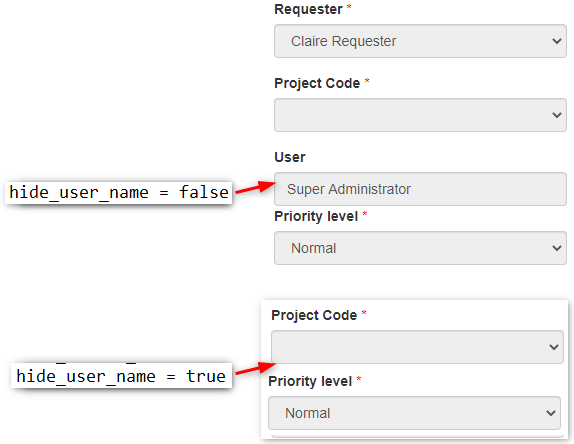
hide_user_name |
false |
connected to user name for a job |
true | false |
| |
- If “true”, then the ‘User’ option won’t appear under the requester name.
- If “false”, then if a user adds a test to an existing job (via the Workflow Manager for example) then the user’s name option will appear under the Requester name.
- *NOTE: In relation to the user name option that allows you to add samples from workflow add-on, for example, you can also add a sample to existing jobs in LSMRemote.
You can use the link below and add (append) the samples to an existing job. You just need to modify your URL (orange part) like below.
https://your online instance name/extra_modules/lsmremote/addfromlc.php?append=1&jobNumber=JOB-106

|
| 27 |
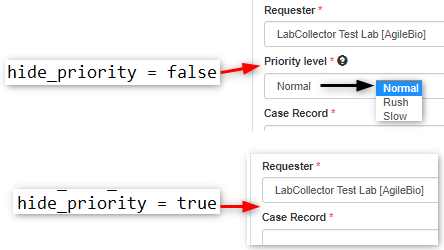
hide_priority |
false |
connected to the priority option for a job. |
true | false |
| |
- If “true”, then the option of ‘priority level’ won’t appear under the requester name.
- If “false” then in a case where the user adds a test to an existing job (via the Workflow Manager for example) then the user’s name will appear under the Requester name.
|
| 28 |
repeat_job_button |
true |
connected to repeating a job |
true | false |
| |
- If “true”, then the repeat option will be seen, which allows you to repeat a certain job. You can also add more samples while repeating the same job.
- If “false” then the repeat option will not be seen.

|
| 29 |
release_partial_results |
true |
connected to a job with multiple samples |
true | false |
| |
- If “true”, then the job info option will appear. If a job has multiple samples then it will show the number of samples validated/total number of samples. Also, you will be able to download the report of samples whose job is ‘Validated“.
- (*This option makes sense in jobs with multiple samples, the provider does not have to wait until the full job is finished, he can access a report of validated samples meanwhile and also notice the job is still In progress, with the button report still visible)
- If “false” then the repeat option will not be seen.

|
| 30 |
grid_width_100 |
true |
connected to a job with multiple samples |
true | false |
| |
- If “true”, then the “submit order” & “Get results” page will adjust its width to 100% (meaning it will fit the page width.)
- If “false” then the pages will be of default width.

|
| 31 |
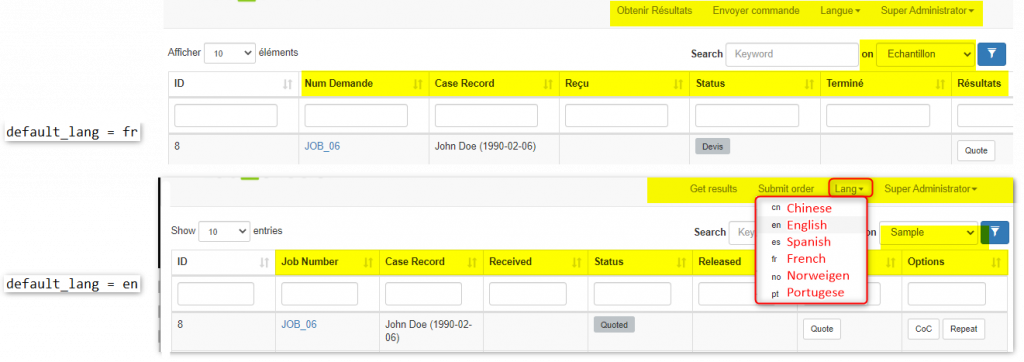
default_lang |
en |
connected to the language of lsmremote |
language initials |
| |
- You can see the language initials on the homepage of LSMRemote. (like in the below image in red)
|
| 32 |
token_access |
true |
connected to the token for patients to access the report |
true | false |
| |
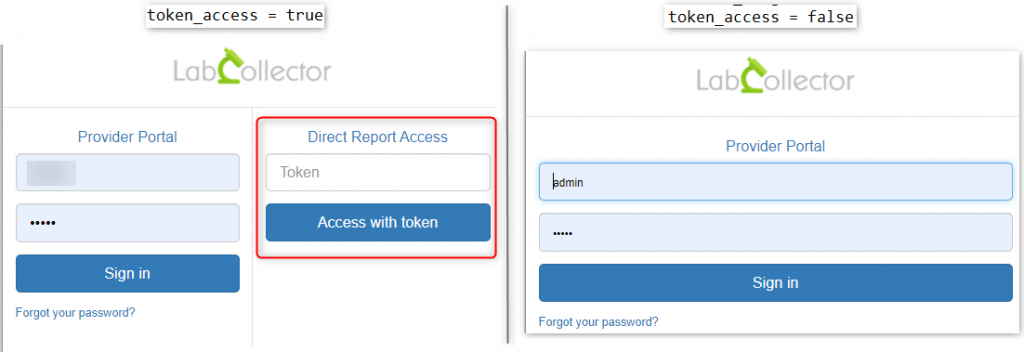
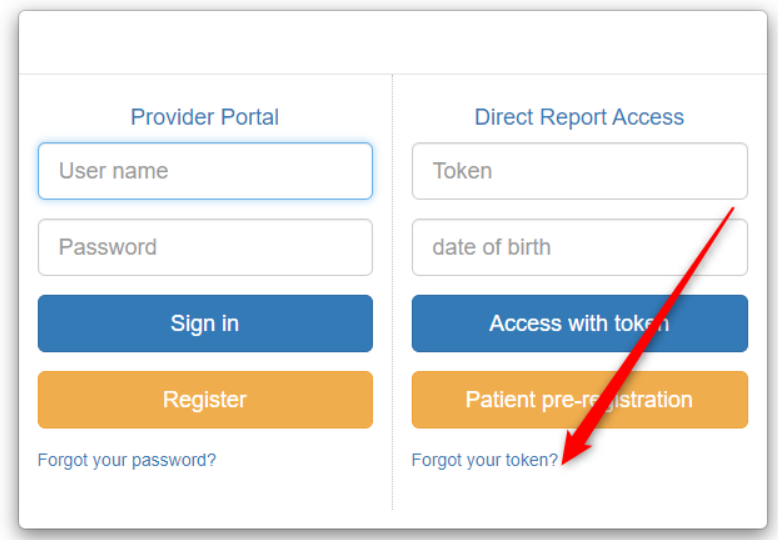
- If “True” you can see the token access option on the login page where the patients can have direct access to their report, by accessing the token number.
- *This is a convenient option for patients who want to see their report directly, instead of waiting or visiting the hospital or test lab.
- If “False” you cannot see the token access option.
- *Please read our KB to see how to activate the report access portal. Section 3
Please note:
This option needs to TRUE for the below options to work and be visible:
– security_parameter
– security_parameter
– allow_patient_register
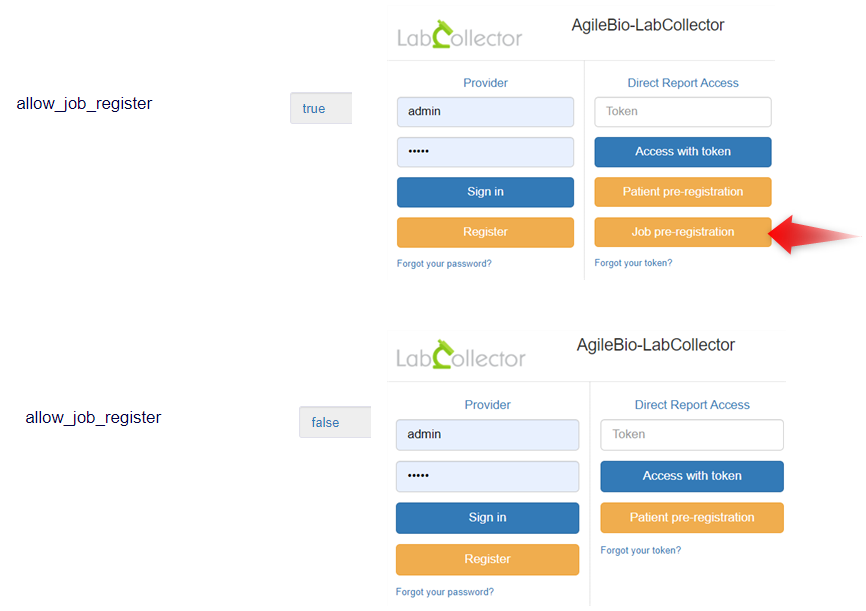
– allow_job_register
– signature
|
| 33 |
security_parameter |
none |
connected to the access for login |
none | any sample custom parameter |
| |
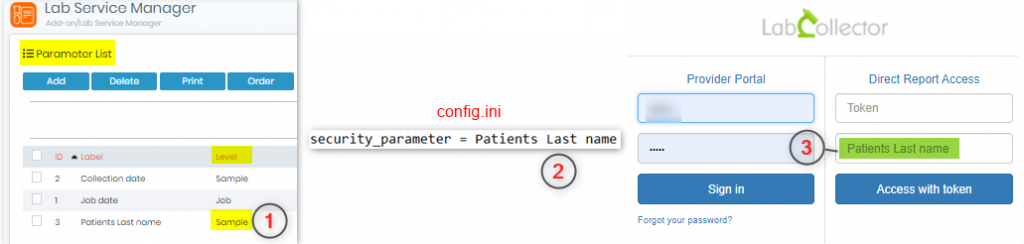
- If “None” you can only see the token access option and no other security parameter.
- 1. To have a security parameter, you need to go to LSM ADD-ON-> ADMIN ->PREFERENCES ->PARAMETERS ->LEVEL SAMPLE & create the parameter as per your requirement.
- 2. Add the same name in the config.ini file under the security parameter option and save the file.patient_login_title
- 3. Access the lsmremote login page and you will be able to see the newly made security parameter.
*Remember that this security parameter will also be present while filling the “submit order” form, under the sample data section.
|
| 34 |
provider_login_title |
_default |
connected to the access for login |
_default | free text |
| |
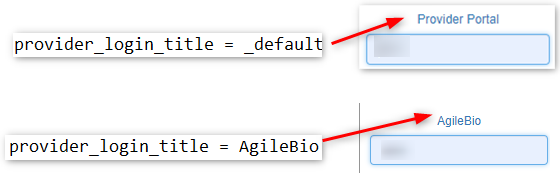
- If “_default” you can see on the login page “Providers portal”
- OR you can add your lab name as a free text.
|
| 35 |
patient_login_title |
None |
connected to the access for login |
none | free text |
| |
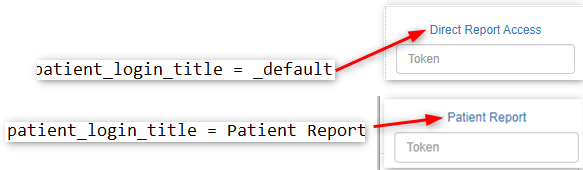
- If “none” you can see on ht login page “Direct Report Access”
- If “free text” you can add the heading for the login page for the token as you want.
|
| 36 |
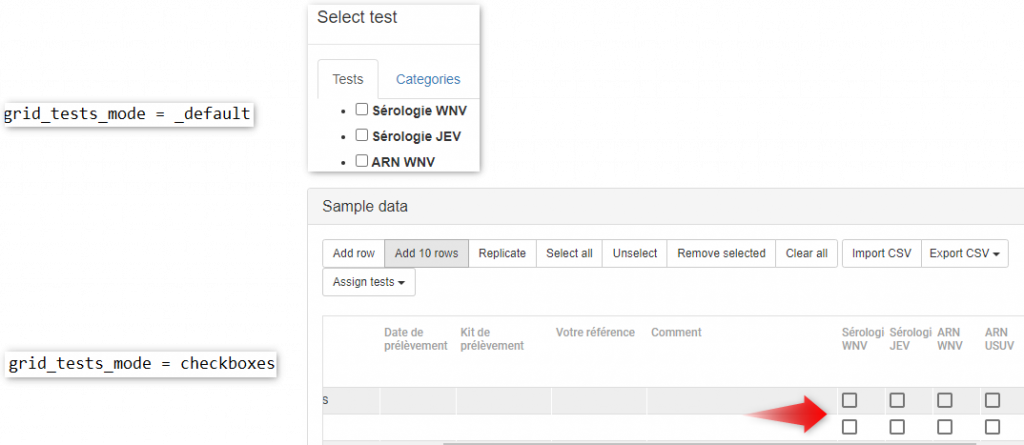
grid_tests_mode |
_default |
connected to the test mode |
_default | checkboxes |
| |
- LSM and LSM remote have 3 modes for tests. When you go to LSMREMOTE -> SUBMIT ORDER -> SAMPLE DATA -> ASSIGN TESTS
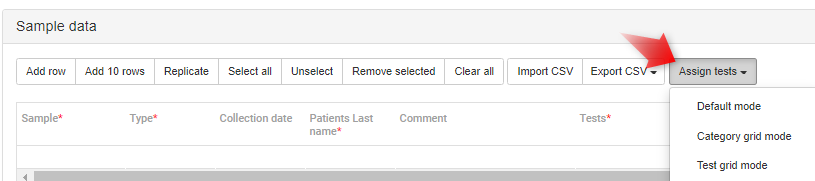
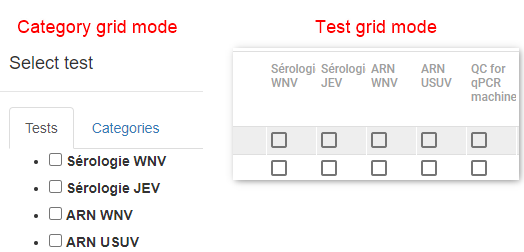
- Category grid mode allows you to select a test in a small pop-up.
- Test grid mode, allows you to select tests in the form of checkboxes.
- When you add the “_default’ option in config.ini then you will see a pop-up to search the test.
- When you add the “checkboxes” option then you will see the tests related to samples in the form of small checkboxes.
|
| 37 |
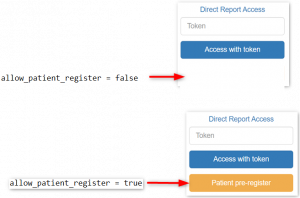
allow_patient_register |
false |
connected to the case record in LSM |
true | false |
| |
- If “True” you can see the Patient pre-register option on the login page where the patients can register themselves before going to the clinic for giving blood, urine, swab, etc samples. in connection to token access option. See point 32 above.
- If “False” you cannot see the Patient pre-register option.
- When you click on pre-register, for example the patients can register themselves before going to the clinic to give the sample.
*Below is just an example to show you.
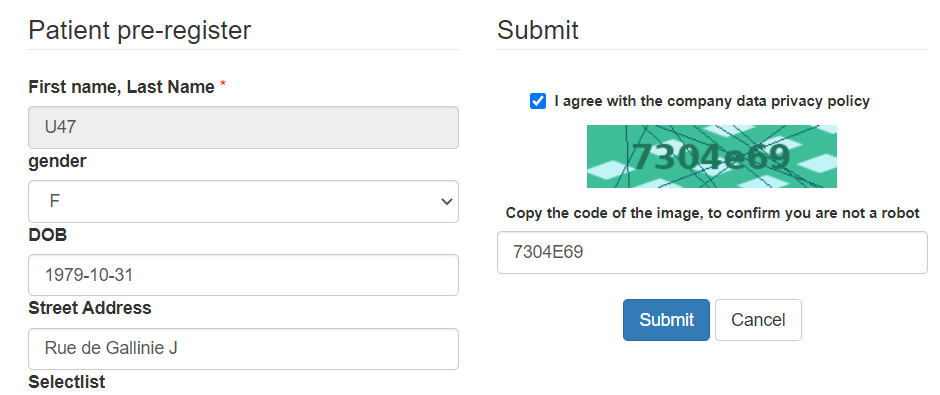
- The information entered in the above form will be seen in the custom module, for example the Patients module created in LabCollector.
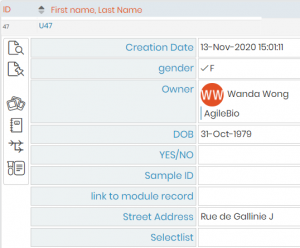
- The fields in pre-register form will be the ones that you will in the LSM create job and add case record. (LSM -> CREATE JOB -> CREATE NEW CASE RECORD)
*Remember your case record option in LSM needs to be activated before LSM -> ADMIN -> SETUP -> CASE RECORD. Please see our KB to activate case record.
- When you type the name, in this case the example name is 47 you will see the case record in your list.

|
| 38 |
category_tree |
false |
connected to the test categories in LSM |
true | false |
| |
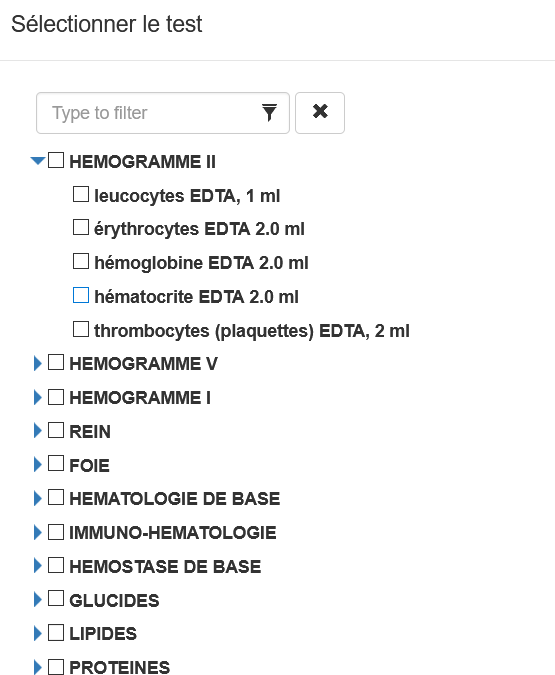
-
- While submitting order you can add samples and the tests that you need to perform on those samples.
- In point 36 above, we could previous see the test in a grid or checkbox format.
- For better representation and easy searching we have the option of “tree” format where the tests will be displayed in the tree hierarchy format.
|
| 39 |
patient_recover_token |
false |
connected to the recover token in LSMRemote |
true | false |
| |
-
- If false, then the patients cannot recover the token by email.
- If true, the client/Patient forgets the token number, you can activate this option for the client to recover the token number by email.
|
| 40 |
patient_send_token |
false |
connected to LSMRemote token option |
true | false |
| |
-
- When false it does not add an link to send the token by email.
- This option when true adds a link to send token by email in job popup in LSMRemote.
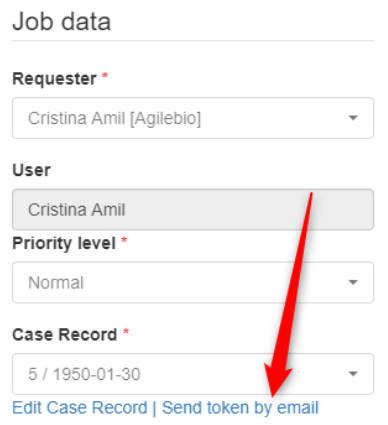
|
| 41 |
open_coc_automatically |
true |
connected to LSMRemote |
true | false |
| |
-
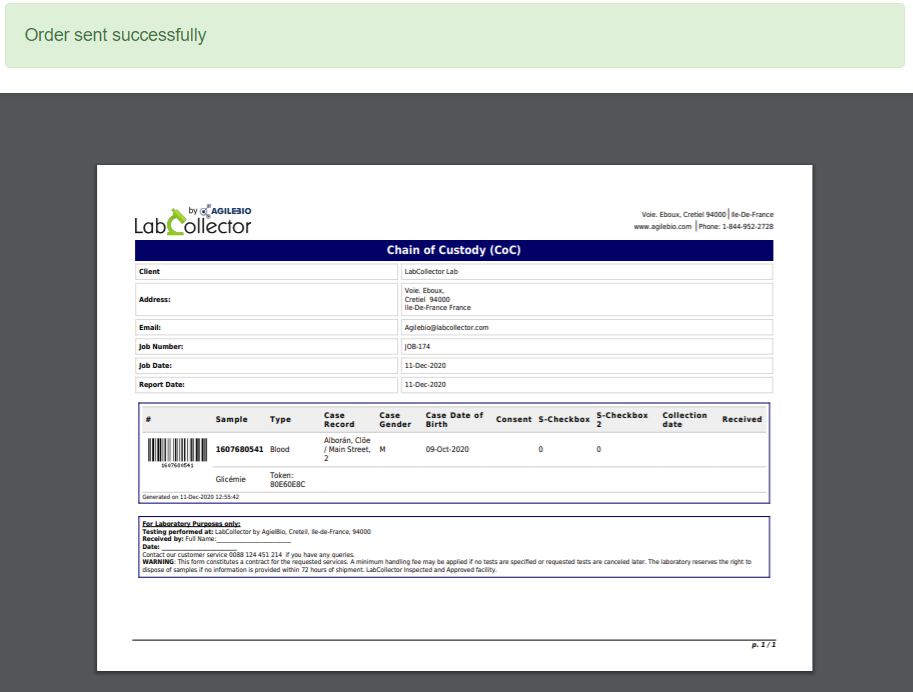
- When false it wont allow the CoC to open after the job is submitted
- If true the CoC will open automatically after submitting the job.
*below is the CoC template we have already created.
|
| 42 |
token_expiration_days |
15 |
connected to LSMRemote |
Numerical values ONLY |
| |
-
- When 15 that means the token that patient receives for accessing report will expires in 15 days.
- NOTE: Don’t keep it zero as the token will expire as soon as it is generated.
- TIP: To keep the token valid for many days, keep a higher number like 365 for 1 years, 60 for 3 months.
*Please see our KB to see how to access patient report using LSMRemote.
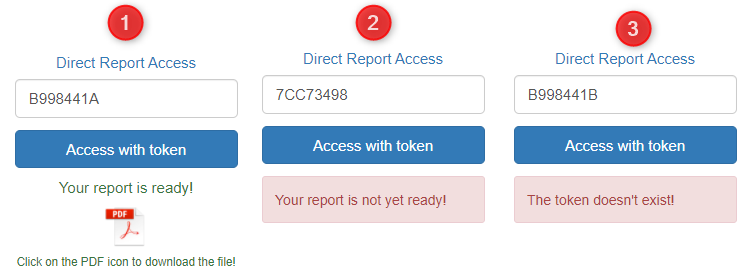
- When the patient access the report, there will be three options.
|
| 43 |
signature |
1 |
connected to LSMRemote |
empty |1 |
| |
-
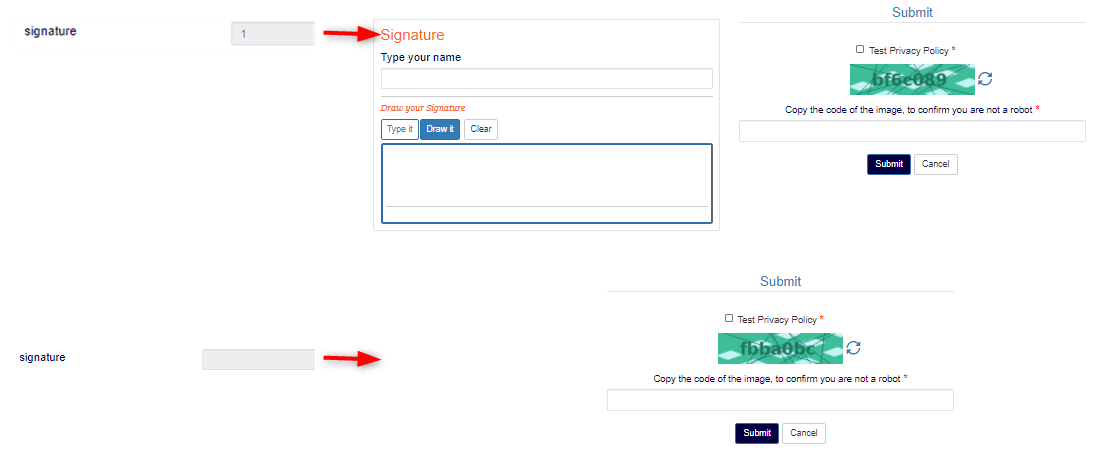
- In the patient pre registration and job pre-registration, now you can have the signature option.
|
| 44 |
allow_job_register |
true |
connected to LSMRemote |
true | false |
| |
-
- This is an option to allow patients to not only register themselves but also do the job registration themselves. So when they go to the sample collection center, they just have to provide the sample and not utilize time to fill all the details in the job form.
*Please see our KB to see how to do pre registration using LSMRemote.
|
| 45 |
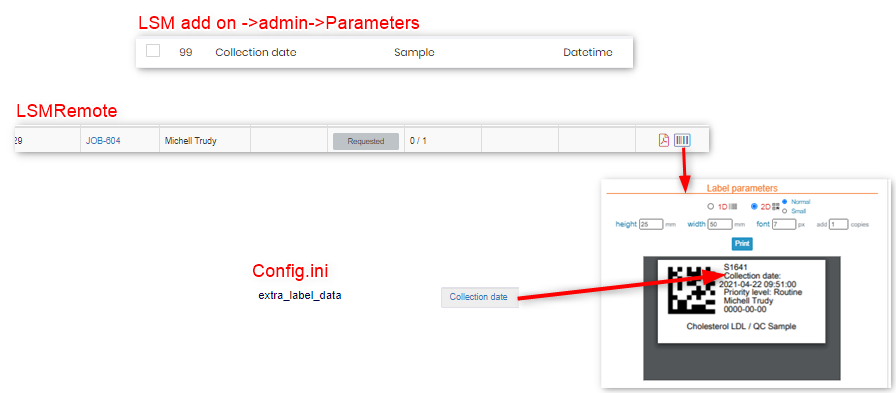
extra_label_data |
free text |
connected to LSMRemote |
sample level parameter |
| |
-
- You can add LSM sample parameters in the barcode of the sample.
NOTE: This can be only seen with 2D barcode only and not 1D barcode.
|
| 46 |
acuity_link_prefix |
free text |
connected to LSMRemote |
free text or empty |
| |
|
| 47 |
case_record_order_by |
free text |
connected to LSMRemote |
free text or empty |
| |
-
- It is to rearrange case order by any custom field in in the patient module.
- You will see this change in the LSMRemote->Provider portal->Submit order LSMREMOTE -> PROVIDER PORTAL -> SUBMIT ORDER -> CASE RECORD DROPDOWN
|
| 48 |
mandatory_filed_exclusion_list |
free text |
connected to LSMRemote |
free text or empty |
| |
-
- It allows you to exclude any mandatory custom fields when you’re importing data from a CSV file for the job. This is particularly useful when you have custom fields that are not relevant to the data being imported, or when you want to exclude fields that are not required for the job.
It’s important to note that the fields you add to the exclusion list must match their corresponding field names, rather than the database field names.
For example, if you have a custom field called “Middle Initial” in your job form, you should add “Middle Initial” to the exclusion list, rather than “middle_initial”. This will ensure that the import process skips this field and does not require it to be filled in.
*Please see the knowledgebase on how to do CSV import to import jobs in bulk.
|
| 49 |
coc_format |
Letter |
connected to LSMRemote |
Letter or A4 |
| |
|
| 50 |
coc_orientation |
L |
connected to LSMRemote |
P (Potrait) or L (Landscape) |
| |
|
| 51 |
coc_integrated_labels |
0 |
connected to LSMRemote |
0 or 1,2,3,4 |
| |
|
| 52 |
allow_patient_register_mandatory |
False |
connected to LSMRemote |
true | false |
| |
-
- You can choose to keep all the patient module custom field mandatory in the LSMRemote patient registration or job pre-registration options even if they are not mandatory in the LabCollector custom Patient module.
|
| 53 |
allow_patient_editing |
False |
connected to LSMRemote |
true | false |
| |
-
- This is in scenarios where the patient has made error while doing the patient pre-registration for example or previous given erroneous information.
- The requesters/providers/clients can now edit the patient information directly on the LSMRemote portal.
- They can click on the job the patient is connected to and edit the details of the patients.
|
| 54 |
job_preload_requester |
False |
connected to LSMRemote |
true | false |
| |
-
- When a patient is existing in database and has already done test previously.
- When this patient needs to do a retest then the requester/provider/client can just create a job with existing patient details.
- The provider has to choose this patient (case record) from the existing list.
- All the fields related to this patient will be automatically preloaded, including the requester they chose last time.
- In case they dont want to have the requester preloaded, then they can edit this config.ini option to remain false.
- In case they want to keep the same requesters for patients that have registered before, they can keep this option in config.ini as True.
|