Search Knowledge Base by Keyword
Sample-receiving add-on : Project configuration settings
SUMMARY:
The sample receiving add-on can connect to LSM (Lab Service Management) add-on. This makes it easy to manage, link, and assign incoming samples to the specific jobs in samples.
To connect sample receiving to LSM add-on you can follow the below steps.
1. Add a project
- A. General Settings
- B. Naming conventions
- C. Data mapping
- D. LSM (linking the sample receiving to LSM)
- E. Additional API
- F. Other Verifications
![]()
1. Add a project
- 1. To add a project go to SAMPLE RECEIVING ADD-ON -> SETTINGS

- 2. You can add the project code and add it to the receiving add-on. You can manage project codes by going to TOOLS -> MANAGE PROJECT CODES.
- 3. Once you click on the “Configure” button you will see the below page.
*Each project code can have its own configuration settings.
-
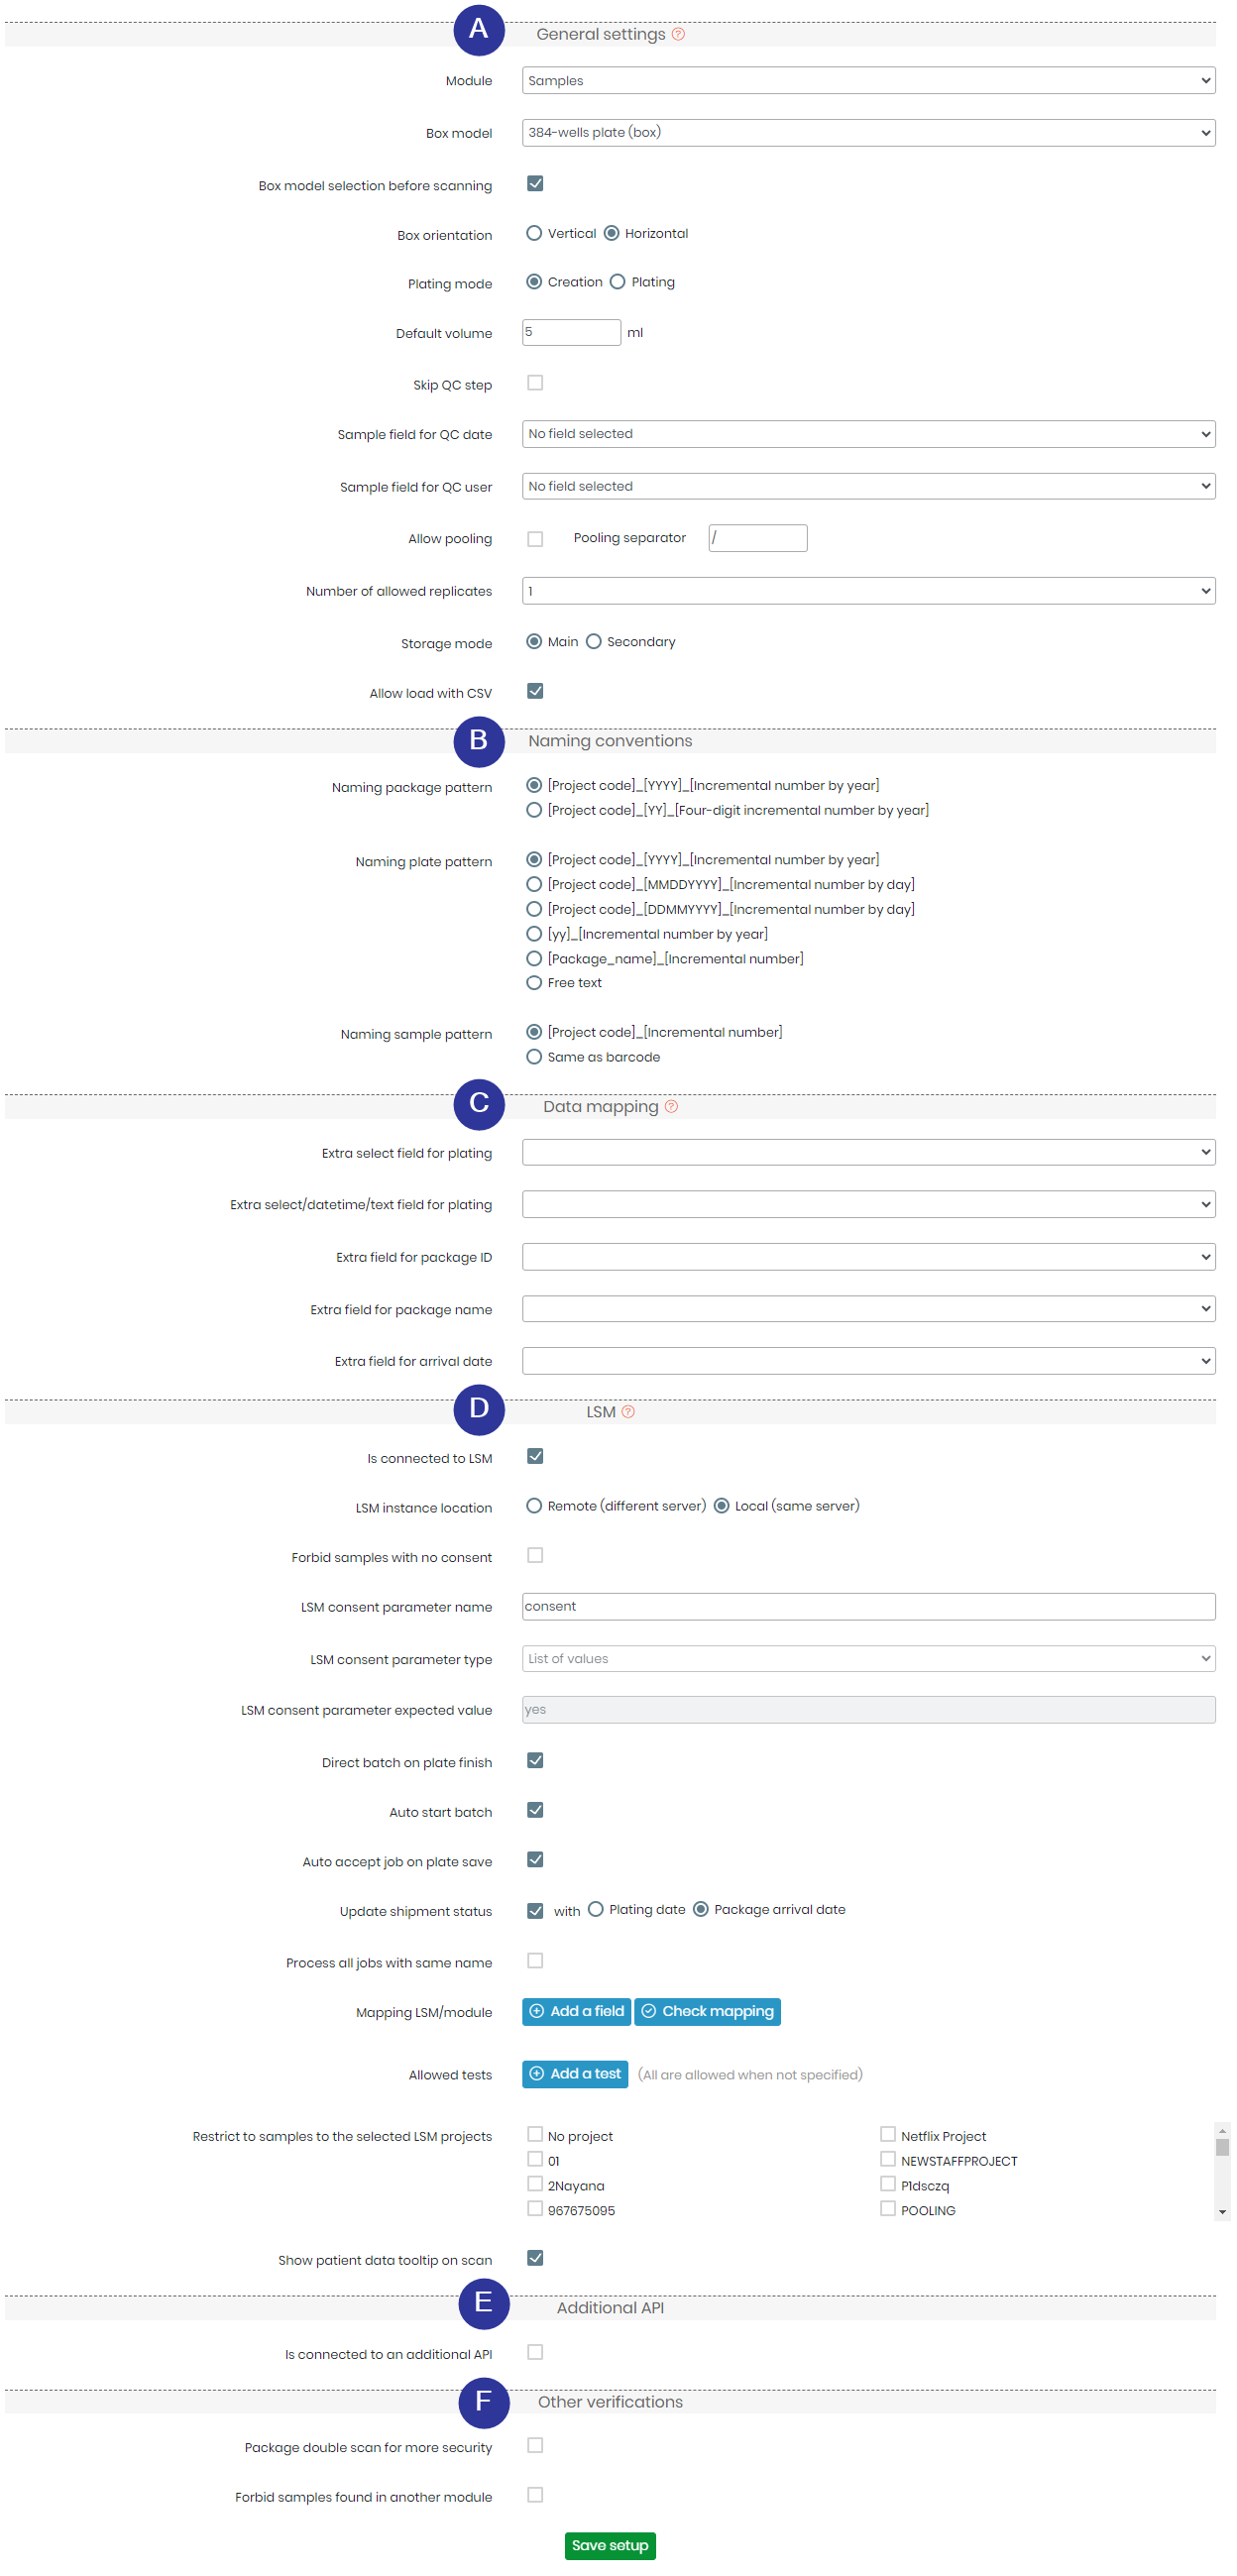
A. GENERAL SETTINGS
– You can add the modules connected to your samples receiving add-on.
*Apart from ‘sample’ modules you can also add any other custom module.
– You can choose the box model for your plates from the drop-down.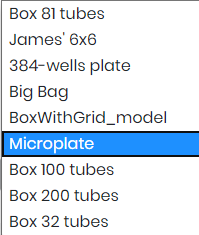
– You can choose the orientation of the box. Let’s say if the box is a rectangle then the alignment will help you mark the orientation of the box.
– Mode offers you to either create a box or plate it.- Creation: This will add samples to the plate along with creating records of samples in either sample module or a custom module.
- Plating: This will just add samples to the plate WITHOUT adding sample records to any module.
– The default volume helps you to choose the volume of the samples or plates.
– You can choose to skip QC steps, select the corresponding sample field for both QC date and user.
– You can also choose to allow pooling and select the pooling separator you require.
– You have the option to select the number of allowed replicates and the corresponding storage mode (either Main or Secondary).
-
B. NAMING CONVENTIONS
– You can choose how your package, plate and sample pattern are named in the module of your choice.
– This will help keep all the plate data organized and uniform. - You can view these samples in the module that you chose during the configuration setting.
- *Check our KB on how to automatically store samples from the sample receiving in a module.
-
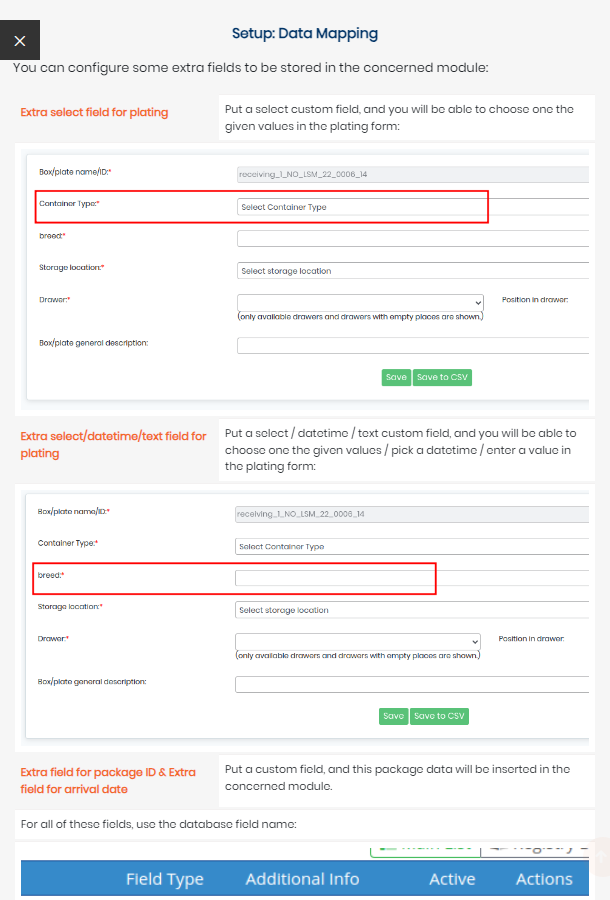
C. DATA MAPPING
– When you make your plate, you can choose to name an extra field for plating, package ID, or for the arrival date of your samples.
– The options named here will appear during the plating procedure.
– You can click the small icon to view the help section, as shown below:
-
D. LSM (linking the sample receiving to LSM)
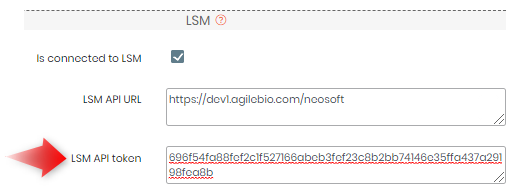
– You can choose if your sample-relieving add-on is linked/ connected to LSM, these options will be visible.
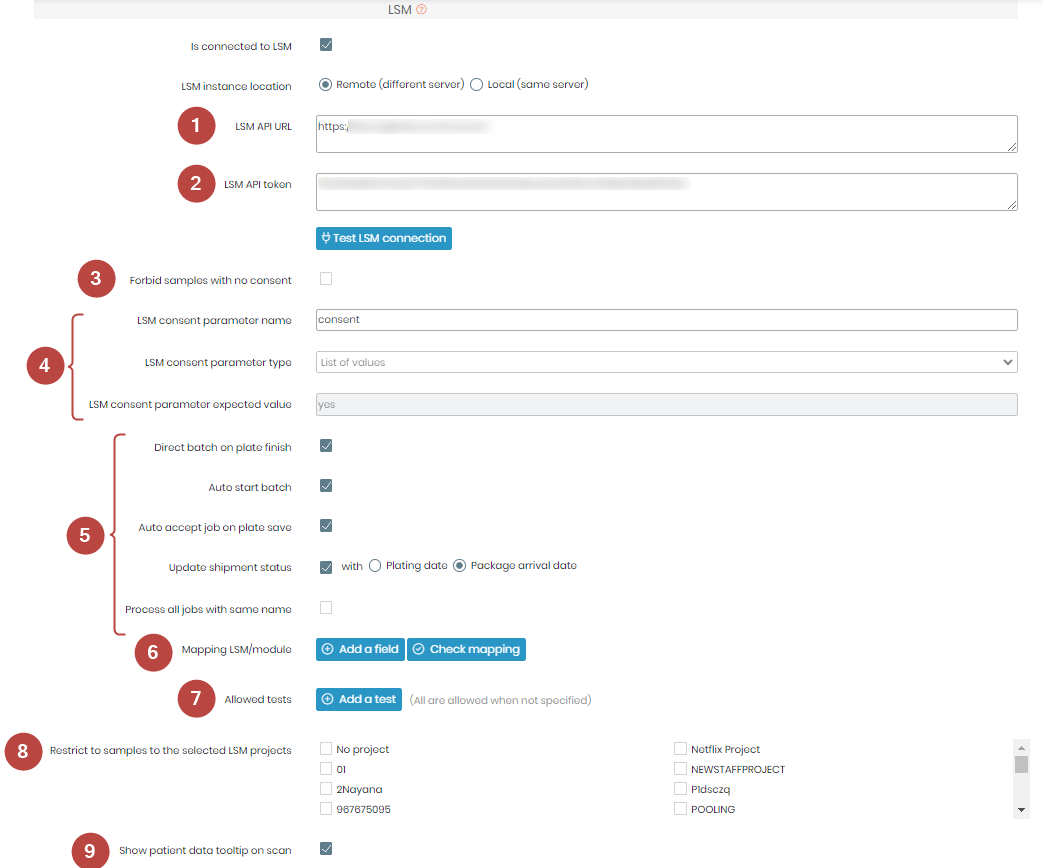
–1. You need to put the LSM URL here. This will be the URL that you see when you log in to LabCollector. For example, https://your lab instance URL
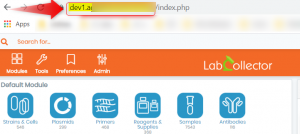
*your URL will be specific to your online instance. it could be different than shown in the image. the important part is to copy everything BEFORE the second ‘/’ sign.
–2. API token is generated from your LabCollector website see in the above image. Go to ADMIN ->OTHER -> SETUP -> WEB SERVICES API
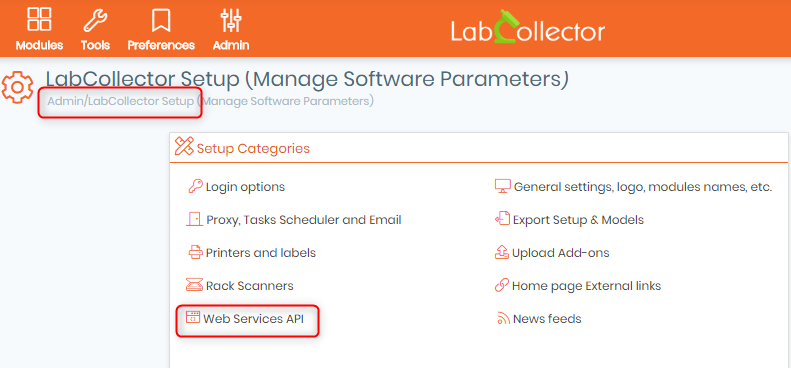
– When you click on the web services option you will see the below page.

– i. You can name the new API as you like. Here we named it sample receiving because it is going to get connected to the add-on.
– ii. You can add the operator for the add-on if you want. You can keep it empty too.
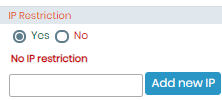
– iii. The IP Restriction is for you to select if you want to restrict or give access to certain IPs. To Manage the IPs you can go to ADMIN -> USERS & STAFF->MANAGE AUTHORIZED IPs. If you select yes and save the API settings, it will ask you to add the IP in the image in the 5th point below.
– iv. You can choose the application, that is modules that you would like to connect. (* Only the sample and the custom modules can be selected for connecting with the sample receiving add-on). In the above image, the modules selected apart from the sample are all custom modules. As you are going to connect the sample receiving add-on to LSM add-on you need to also choose the add-on option.
– v. Once you have selected your options you can click on the “ADD” option.

– Once you do add, in the list below, you will see the API you created with the specific token. You can copy it and paste it in the sample receiving add-on settings, LSM token option.
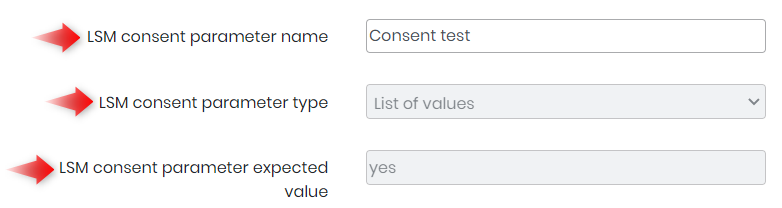
– 3.You can forbid a sample with no consent. This means that sometimes patients don’t agree to allow tests to be performed on their samples. In this case, you can check these options. The samples with no consent will not be included in the tests.
– 4.When you have the consent you can also add the consent parameter name.
* This parameter first needs to be added in LSM ->ADMIN ->PREFERENCES->PARAMETERS.

The “Label” name is the name you put in the sample receiving LSM option.
– 5. In this section, you have several options to customize, such as:
- Auto Start Batch: Enabling this option means that when samples are received, a new batch will be automatically started without manual intervention. This facilitates the process and reduces the need for manual batch initiation.
- Direct Batch on Plate Finish: When this option is activated, completing the process of adding samples to a plate will directly create a new batch. This is particularly useful for maintaining a continuous workflow without extra steps.
- Auto Accept Job on Plate Save: This feature automatically accepts jobs associated with the plates when they are saved. It ensures that jobs are seamlessly integrated with the samples received.
- Update Shipment Status: This option allows the sample receiving add-on to automatically update the status of shipments when samples are processed either with the plating date or the package arrival date.
- Process All Jobs with Same Name: When multiple jobs share the same name or identifier, activating this option ensures that all of them are processed together. This can be helpful in scenarios where different samples belong to the same project or study.
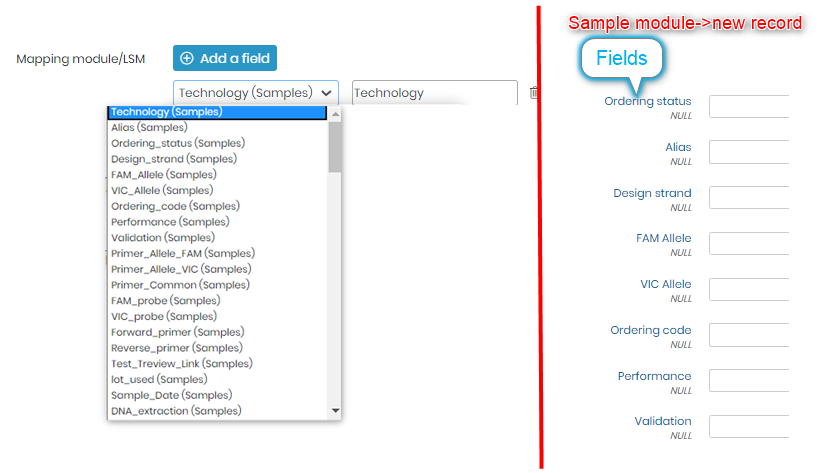
– 6. The mapping module/LSM option helps you to connect a “field” (LSM -> ADMIN -> PREFERENCES -> TESTS) in the Module you selected in step A. General settings.
-
- The objective of this mapping is to be able to automatically fill data (which already exists in LSM from these fields in Sample module.
- Hence take care that all fields exist in both places in the same format -> LSM and Sample receiving.
- These fields are ONLY custom fields that exist at sample level in LSM.
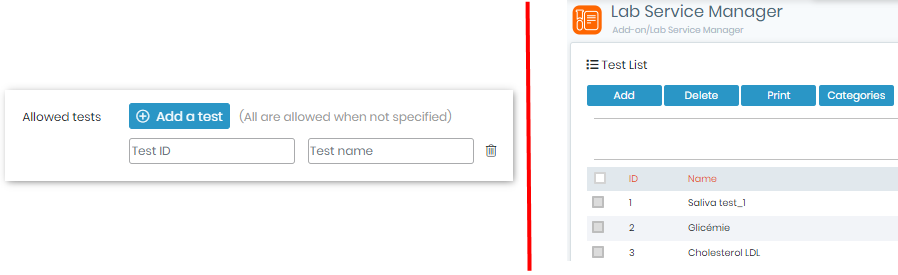
– 7.The allowed test options allow you to add tests that you would like to be performed on the samples. Generally, there will be many tests that will be created in the LSM (LSM -> ADMIN -> PREFERENCES-> TESTS) for different purposes or projects. Thus this option will give you the specification to choose from all the tests created in LSM.
– 8. You can use this feature to limit the assignment of received samples to specific LSM projects. This is valuable when you want to ensure that samples are only associated with the projects you choose.
– 9. Enabling the “Show Patient Data Tooltip on Scan” option allows for the display of patient-related information when scanning samples. This feature can be especially useful in clinical or medical settings where patient data is critical for sample identification and tracking.
When this option is activated, scanning a sample will trigger the display of relevant patient data, such as patient name, ID, and other essential information.
By showing patient data tooltips on scan, lab personnel can easily verify that they are working with the correct samples and that all necessary patient information is readily available. This contributes to efficient and error-free sample management within the lab.
-
E. ADDITIONAL API
-This option is to have the sample-receiving connected to more personal API for example with help from your API developers. When you click to check for this option you will see the boxes will appear to add the external API URL and the API headers.

F. OTHER VERIFICATION
– It gives you the option to double scan the package of samples for having more security.
– You can either “forbid” or “allow” the samples found in another module.
Related topics:
- Check our Knowledgebase on how to add a job in LSM.
- Please check our KB on how to create and process packages in sample receiving add-on.
- Read more on how to automatically store samples from the sample receiving in a module.
- Read our KB on How to process plates
- Read more on How to connect and send samples from ‘sample receiving’ to do tests in ‘LSM’.
