Search Knowledge Base by Keyword
Report tags in LSM for result/invoice/CoC/batch templates?
SUMMARY:
Lab Service Manager (LSM) add-on is the perfect application for service core & test labs.
It also helps you create & customize templates for reports when a job is finished. You can easily export a report in PDF format as soon as you complete a job (test).
Moreover, you can use “tags” to enter in your report templates. These tags will help you insert automatically the values/results/patient/sample, etc information, when a job is complete.
Follow the steps below to create and use tags in LSM:-
1. LSM template creation
2. Report tags
- Results template / Processing template
- Invoice template
- CoC report template
- Batch report template
- Dynamic tags
![]()
1. LSM template creation
- In order to create a report you need to go to LSM -> ADMIN -> PREFERENCES -> REPORTS & INVOICE TEMPLATES.
- You will see the below page.
* NOTE: Please note that the below page is pre-configured so you can see many templates on the left-hand side. During the first time login, it will be empty on the left-hand side with just one general template.
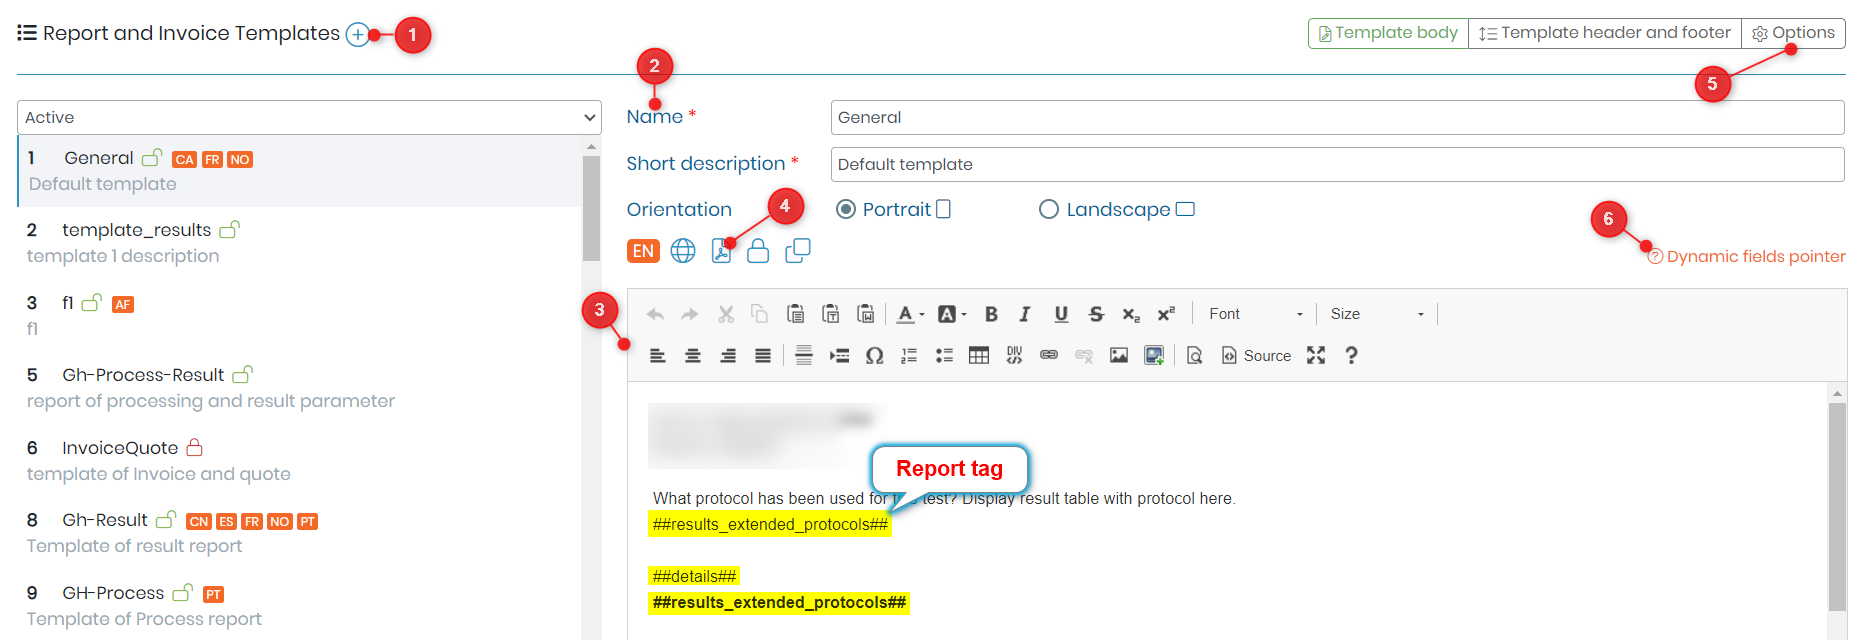
- 1. By clicking here you can create a new template.
- 2. When you create a new template you need to add the name and a short description of the report like in the above image.
- 3. Here you can edit your content using the rich text editor. *Please read our KB to see how to create a result report and invoice template & view it after a job is finished.
- 4. As when you finish the report, you can click on pdf which will open in a new tab of your browser and show you the preview of your report.
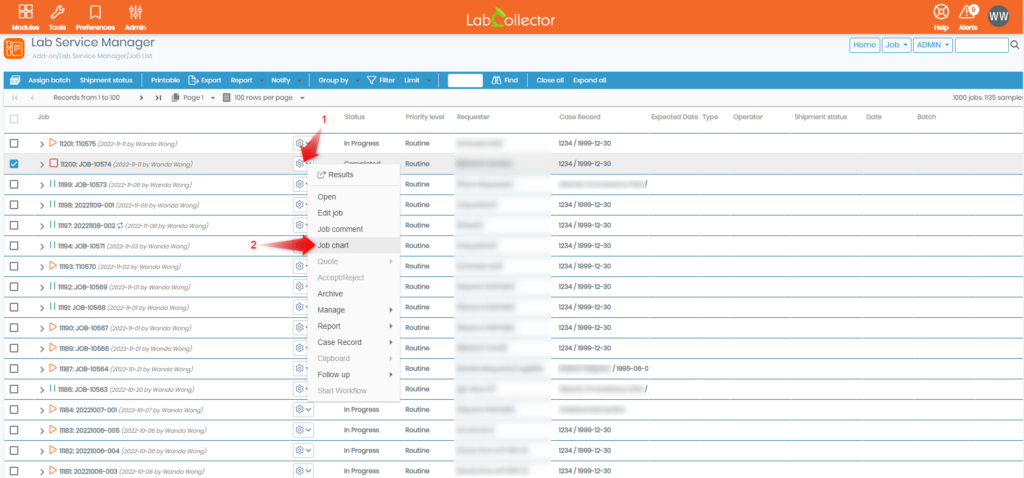
- 5. By clicking here, you can choose the template for COC, Batch, and results.
*Please read our KB on how to create a job from LSMremote to create a CoC. section 4 - 6. When you click on this option you’ll see the tags, that you can use in your report like in the image content.
![]()
2. Report tags
– As mentioned above, tags help you make your report building process easier.
– When you click on this option, a popup will open on the left-hand side of the browser page and you will see the list of tags, like below:

– Tags for each purpose are explained below.
| Results template / Processing template | ##job_submitter## | ##amendment_date## | ##job_number## | Dynamic tags |
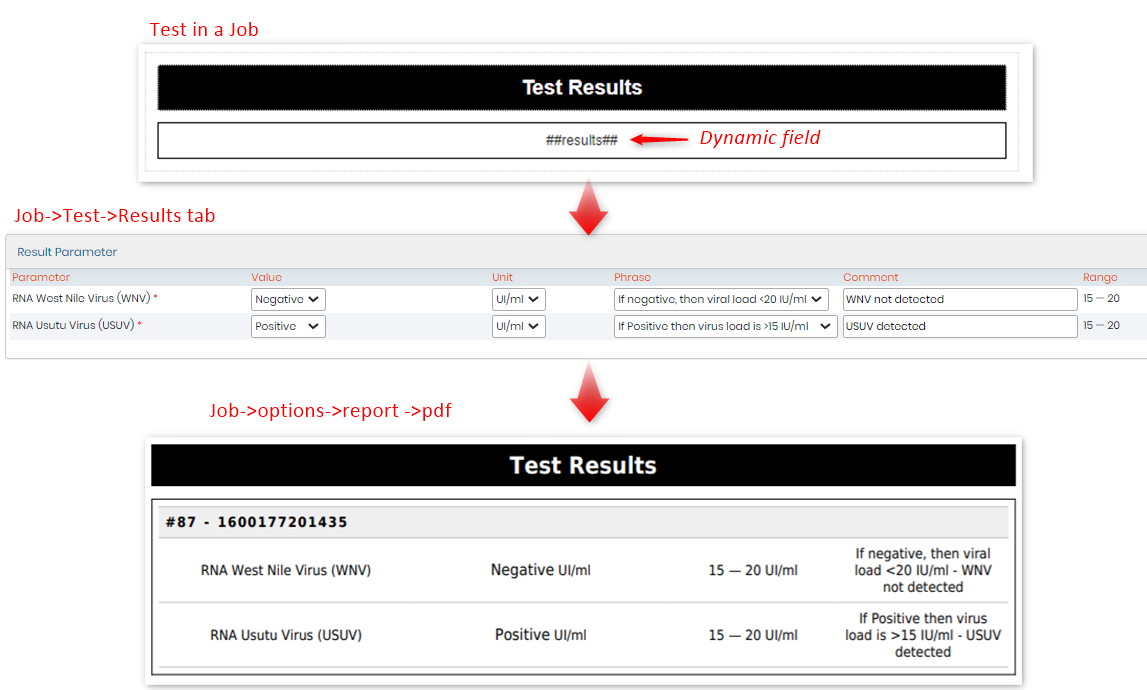
| ##results## | ##job_comment## | ##corrective_title## | ##job_date## | Any parameter can be used as tag adding ## around it. e.g. ##parameter_name## |
| ##results_extended## | ##job_validation_comment## | ##corrective_comment## | ##job_id## | For display the parameter’s phrase append _phrase. e.g. ##parameter_name_phrase## |
| ##results_extended_wdate## | ##priority_level## | ##corrective_date## | ##job_submitter## | For display the parameter’s comment append _comment. e.g. ##parameter_name_comment## |
| ##results_extended_protocols## | ##sample_number## | ##accreditation_seal## | ##priority_level## | For case record fields prepend case_. e.g. ##case_field_name## |
| ##results_extended_ids## | ##sample_name## | ##job_chart_area## | ##invoice_number## | For attached modules fields prepend the module code_. Ex: ##IS_field_name## |
| ##results_merged## | ##sample_type## | ##job_chart_bars## | ##invoice_date## | Date format |
| ##results_merged_wdate## | ##sample_comment## | ##job_chart_boxes## | ##tax_number## | All dates follow date format set in general settings |
| ##process_extended## | ##sample_lot## | ##job_chart_bubbles## | ##purchase_order## | Dates tags support format as ‘date’ appending the modifier #D or ‘datetime’ appending the modifier #DT e.g. ##report_date#D## |
| ##details## | ##sample_id## | ##job_chart_linepoints## | ##protocols## | |
| ##details_w/o_footer## | ##test_name## | ##job_chart_lines## | ##protocol_name## | |
| ##matrix## | ##test_code## | ##job_chart_pie## | ##protocol_description## | |
| ##matrix_param## | ##test_description## | ##job_chart_points## | ##case_record## | |
| ##matrix_sp## | ##operator_name## | ##job_chart_squared## | ##case_gender## | |
| ##matrix_with_sum## | ##operator_signimage## | ##job_chart_squaredarea## | ##case_dob## | |
| ##matrix_with_sum_extended## | ##validator_name## | ##job_chart_stackedarea## | CoC report template | |
| ##matrix_catalog## | ##validator_signimage## | ##job_chart_stackedbars## | ##details## | |
| ##samples## | ##protocols## | ##job_chart_stackedsquaredarea## | ##requester_name## | |
| ##requester_name## | ##protocol_name## | ##job_chart_table## | ##requester2_name## | |
| ##requester2_name## | ##protocol_description## | Invoice template | ##requester_code## | |
| ##requester_code## | ##report_number## | ##details## | ##requester_address## | |
| ##requester_address## | ##today_date## | ##samples## | ##requester_contact## | |
| ##requester_contact## | ##labname## | ##requester_name## | ##requester_email## | |
| ##requester_email## | ##reagents## | ##requester2_name## | ##requester_phone## | |
| ##requester_phone## | ##equipments## | ##requester_code## | ##requester_fax## | |
| ##requester_fax## | ##equipments_protocols## | ##requester_address## | ##job_number## | |
| ##requester_company## | ##case_record## | ##requester_contact## | ##job_date## | |
| ##requester_users## | ##case_gender## | ##requester_email## | ##job_id## | |
| ##job_number## | ##case_dob## | ##requester_phone## | ##job_submitter## | |
| ##job_date## | ##case_qr_code## | ##requester_fax## | ##priority_level## | |
| ##job_end_date## | ##received_date## | ##case_age## | Batch report template | |
| ##job_id## | ##completed_date## | ##billing_address## | ##details## | |
| ##job_param## | ##samples_line## | ##billing_contact## | ##batch## | |
| ##results_merged_protocols## | ##tests_line## | ##billing_email## | ||
| ##process_matrix## | ##amendment_title## | ##billing_phone## | ||
| ##case_age## | ##amendment_comment## | ##billing_fax## |
![]()
-
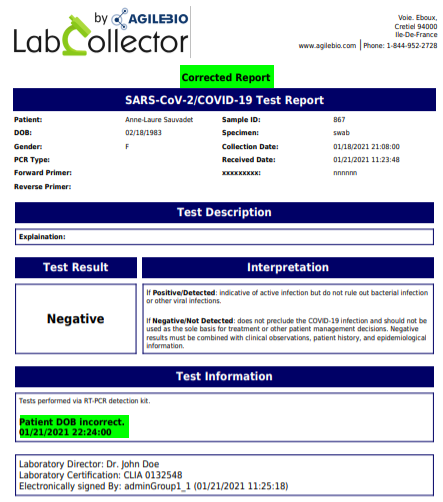
Results template / Processing template
- Fields here can be used for a template for result reports like a blood test, COVID test, or a urine test.
- The processing report is done when you are processing your tests. For example, you are doing an experiment for RTPCR and your processing parameters can be the purity of DNA, the master mix preparation with various enzymes, etc. Some companies with regulatory compliance need to have such processing reports. You can choose the processing template when you create a test. *Please check our KB on how to create a test.
| 1 | ##results## | Will be replaced by results narrow table |
|
||
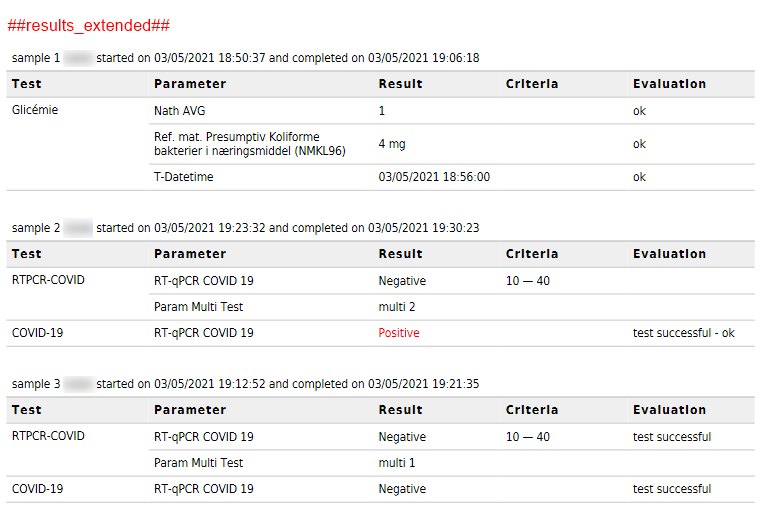
| 2 | ##results_extended## | Will be replaced by results wide table [This option will show the name of the test, parameter, result values, range (criteria), units, and evaluation (phrase)] and the JOB started and completed date. |
 |
||
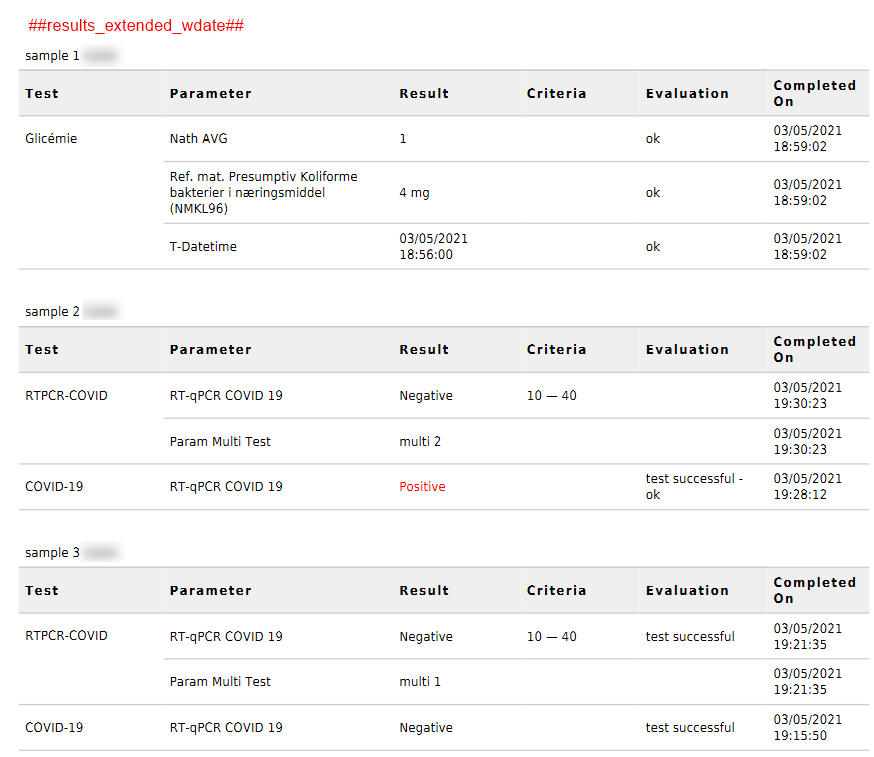
| 3 | ##results_extended_wdate## | Will be replaced by results wide table [This option will show the name of the test, parameter, result values, range (criteria), units, and evaluation (phrase)] and test completion time. |
 |
||
| 4 | ##results_extended_protocols## | Will be replaced by results wide table with methods. |
| 5 | ##results_extended_ids## | Will be replaced by results wide table [This option will show the name of the test, parameter, result values, range (criteria), units, and evaluation (phrase)] with sample ID. |
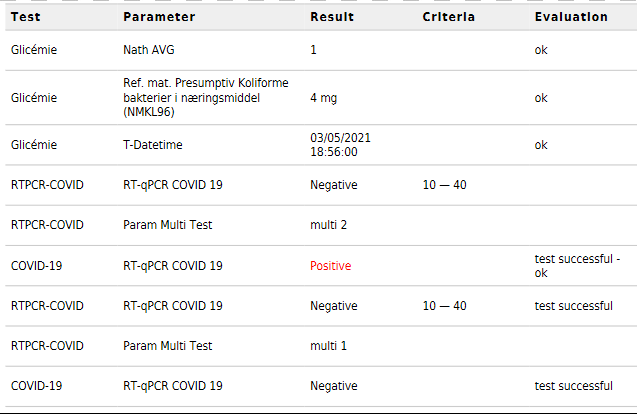
| 6 | ##results_merged## | Will be replaced by results wide table, without break by sample (This option will display the test name for each parameter, result values, unit, evaluation (phrase)). |
 |
||
| 7 | ##results_merged_wdate## | Will be replaced by results wide table, without break by sample (This option will display the test name for each parameter, result values, unit, evaluation (phrase), plus the date & time on which the test was completed.) |
 |
||
| 8 | ##process_extended## | Will be replaced by processing parameters table
|
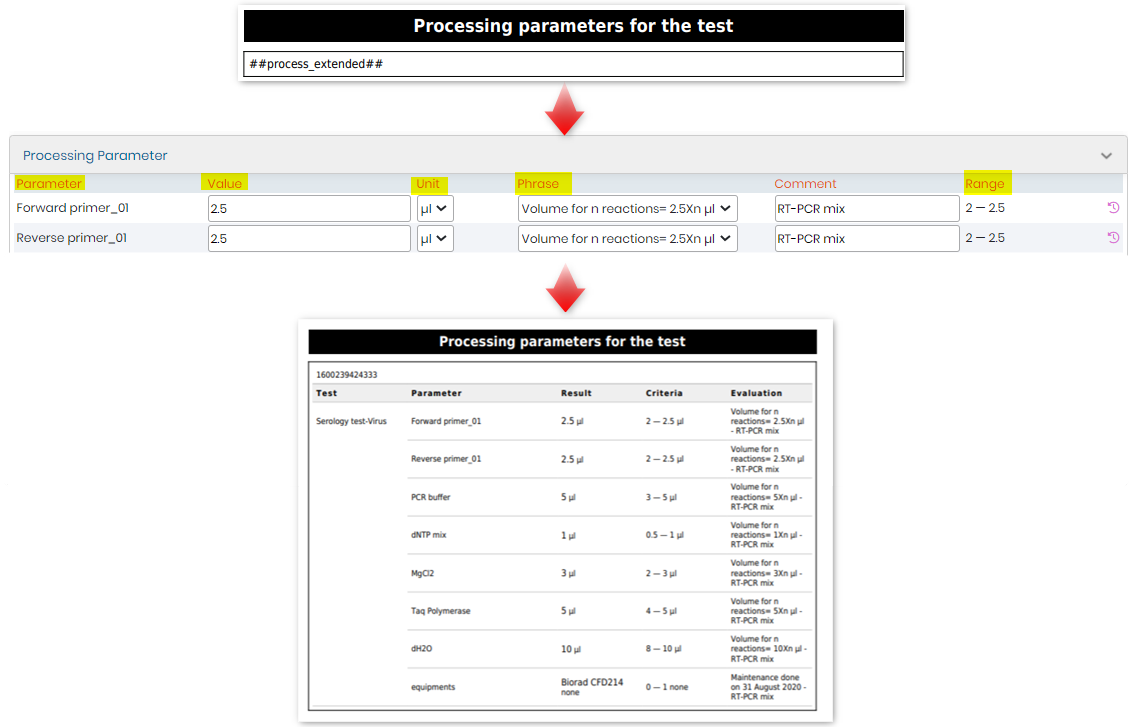 |
||
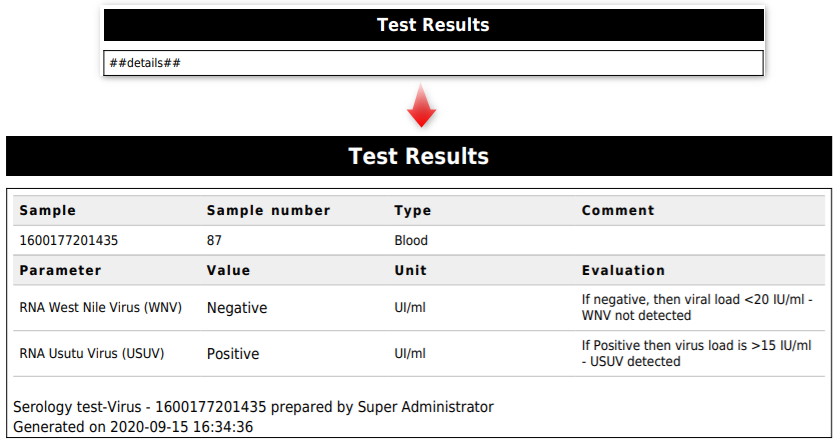
| 9 | ##details## | Will be replaced by results detailed table [This option will display the sample ID, number, type, comment for sample (while creating the job), parameter name, values for results, unit, evaluation (phrase) name of the test, name of the user level who created the job, and the date of report generation] |
| 10 | ##details_w/o_footer## | Will be replaced by results detailed table [This option will display the sample ID, number, type, comment for sample (while creating the job), parameter name, values for results, unit, evaluation (phrase) name of the test, name of the user level who created the job, and the date of report generation] but without the footer |
 |
||
| 11 | ##matrix## | Will be replaced by results matrix
|
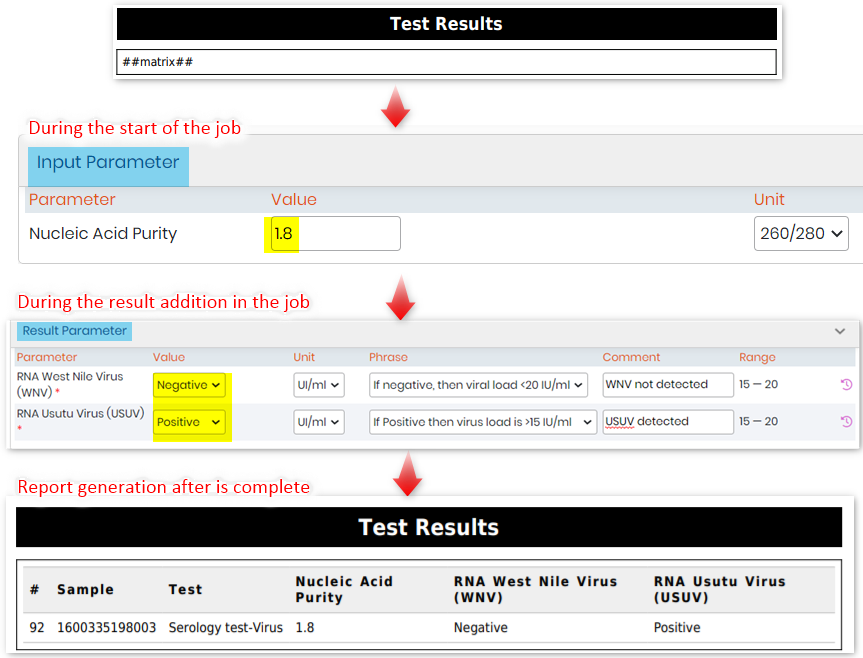 |
||
| 12 | ##matrix_param## | Will be replaced by results matrix (see section 5.1) but with all tests in the same row |
| 13 | ##matrix_sp## | Will be replaced by results matrix (see section 5.1), plus the sample type |
| 14 | ##matrix_with_sum## | Will be replaced by results matrix (see section 5.1) with sum on the footer |
| 15 | ##matrix_with_sum_extended## | Will be replaced by results matrix (see section 5.1) with sum and other options on the footer (such as: the minimum & maximum value, the average value, and much more). |
| 16 | ##matrix_catalog## | Will be replaced by a list of samples ID, samples number and tests name |
| 17 | ##samples## | Will be replaced by a samples list (This option will display sample ID, number, name of the test/s, name, and values of the parameters in the results.) |
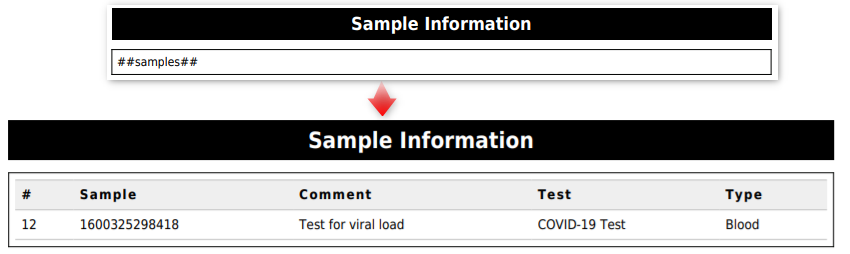 |
||
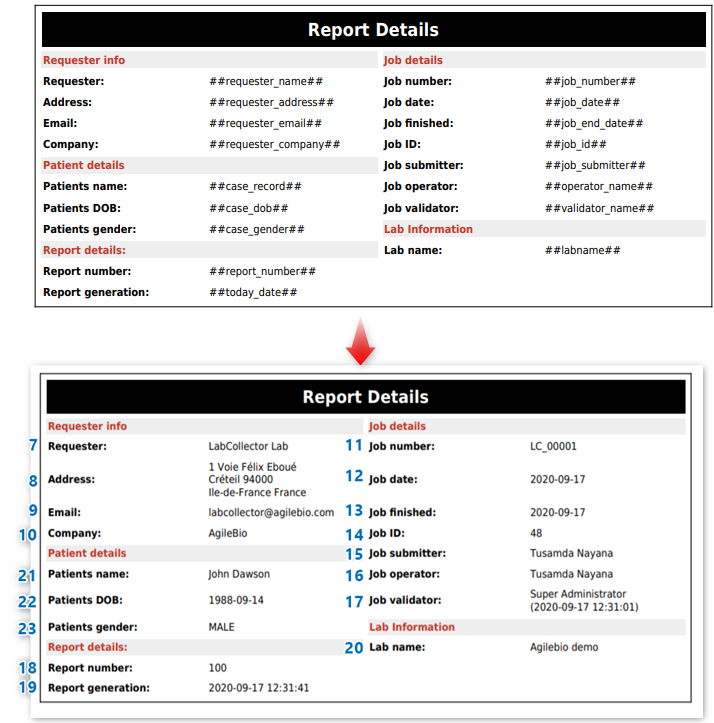
| 18 | ##requester_name## | Will be replaced by the requester’s name (LSM -> ADMIN -> PREFERENCES -> CONTACTS -> REQUESTERS) |
| 19 | ##requester_address## | Will be replaced by the requester’s address (LSM -> ADMIN -> PREFERENCES -> CONTACTS -> REQUESTERS) |
| 20 | ##requester_email## | Will be replaced by the requester’s email (LSM -> ADMIN -> PREFERENCES -> CONTACTS -> REQUESTERS) |
| 21 | ##requester_company## | Will be replaced by the requester’s company (LSM -> ADMIN -> PREFERENCES -> CONTACTS -> REQUESTERS) |
| 22 | ##requester2_name## | Will be replaced by the secondary requester’s name (LSM -> ADMIN -> PREFERENCES -> CONTACTS -> REQUESTERS) |
| 23 | ##requester_code## | Will be replaced by the requester’s code (LSM -> ADMIN -> PREFERENCES -> CONTACTS -> REQUESTERS) |
| 24 | ##requester_contact## | Will be replaced by the requester’s contact person (LSM -> ADMIN -> PREFERENCES -> CONTACTS -> REQUESTERS) |
| 25 | ##requester_phone## | Will be replaced by the requester’s phone number (LSM -> ADMIN -> PREFERENCES -> CONTACTS -> REQUESTERS) |
| 26 | ##requester_fax## | Will be replaced by the requester’s fax number (LSM -> ADMIN -> PREFERENCES -> CONTACTS -> REQUESTERS) |
| 27 | ##requester_users## | Will be replaced by the requester’s users (LSM -> ADMIN -> PREFERENCES -> CONTACTS -> REQUESTERS) |
| 28 | ##job_number## | Will be replaced by job number (While creating the job) |
| 29 | ##job_date## | Will be replaced by job date (While creating the job) |
| 30 | ##job_end_date## | Will be replaced by job end date (after the job is in validated and is seen under “Approved” stage) |
| 31 | ##job_id## | Will be replaced by job identifier (under the job list, each job will have a by default created ID) |
| 32 | ##job_submitter## | Will be replaced by the job’s submitter name (Person who created the job) |
| 33 | ##job_comment## | Will be replaced by the job’s comment |
| 34 | ##job_validation_comment## | Will be replaced by the job’s QC validation comment |
| 35 | ##priority_level## | Will be replaced by the job’s priority level (routine, urgent or same day) |
| 36 | ##operator_name## | Will be replaced by the operator’s name (person who performed the tests in the job) |
| 37 | ##operator_signimage## | Will be replaced by the operator’s signature image |
| 38 | ##validator_name## | Will be replaced by validator name (Person who validated the job, for example like lab supervisor) |
| 39 | ##report_number## | Will be replaced by report unique identifier (After the Job is in “Approved” status, a generated report contains a number along with the barcode specific to the report.) |
| 40 | ##today_date## | Will be replaced by report generation date (Date when the report was generated.) |
| 41 | ##labname## | Will be replaced by lab name (You will see the lab name, in the browser URL or your LC server manager) |
| 42 | ##case_record## | Will be replaced by case record name (It can be, for example, patients name or animal name or any record name in any custom module) – *Please read our KB to know more about how to activate case records. |
| 43 | ##case_gender## | Will be replaced by case record gender (It can be, for example, patients gender or animal gender or any record gender in any custom module) – *Please read our KB to know more about how to activate case records. |
| 44 | ##case_dob## | Will be replaced by case record Date Of Birth (It can be, for example, patients DOB or animal DOB or any record DOB in any custom module) – *Please read our KB to know more about how to activate case records. |
|
||
| 45 | ##case_age## | Will be replaced by case record age (It can be, for example, patient’s age) |
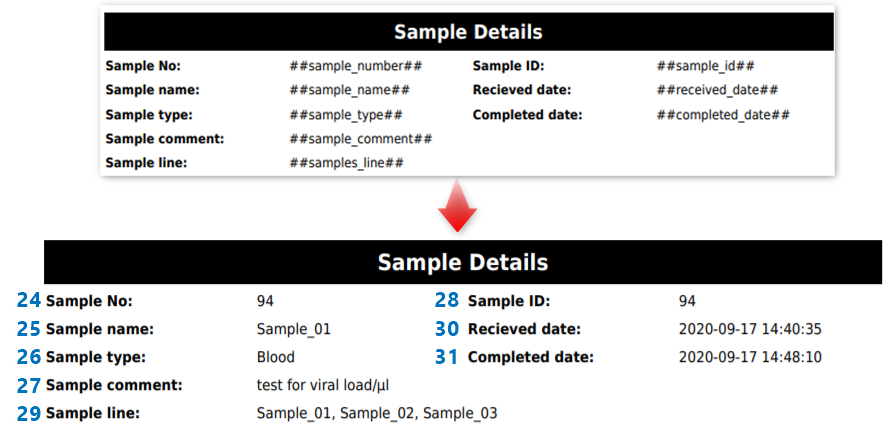
| 46 | ##sample_number## | Will be replaced by sample number (under the job list -> sample level; each sample will have a by default created ID) |
| 47 | ##sample_name## | Will be replaced by sample name (When you create a job and add sample rows, either you can rename the sample or they will have a default created number) |
| 48 | ##sample_type## | Will be replaced by sample type (When you create a job and add sample type if it is blood, tissue, swab, etc) |
| 49 | ##sample_comment## | Will be replaced by sample comment (When you create a job and add comments for the sample) |
| 50 | ##sample_id## | Will be replaced by sample id (under the job list -> sample level; each sample will have a by default created ID) |
| 51 | ##samples_line## | Will be replaced by samples list in a line (When you create a job and add sample rows, each sample name will be shown here) |
| 52 | ##sample_lot## | Will be replaced by the sample lot |
| 53 | ##received_date## | Will be replaced by sample received date (When you create a job and add if you have received the sample and the date and time) |
| 54 | ##completed_date## | Will be replaced by the sample completed date (When your job is in “completed status” that date is completed date. You can also choose the option “Save & complete” when you are executing a job. This date will be the “completed date”) |
|
||
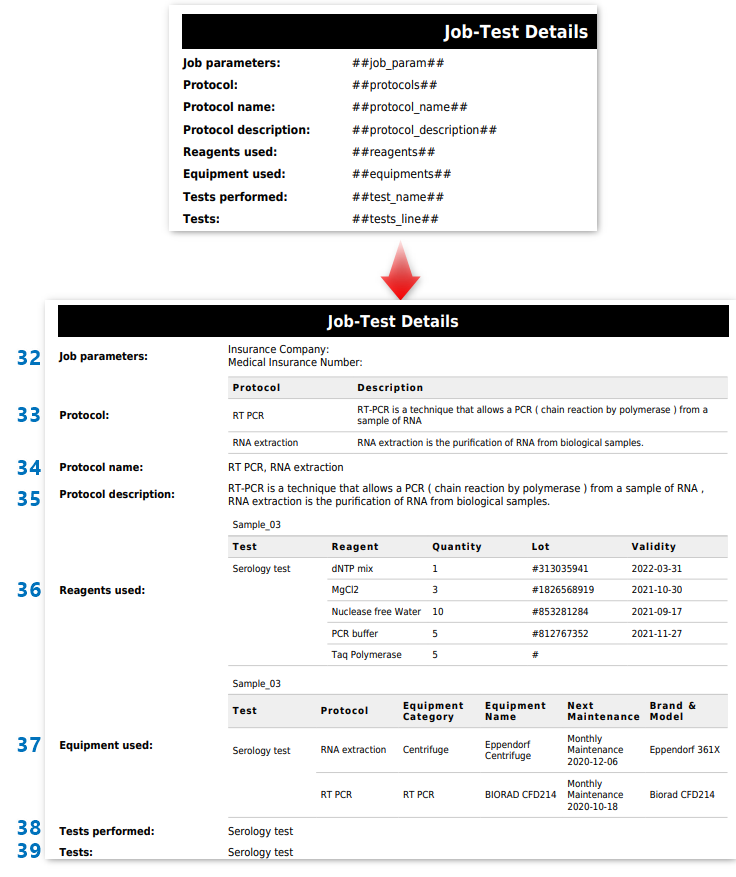
| 55 | ##job_param## | Will be replaced by job custom parameters (These are the parameters you create at the “Job level”). (LSM->ADMIN -> PREFERENCES->PARAMETERS) – *Please read our KB to know more about how to create parameters. 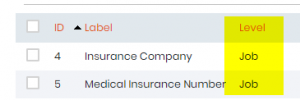 |
| 56 | ##protocols## | Will be replaced by protocols list (This will be the protocol name and its description.) (LSM->ADMIN -> PREFERENCES->PROTOCOLS) *Please read our KB to know more abouthow to create protocols. |
| 57 | ##protocol_name## | Will be replaced by protocol name (This will be just the protocol name separated by a comma.) |
| 58 | ##protocol_description## | Will be replaced by protocol description (This will be just the protocol description separated by a comma.) |
| 59 | ##reagents## | Will be replaced by reagents list (This will show a table with the test, reagent list, quantity.) (LSM->ADMIN -> REAGENTS) *Please read our KB to know more about how to create reagents and equipment in LSM. |
| 60 | ##equipments## | Will be replaced by the equipment list (This will be replaced by the test name, protocol name, equipment category & name, upcoming maintenance of the equipment, and it’s brand and model.) (LSM->ADMIN -> EQUIPMENT) *Please read our KB to know more about how to create reagents and equipment in LSM. |
| 61 | ##test_name## | Will be replaced by test name (LSM->ADMIN -> PREFERENCES->TESTS) |
| 62 | ##test_code## | Will be replaced by test code (LSM->ADMIN -> PREFERENCES->TESTS) |
| 63 | ##tests_line## | Will be replaced by tests list in a line (this is the case when you have many tests for one sample separated by a comma) (LSM->ADMIN -> PREFERENCES->TESTS) |
 |
||
| 64 | ##validator_signimage## | Will be replaced by the validator signature image |
| 65 | ##equipments_protocols## | Will be replaced by the equipments and protocols list |
| 66 | ##case_qr_code## | Will be replaced by the QR code with direct link to report |
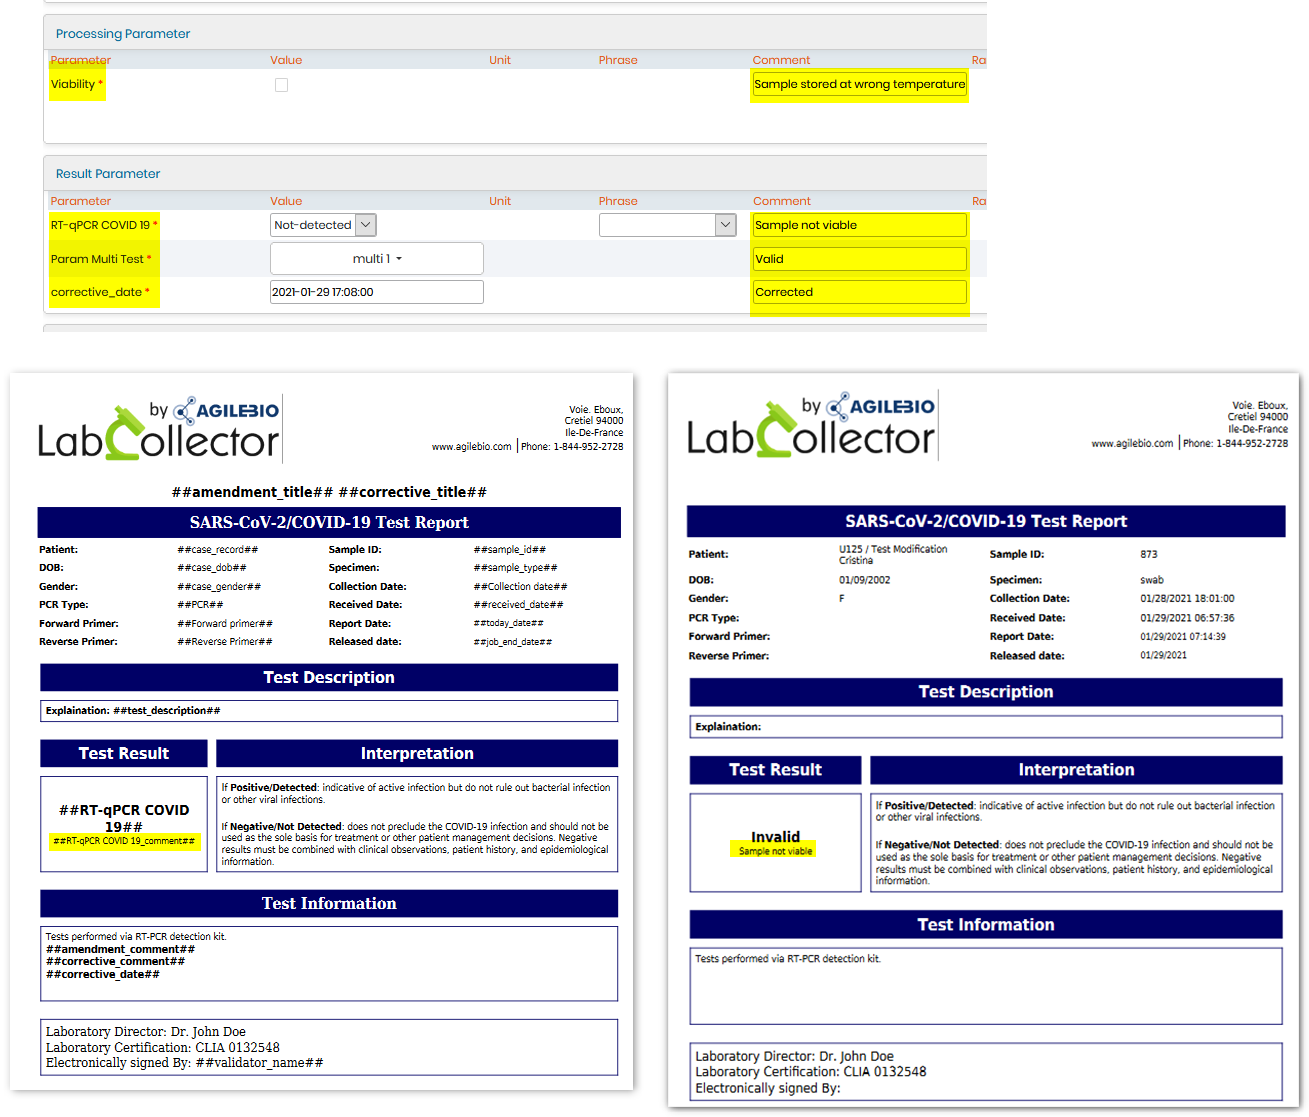
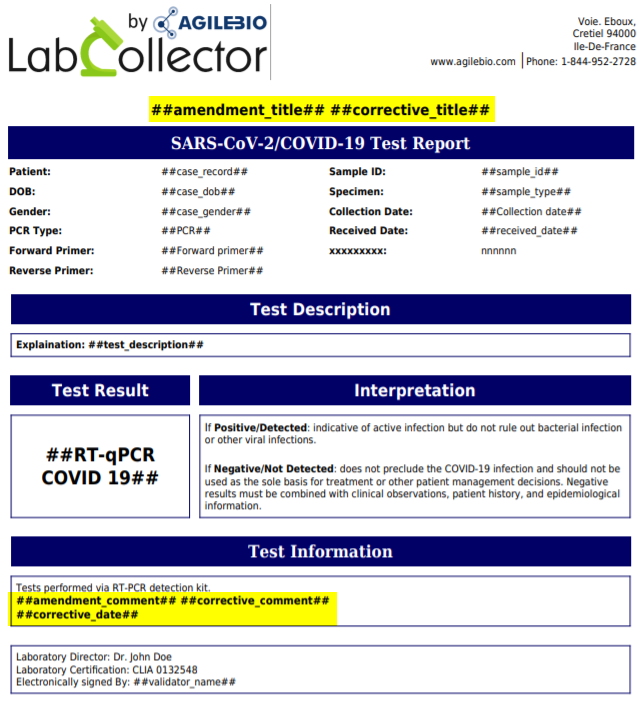
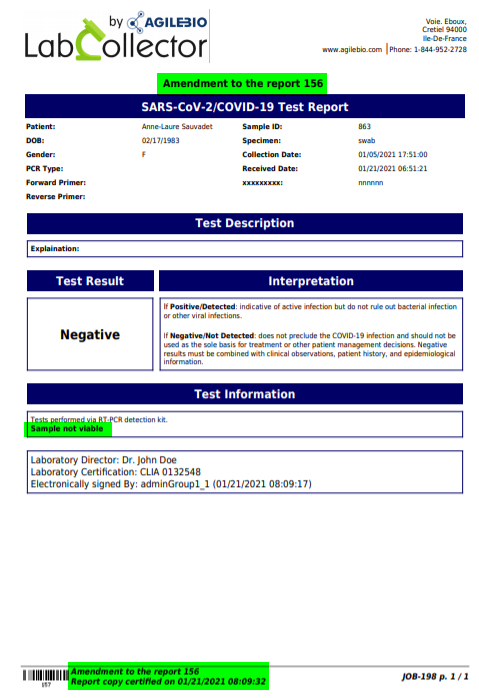
| 67 | ##amendment_title## | Will be replaced by amendment label with previous report ID |
| 68 | ##amendment_comment## | Will be replaced by reason to restart |
| 69 | ##amendment_date## | Will be replaced by date of restart |
| 70 | ##accreditation_seal## | Will be replaced by the accreditation (configured in the page “Regulatory options”) |
| 71 | ##corrective_title## | Will be replaced by corrective title or empty if no correction |
| 72 | ##corrective_date## | Will be replaced by date of correction |
| 73 | ##corrective_comment## | Will be replaced by corrective comment |
| Please see out KB on Correction/Amendment actions in LSM report.
|
||
| 74 | ##parameter_name_comment## | Will be replaced by comments related to processing and result parameters. |
 |
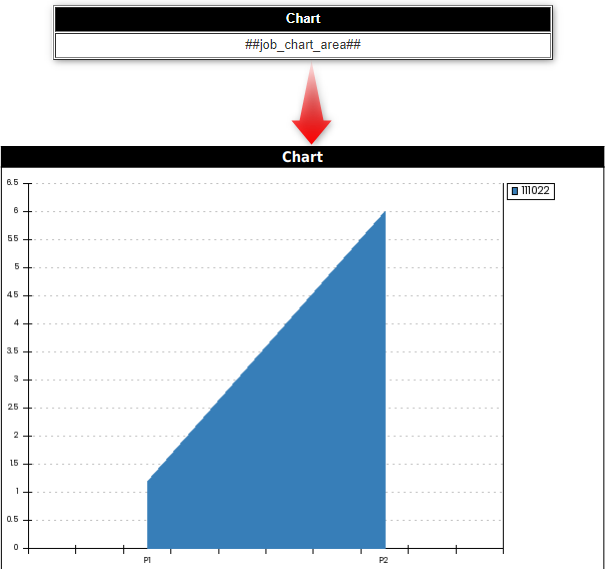
||
| 75 | ##job_chart_area## | Will be replaced by the job’s area chart |
|
||
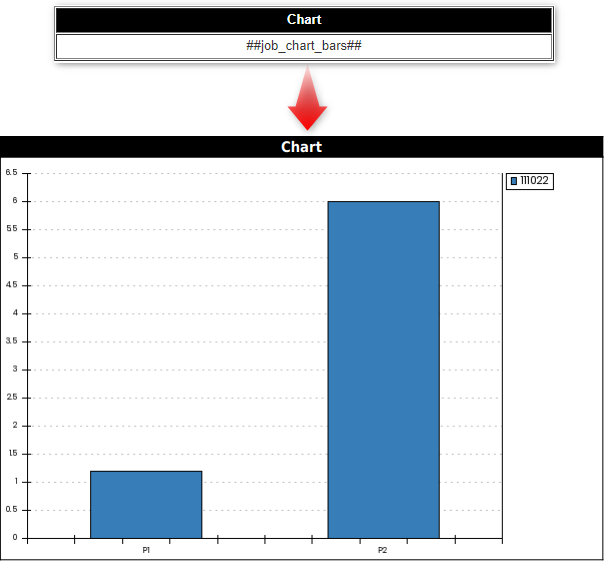
| 76 | ##job_chart_bars## | Will be replaced by the job’s bars chart |
 |
||
| 77 | ##job_chart_boxes## | Will be replaced by the job’s boxes chart |
| 78 | ##job_chart_bubbles## | Will be replaced by the job’s bubbles chart |
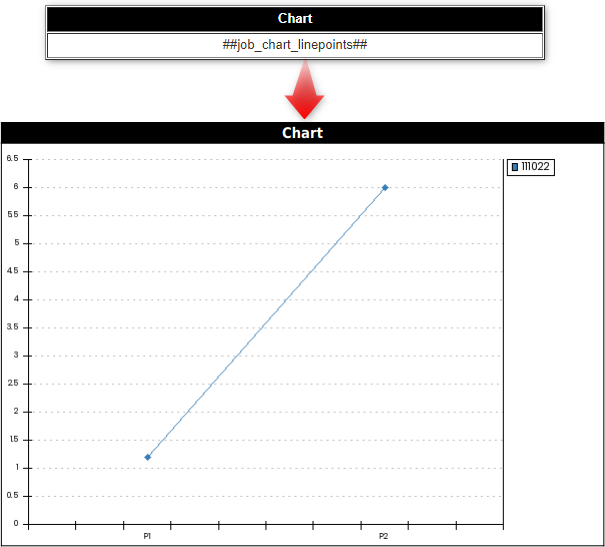
| 79 | ##job_chart_linepoints## | Will be replaced by job’s points chart, where the points are connected together |
 |
||
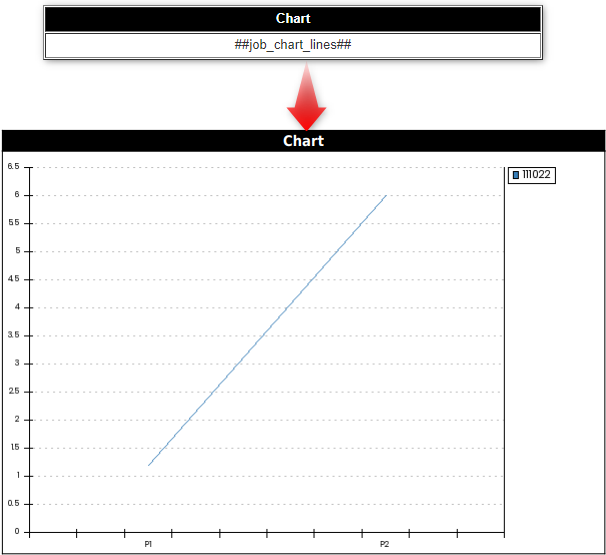
| 80 | ##job_chart_lines## | Will be replaced by the job’s lines chart |
 |
||
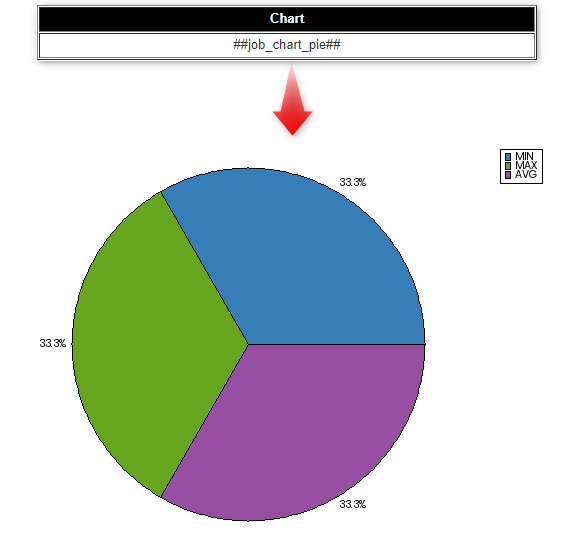
| 81 | ##job_chart_pie## | Will be replaced by the job’s pie chart |
 |
||
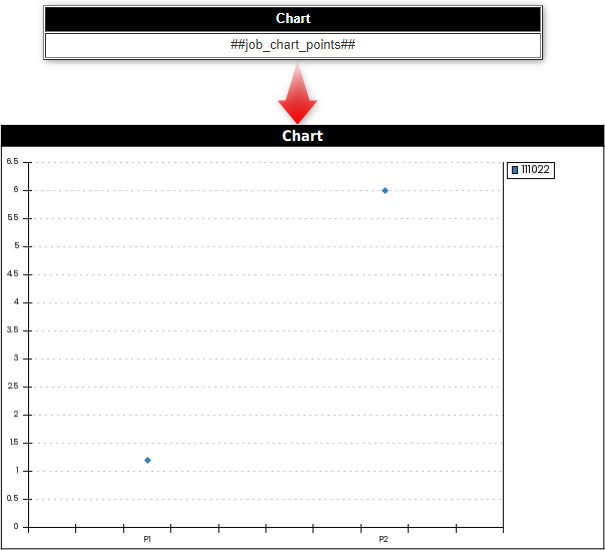
| 82 | ##job_chart_points## | Will be replaced by the job’s points chart |
 |
||
| 83 | ##job_chart_squared## | Will be replaced by the job’s squared chart |
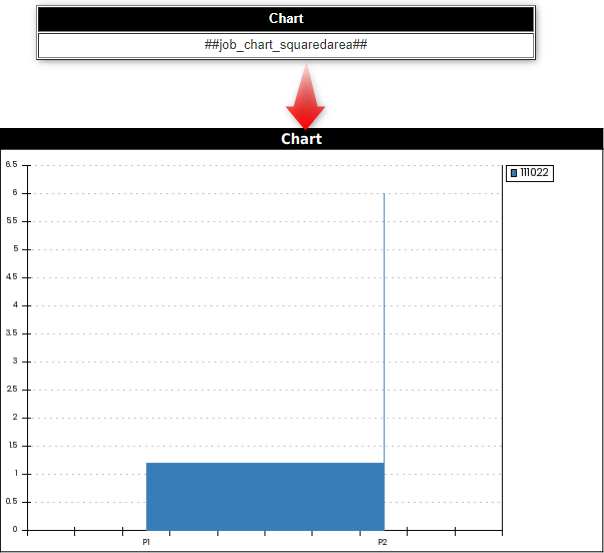
| 84 | ##job_chart_squaredarea## | Will be replaced by the job’s squared area chart |
 |
||
| 85 | ##job_chart_stackedarea## | Will be replaced by the job’s stacked area chart |
| 86 | ##job_chart_stackedbars## | Will be replaced by the job’s stacked bars chart |
| 87 | ##job_chart_stackedsquaredarea## | Will be replaced by the job’s combination of stacked and squared area charts |
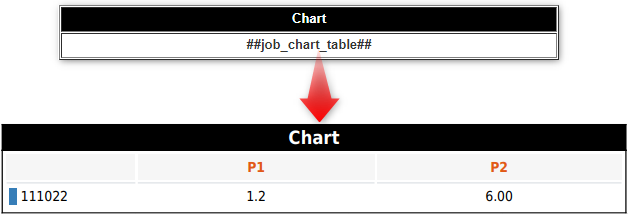
| 88 | ##job_chart_table## | Will be replaced by the chart’s value table |
 |
||
| 89 | ##results_merged_protocols## | Will be replaced by results wide table, with methods and without break by sample |
| 90 | ##process_matrix## | Will be replaced by processing parameters matrix |
.
-
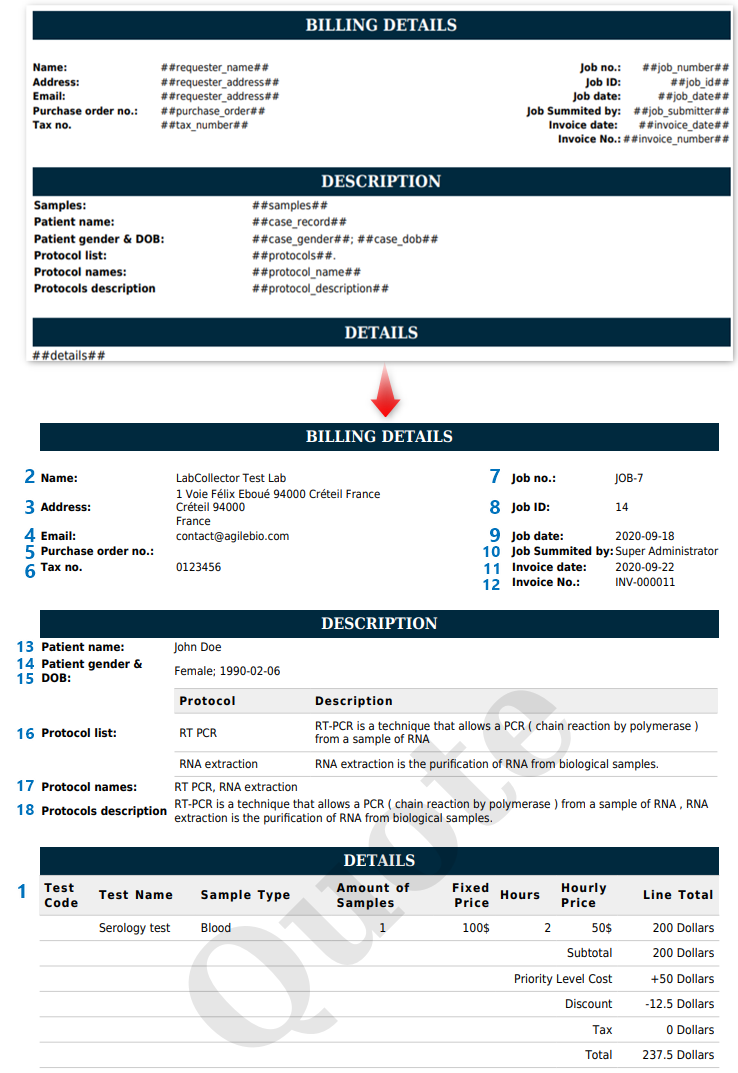
Invoice template
- Fields here can be used for a template for creating quotes, invoices, or purchase orders.
*Please see the KB on how to create invoices. - The invoice details can be added by going to LSM->ADMIN -> PREFERENCES ->COSTS.
- Fields here can be used for a template for creating quotes, invoices, or purchase orders.
| 1. | ##details## | Will be replaced by invoice details (It will show details in a table format with test code, name, sample type, amount of samples, fixed price, hours, hourly price, line total showing the calculation based of defined costs in LSM->ADMIN -> PREFERENCES ->COSTS) |
| 2. | ##samples## | Will be replaced by the samples list |
| 3. | ##requester_name## | Will be replaced by requester name (LSM-> ADMIN -> PREFERENCES -> CONTACTS -> REQUESTERS) |
| 4. | ##requester2_name## | Will be replaced by secondary requester address (LSM-> ADMIN -> PREFERENCES -> CONTACTS -> REQUESTERS) |
| 5. | ##requester_address## | Will be replaced by requester address (LSM-> ADMIN -> PREFERENCES -> CONTACTS -> REQUESTERS) |
| 6. | ##requester_email## | Will be replaced by requester email (LSM-> ADMIN -> PREFERENCES -> CONTACTS -> REQUESTERS) |
| 7. | ##requester_code## | Will be replaced by requester code (LSM-> ADMIN -> PREFERENCES -> CONTACTS -> REQUESTERS) |
| 8. | ##requester_contact## | Will be replaced by requester contact person (LSM-> ADMIN -> PREFERENCES -> CONTACTS -> REQUESTERS) |
| 9. | ##requester_phone## | Will be replaced by requester phone number (LSM-> ADMIN -> PREFERENCES -> CONTACTS -> REQUESTERS) |
| 10. | ##requester_fax## | Will be replaced by requester fax number (LSM-> ADMIN -> PREFERENCES -> CONTACTS -> REQUESTERS) |
| 11. | ##purchase_order## | Will be replaced by job purchase order (Will be replaced by purchase order number) |
| 12. | ##tax_number## | Will be replaced by a requester tax number (Will be replaced by the tax number you put in the requesters billing address details) |
| 13. | ##job_number## | Will be replaced by job number (While creating the job the number will be assigned to the job) |
| 14. | ##job_id## | Will be replaced by job identifier (While creating the job an ID will be assigned to it automatically) |
| 15. | ##job_date## | Will be replaced by job date (While creating the job will be considered as job date) |
| 16. | ##job_submitter## | Will be replaced by the job’s submitter name (The person who creates or submits the job) |
| 17. | ##priority_level## | Will be replaced by job priority level (routine, urgent or same day) |
| 18. | ##invoice_date## | Will be replaced by invoice date (You can add the invoice date by going to LSM->ADMIN -> PREFERENCES ->COSTS) *You cannot add the invoice date when the invoice status is pending. |
| 19. | ##invoice_number## | Will be replaced by invoice number (You can add the invoice date by going to LSM->ADMIN -> PREFERENCES ->COSTS) |
| 20. | ##billing_address## | Will be replaced by billing address |
| 21. | ##billing_contact## | Will be replaced by billing contact information |
| 22. | ##billing_email## | Will be replaced by billing email address |
| 23. | ##billing_phone## | Will be replaced by billing phone number |
| 24. | ##billing_fax## | Will be replaced by billing fax number |
| 25. | ##case_record## | Will be replaced by case record name (It can be, for example, patients name or animal name or any record name in any custom module) – *Please read our KB to know more about how to activate case records. |
| 26. | ##case_gender## | Will be replaced by case record gender (It can be, for example, patient’s gender) |
| 27. | ##case_dob## | Will be replaced by case record date of birth (It can be, for example, patient’s date of birth) |
| 28. | ##case_age## | Will be replaced by case record age (It can be, for example, patient’s age) |
| 29. | ##protocols## | Will be replaced by protocols. (This will be the protocol name and its description.) (LSM->ADMIN -> PREFERENCES->PROTOCOLS) |
| 30. | ##protocol_name## | Will be replaced by protocol name (This will be just the protocol name separated by a comma.) |
| 31. | ##protocol_description## | Will be replaced by protocol description (This will be just the protocol description separated by a comma.) |
| *
|
||
-
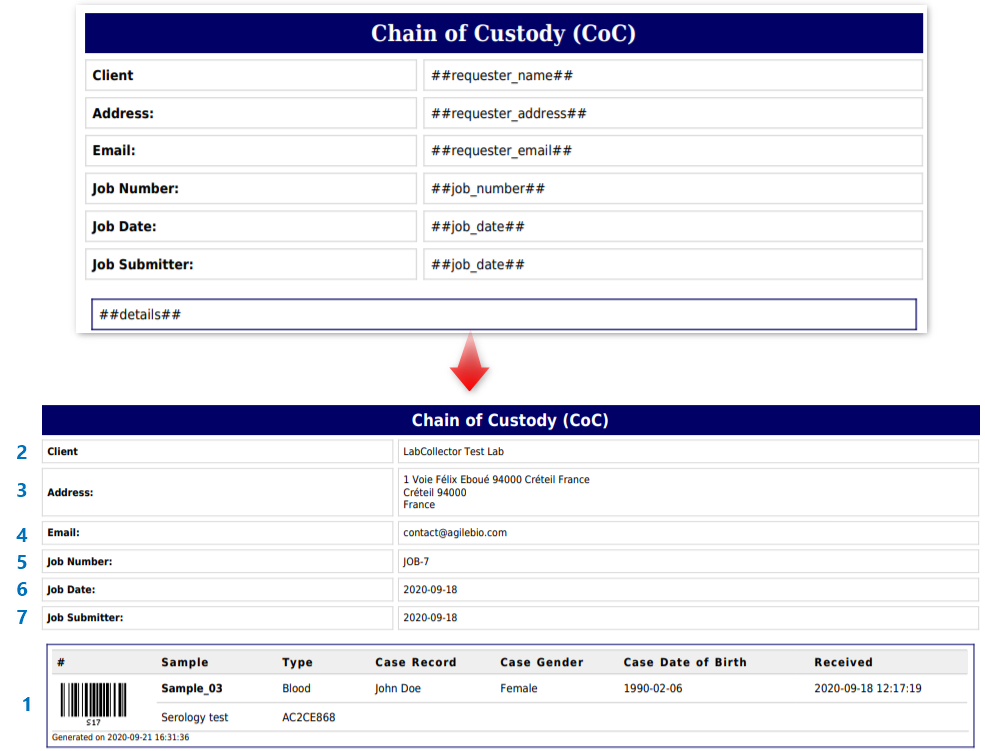
CoC (Chain of Custody) template
- Fields here can be used for a template for creating the chain of custody for samples.
- This template is important especially if you are receiving samples from another lab. Then the lab can use our LSMRemote application and create a CoC report for the samples.
*Please read our KB on how to create a CoC by submitting the order from LSMRemote. - CoC can also have a token where a patient can directly access their report.
*Please see our KB check on how the token number can be used to access the report directly by the patient.
| 1 | ##details## | Will be replaced by Chain of Custody (CoC) list (It will show the sample name, number with the barcode, test name, token number [under type], name of the patient, gender, and Date of birth and when the sample was received including time. It will also include the date and time the CoC will be generated). *Please see our KB check on how the token number can be used to access the report directly by the patient. |
| 2 | ##requester_name## | Will be replaced by requester name ( LSM-> ADMIN -> PREFERENCES -> CONTACTS -> REQUESTERS) |
| 3 | ##requester_address## | Will be replaced by requester address ( LSM-> ADMIN -> PREFERENCES -> CONTACTS -> REQUESTERS) |
| 4 | ##requester_email## | Will be replaced by requester email ( LSM-> ADMIN -> PREFERENCES -> CONTACTS -> REQUESTERS) |
| 5 | ##requester2_name## | Will be replaced by secondary requester name ( LSM-> ADMIN -> PREFERENCES -> CONTACTS -> REQUESTERS) |
| 6 | ##requester_code## | Will be replaced by requester code ( LSM-> ADMIN -> PREFERENCES -> CONTACTS -> REQUESTERS) |
| 7 | ##requester_contact## | Will be replaced by requester contact person ( LSM-> ADMIN -> PREFERENCES -> CONTACTS -> REQUESTERS) |
| 8 | ##requester_phone## | Will be replaced by requester phone number ( LSM-> ADMIN -> PREFERENCES -> CONTACTS -> REQUESTERS) |
| 9 | ##requester_fax## | Will be replaced by requester fax number ( LSM-> ADMIN -> PREFERENCES -> CONTACTS -> REQUESTERS) |
| 10 | ##job_number## | Will be replaced by job number (While creating the job the number will be assigned to the job) |
| 11 | ##job_date## | Will be replaced by job date (While creating the job will be considered as job date) |
| 12 | ##job_id## | Will be replaced by job identifier (While creating the job an ID will be assigned to it automatically) |
| 13 | ##priority_level## | Will be replaced by job priority level (routine, urgent or same day) |
| 14 | ##job_submitter## | Will be replaced by the job submitter’s name (The person who creates or submits the job) |
 |
||
-
Batch report template
- Fields here can be used for a template for the batches.
- This report is important in scenarios where you run 100’s of tests every day in form of batches.
- A batch report can help you see all the samples in the batch and tests performed.
- To create a batch report go to LSM-> JOB LIST -> GROUP BY -> BATCH-TEST-SAMPLE -> OPTIONS -> Report -> PDF
| 1. | ##details## | Will be replaced by batch samples list (This option will show sample ID, test name, equipment used, requester-lab requesting the test, and the date/time the report was generated on.) |
| 2. | ##batch## | Will be replaced by a batch (This will show the batch name.) |
 |
||
-
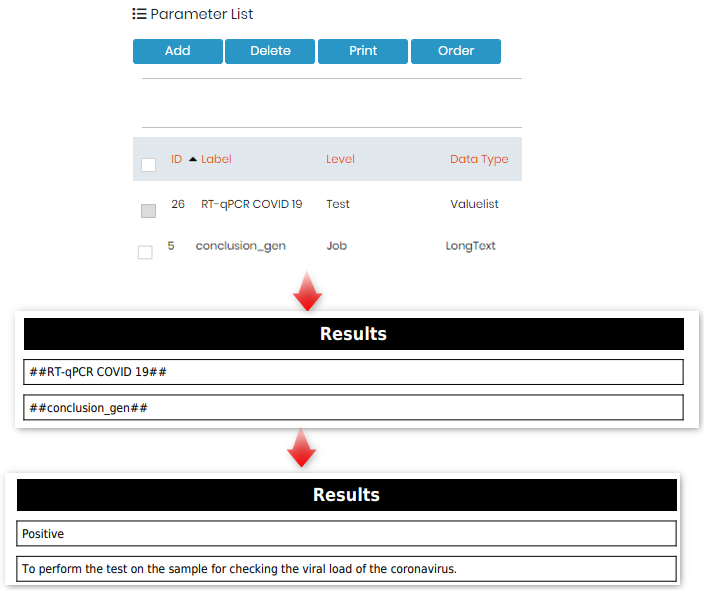
Dynamic tags
- You can use these custom tags in your report.
- For example, if you made a parameter at a job or sample level and you want that parameter to appear in your report. All you have to do is add ## sign around the parameter name.
Any parameter can be used as tag adding ## around it. e.g. ##tag_name## or alternatively ##{test ID}_{parameter_ID}##
For case record fields prepend case_. e.g. ##case_field_name## - To display the parameter’s phrase, all you have to do is append “_phrase”. e.g. ##parameter_name_phrase##
- To display the parameter’s comment, all you have to do is append “_comment”. e.g. ##parameter_name_comment##
- For case record fields, prepend “case_”. e.g. ##case_field_name##
- For attached modules fields, prepend the module code_. e.g. ##IS_field_name##
- Once you complete the job and create a report for the job, the values you put for parameters will appear in your report.
* Take care that the tags are case & space sensitive, so write them exactly as you have written them in parameters.
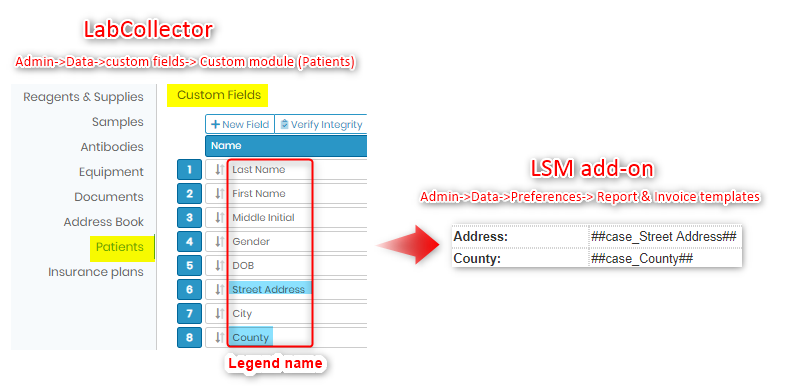
- Dynamic tags from a custom module
- You can activate an option for “Case record” in LSM to connect.
* Please read our KB on how to activate case record. - The case record information is stored in custom module. For example, if you are doing tests related to samples from hospitals, you can create a custom module called “Patients” and connect this module with LSM.
- The LSM generally activated case record that connects custom modules with 3 information : Case record name, gender & date of birth. However, you can have other information related to sample that you would like to import from the custom module directly into the LSM report using dynamic tags as explained in this KB. See above points 21, 22, 23 from section result template/processing template.
- Thus you can use create custom dynamic tags from the custom module connected to LSM’s case record.
- For example, if the custom module is a patients modules, you might want to import information like patients phone number, insurance, email, address, etc. apart from his name, gender or date of birth.
- To do so, you can create tags like “case_LEGEND NAME”. The legend name is the field name. For example see below the field name from a custom module and its use in report template as dynamic field.
- You can activate an option for “Case record” in LSM to connect.
- Date format
- All dates follow the date format set in general settings.
- Dates tags support format as ‘date’ appending the modifier #D or ‘datetime’ appending the modifier #DT e.g. ##report_date#D##
Related topics:
- Please see the KB on how to create invoices.
- Please read our KB to know more about how to create parameters.
- Please read our KB to know more about how to activate case records.
- Please read our KB to know more about how to create reports.
- Please read our manual for more info.
- Check our KB on LSM usage guide from jobs to reports creation.
- Please see our KB check on how the token number can be used to access the report directly by the patient.
- Please read our KB on how to create a CoC by submitting the order from LSMRemote.
