Search Knowledge Base by Keyword
What’s Equipment Scheduler add-on? And how to use it?
![]() The Equipment Scheduler add-on for LabCollector
The Equipment Scheduler add-on for LabCollector ![]() is a powerful and versatile tool that allows you to easily manage and keep track of your laboratory equipment booking schedule. With this add-on, you have the ability to create an unlimited number of reservations, ensuring that your equipment is always available when you need it. The add-on also comes equipped with a comprehensive reporting tool, which allows for greater traceability and oversight of your equipment usage, which makes it an ideal solution for research projects and technical platform service activities, where equipment availability and usage is of paramount importance.
is a powerful and versatile tool that allows you to easily manage and keep track of your laboratory equipment booking schedule. With this add-on, you have the ability to create an unlimited number of reservations, ensuring that your equipment is always available when you need it. The add-on also comes equipped with a comprehensive reporting tool, which allows for greater traceability and oversight of your equipment usage, which makes it an ideal solution for research projects and technical platform service activities, where equipment availability and usage is of paramount importance.
The following Knowledge Base will provide a detailed overview of the capabilities and usage of this add-on, allowing you to fully utilize its features and optimize your equipment management.
![]()
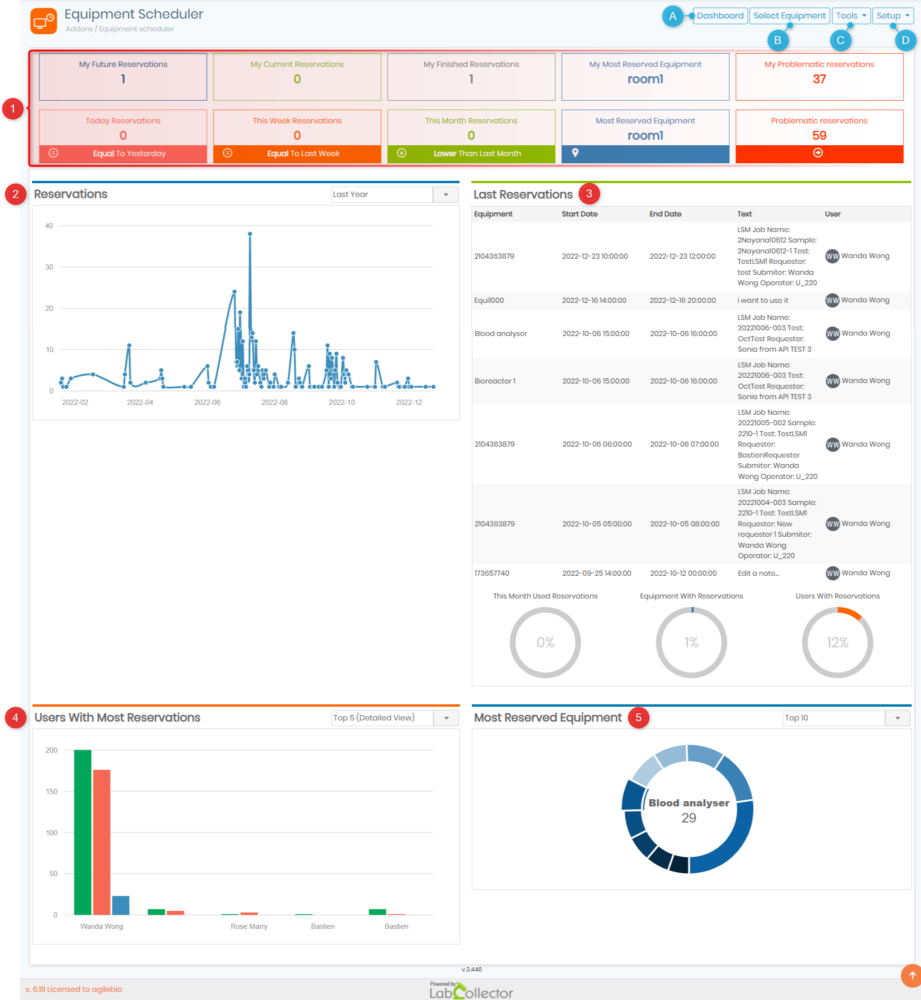
The screenshot below provides a comprehensive visual representation of the main interface of the Equipment Scheduler add-on. The interface is designed with a user-friendly and intuitive layout, making it easy for users to navigate and manage their equipment reservations, it also offers the flexibility to view the schedule by day, week, month, or year, providing you with an overview of your equipment usage.
- A: When you click on
 located on the top right corner of the page, you will be redirected to the page shown in the screenshot above. This is the default page you will see when you first access the add-on, it is designed to provide you with an overview of all the important information related to your reservations:
 - Please refer to the numbers on the screenshot above:
- 1: In this section, you will find multiple widgets that display all the necessary numbers about today’s reservations, as well as current, future, and finished reservations. Additionally, you will have an overview of the most reserved equipment and any problematic reservations (both your own and those across all equipment globally). This will help you to quickly identify and resolve any issues that may arise, you will also be able to compare this week’s, month’s, or today’s numbers to previous ones, allowing you to know if they are lower, higher, or equal to the ones before, which helps track the performance of your reservations over time.
- 2: On this page, you will see a graph that displays the number of reservations per day. You can view this graph for the past couple of days, months, or even for the last year, giving you a clear understanding of your reservation trends.
- 3: You are also provided with a comprehensive and up-to-date list of equipment reservations. You will find detailed information including the equipment names, reservation start and end dates, brief descriptions of their usage, and the responsible user for each reservation.
- 4: Here you have an intuitive and informative bar diagram representation of the users with the most equipment reservations. With the ability to filter and view the top 5, top 10, or even top 15 users, you can easily identify the lab members who frequently reserve equipment and plan accordingly. This feature allows for a clear understanding of equipment usage patterns within the lab, and can aid in ensuring that all members have fair access to equipment.
- 5: In this section, you have a clear and comprehensive pie chart representation of the most frequently reserved equipment. With the ability to filter and view the top 5, top 10, or even top 15 equipment, you can easily identify which equipment is in high demand and plan accordingly.
- B: When you click on
 you will be redirected to the page shown in the screenshot below.

-
- 1: In this section, you can easily find and reserve the equipment you need by filtering them based on their location. Once you’ve selected your desired location, the drop-down menu below will get updated, displaying all the available equipment within the selected location. You can then add/edit a reservation. Furthermore, you can easily identify your favorite equipment (displayed in green) and the ones that are blocked (displayed in red), as shown below.

-
- 2: Here you will have access to a calendar with all the equipment that were selected as favorite (as shown in the screenshot below). You can then make reservations directly by selecting time periods on the scheduler and choose your start hour, then drag and drop until the end.

-
-
- 1: To view public notes about all available equipments click on the following icon
 found in the top left corner, you can also import your calendar by clicking on
  or export the one you are working on by clicking on
  . Finally, to print your caledar, all you have to do is click on the printer icon
  .
. - 2: Here you can filter your calendar view, either per day, week or month, you can also view the timeline for all selected equipment in order to monitor their usage with precision.
- 3: You can swipe your calendar to the left (to view past dates), or to the right (for future dates), you can also click on the icon
 to swith the full screen mode.
- 1: To view public notes about all available equipments click on the following icon
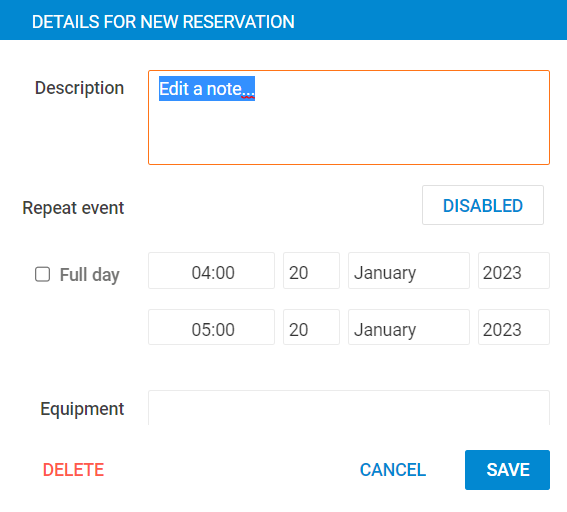
- when you select a reservation window, a new tab will appear prompting you to add details, such as a brief description, name of the equipment, and the ability to make the event repetitive or not.
-
-
- 3: Reservations can be made using the equipment category selector.
- 4: With this option, users can define a date, time and an equipment category. Regarding these settings, the Scheduler add-on automatically finds available equipment within the selected category. To make a reservation, users have to click the icon displayed in the screenshot below. Then select the desired time in the calendar and add notes about the reservation.

- C: You have multiple tools to choose from within the Equipment Scheduler add-on, which are accessible by clicking on
 located in the top right corner.
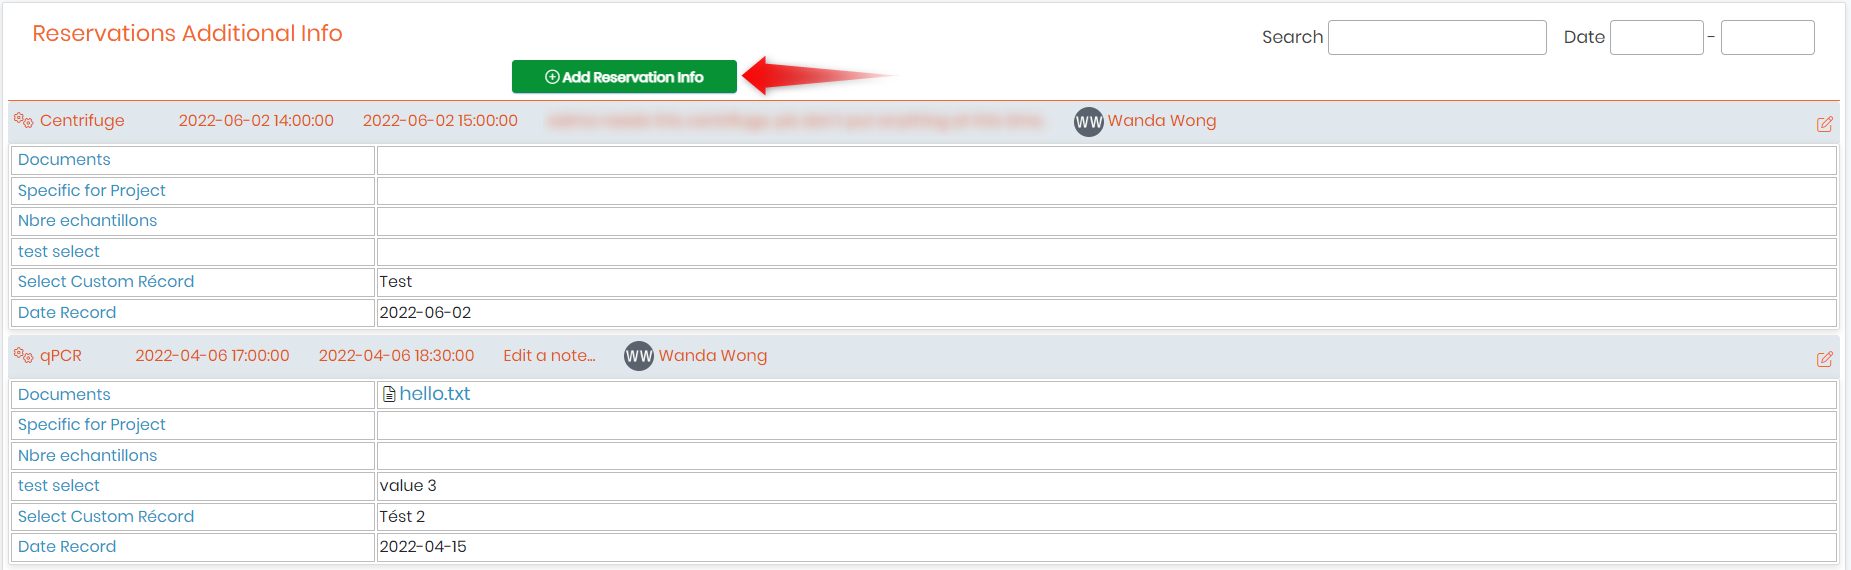
- When you click on Reservations Info within the tools menu, you’ll be directed to a page that provides you with all the additional information you need to manage your reservations. This page includes information like date, time, duration, notes, and any other custom field that you desire (which can be added through the setup menu). You also have the option to add more info by clicking on the green button (as shown in the screenshot below).
-
- The following tab appears when you click on EQ Notifications:

-
-
- 1: To create a new notification, simply select the date, choose the equipment you want to notify about, and add text using the editor provided. The editor allows you to add rich text making it easy to convey all the necessary information to your team members. Once you have finished, simply click on the “Write note” button to save and validate your notification.
- 2: For the super-administrator, the menu also provides the option to view equipment notes that were added by other users, making it easy to keep track of all the notifications across the team. They also have the option to print or export the notes, and filter them by selecting a time period or exact time limits, and use additional options such as user name and/or equipment name, which makes it easy to find specific notes.
-
-
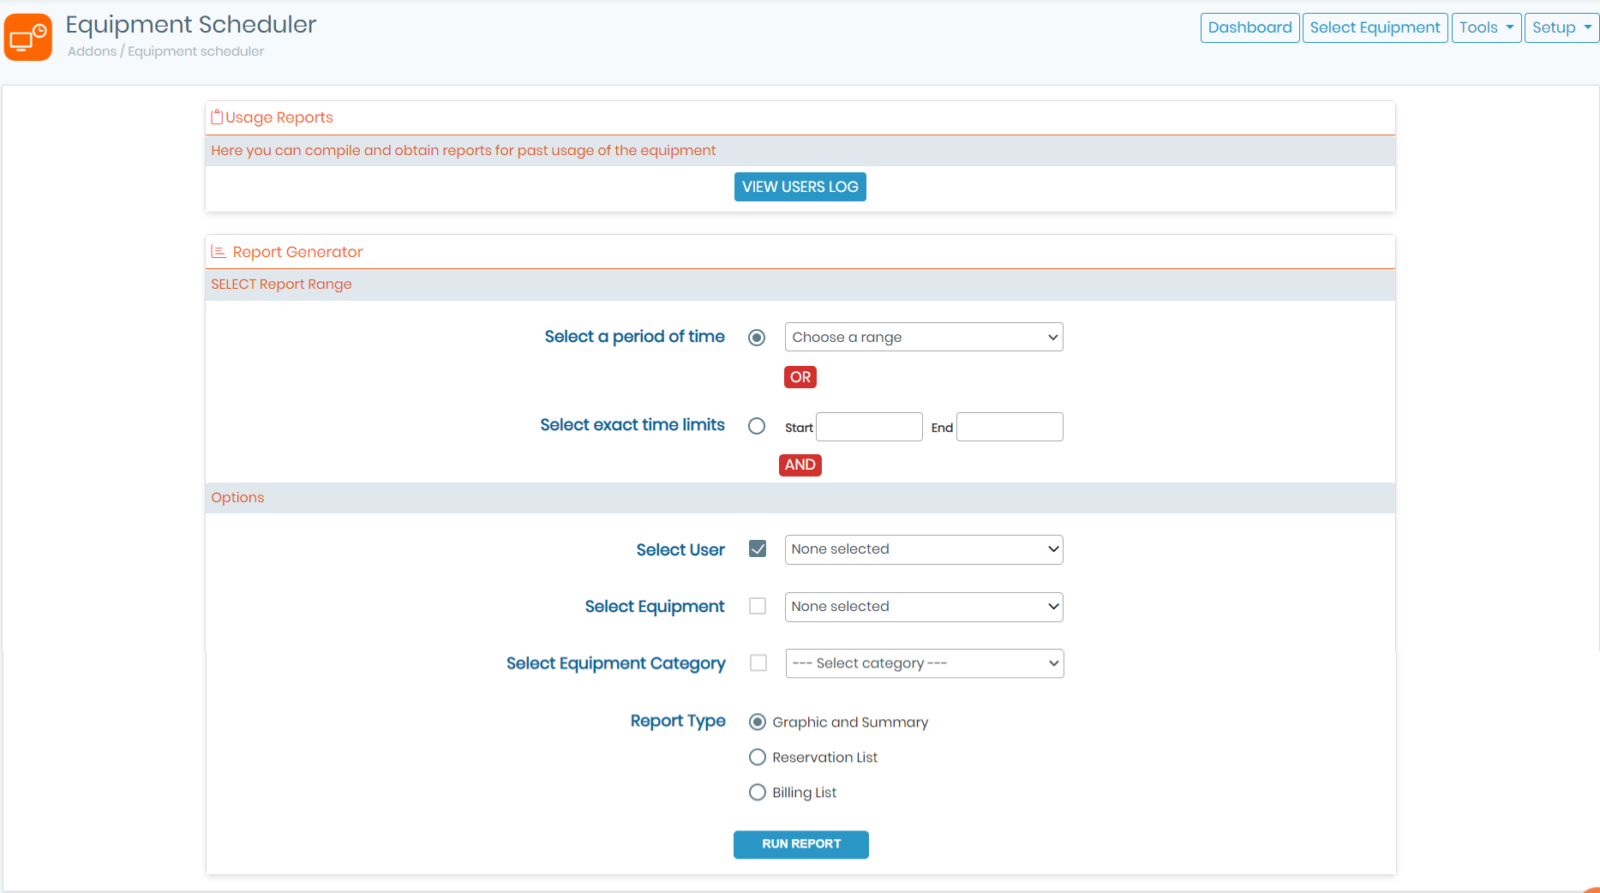
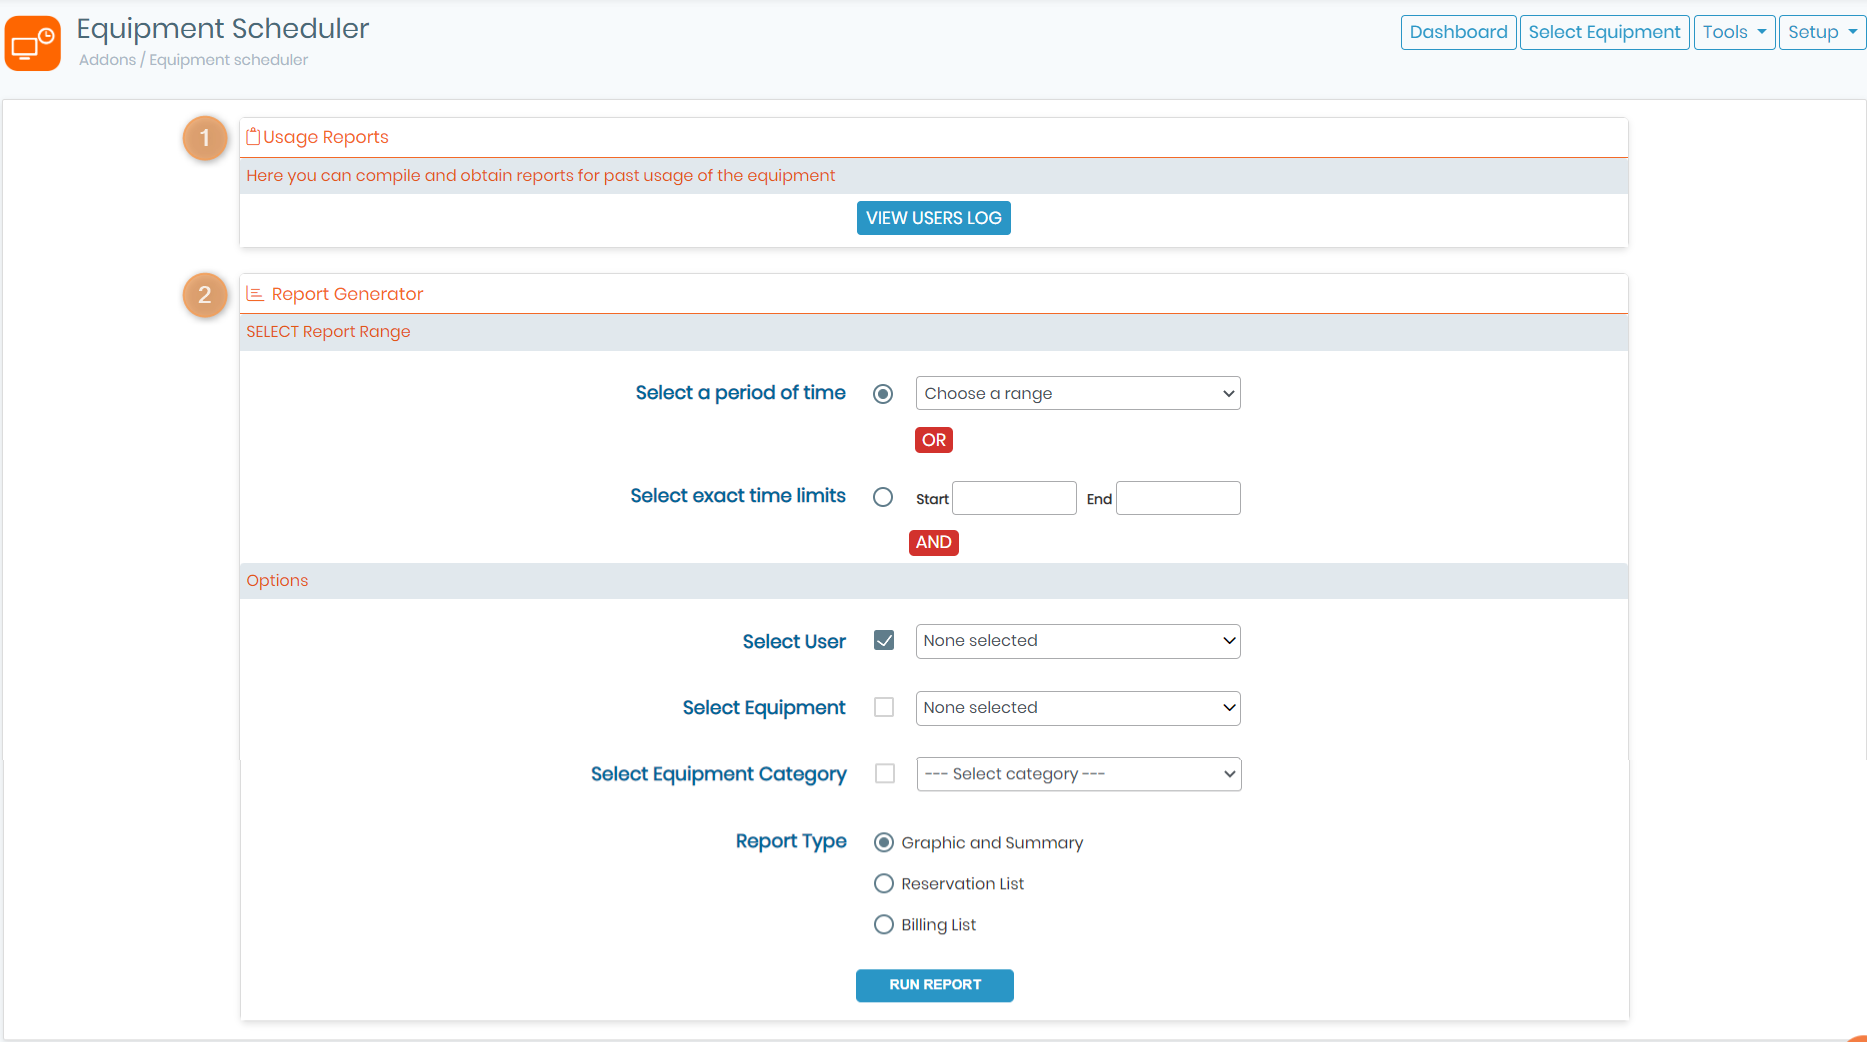
- The reporting tool within the Equipment Scheduler add-on is designed to provide you with a comprehensive view of your equipment activities and traceability. This powerful tool allows you to easily track and analyze the usage of your equipment, making it an essential tool for any laboratory, it is accessible by clicking on Reports within the Tools menu.
-
-
- 1: The first option available is to view users’ past usage only. With this feature, you can easily track and analyze the usage of your equipment by user, equipment or equipment category. This allows you to identify patterns, usage trends, and any potential issues with your equipment.
- 2: The second option available is to create more complete reports. This feature allows you to generate detailed reports for a time range, you can also select a user or an equipment or equipment category, this feature makes it easy to find the specific reports you need. Additionally, three reporting formats are available:
- Graphic and summary: This format provides you with a visual representation of your data, making it easy to analyze EQ usage.
- Reservation list: This format provides you with a list of all the reservations for a specific time period.
- Billing list: This format provides you with a list of all the billing information for a specific time period, making it easy to track and analyze the cost of your EQ usage.
-
-
- You also have the option to view all Problematic reservations, which are reservations that are causing issues or delays in the laboratory, such as equipment malfunction, scheduling conflicts, or any other issue. You will have a detailed list including the equipment name, time slot during which the problem occured, the user that ordered the reservation, location and also check-in/out dates.

- D: The Equipment Scheduler add-on offers a variety of settings that can be accessed by clicking on the setup button
 located in the top right corner. Here, you can set your favorite equipment, set alerts, manage users, create custom fields, manage your license, and much more. These settings allow you to tailor the add-on to your specific needs, making it easy to manage your equipment schedule and ensure your laboratory runs smoothly.
-
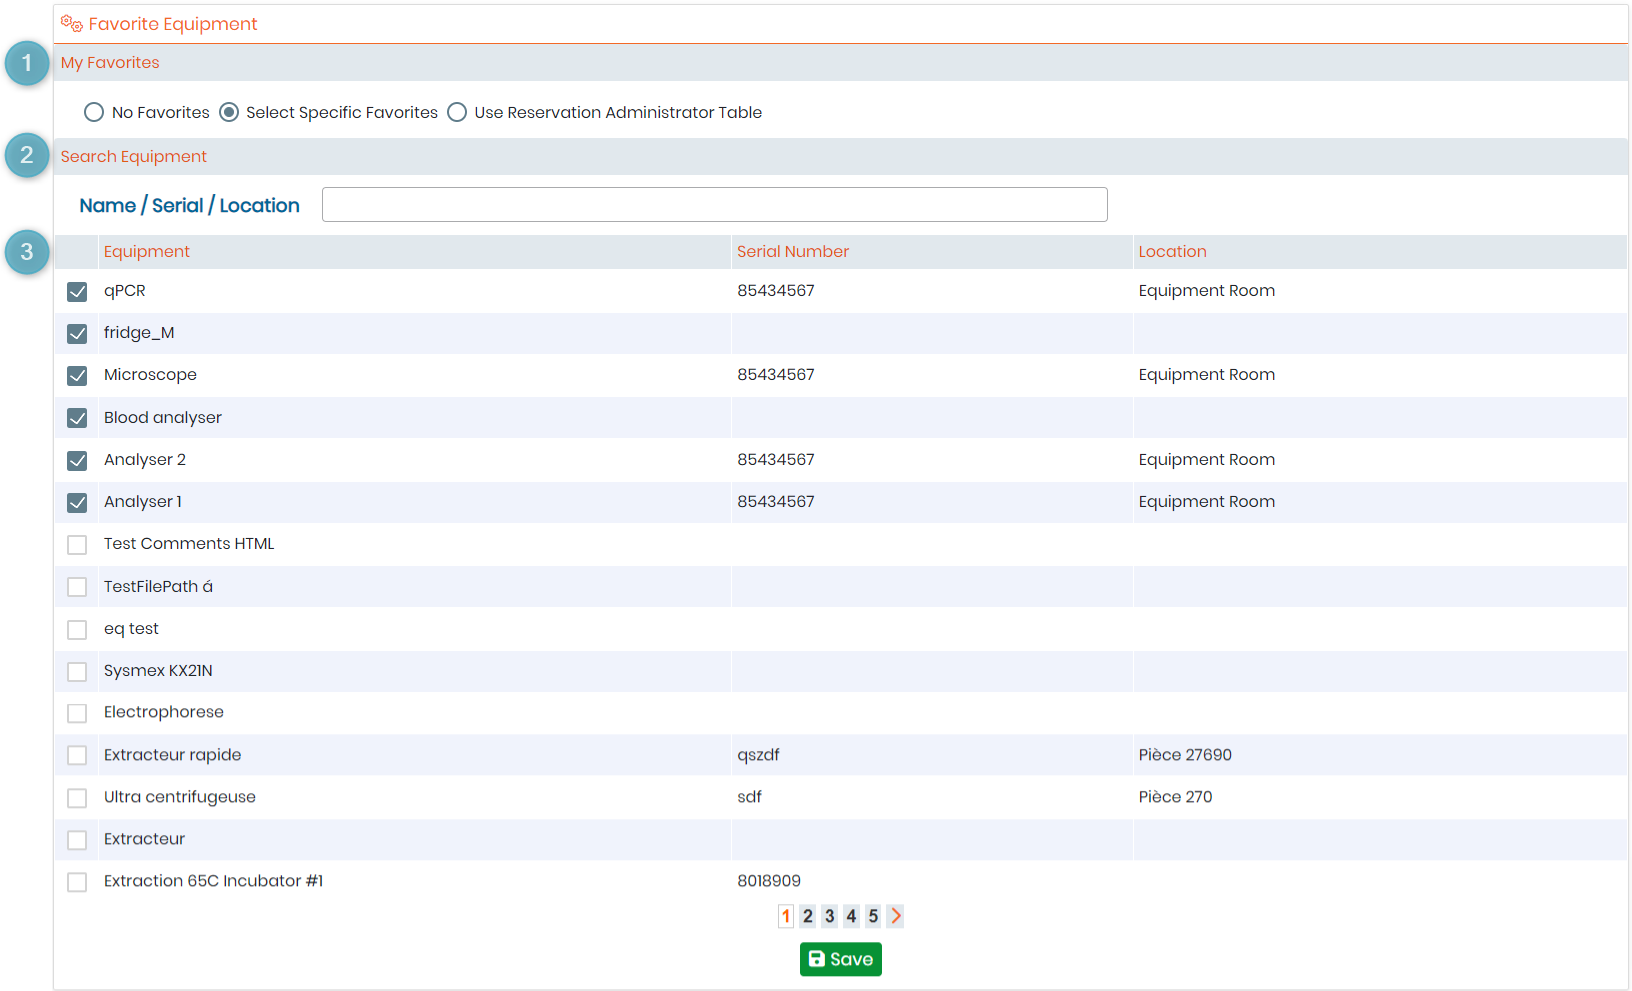
- The Favorites tab within the setup menu allows you to easily manage and reserve your favorite equipment. By setting some equipment as favorite, it facilitates your lab schedule and helps reserve them easily.
-
-
- 1: Here you can select whether you want to have no favorite equipment, select specific favorite ones, or use the reservation administrator table. Selecting specific equipment as your favorite will give you access to additional options (which are described in point 2 and 3 below) which allows you to easily reserve and manage them.
- 2: Here you can search for an equipment by inputting its name, serial number or even its location.
- 3: Here you have a detailed table with all the equipment that you want to set as your favorite. This table provides you with all the necessary information about the equipment, such as its location, serial number. You can also set an equipment as favorite by checking the box to the left and hitting the save button.
-
-
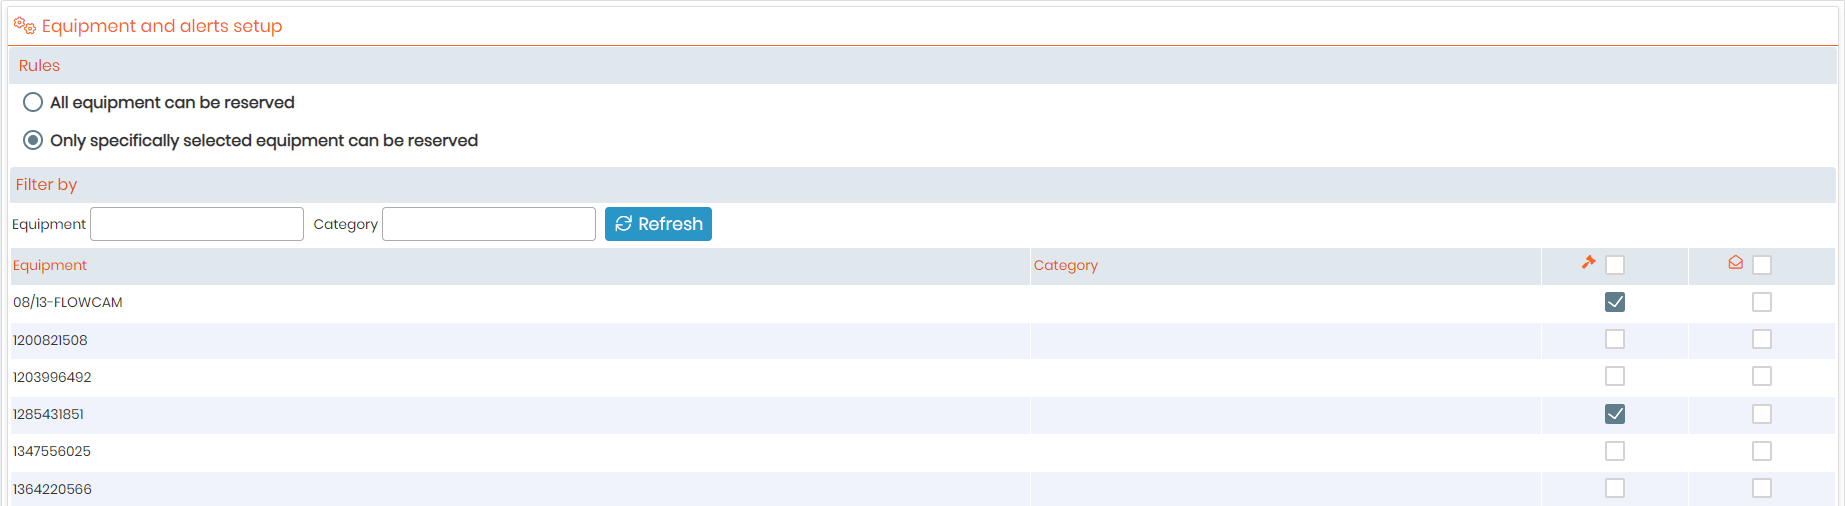
- The Equipment & Alerts setup provides you with the flexibility to choose which equipment can be reserved and which ones cannot. With the option to reserve all equipment or only specific ones, you have complete control over your laboratory’s equipment schedule. Additionally, you have the option to set an alert email that will be sent whenever an equipment is reserved. This feature allows you to stay informed and up-to-date on any changes to your equipment schedule, providing you with the peace of mind that your laboratory is running smoothly.
-
- Equipment Maintenance gives you the option to choose whether you want to block the reservation of all equipment whenever they are on maintenance or not, or even block that of specific ones.

-
- You can also manage your users’ equipment reservation, by clicking on Users within the setup menu. Here you can choose if all users *without exception can reserve any given equipment, or simply define specific rules and choose certain equipment that only selected users can reserve.

-
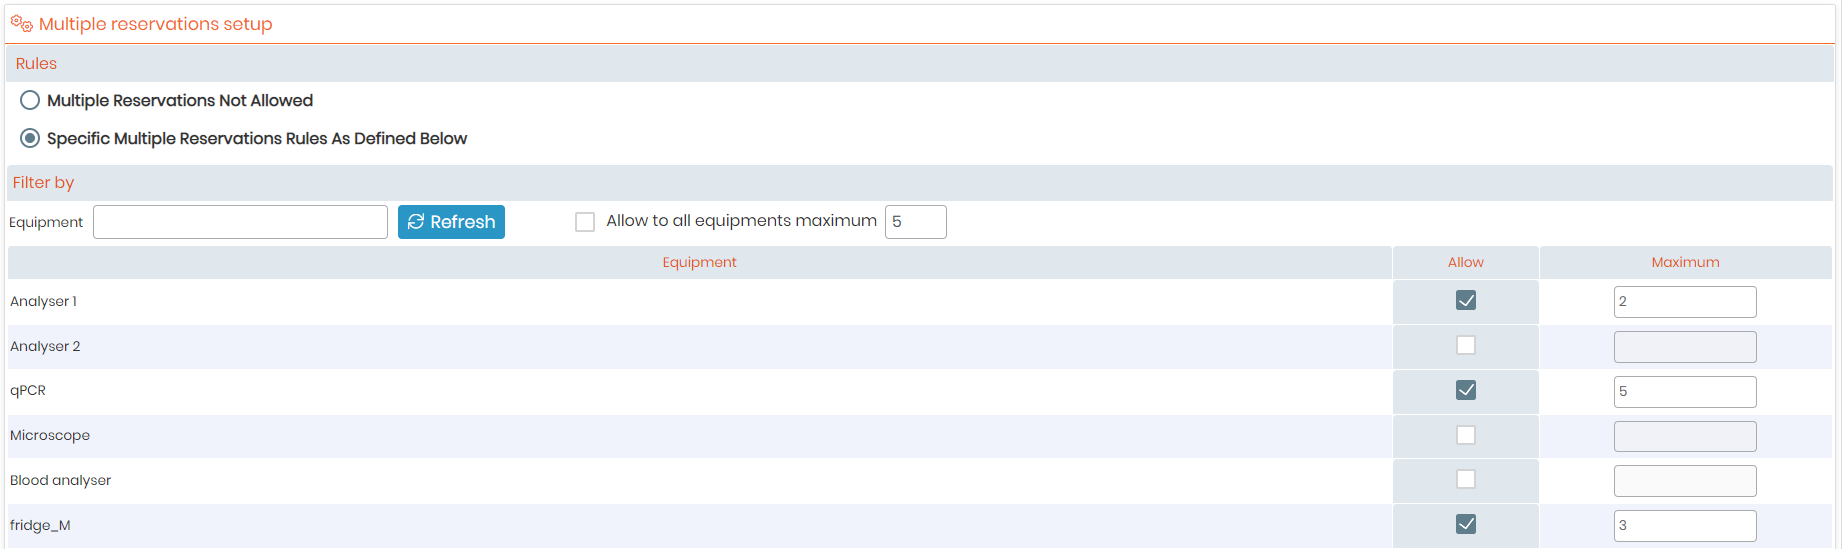
- You can also manage the number of reservations possible for your lab equipment. To do so, click on Multiple reservations within the setup menu. Here you can choose whether you want to define a certain number of possible reservations per equipment or keep it unlimited.
-
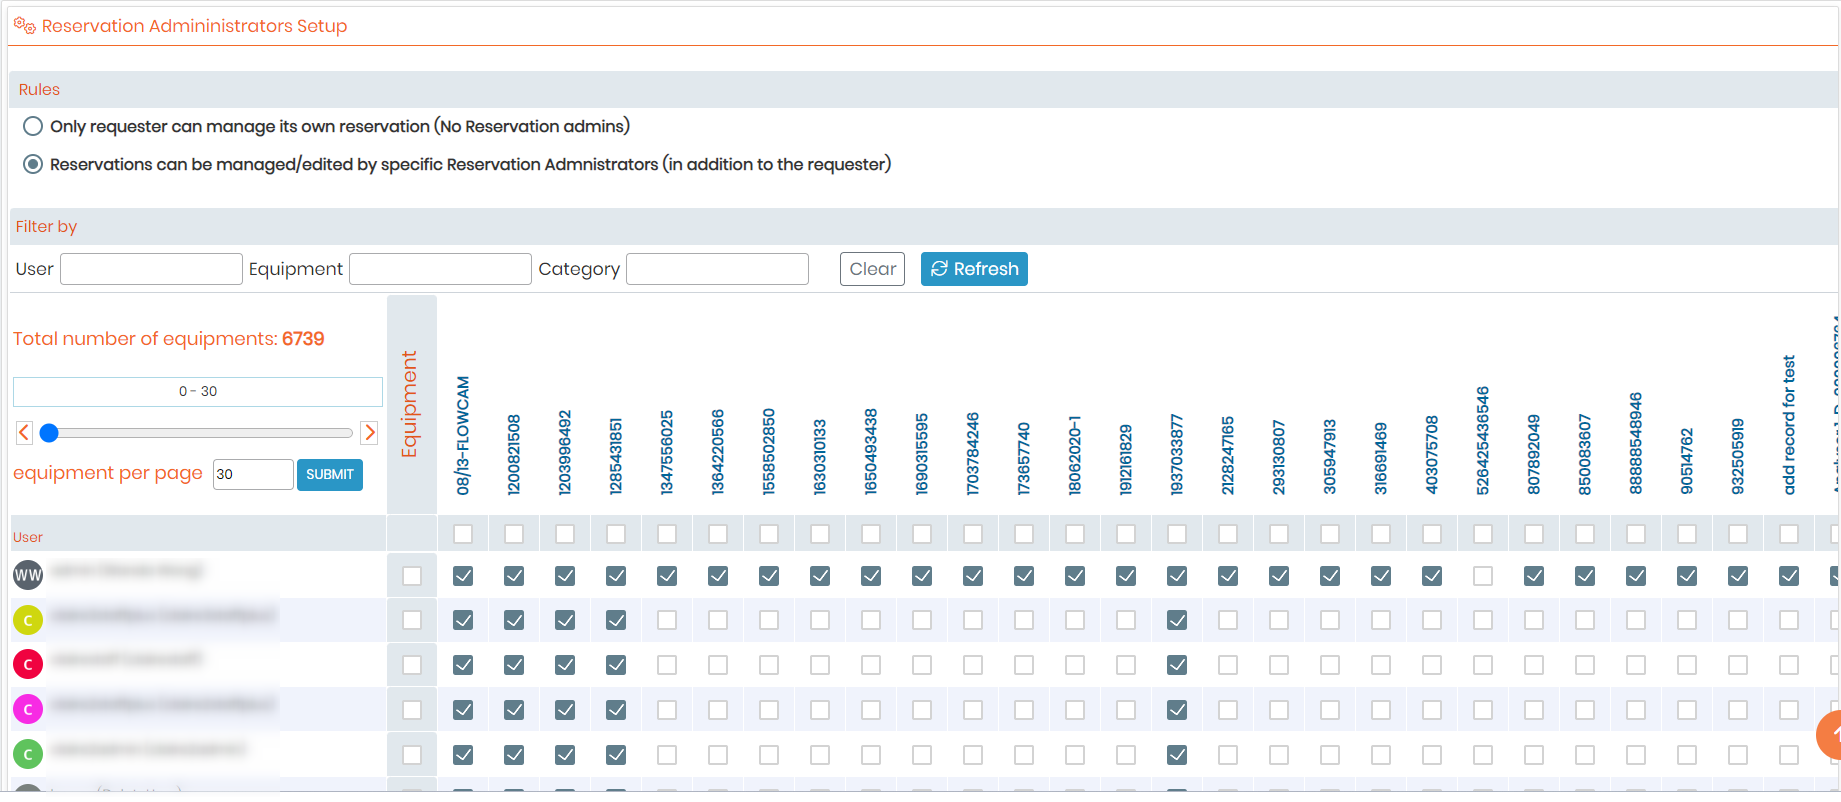
- By clicking on Reservation Administrators, you’ll have the option to give the requester full control over his/her reservation, therefore they can add reservations/modify existing ones, or you can set certains admins to manage/edit the reservations.
-
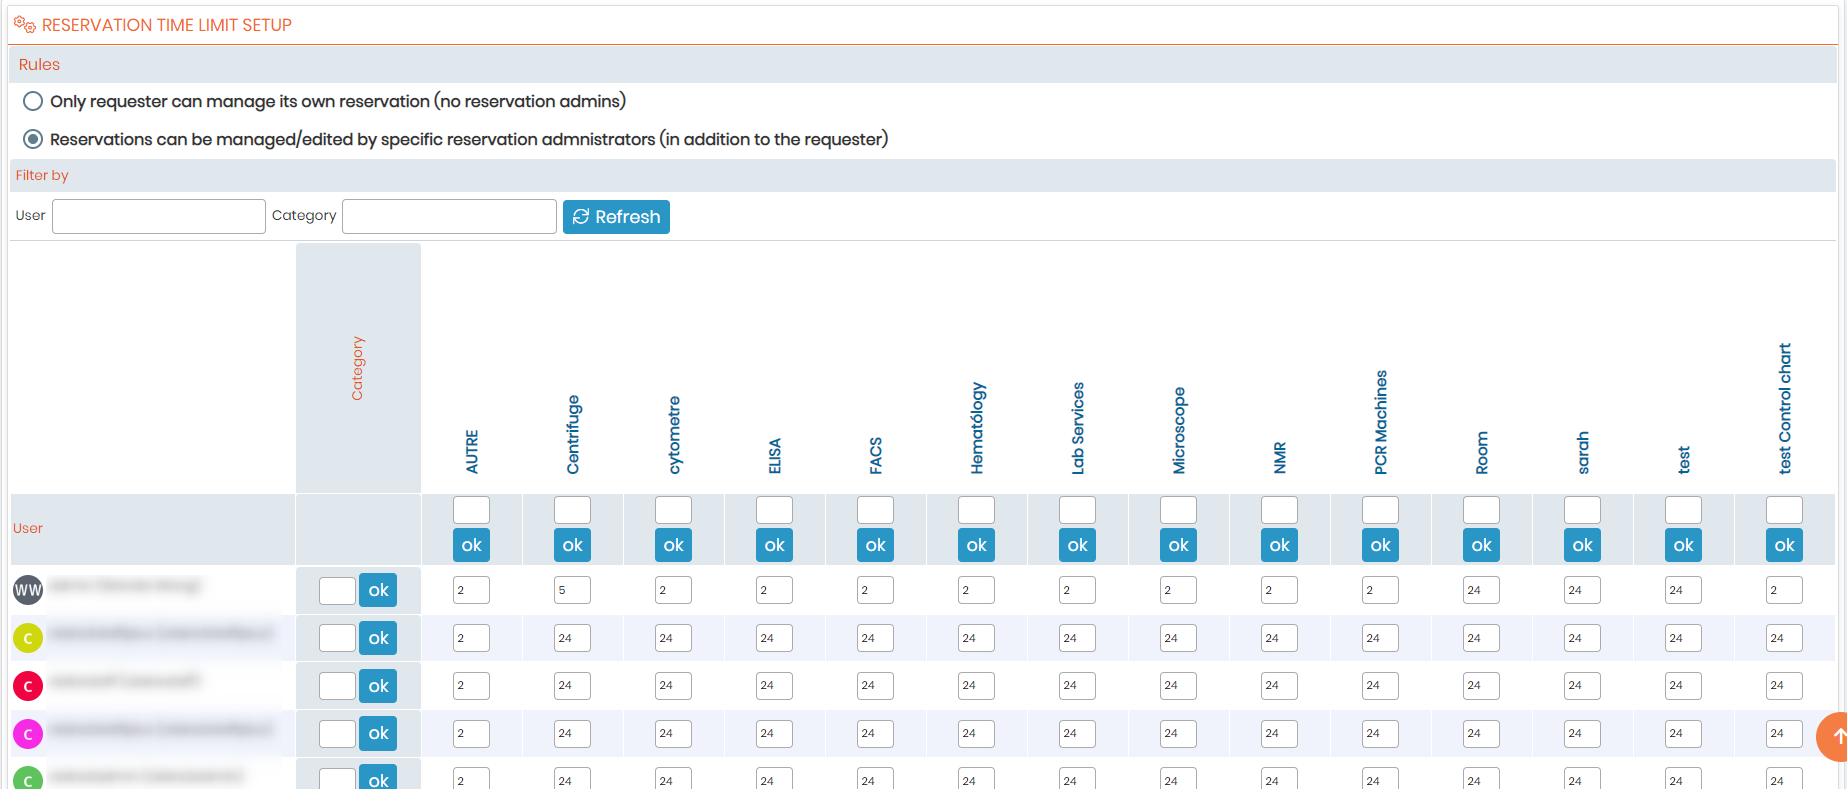
- By clicking on Reservation time limit, you’ll have the option to let the requester control his/her own reservation time limit, therefore they can reserve an equipment for any desired amount of time, or you can set certains admins to manage/edit the time limit for the reservation of each equipment.
-
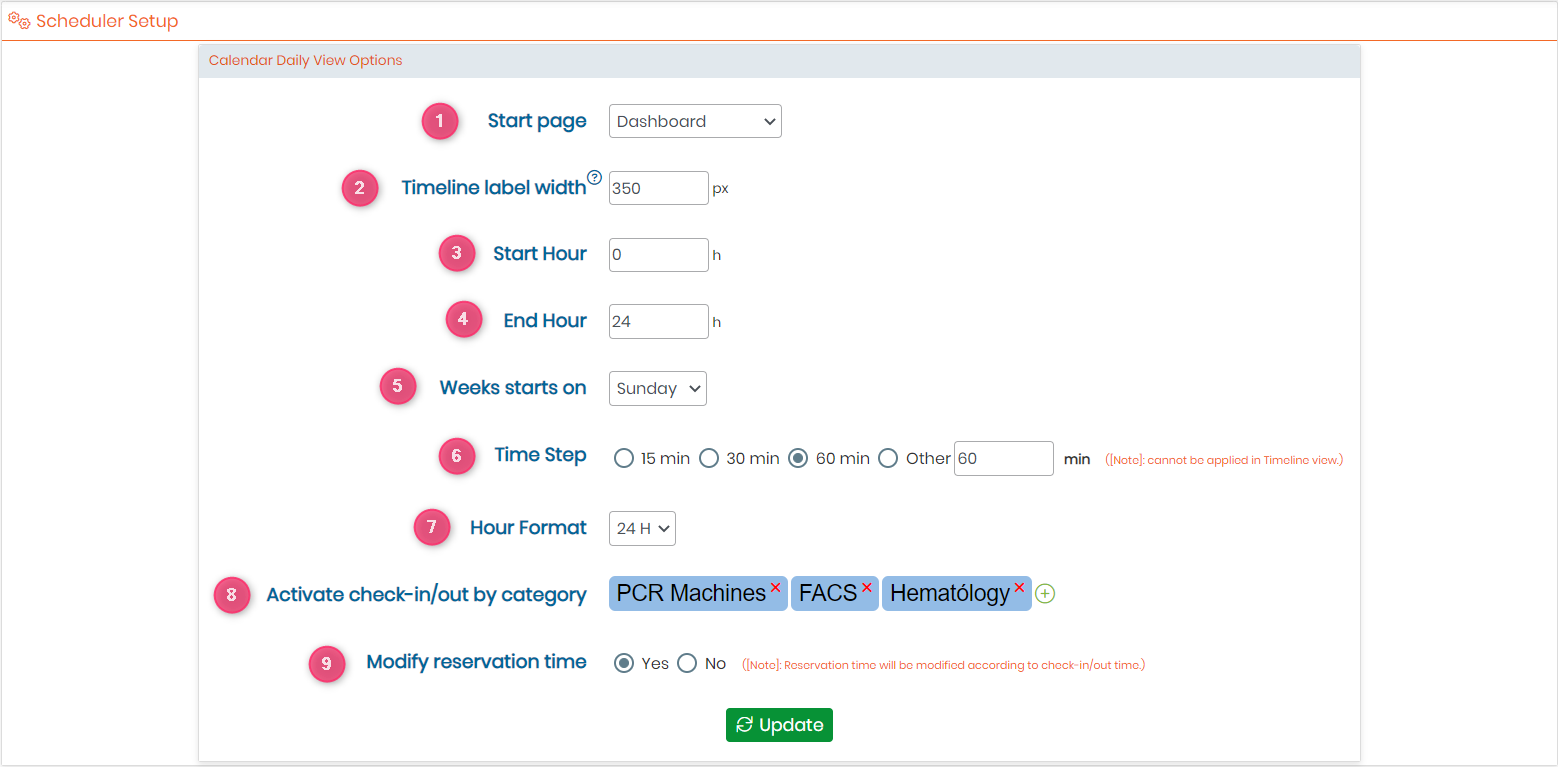
- You can always set your preferred options/settings for the Equipment Scheduler add-on. To do so, simply click on Scheduler within the setup menu.
-
-
- 1: Choose whether you want the Dashboard or the Select Equipment page to appear first (as a starting page) when you access the add-on.
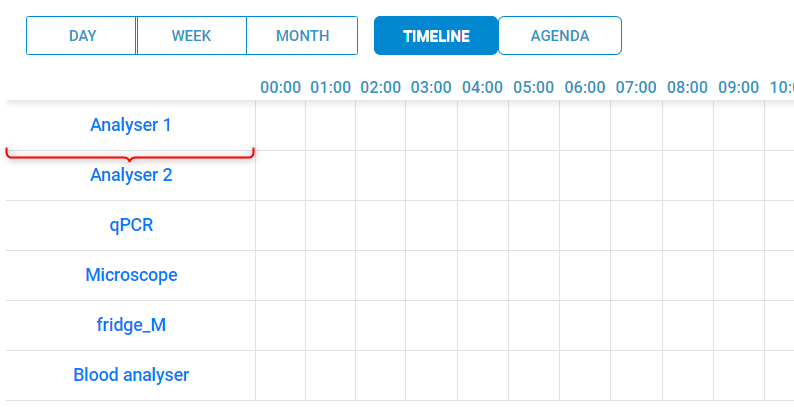
- 2: Set your preferred timeline label width which corresponds to the one in the screenshot below.
-
-
-
- 3: Choose the starting hour (at the beginning of your timeline), please note that it is set to 00:00 by default.
- 4: Choose the end hour (at the end of your timeline).
- 5: Choose which day correspond to the start of the week.
- 6: You have the option to set your preferred time step, either 15min, 30min, 60min, or any given number of minutes you require.
- 7: Select your hour format, either 12H or 24H.
- 8: Select the categories for which you want to activate check-in/out.
- 9: You can also modify the Reservation time, if you choose to do so, please note that it will be modified according to check-in/out time.
-
-
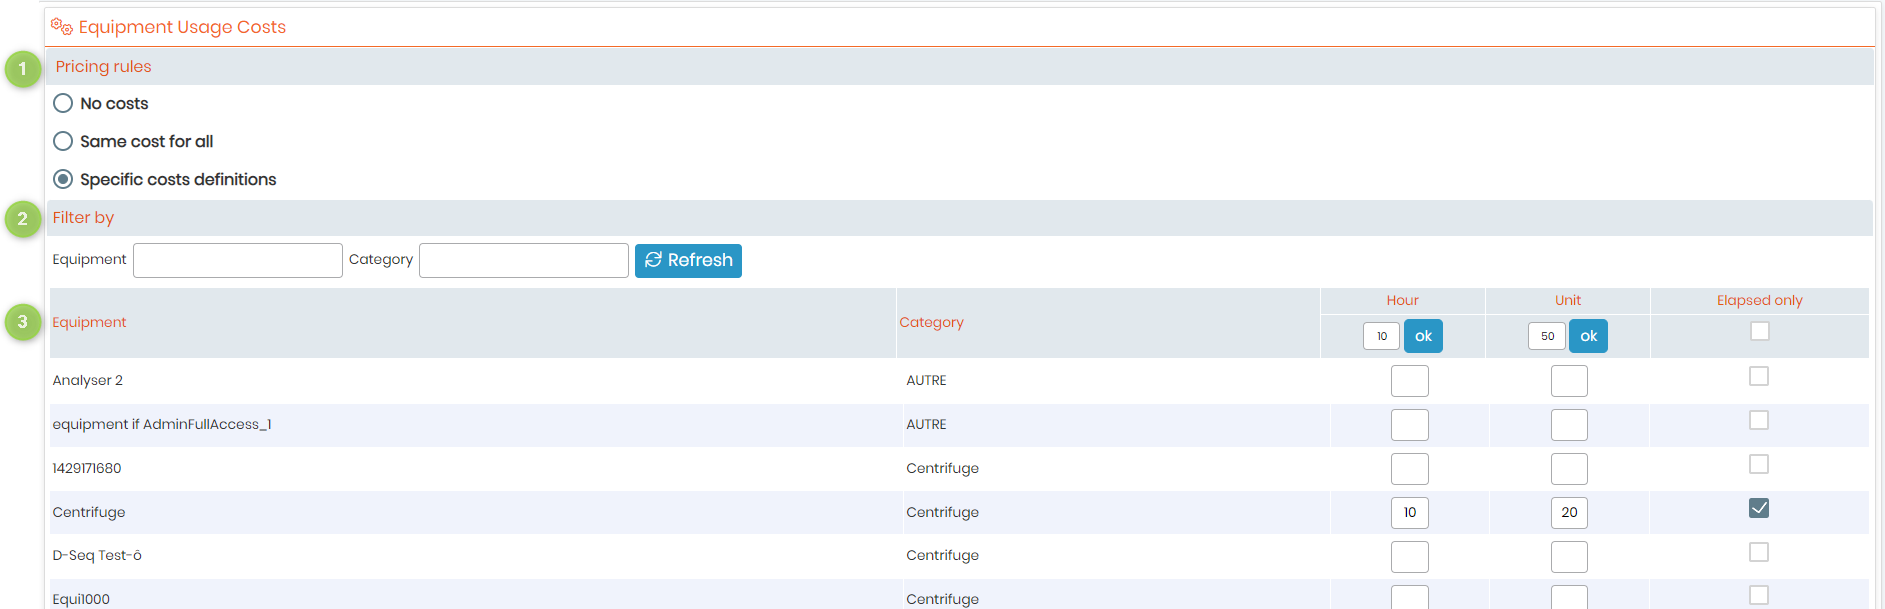
- Cost definitions allows you to effectively manage and monitor the cost of your laboratory’s equipment. With the ability to track and analyze the usage of your equipment, you can easily identify patterns and usage trends, and make informed decisions to optimize your equipment usage and reduce costs. It helps ensure that you stay within your budget, prevent overuse, and prolong your EQ lifespan.
-
-
- 1: Set your preferred pricing rules, whether you want your equipment to be reserved and used without any cost limit, or define the same cost for all equipment or even specific costs for each one of your EQ.
- 2: Here you can search for the equipment for which you want to set a usage cost, by inputting its name and/or category.
- 3: Here you can find a list of all the equipment you searched for, you can then set a time limit for their reservation and also a cost for each one of them.
-
-
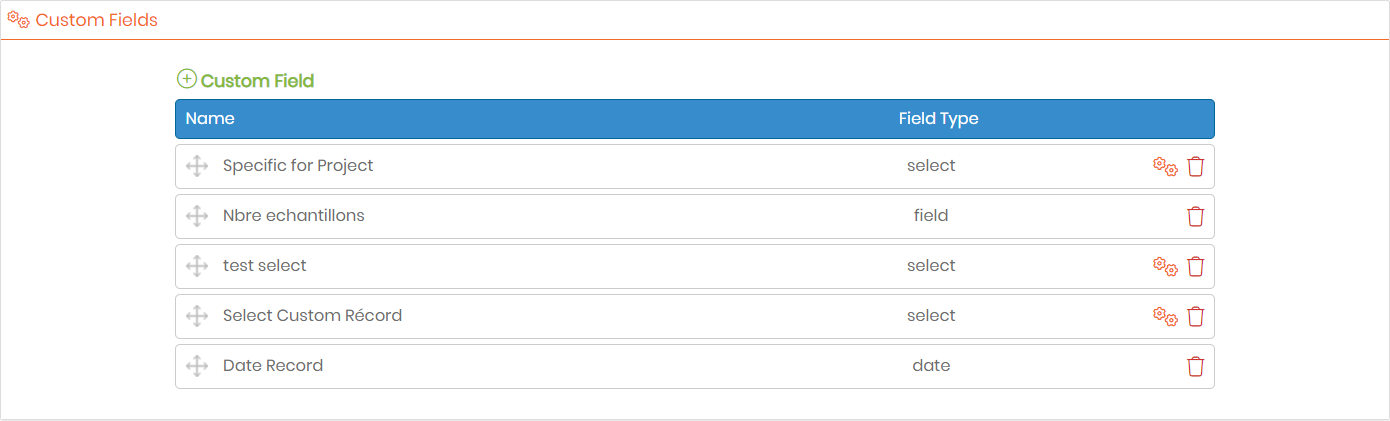
- You also have the option to create any given custom field that you require, simply click on Custom Fields, these fields can then be used in the reservations info tool, which helps you add customized information about your reservations, you also have the choice to select different types of custom fields, check this KB for more details.
-
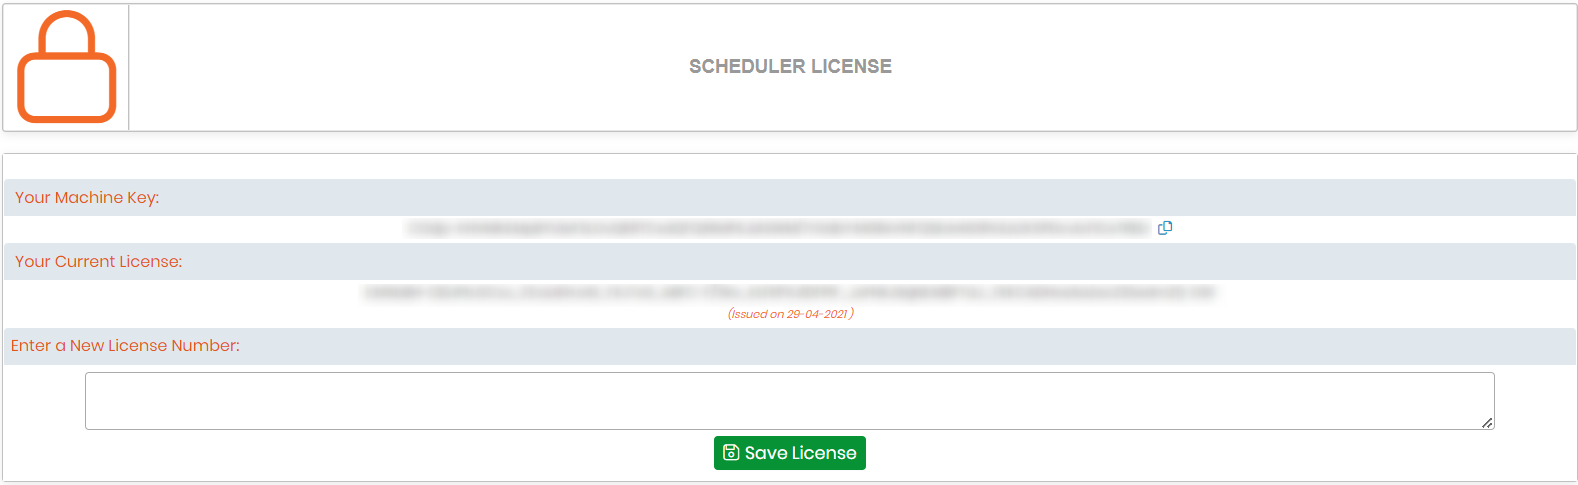
- Finally, you can manage your License and activation key through the License tab within the setup menu.
![]()
Related topics:
-
-
- Check our Equipment Scheduler manual for more details.
- Read our KB on How to change parameters in I-Collector.
- Read our KB on How to connect Parser to I-Collector.
-
