Search Knowledge Base by Keyword
How to use Transnetyx tool?
![]() is a leading provider of automated genotyping solutions for researchers. By utilizing their proprietary genotyping technology, Transnetyx offers fast, reliable, and cost-effective genotyping services. It eliminates the need for manual processes, saving valuable time and effort in the laboratory. Their genotyping services are available for mice, zebrafish, rats and more. You can visit their website by clicking on the following link.
is a leading provider of automated genotyping solutions for researchers. By utilizing their proprietary genotyping technology, Transnetyx offers fast, reliable, and cost-effective genotyping services. It eliminates the need for manual processes, saving valuable time and effort in the laboratory. Their genotyping services are available for mice, zebrafish, rats and more. You can visit their website by clicking on the following link.
The following Knowledge Base will cover all the essential steps needed to fill out and send an order to Transnetyx, how you can view and check out the results you received, manage your strains, and much more!
Transnetyx is accessible via the Tube Sorter add-on ![]()
SUMMARY:
1. Introduction to Transnetyx
2. Integration benefits
3. Filling out and sending orders
4. Checking received results
5. Managing Strains
6. Settings
![]()
1. Introduction to Transnetyx:
![]() revolutionizes genetic analysis with automated genotyping solutions. Their advanced technology delivers fast, accurate, and cost-effective results, simplifying research and saving time. With Transnetyx, researchers can focus on their objectives while obtaining reliable genotyping data.
revolutionizes genetic analysis with automated genotyping solutions. Their advanced technology delivers fast, accurate, and cost-effective results, simplifying research and saving time. With Transnetyx, researchers can focus on their objectives while obtaining reliable genotyping data.
Genotyping plays a crucial role in understanding genetic variations, gene expression, and disease susceptibility. Traditionally, genotyping involved complex laboratory techniques and required significant time and resources. However, Transnetyx has simplified this process by offering a comprehensive, end-to-end solution that combines cutting-edge technology with exceptional data accuracy.
2. Integration benefits:
By partnering with Transnetyx, LabCollector ![]() users gain access to a highly reliable genotyping platform that delivers results with exceptional speed and accuracy. This integration further enhances the efficiency of the genotyping workflow, enabling seamless data transfer and result retrieval.
users gain access to a highly reliable genotyping platform that delivers results with exceptional speed and accuracy. This integration further enhances the efficiency of the genotyping workflow, enabling seamless data transfer and result retrieval.
3. Filling out and sending orders:
To fill out and send orders from LabCollector to Transnetyx, follow these steps:
a. Log in to LabCollector and navigate to the Tube Sorter add-on ![]() . Locate the Transnetyx tool, which can be accessed through the intuitive interface (as shown in the screenshot below).
. Locate the Transnetyx tool, which can be accessed through the intuitive interface (as shown in the screenshot below).
![]()
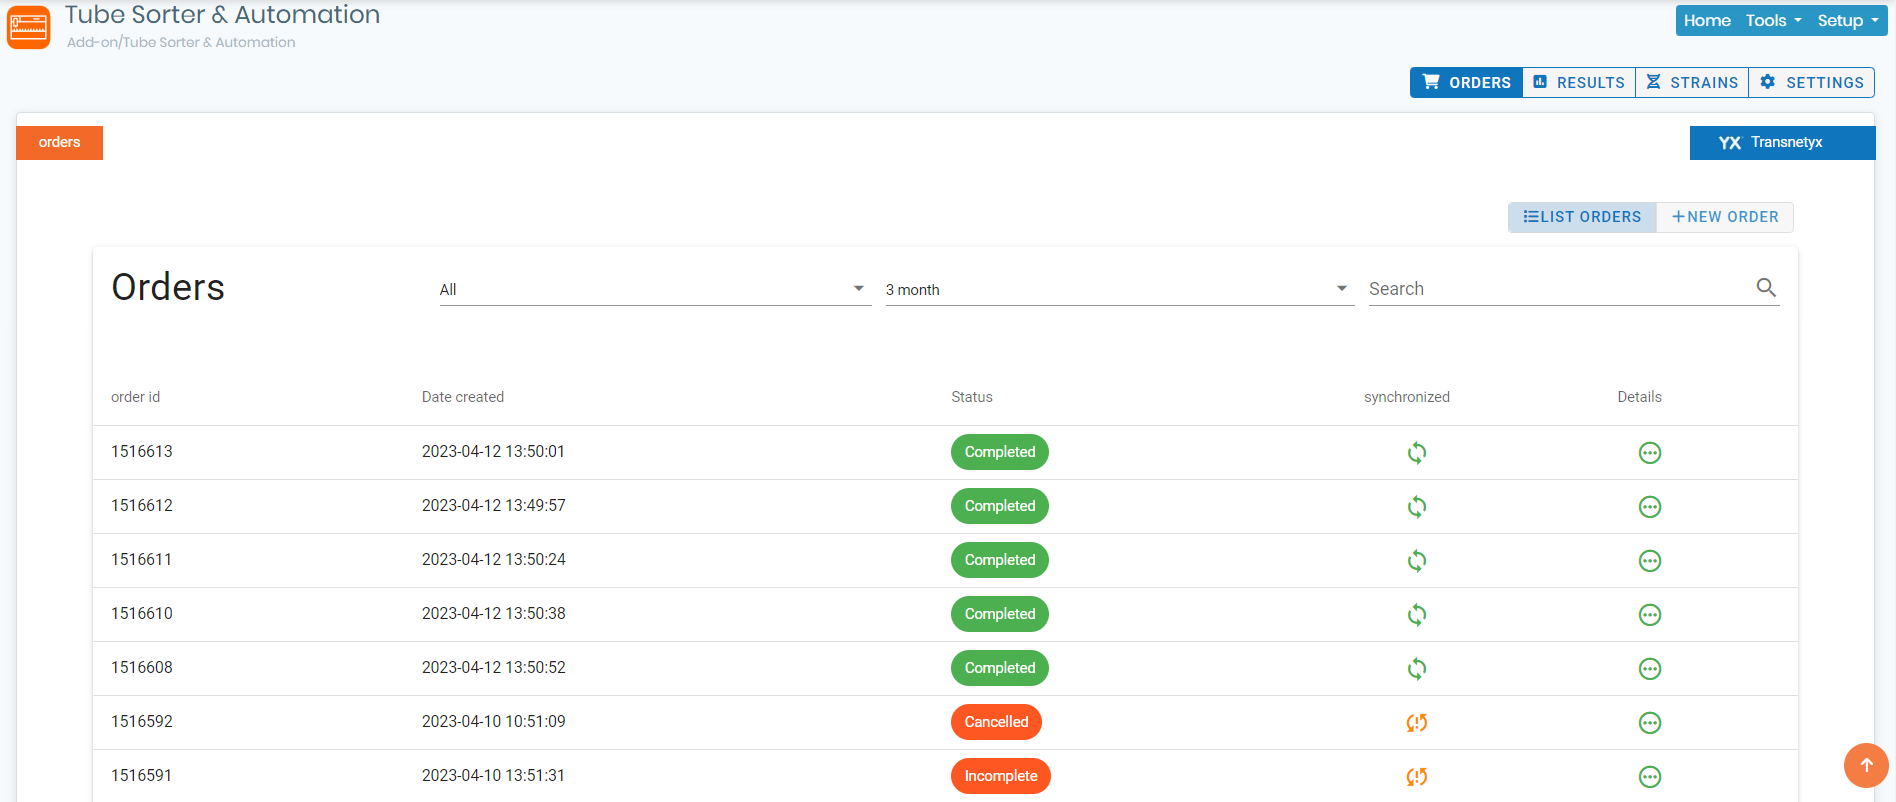
b. You can view the list of orders by clicking on ![]() (as shown in the screenshot below). This provides an overview of all previous orders, the interface offers various filter options based on order status. You can sort orders based on completion, cancellation, progress, incompleteness, receipt status (not yet received, partially completed, received but awaiting probe, received but the order was partial, etc.), and more.
(as shown in the screenshot below). This provides an overview of all previous orders, the interface offers various filter options based on order status. You can sort orders based on completion, cancellation, progress, incompleteness, receipt status (not yet received, partially completed, received but awaiting probe, received but the order was partial, etc.), and more.
For greater convenience, you can choose to view orders from specific time frames, such as the past few days, weeks, months, or even years. This flexibility allows you to focus on the relevant timeframe for your analysis.
To locate specific orders swiftly, you can utilize the search bar located to the right of the interface. Simply enter relevant keywords or order details to narrow down your search results.
Please note the following indications regarding synchronization status between LabCollector and Transnetyx:
- A successful synchronization is indicated by the following icon:
 This signifies that the synchronization between LabCollector and Transnetyx is functioning correctly.
 - In case the synchronization encounters any issues or failures, the icon will appear as:
 This indicates that the results are not synchronized between LabCollector and Transnetyx.
Monitoring the synchronization icon provides a visual cue for the status of data exchange between LabCollector and Transnetyx. It enables you to quickly identify if there are any synchronization issues that may impact the availability or accuracy of your genotyping results within LabCollector ![]()
.
-
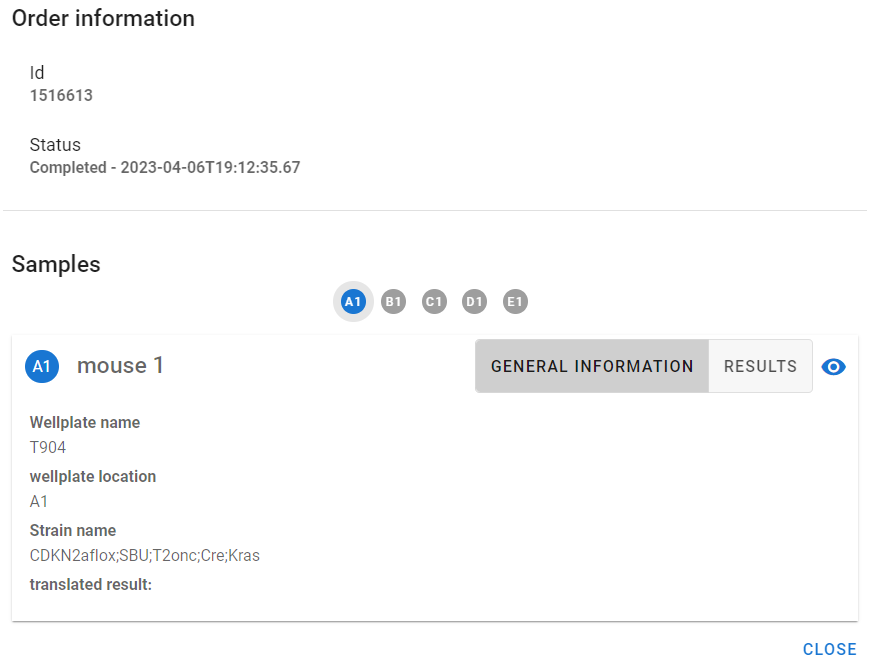
- Within the pop-up page, the general information section presents crucial details such as the wellplate name, wellplate location, and the corresponding strain name. This information helps researchers to quickly identify and locate specific samples within their genotyping workflow.
-
- In the screenshot below, you’ll notice the presence of a dedicated results section within the pop-up page. This section allows you to directly view all the results associated with the selected sample. The results include essential data points such as the probe ID number, probe name, probe result, and the corresponding ordinal value.
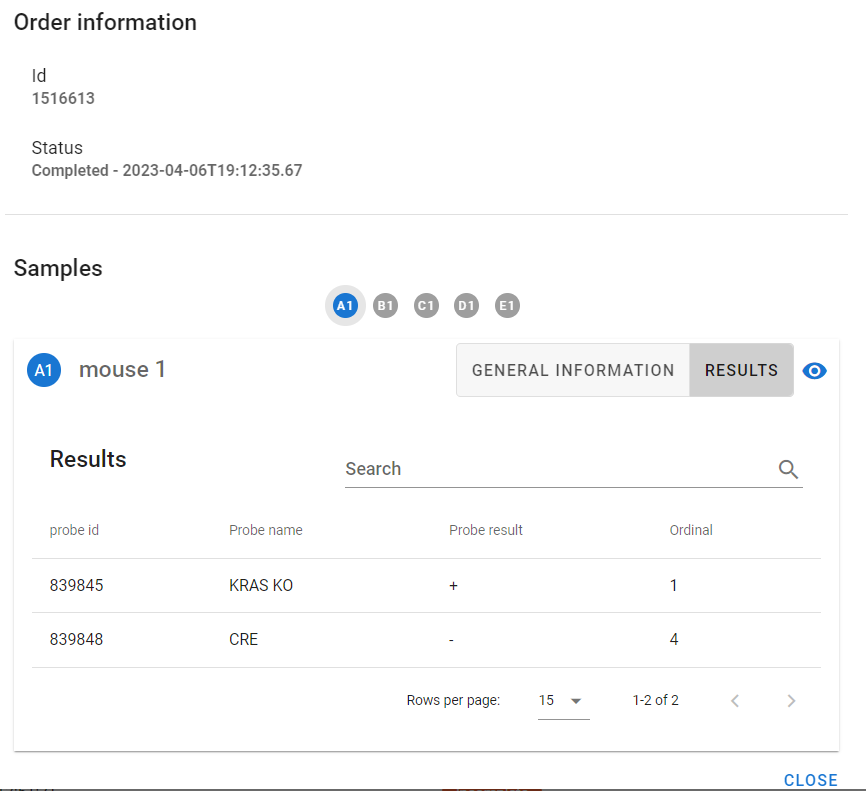
- In the screenshot below, you’ll notice the presence of a dedicated results section within the pop-up page. This section allows you to directly view all the results associated with the selected sample. The results include essential data points such as the probe ID number, probe name, probe result, and the corresponding ordinal value.
c. To create a new order, follow the below steps:
- Click on the designated button
 to initiate the creation of a new order. This will prompt a form where you can enter the relevant information for the order.
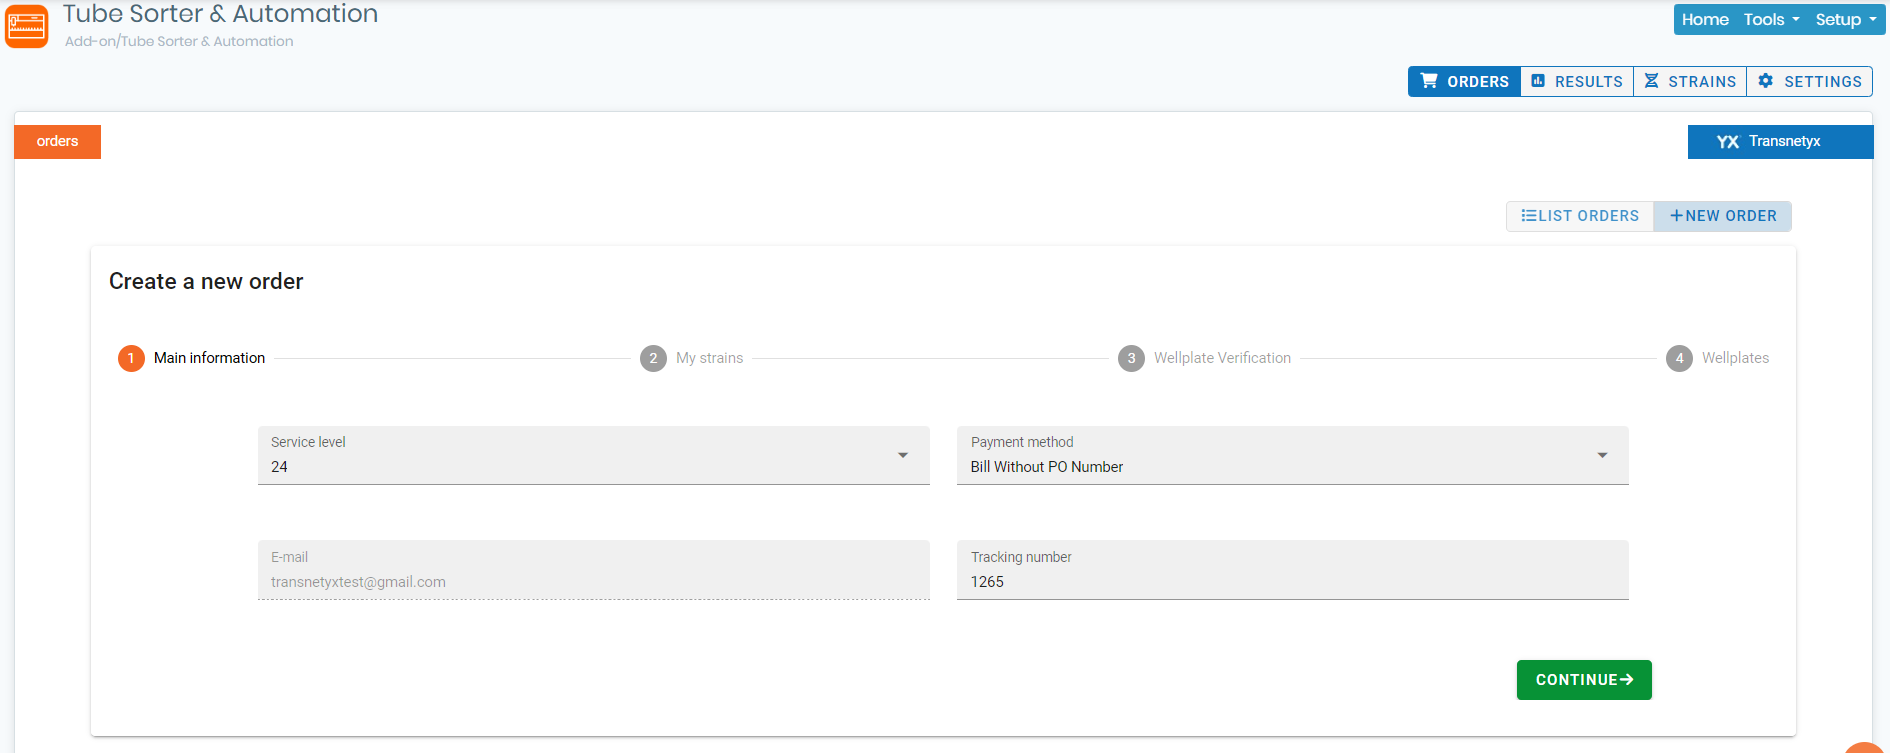
 - The first step consists of filling out the main information section, which includes:
- Service Level: Choose between 24-hour (priority) or 72-hour (standard) service options.
- Payment Method: Select from options such as purchase order, credit card, bill without PO number, or mark as unavailable if no payment method is required.
- Email Address: Provide your email address for order notifications.
- Tracking Number: Enter a tracking number consisting of 3 to 15 digits.
- Proceed to the second step by clicking on the
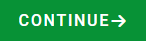 button. Here, you will provide details about your strains:
- Select Strains: Choose the strains you want to analyze.
- Probes: Specify the desired genotyping markers.
- Number of Samples: Indicate the quantity of samples for each strain.
- Additional Notes: Include any relevant information about your strains that you would like Transnetyx to know before analysis.
- Control Samples: Check the corresponding checkbox if the provided samples are control samples.
- Click on
 to quickly input desired strains into the order.
 - You also have the option to
 , this will allow you to quickly add the desired strains into the order, without having to select them one by one.
 - Once you added all your strains, you can edit or delete them as needed, before proceeding to the next step.
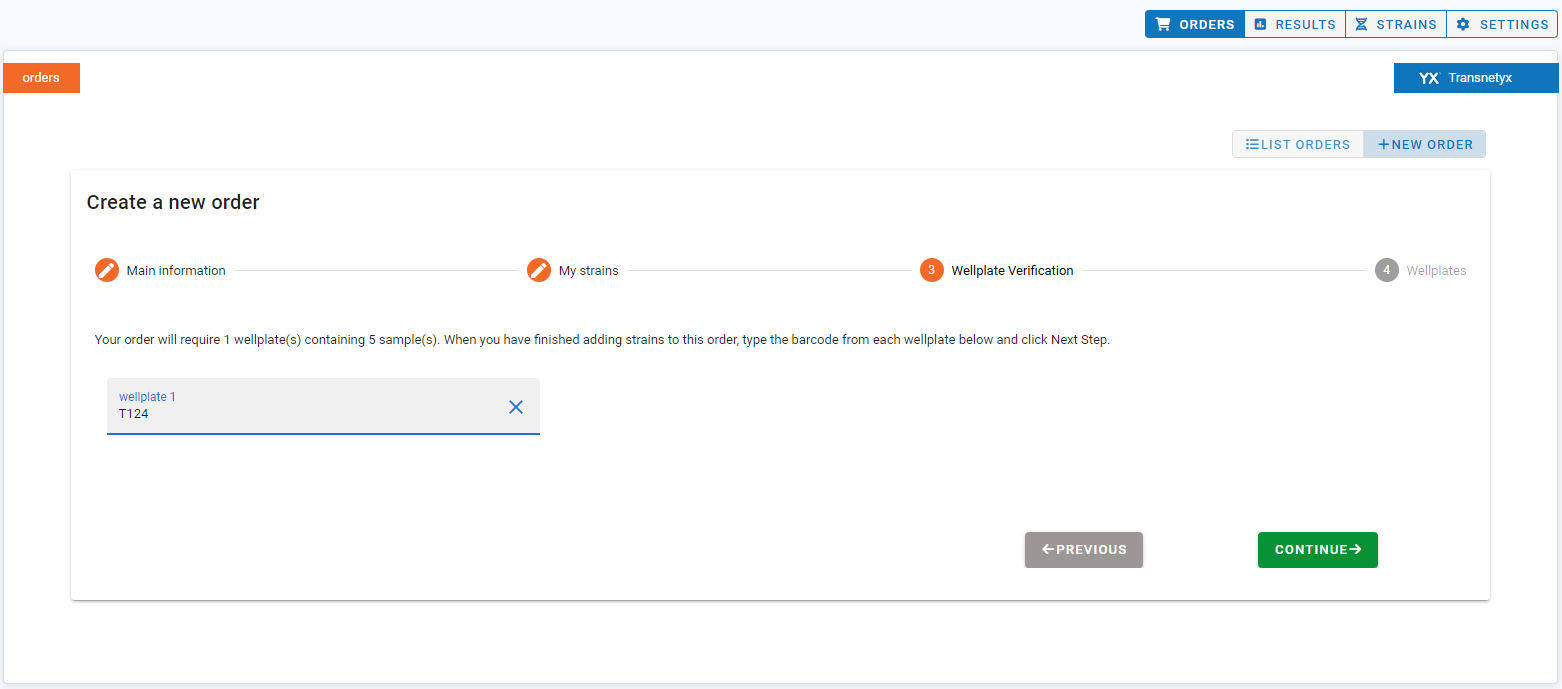
- In the third step, assign a name to your wellplates. Each plate consists of 92 wells, and the name must begin with the letters T, E, or B and should be between 3 and 15 characters long.
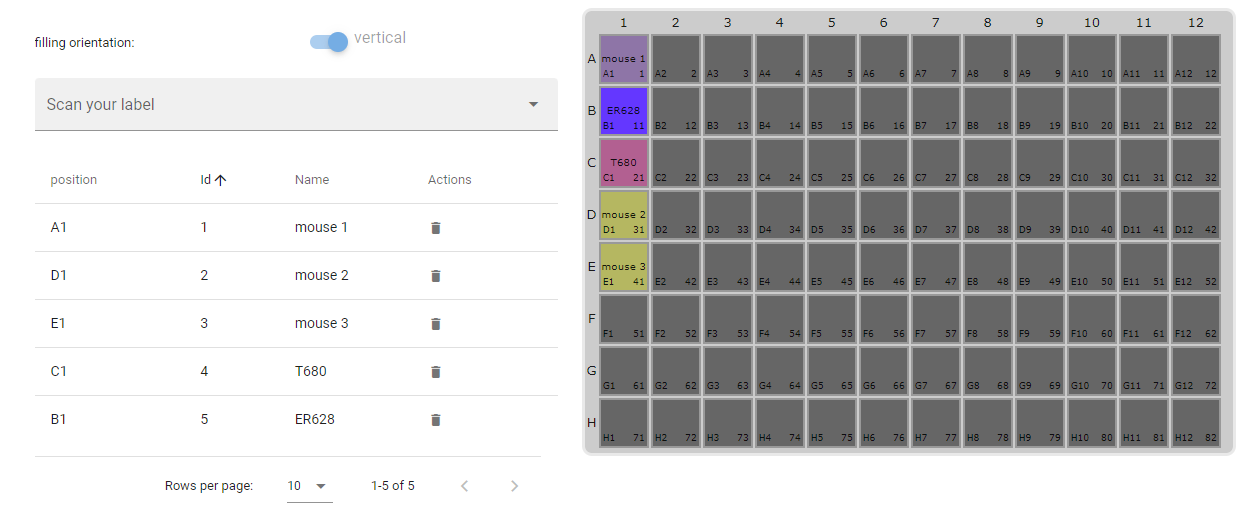
- Moving to the fourth and final step, attribute each strain to a well. You can scan individual labels, and they will automatically be added to the plate vertically or horizontally, depending on your selection. Alternatively, you can use the
 feature to quickly input your already memorized samples.
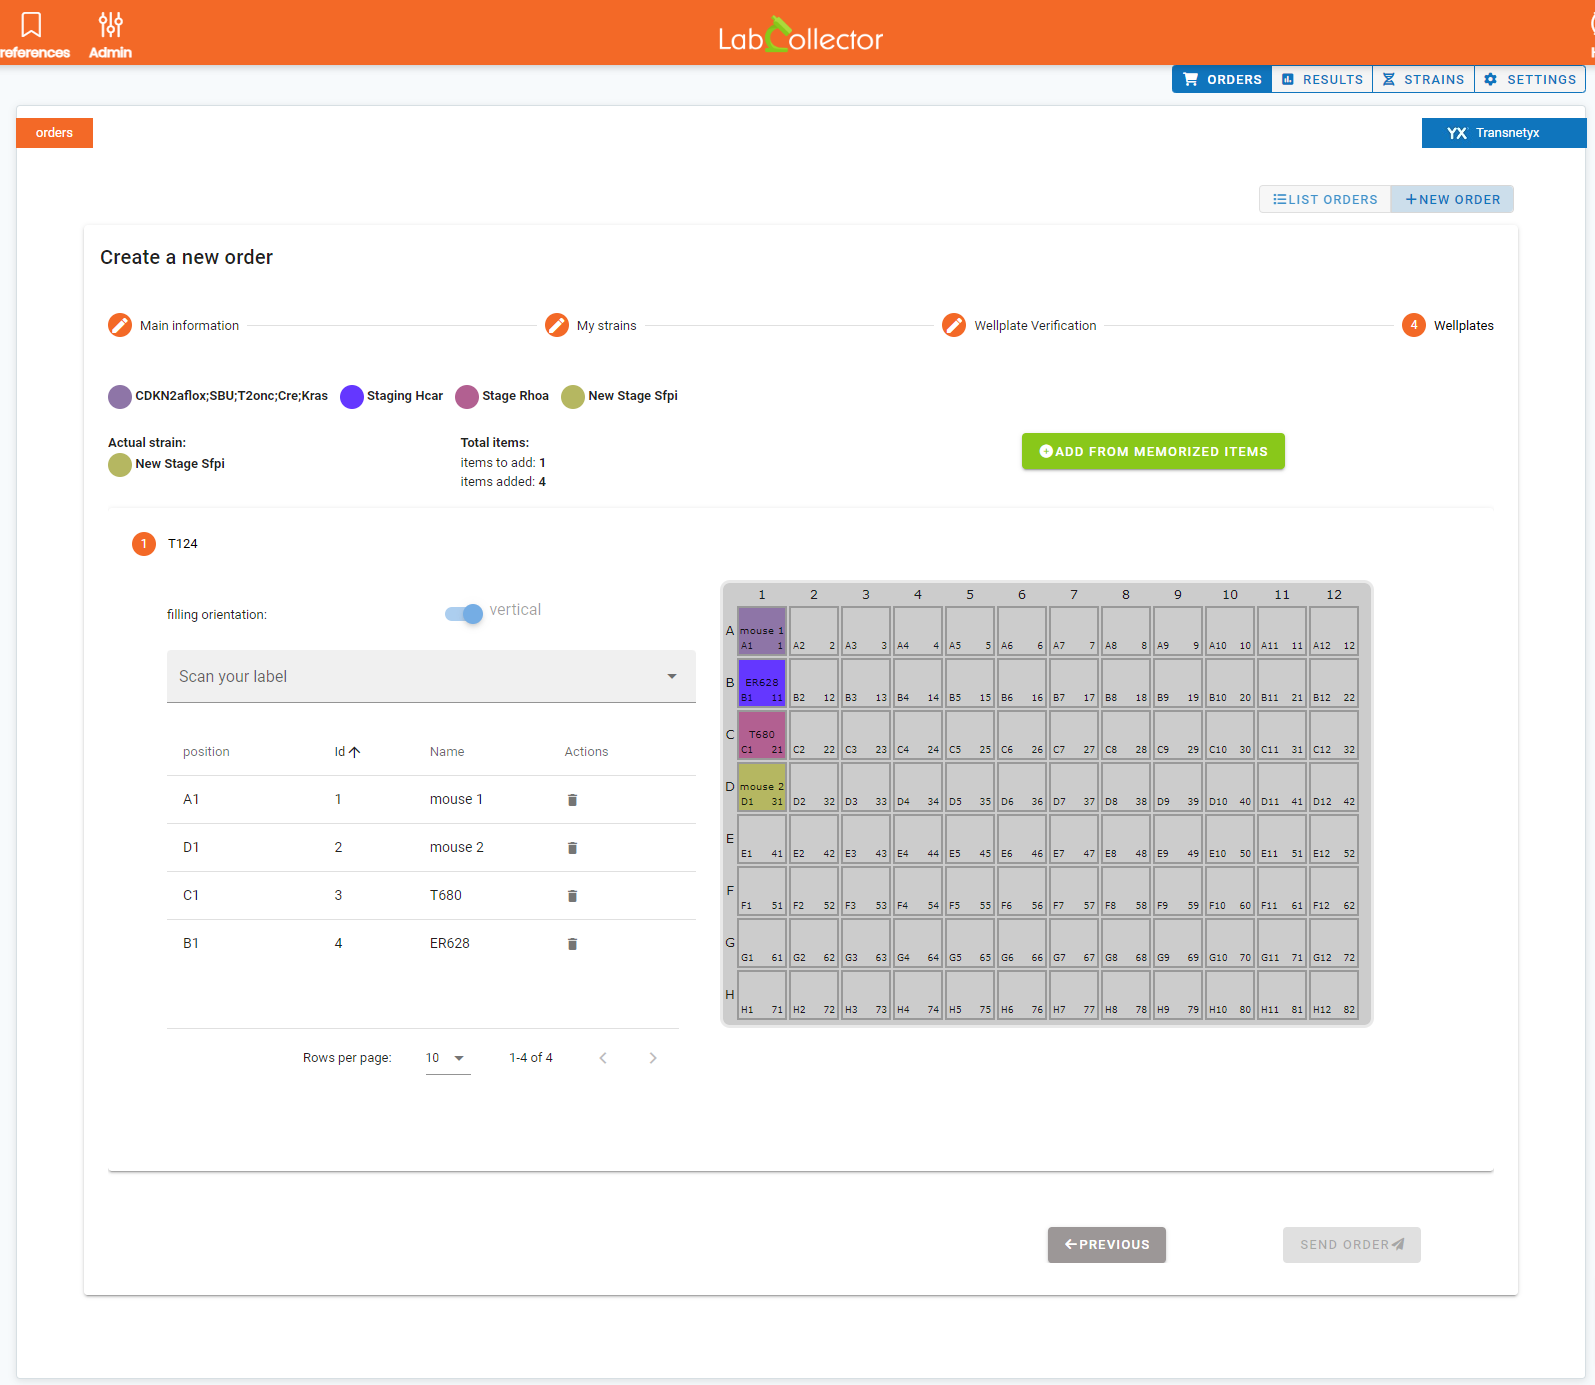
- It’s important to input all samples required for the order to be processed successfully. Once all samples have been added, the wellplate will be automatically grayed out, indicating that it is complete.
d. To finalize the order creation process, simply click on the ![]() button. After clicking, you will receive a confirmation message indicating that your order has been successfully sent (as illustrated in the screenshot below).
button. After clicking, you will receive a confirmation message indicating that your order has been successfully sent (as illustrated in the screenshot below).

e. LabCollector automatically generates a unique order ID for each created order. This order ID serves as a reference for tracking and allows you to conveniently identify and manage your orders. You can find the assigned order ID in the confirmation message, as depicted in the screenshot above.
4. Checking received results:
Once Transnetyx completes the genotyping analysis, the results can be seamlessly integrated into LabCollector for easy access. Here’s how to check and view the received results:
a. Navigate to the ![]() section.
section.
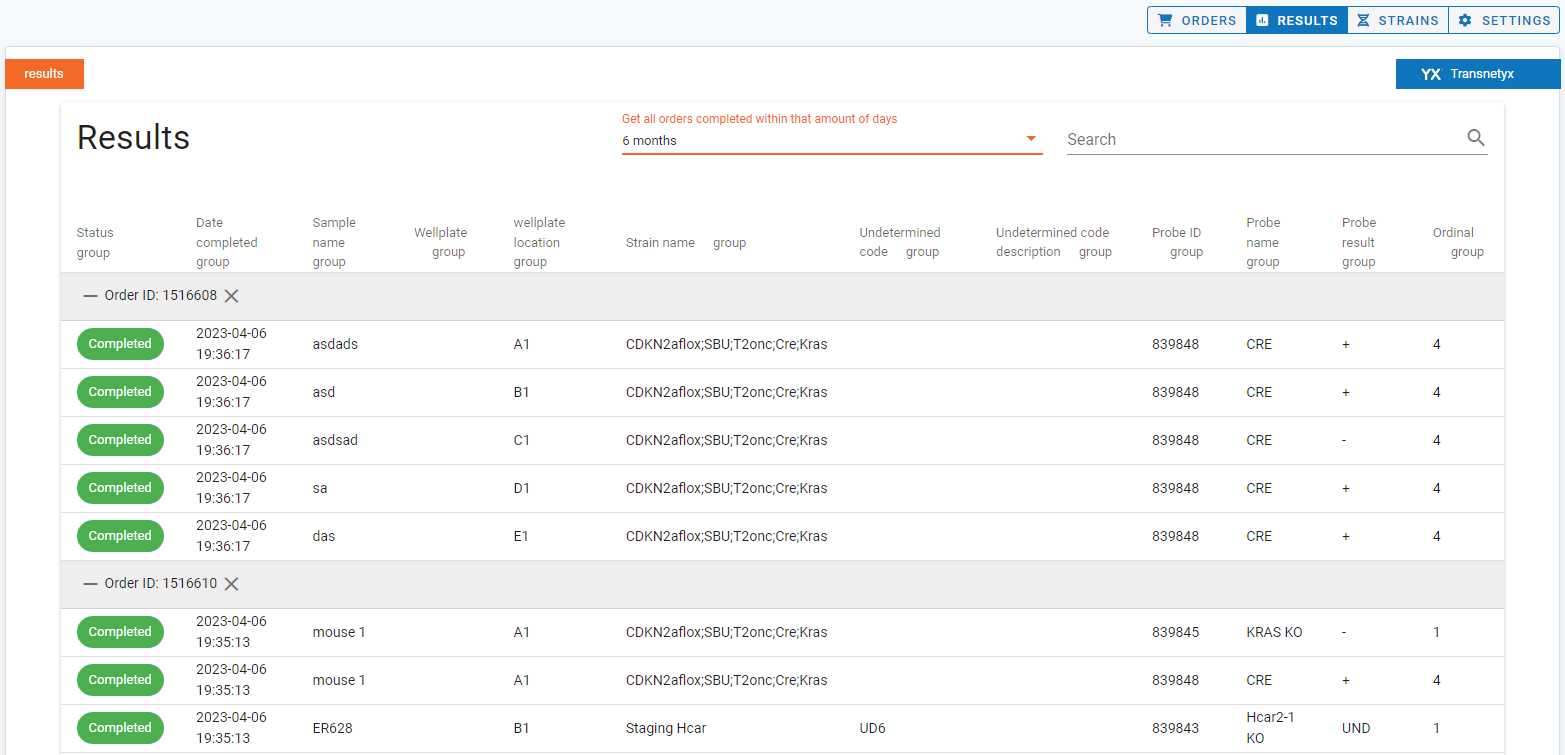
b. Locate the relevant order using the unique order ID or search functionality (you can also search for them by selecting the time period in which they were completed, for example: 10 days, 3 months, 5 years… etc.).
c. You can group the results based on different criteria, whether you want to group them based on the date they were completed, their strain name, wellplate location, sample name, and much more, simply click on the the corresponding option from the top line.
d. Review and analyze the genotyping results directly within LabCollector.
You can also view the Transnetyx genotyping results by following these steps:
- Navigate to the “Animals” module in LabCollector.
- Open the record of the specific animal for which you want to access the genotyping results.
- Within the record’s tab, locate the “Transnetyx Result” field. This field is specifically designated to display the genotyping results obtained from Transnetyx.
- The genotyping results will be presented in the form of a table, providing a structured overview of the obtained data. This table includes relevant information such as order ID numbers, probe names, probe results, and ordinals.
5. Managing Strains:
LabCollector provides robust strain management capabilities in collaboration with Transnetyx. This feature empowers you to effectively organize and track different strains, along with their associated genotyping data.
In the ![]() section, you’ll find:
section, you’ll find:
- Transnetyx Strains: Here, you will find all the strains that have been created in Transnetyx:
- To manage these strains, select the corresponding probes that are relevant to each strain.
- You also have the option to assign specific colors to differentiate between different strains.
- If there are strains that are no longer needed, you can easily delete them from this section.
![]()
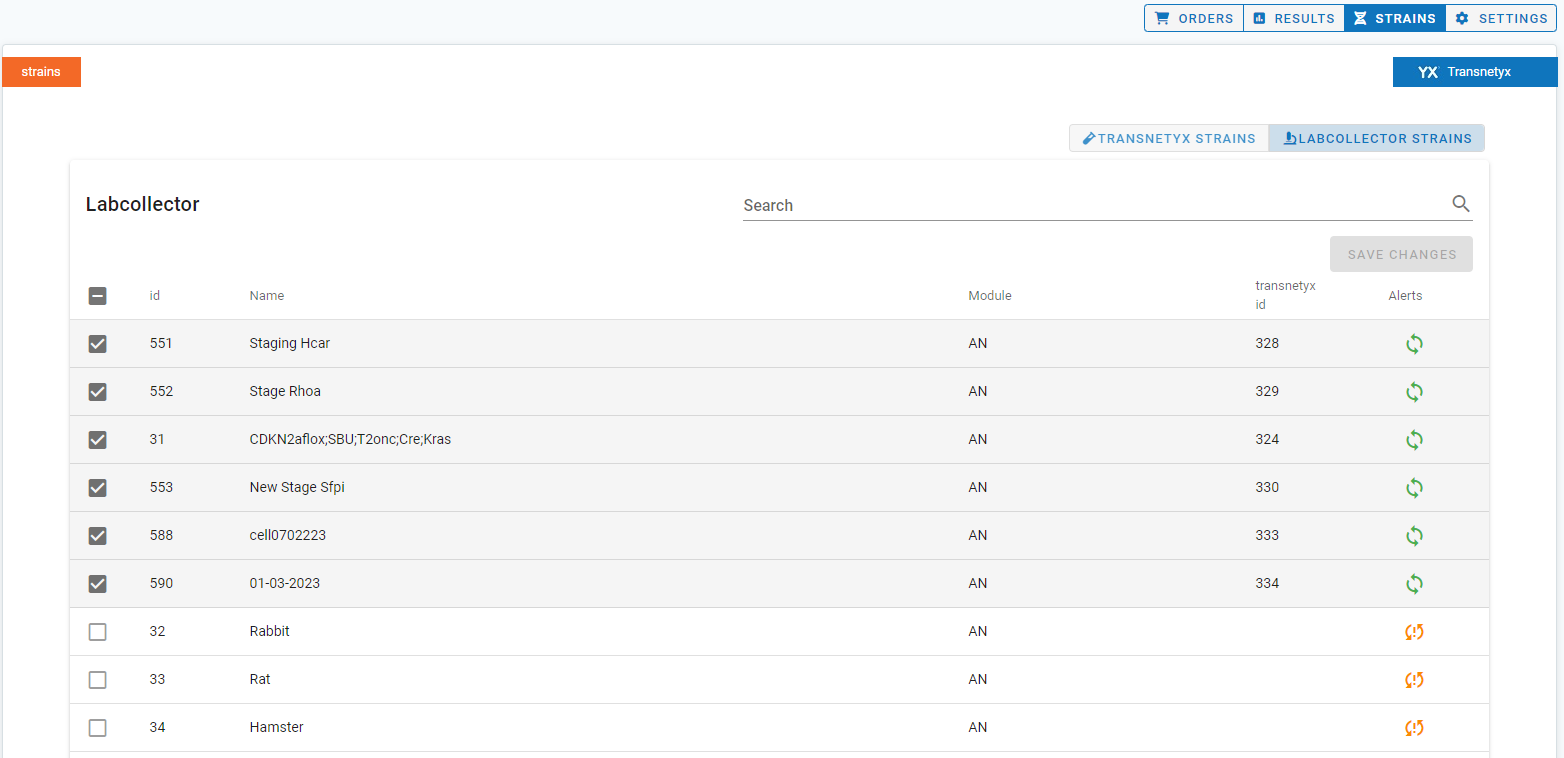
- LabCollector Strains: In this section, you can access and manage strains that have been created within LabCollector:
- Each strain is accompanied by a synchronization icon located to the right of its entry.
- A green synchronization iconindicates that the strains are successfully synchronized between LabCollector and Transnetyx.
- If the synchronization icon appears as , it indicates that the strains are not synchronized between LabCollector and Transnetyx.
6. Settings:
To configure your Transnetyx settings, follow these detailed steps:
- Navigate to the
 section.
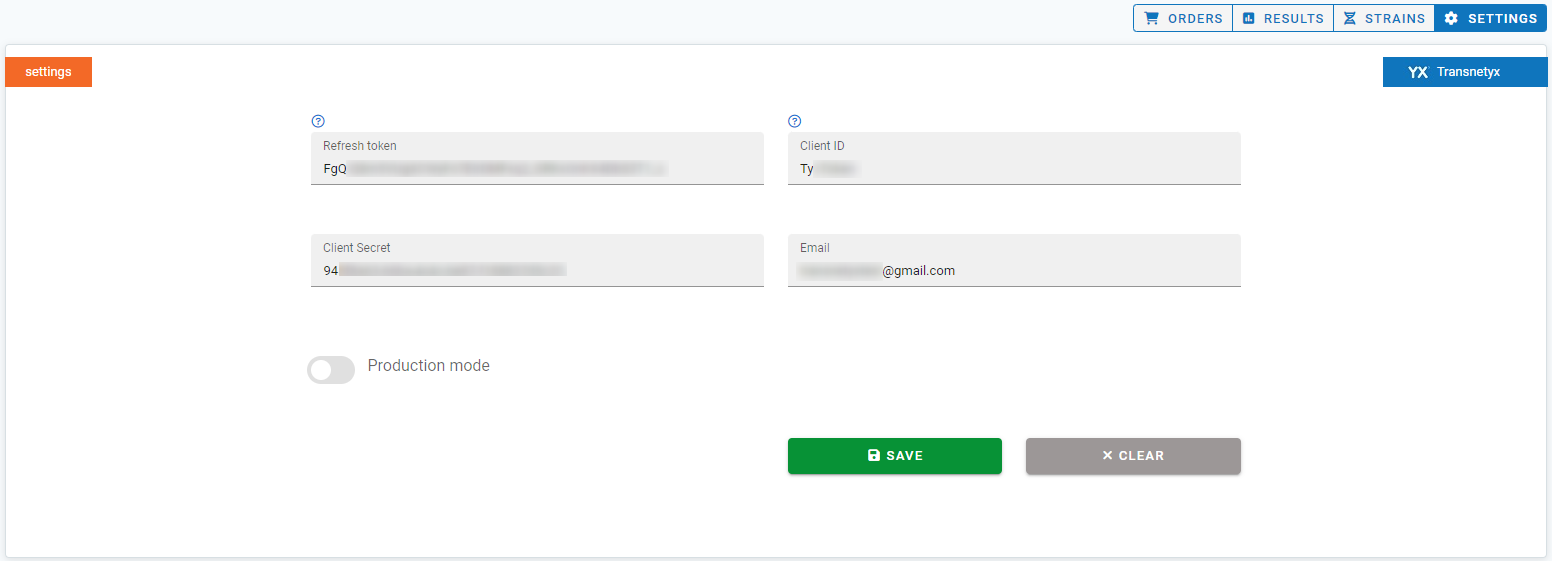
 - Here, you will find certain fields, such as:
- Refresh Token: Enter your Transnetyx refresh token. This token is a unique identifier that allows LabCollector to securely authenticate and access your Transnetyx account.
- Client ID: Provide your Transnetyx client ID. This ID serves as a credential that LabCollector uses to establish a connection with your Transnetyx account.
- Client Secret: Input your Transnetyx client secret. It acts as a password to authenticate and authorize LabCollector’s access to your Transnetyx account.
- Email Address: Enter the email address associated with your Transnetyx account. This ensures proper communication and synchronization between LabCollector and Transnetyx.
- Finally, save the entered settings to apply the configuration changes.
The integration of ![]() into LabCollector
into LabCollector ![]() offers you a powerful solution for automating genotyping processes and enhancing laboratory data management. By following the steps outlined above, you can efficiently fill out and send orders, access and analyze received results, and effectively manage strains. This integration not only saves time but also ensures seamless data transfer, allowing researchers to focus on their core scientific objectives.
offers you a powerful solution for automating genotyping processes and enhancing laboratory data management. By following the steps outlined above, you can efficiently fill out and send orders, access and analyze received results, and effectively manage strains. This integration not only saves time but also ensures seamless data transfer, allowing researchers to focus on their core scientific objectives.
![]()
Related topics:
- Check our KB on LabCollector’s linux requirements and installation.
- Check out our Introduction to LabCollector API.
- Read our KB on LabCollector installation requirements for AWS.
