Search Knowledge Base by Keyword
What’s Aquarium add-on? And how to use it?
![]() Aquarium add-on within LabCollector
Aquarium add-on within LabCollector ![]() is designed to manage and monitor the daily operations of aquatic research facilities. It provides a comprehensive solution to track the status of tanks, feeding schedules, and experimental protocols, as well as inventory management of strains and supplies.
is designed to manage and monitor the daily operations of aquatic research facilities. It provides a comprehensive solution to track the status of tanks, feeding schedules, and experimental protocols, as well as inventory management of strains and supplies.
The beauty of Aquarium lies in its ability to automatically insert samples into a new plate or box map with a simple scan of the tube/vial barcode. This means you can move through your sample management tasks quickly and efficiently, without having to worry about the tedious process of manually recording each sample’s location.
This knowledge base serves as a guide to help you navigate through the various features and functionalities of the Aquarium add-on. Here, you will find detailed information on how to set up and manage your facilities, tanks, strains, and inventory. You will also learn how to monitor your aquatic animals, their feeding schedules, and track experimental data.
A. Batch management
B. Feeding/Treatments
C. Reports
D. Settings
![]()
The screenshot below provides a comprehensive visual representation of the main interface of the Aquarium add-on.
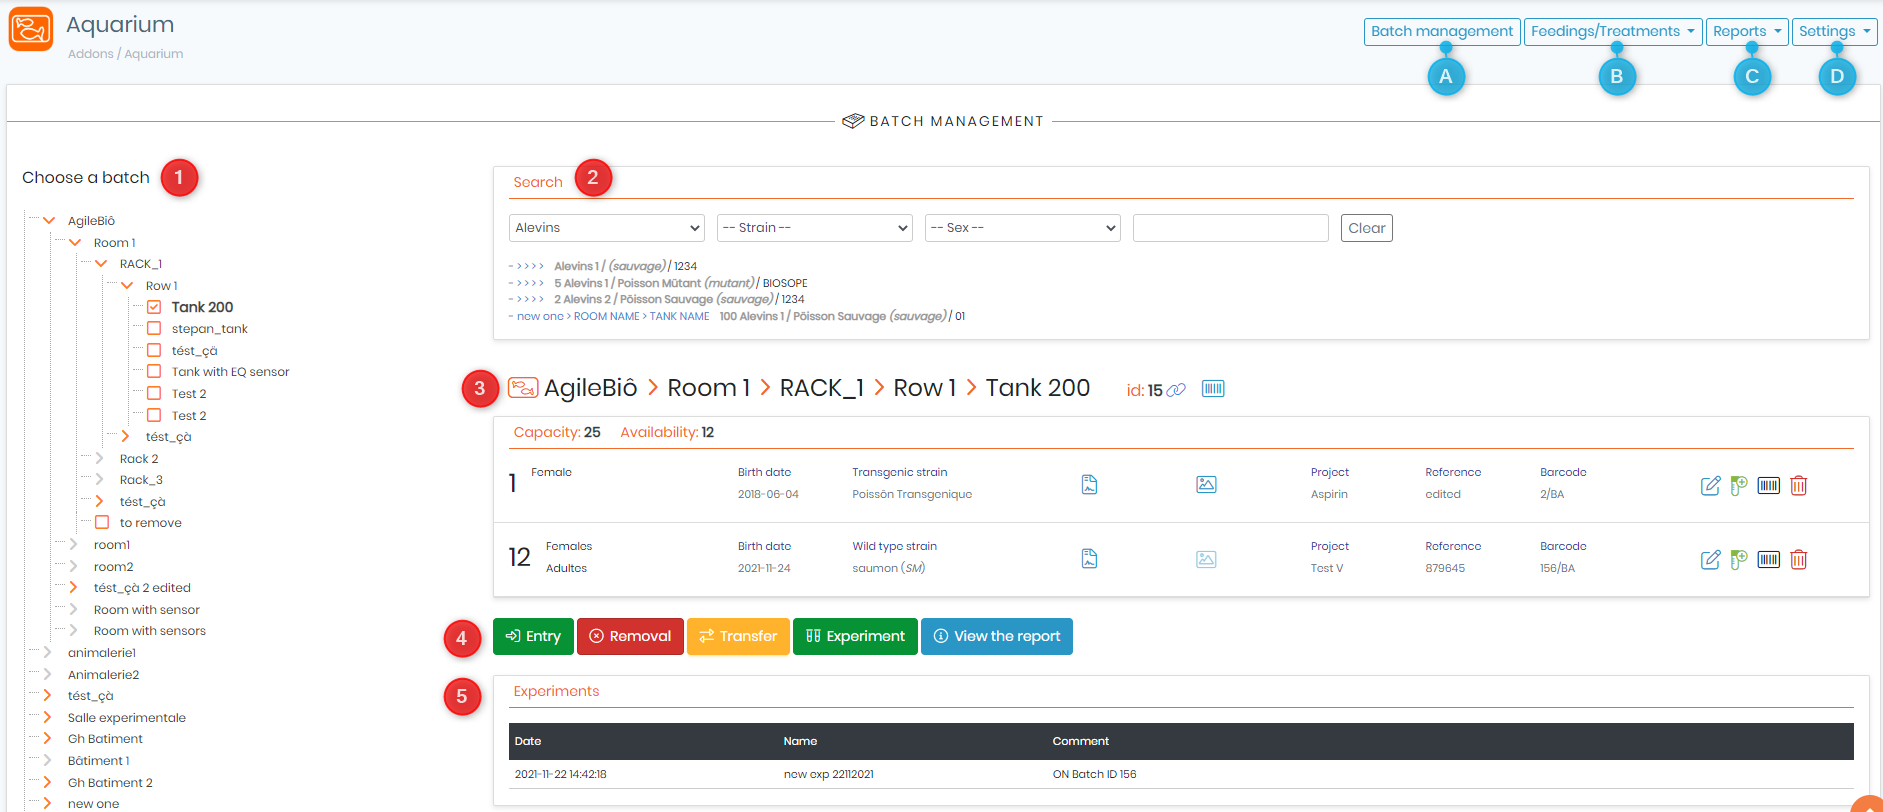
A: When you click on “Batch management“, you will be redirected to the main page of our add-on, which is the same as the one shown above. Here, you can manage your batches or search for specific ones (based on their type, strain, sex, or any other keyword that might help in finding the batch you are looking for).
- 1: Batch selection, this section provides a list of all batches that are already available within the add-on. This feature enables you to quickly and easily identify and select the batch you need.
- 2: Search batch, in this section, you can look for a specific batch by inputting its type, strain, sex, or any valuable keyword. With the search batch feature, you can quickly find the batch you need, saving you time and effort.
- 3: Info list, Here, you’ll find all the necessary info about your tank/batch, you can also download files and images, print labels, add experiments, and edit/delete the info. This section is particularly useful when you need to update or modify the information associated with a specific batch of samples.
- 4: Action list, Here, you can see all the actions that you can perform on the selected batch, for example: you can execute a removal, transfer, an entry, perform an experiment, and view the corresponding report.
- 5: Experiments table, Here, you can see all the experiments, alongside the date in which they were performed, their name, and any important comment associated with it.
B: When you click on “Feeding/Treatments“, you’ll have the option to choose between three different of options, you can access all feedings & treatments, live food production, and alerts.
- Feeding/Treatments: this section allows you to easily manage the feeding and treatment within your tanks. This section provides a clear overview of all the tanks available within the system, the corresponding food being distributed to each tank, and the user responsible for managing the feeding schedule.

-
- 1: Manage food types, this section, provides you with complete control over the types of food that are available for distribution to your tanks. It allows you to easily add new food types, manage existing ones, and delete those that are no longer needed.

-
-
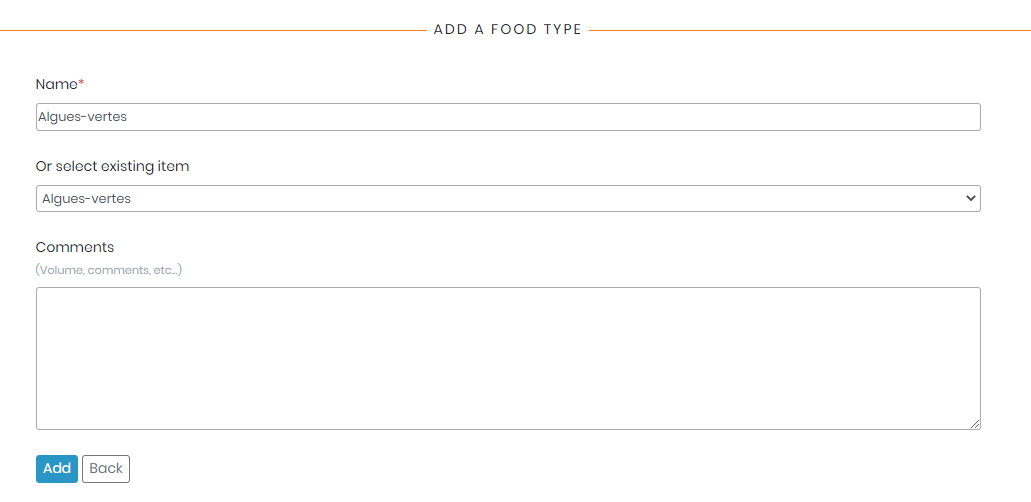
- 1: Add a food type, you can easily create new types of food that are specific to the needs of your samples. This feature enables you to enter the name, description, and any other relevant information about the food type, and then save it to the system. With this feature, you can quickly expand the range of food types available for distribution, ensuring that your samples receive the nutrients they require for healthy growth and development.
-
-
-
- 2: Back to feeding, by clicking on this button, you’ll be redirected to the previous page.
-
-
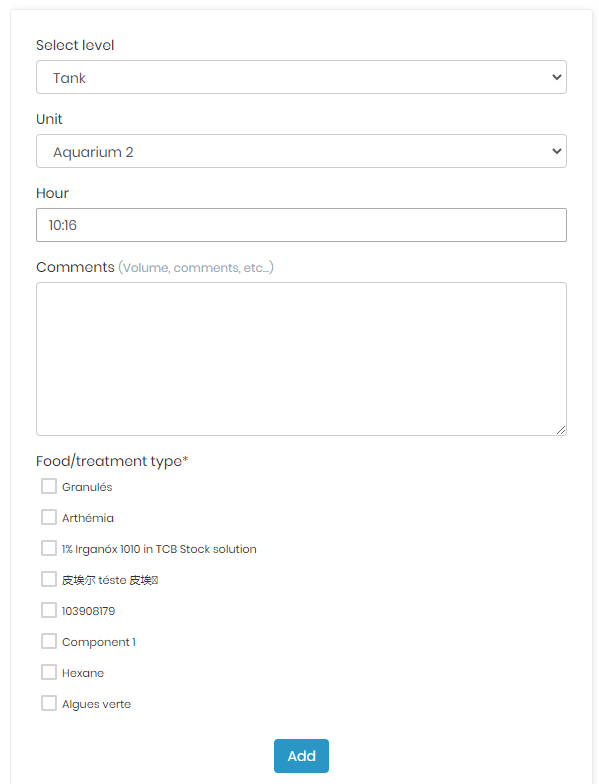
- 2: Add a record, once you click on the corresponding button, a new tab will appear, prompting you to input all the necessary information. This tab is designed to guide you through the process of creating a new record, ensuring that all relevant details are captured accurately.To create a new record, you will need to select the appropriate facility level and unit, as well as the type of food and the hour at which the food or treatment is to be administered. Additionally, you will be prompted to provide any relevant comments, such as notes on the quantity or frequency of the food or treatment.
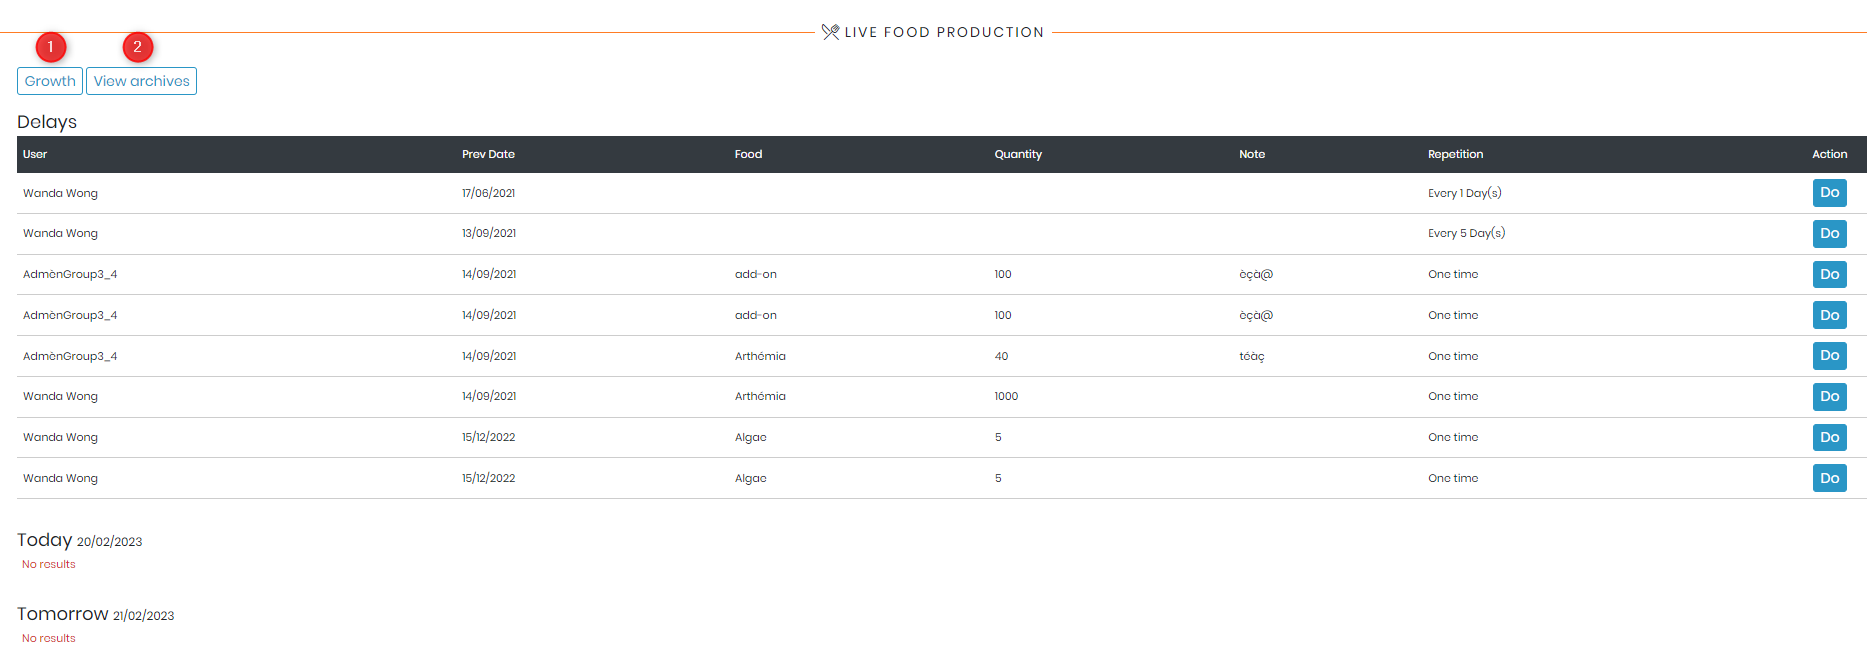
- Live Food Production: This section provides you with an overview of all feeding actions that need to be done, both in the present and near future. It is essential for keeping track of your live food production, ensuring that your samples receive the nourishment they need to thrive. The list includes the type of food required, the quantity needed, any valuable notes, and the frequency at which the feeding action should be performed.
- To execute the feeding process, all you have to do is click on the button
 located to the right.
-
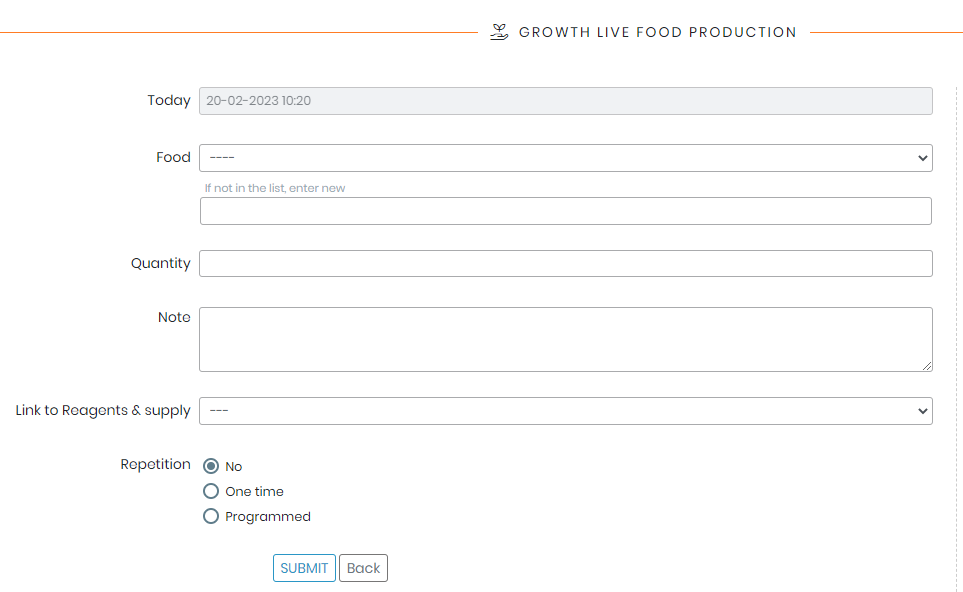
- 1: Growth, To add a feeding action to the list, simply click on growth, a new tab will appear, in which you will need to select the food type, quantity, notes, any link to the reagents & supply module and the repetition.
-
- 2: View archives, in this section, you can view all the archived actions.

- Alerts: This section lets you manage all your alerts in one place. You can easily select the level of alert, whether it’s for a facility, room, rack, row, or tank. Once selected, you can quickly modify the specific alert you require or the one that you need.
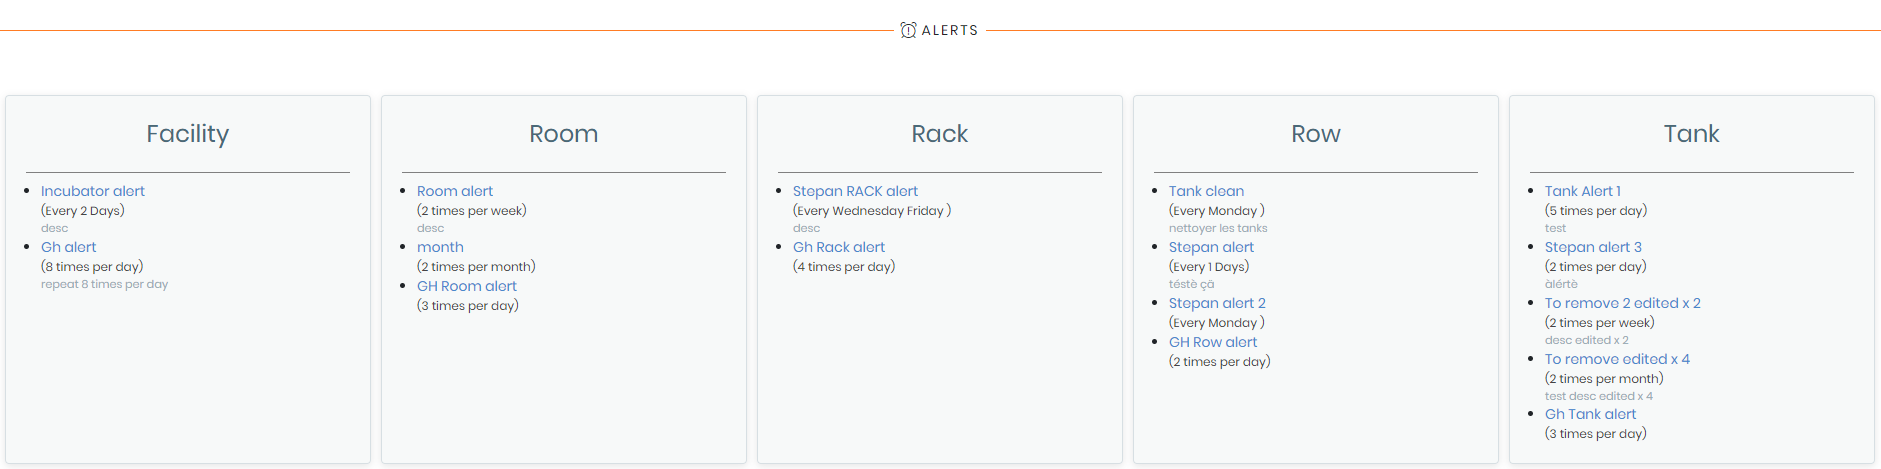
- Once you click on the alert, a new tab will appear (as shown below), you can then choose to validate it, view all the corresponding reports or delete it if needed.

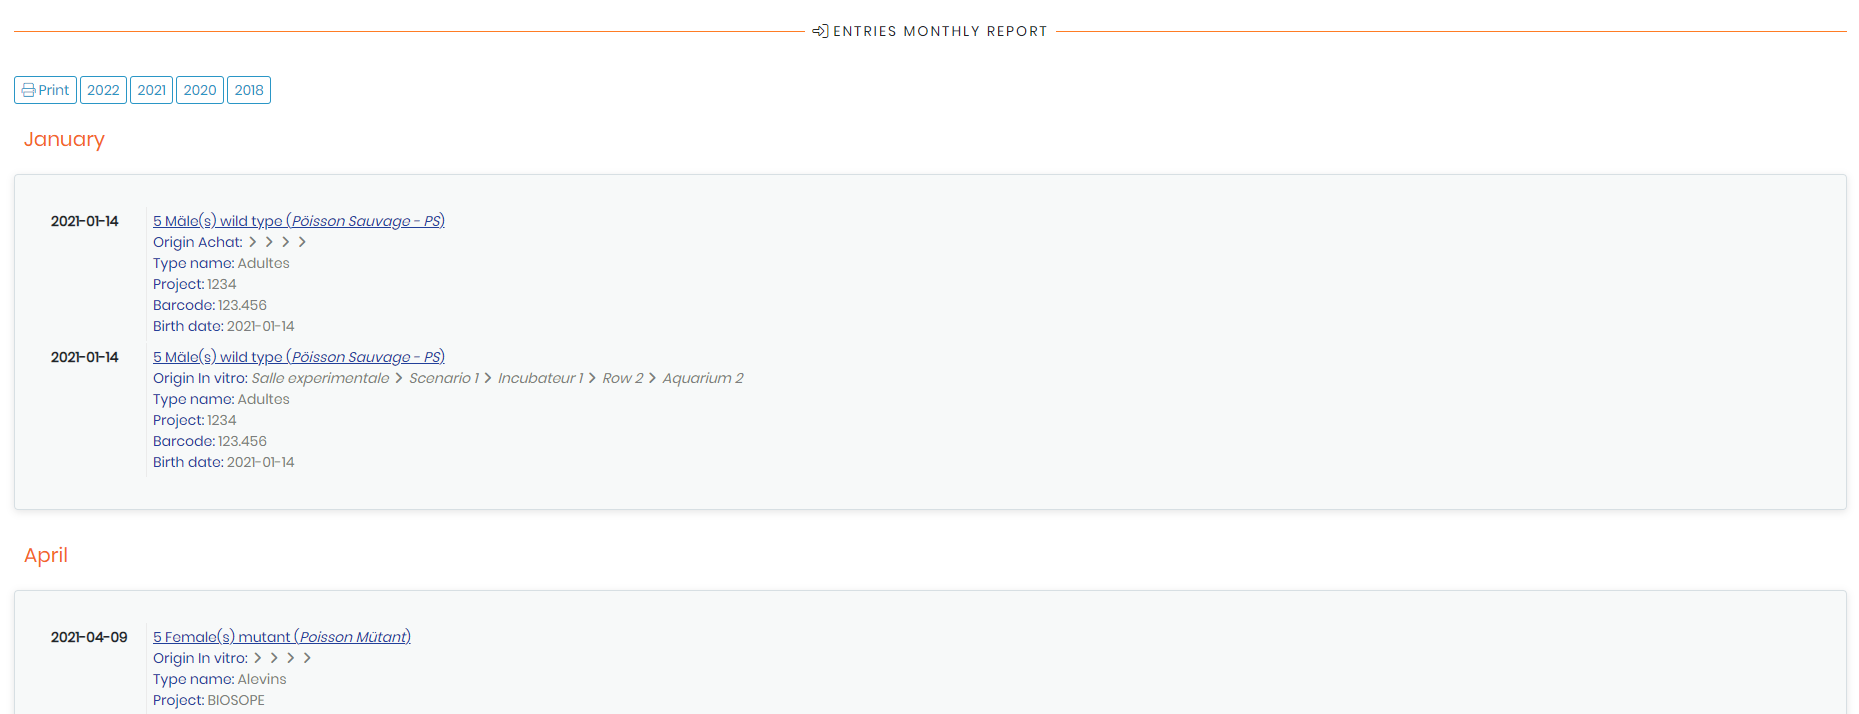
C: In the “Reports” section, you can generate detailed reports on all aspects of your aquatic research. Whether you need to track growth rates, monitor feeding schedules, or analyze water quality, the Reports section provides the data you need in an easy-to-read format.
- You can easily access the Entries report, Removals report, Transfers report, Experiments report, and Projects report in the Aquarium add-on by selecting the time period you are interested in. This allows you to quickly generate reports on specific timeframes and gain insights into the data you need to manage your aquatic research. Simply select the desired report and choose the time period, and the system will generate the report for you automatically. You can also print the reports in order to share them with other users later on (simply click on
 ).
).
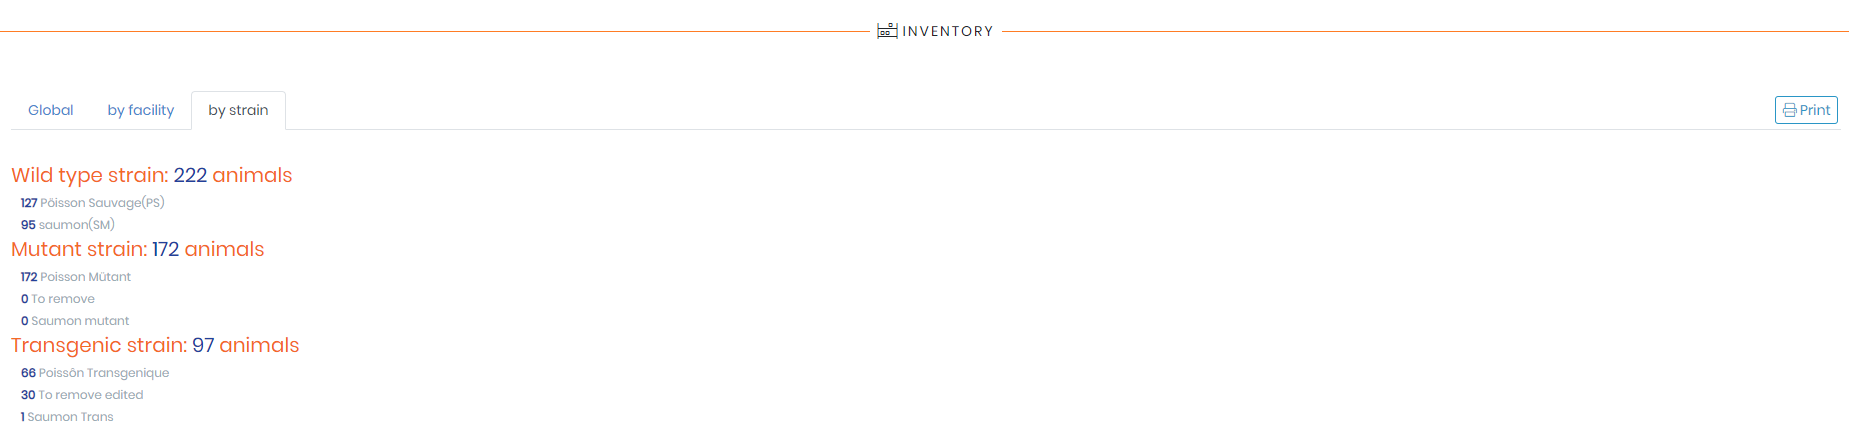
- Inventory: In this section, you can easily manage and keep track of your animal inventory, you will have an overview of your current animal count, including the number of strains, their distribution across facilities, and the quantity of each strain (wild type, mutant, and transgenic). With this information at your fingertips, you can quickly monitor animal population levels and ensure that you have the necessary animals for your research projects. You can also make adjustments to your animal inventory to ensure optimal breeding and research outcomes.
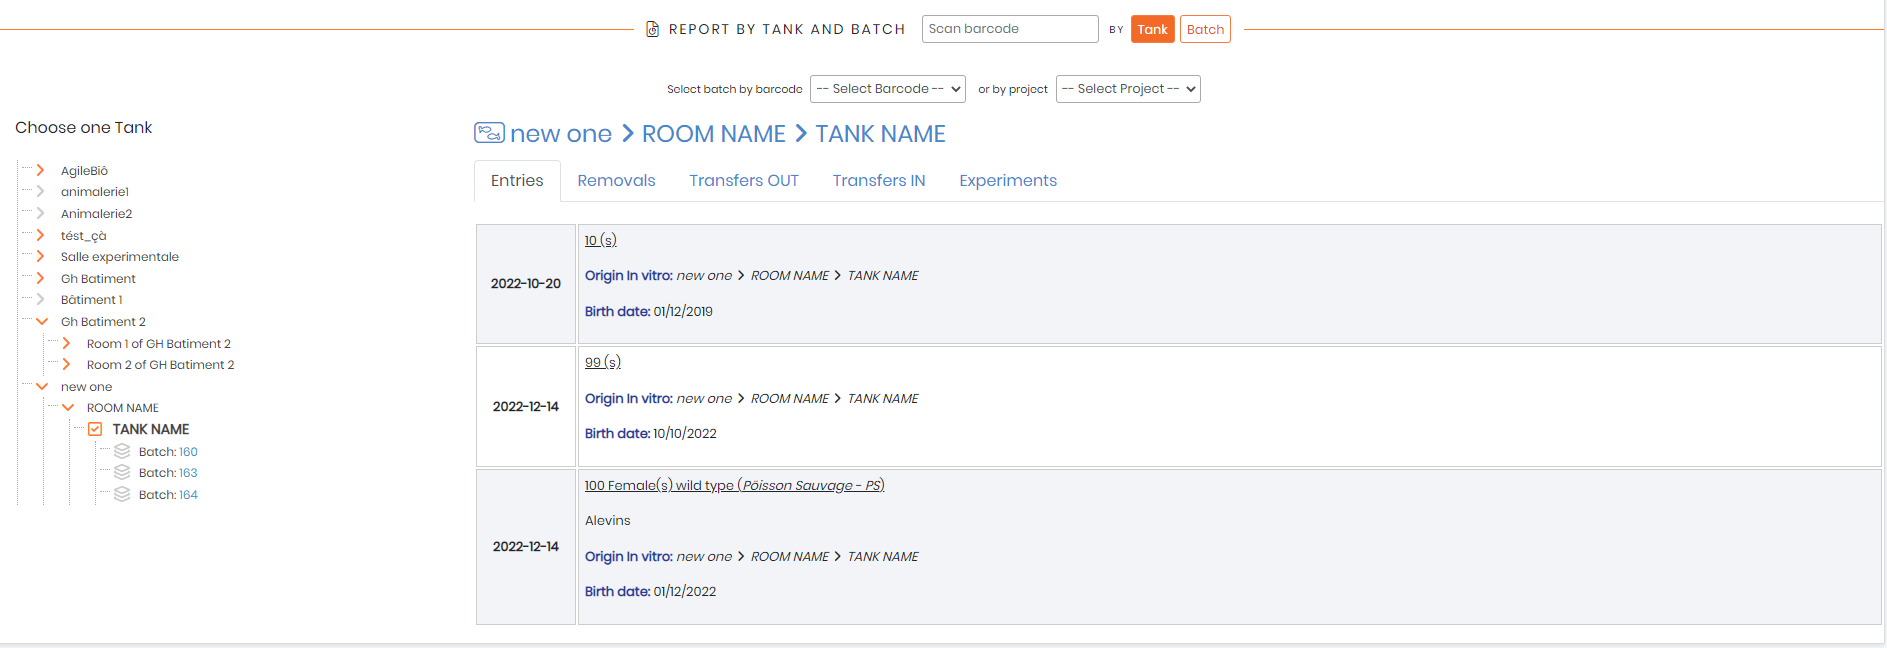
- By Tank and Batch: In this section, you can conveniently view detailed reports by tank or batch. By scanning the barcode, you can instantly access a report that contains information on all entries, removals, transfers, and experiments performed within that specific tank or batch.Whether you need to track the history of a particular batch or monitor the activity of a specific tank, this section provides you with all the information you need.
D: When you click on “Settings“, a drop down menu will open up, providing you with a range of options for customizing your add-on according to your needs.
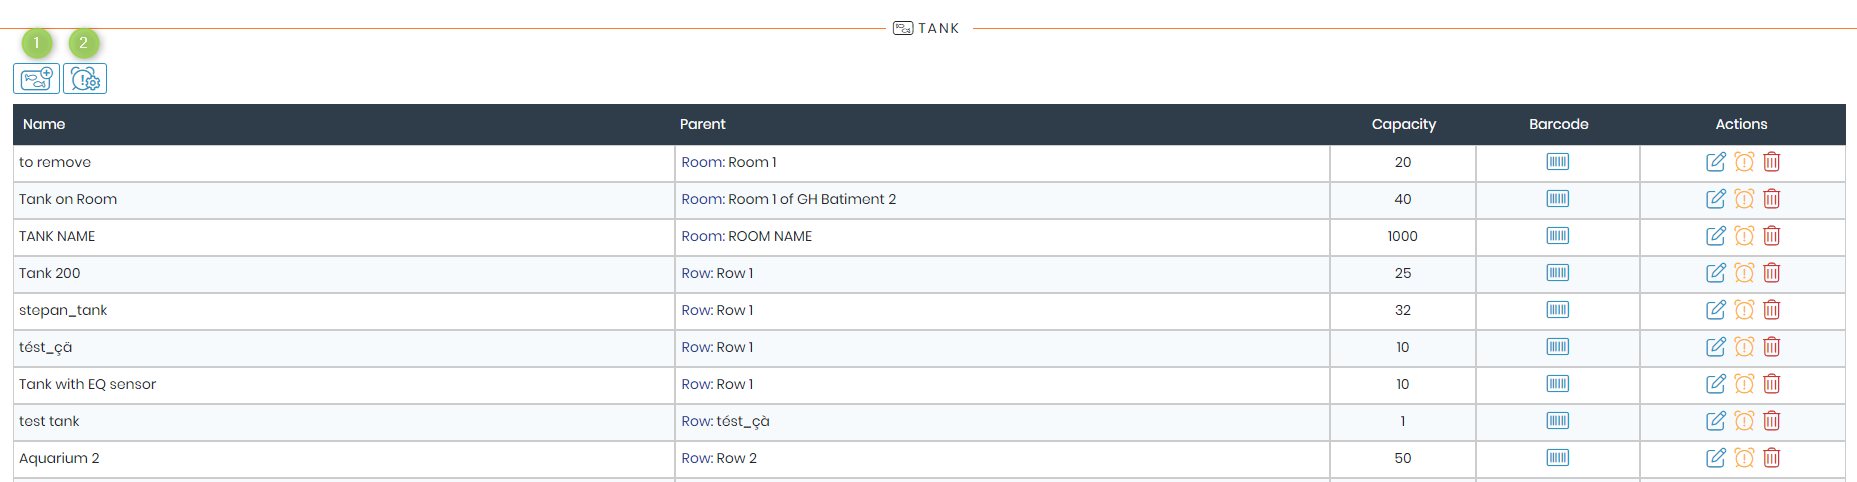
- Tank: This section displays a list of all tanks in the inventory, including their name, capacity, barcode, parent storage room, and a variety of actions that can be performed. You can edit the tank, enable or disable specific alerts, and remove the tank.
-
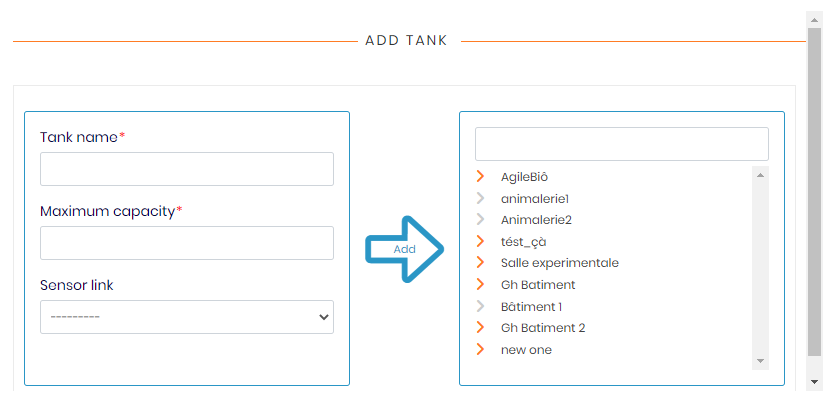
- 1: Add Tank, adding a new tank is easy, simply click on the “Add Tank” button and a new tab will appear where you can specify the name of your tank, its maximum capacity, and the corresponding sensor link. Once you have filled in all the necessary information, click on the “Add” button to complete the process and add the new tank to your selected facility.
-
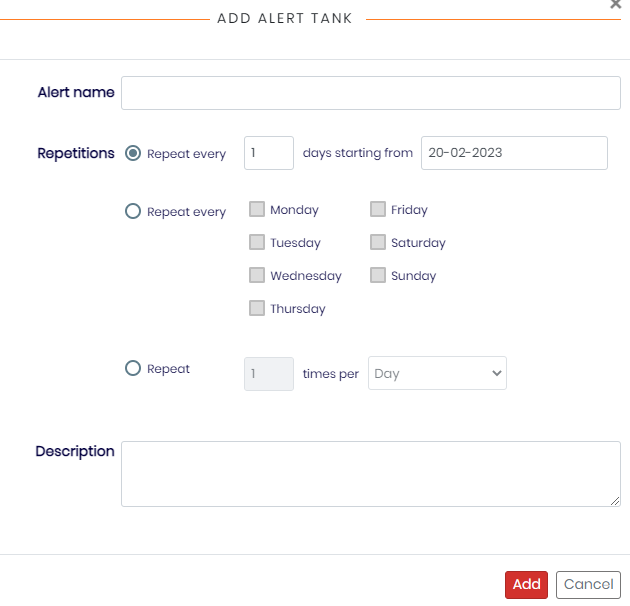
- 2: Manage alerts, in this section, you can edit/delete already existing alerts of your tank or create new ones. To add a new alert, simply click on the corresponding button
 and give it a name, then select the appropriate repetition frequency and add a description, finally click on Add.
- 2: Manage alerts, in this section, you can edit/delete already existing alerts of your tank or create new ones. To add a new alert, simply click on the corresponding button
- When browsing the other pages (Row, Rack, Room and Facility) you are going to notice that they have the exact same setup as the one above, all you have to do is configure them as you require.
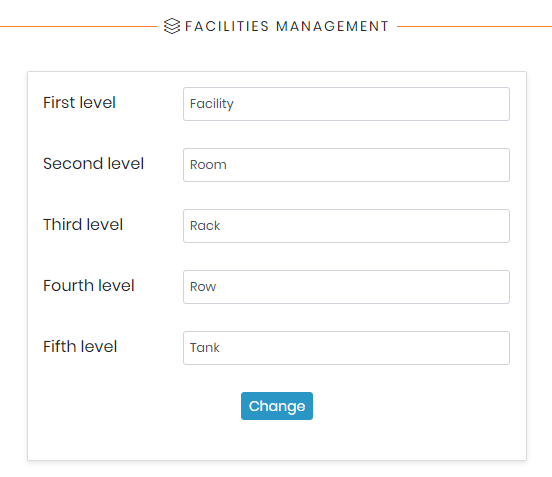
- Facilities naming: This section allows you to configure the naming of your facility levels. You can modify the existing names or add new ones to suit your needs.
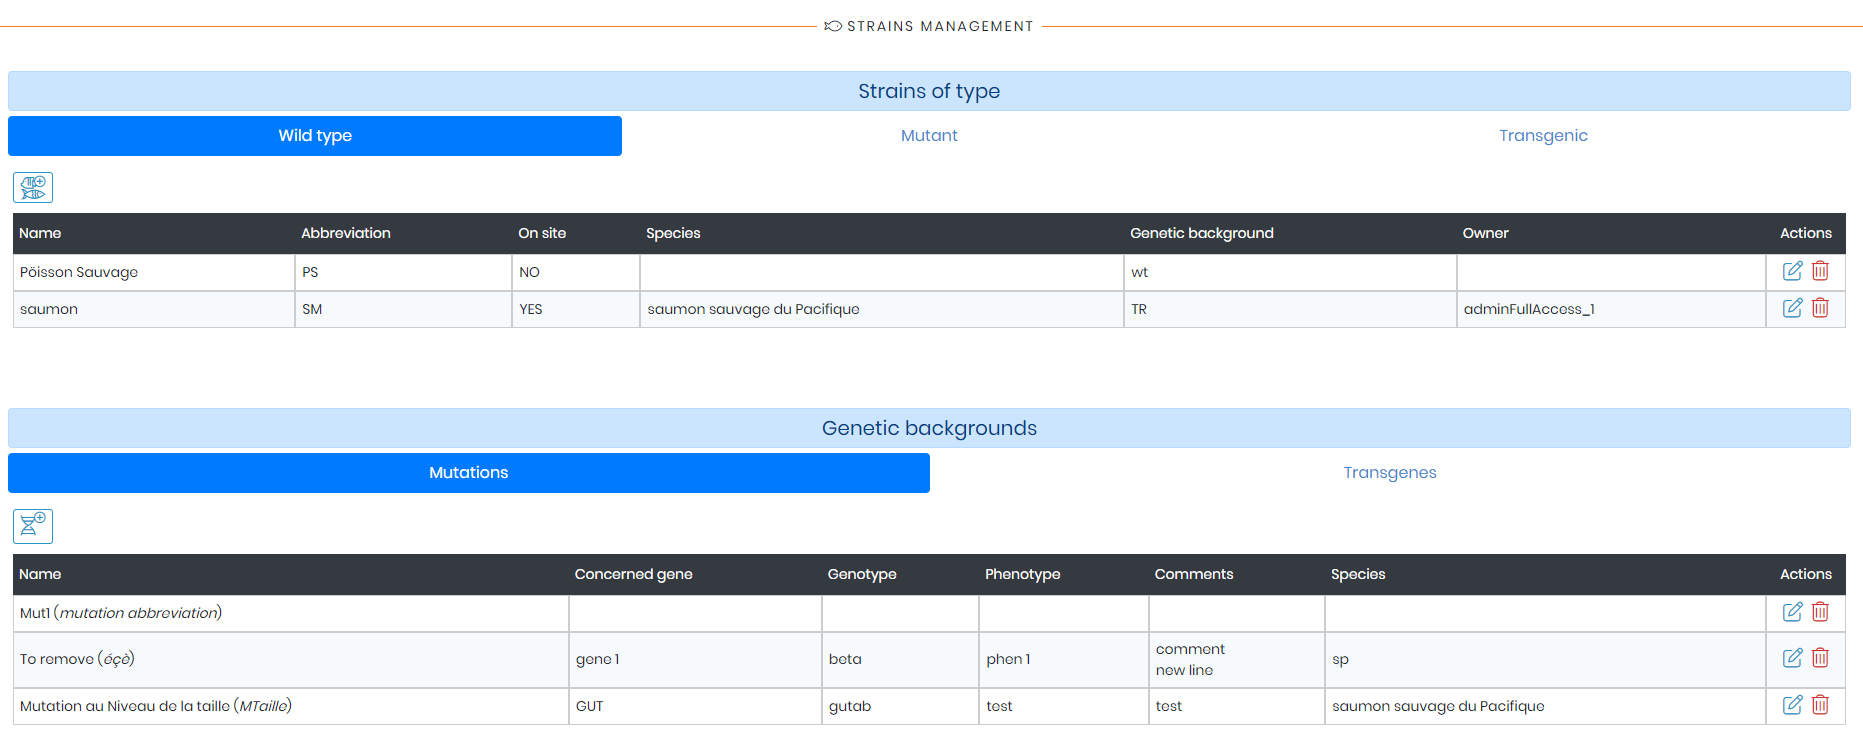
- Strains management: Here, you can view and configure all the strains and genetic backgrounds that are currently available. You have the ability to add new strains, as well as edit or delete existing ones as needed. This section allows you to keep track of important information about each strain, such as the genotype, phenotype, and any relevant notes or comments. With easy access to this information, you can ensure that you are using the right strains for your experiments and research projects.
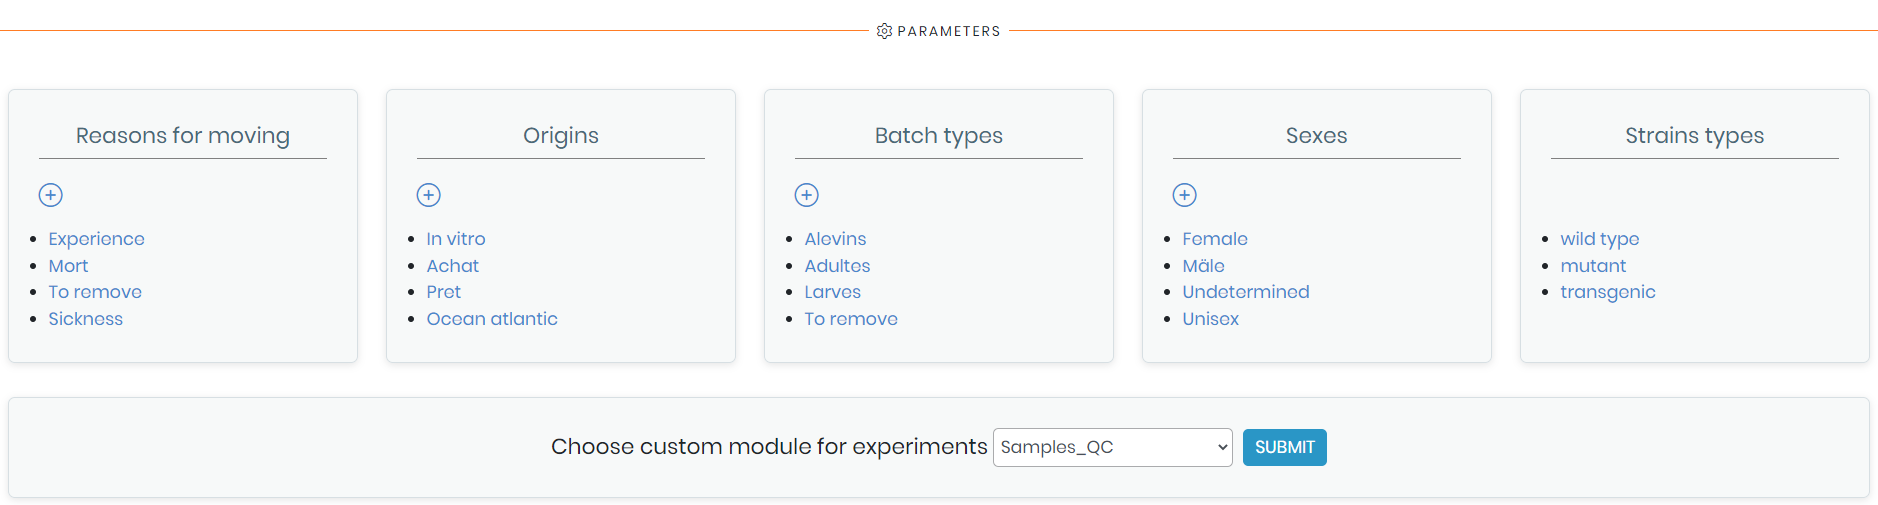
- Parameters: Here, you can easily customize and configure all the necessary parameters required for efficient management of your laboratory aquarium. This includes setting up reasons for moving animals, origins, batch types, sexes, and strain types. You can also choose a custom module to be used for experiments.
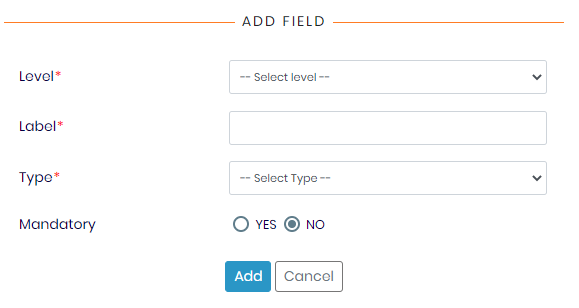
- Custom fields: Here, you can set up your custom fields, add new ones, edit/delete already existing ones, you will also have to select the level in which you want the custom field to appear, choose a label, select its type (whether a text field, numeric, select, value list, Yes/No…etc) and also whether the field has to be mandatory or not.

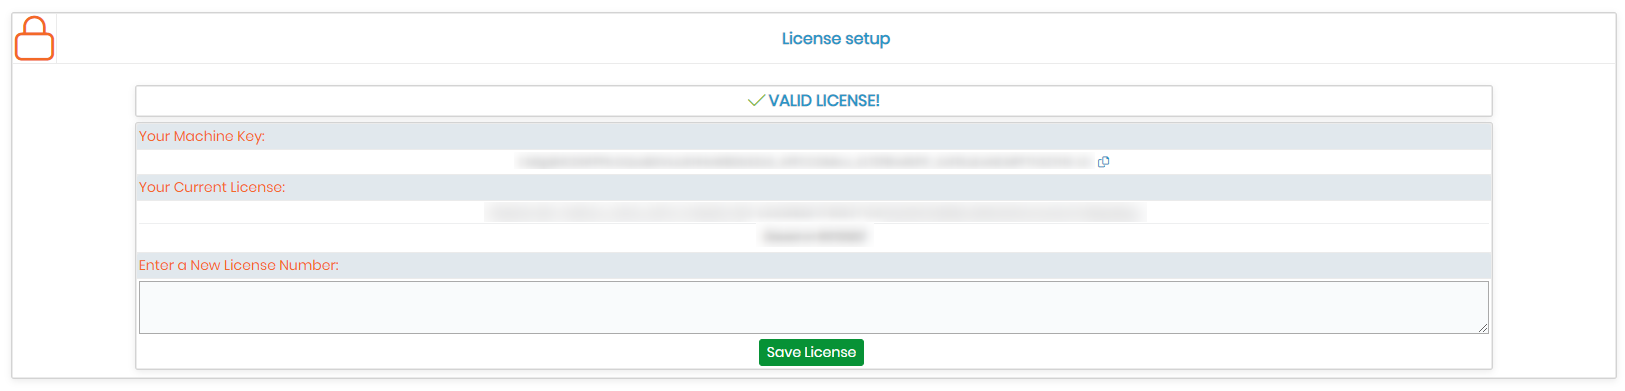
- License: In this section, you can manage your add-on license, you can view your machine key and current license number or enter a new one to renew your expired license.
![]()
-
-
- Check our Aquarium add-on manual.
- Want to take your testing process to the next level? read our KB on How to start with LSM (Lab Service Manager).
- Read our LSM Usage Guide.
-
