Search Knowledge Base by Keyword
-
HOW TO START WITH LABCOLLECTOR
- How does LabCollector interface look like?
- How does a module generally look like?
- How to set up storage in LabCollector?
- What are fields in LabCollector?
- What are records in LabCollector & how to create them?
- How to start with Antibodies module?
- How to start with Chemical structures module?
- How to start with Document module?
- How to start with Electronic Lab Notebook (ELN)?
- How to start with Equipment module?
- How to start with Plasmids module?
- How to start with Primers module?
- How to start with Reagent & Supplies module?
- How to start with Sample module?
- How to start with Sequences module?
- How to start with Strains & Cells module?
- How to use Webinars add-on?
- How to mass update memorized records?
- How to use LabCollector for COVID-19 testing?
- Show all articles ( 4 ) Collapse Articles
-
INSTALLATION
- How can I connect to LabCollector from another computer?
- LabCollector Installation Requirements for AWS
- How to install LabCollector using Docker?
-
- How to move a whole installation to a new Windows server?
- How to run LabCollector server on a 64bits Windows machine?
- Install LabCollector with IIS on Windows Server
-
- Clean the apache log manually to improve the speed.
- Switching to the ServerManager v2.5 (old way)
- Windows Installation Using Setup Wizard
- How to enable the soap.dll extension in LSMRemote using php file or LabCollector Server Manager (Windows)?
- How to use the LabCollector Server Manager?
- How to replicate LabCollector in real time with Windows Server Manager?
-
- Apache Server/Web server doesn't run on Windows 10
- Clean the apache log manually to improve the speed.
- Clean the logs manually to improve the speed.
- ERROR in log: AH00052: child pid 3461 exit signal Segmentation fault (11)
- ERROR: Warning: mysql_connect(): Client does not support authentication protocol requested by server (…)
- How to make Java applets work again after upgrading to Java 7U51+?
- How to restore overwritten documents
- I have the message "Failed to connect to mySQL server. No Database found for this lab account". What can I do?
- My LabCollector or Add-on is very slow. Why and how to fix it?
- Unknown column “auto_name_mode” in “field list”: The error is occurring when I want to adjust existing records, make new records or import data. What can I do?
- URL issue
- When I add records or any values I have this message: "incorrect integer value: for column 'count' at row 1"
-
- Give access to LabCollector to collaborators outside your network
- How can I connect to LabCollector from another computer?
- Can the database be separated from the system on which labcollector is installed?
- I have problems installing PHP and/or MySQL. Is there an alternative?
- Mysql Server memory usage optimization
- PHP extensions needed
- Rack scanners installation and connection with ScanServer
- System Requirements - Hosted options (FR/ENG)
- What are PHP and MySQL? Do I need to have PHP & MySQL?
- How to migrate LabCollector to new Linux Server?
-
GENERAL
- What is LabCollector?
- How do I install LabCollector? Where can I find the install.exe file?
- System Requirements - Hosted options (FR/ENG)
- How does the remotely hosted version work?
- Can I use LabCollector on a single computer? Can I install it on a web server?
- If I purchase ONE license, do I need to purchase additional licenses for other computers in my lab network?
- Client Area Tutorial
- LabCollector support
- What are the FDA requirements for software to comply with GxP guidelines?
- Do I need to purchase all modules? Can I use only the primers module?
- Icons meaning (EN/FR) V.6.0
- Icons meaning (EN/FR)
- How do I search in LabCollector?
- Can I see/list all records in a module?
- How do I print records?
- How to add panels to LabColletor v6.0?
- How to create tubes with storage and mark their usage? (v6.0)
- How to create and set alerts for tubes? (v6.0)
- Label network printers and roll types
- Show all articles ( 4 ) Collapse Articles
-
BASIC FEATURES
- Export and print models
- How do I add multiple records without data import
- How do I link records and for what purpose?
- How do you create or edit records? (FR/EN)
- Icons meaning (EN/FR)
- Icons meaning (EN/FR) V.6.0
-
- What can I do with the default fields?
- Can I add a custom module to fit my specific needs?
- Custom field types
- How do you create a custom field?
- How do you create a custom field? For version 5.2 onwards
- Custom field: Field category option version 5.2x
- Custom fields: Tab Analysis option
- How do I customize record options?
- How do I use a Read-only field?
- How to customize LabCollector login page colors?
- How to change the language & name of custom fields?
-
- What is a CSV file?
- Import your data (v6.0)
- Import your data (5.3 version and above)
- How to delimit data csv for data import?
- What are the default fields values while importing data? v6.0
- How do I format the date value as yyyy-mm-dd or yy-mm-dd to import?
- Import your samples and associated storage in 3 steps
- Import and manage your Reagent & Supplies V5.3 and above
- Importer ma BDD EndNote dans LabCollector (FR)
- How to solve errors while importing data
- How to mass update memorized records?
-
- What are user level permissions?
- How do you use versioning? v5.31 and below
- How do you use versioning? v5.4 and above
- How to manage users (v5.31 and below)
- How to manage users (v5.4 and above)
- How to use AD or LDAP for login authentication?
- What are group policies and how to use them?
- What are group policies and how to use them? v5.4 and above
- What are group policies and how to use them? v6.0 and above
- How to manage users? (v.6.032+)
- How to configure access permissions?
-
MODULES
-
- Articles coming soon
-
- How to start with Reagent & Supplies module?
- Reagent & supplies preferences (v6.03)
- Reagent & supplies preferences
- How do I create alerts for chemical and equipment?
- How do I create alerts with lots? (v6.0)
- Manage your reagent lots (v6.0)
- Manage your reagent lots
- How to dispose of a lot?
- Risk codes
- How do I manage vendors and sellers?
- How do I print risk and safety data information?
- Import and manage your Reagent & Supplies V5.3 and above
- Manage storage for Reagent & Supplies module
- Manage storage for Reagent & Supplies module (v6.0)
- GHS Hazard Pictograms, Mandatory Safety Signs and the NFPA Hazard Rating System
- How to Use SDS Maker?
- Show all articles ( 1 ) Collapse Articles
-
- Articles coming soon
-
- Articles coming soon
-
- How do I create alerts for chemical and equipment?
- How to activate and set different types of Equipment alerts? (v6.0)
- How to activate and set different types of Equipment alerts? (v5.4 and below)
- How to add a new category and record in equipment module? (v6.0)
- How to add a new category and record in equipment module? (v5.4 and below)
- How to add control chart for calibration maintenance of equipment?
- How to Add/Edit Maintenance for Equipment? (v6.0+)
- How to add/edit maintenance for equipment (v5.4 and below)
- How to export equipment maintenance report?
- What are the options in "display maintenance" section of equipment. (v5.4 and below)
- What are the options in "display maintenance" section of equipment. (v6.0)
-
- Articles coming soon
-
ADD-ONS
- What are Add-ons?
- Fly Stock Manager
- What's Weight Tracker Add-On? How To Use It?
- Custom Field File Upload
- What is e-catalog add-on? And how to use it?
-
- How to start with LSM?
- LSM Usage Guide – From Job Request to Results Reporting
- Test the LSM API
- Insert the LSMremote application in your website
- How to Perform a Paternity/Relationship Genetic Test using LSM?
- Introduction to HL7 and how to use it in LSM
- LSM Job List Icons - What do they mean?
- LSM: How to Group Test Results by Specialty?
- Lot-Sample Linking in LSM for Quality Control
-
- 1st step: Create users and requesters
- How to send samples from LabCollector to a LSM job
- How to link a custom module to LSM?
- How to manage case records (patients, animals...) in LSM?
- How to re-order/re-arrange job & sample custom fields in LSM?
- How to manage ranges in LSM?
- How to restart a job in LSM?
- I’m able to add a new job with no problems but when I try to start it I can’t do it. The following error appears: Error loading XML document: data/bl/bl-job.php. What’s the problem?
- How to accept jobs in LSM?
- How to create & execute a job in LSM?
- How to create version of test in LSM?
- How to import CSV with samples and tests in LSM?
-
- 5th step: Result and invoice template
- How to generate Reports in LSM?
- How to create a processing report in LSM?
- How to Generate Invoices Report Template in LSM?
- How to create a Chain Of Custody (CoC) report and use it LSM & LSMRemote?
- How to use text editor to create a report template in LSM?
- Report tags in LSM for result/invoice/CoC/batch templates?
- Correction/Amendement actions in LSM report
- How to print and follow multiple reports/CoC's in LSMRemote?
- Error loading big reports in LabCollector
- Error loading big reports in LSM
- How to configure header & footer in LSM report/CoC/invoices? (from v4.057+)
- What's the purpose of the report unique ID barcode?
-
- LSMRemote (v6.0) registration, login and other options
- LSMRemote installation steps & Integration into the website ? (v4.0)
- LSMRemote configurable options (v4.0)
- How to configure new fields, submit a job in LSMRemote & view it in LSM?
- How to search in LSMRemote?
- How to create a token for report access for patient/client using LSMRemote?
- How to generate CoC Manifest with integrated labels?
- How to print and follow multiple reports/CoC's in LSMRemote?
- Patient pre-registration configuration and LSMRemote portal connection
- How to do job pre-registration from the LSMRemote portal?
- How to integrate appointments scheduling in LSMRemote?
- How to enable the soap.dll extension in LSMRemote using php file or LabCollector Server Manager (Windows)?
- How to import jobs using LSMRemote?
- How to configure kit and activate it in LSMRemote?
- How to print in bulk the barcodes using LSMRemote?
-
- OW-Server ENET manual
- OW-Server Quick start guide
- OW-Server WiFi manual
- Quick WiFi configuration for OW-Server WiFi
- Conversion method from mA reads to specific Unit for data logger probe?
- How to setup your Data Logger in LabCollector?
- How to Install Sensors on ULT Freezers?
- How to Setup Alerts in Data Logger?
-
-
- How to create a Book, add an Experiment and a Page?
- What is inside a Book?
- What is inside an Experiment?
- Whats inside ELN Page?
- How do I print from ELN?
- ELN Workflows
- ELN templates
- TIFF Image usage
- How to electronically sign the ELN pages?
- How to add a microplate in ELN Page?
- How to add a reagents/solutions recipe in ELN?
-
- ELN - Zoho Spreadsheet Help Guide
- Graph in Flat spreadsheet
- How to change the language of ZOHO excel in ELN?
- How to replicate/import your excel in ELN?
- How to use spreadsheets?
- What is Flat & Zoho Spreadsheet Editor & how to enable it?
- How to use Flat spreadsheet & formulas in it?
- How to make graph in Flat Spreadsheet?
- What can be copy pasted from excel into Flat spreadsheet?
-
- Sample-receiving add-on : Project configuration settings
- How to create & process a package in Sample receiving add-on?
- How to perform pooling in sample receiving add on?
- How to process plates in sample receiving add-on?
- How to view samples created in sample receiving add-on into a module?
- How to add samples created in sample receiving into Workflow add-on?
- How to connect and send samples from 'sample receiving' to do tests in 'LSM'?
-
MOBILE APPS
-
INTEGRATION
-
API
- Introduction to LabCollector API
- API for LabCollector (v5.4+)
- API for LSM (v2)
- API for ELN (v1)
- How to test the LabCollector REST API?
- API error messages
- API: How to create boxes or plates?
- Test the Lab Service Manager API
- Webservice/API Apache setup
- How to set up your Web Services API?
- What's Swagger UI? How to access it & test out API endpoints?
-
TOOLS
- How do you install NCBI blast executable to use in LabCollector?
- How to setup and use Recipe Manager (old version)
- How to manage memorized items?
- Purchase order management - A to Z
- Purchase order management – A to Z (v 6.0+)
- Recipe Manager (v6.0)
- Samples batch tool (Rack scanner)
- How to use Mass Record Updater?
-
UTILITIES / MIDDLEWARE
-
- How to download and Install File connector v2.2? (Labcollector v6.0 )
- How to install Fileconnector in Mac OS? (Labcollector v6.0 )
- Editing a file using File Connector
- How to use a specific software to open certain types of files in fileconnector? (Labcollector v6.0 )
- How to use Fileconnector in Mac OS?
-
- How to setup and configure Scan Server with LabCollector?
- Samples batch tool (Rack scanner)
- The rack barcode on top or as third element in lines?
- How to open CSV in UTF8 in Excel?
-
PRINTING
- How to configure printer with LabCollector?
- How to connect USB printer to LabCollector?
- Compatible Label printers
- Label network printers and roll types
- Barcode label generation and printing
- How do I print barcode labels?
- How do I print box maps?
- How do I print records?
- How do I print risk and safety data information?
- How do I print storage records
- How to print labels on HTTPS environment?
- How to best configure your PDA N5000 for LabCollector use
- How can I configure my barcode scanner AGB-SC1 CCD?
- How can I configure my barcode scanner HR200C ?
- How do I configure FluidX to support ScanServer?
- Barcode Printer Connection Time Out
- AGB-W8X Manual for barcode scanning
- How to set up your Printers & Labels?
- Show all articles ( 3 ) Collapse Articles
-
STORAGE
- How to set up storage in LabCollector?
- How to create boxes/drawers/racks in storage equipment?
- How to create box models for storage?
- How to replicate and duplicate boxes in storage?
- How to store and manage straws? (EN/FR)
- How Do I Add Samples to a Specific Freezer, Shelf or Other Part of the Storage System?
- How do I get out samples from a specific freezer?
- Manage storage for Reagent & Supplies module
- How to organize Storage Browser?
- How do I print box maps?
- How do I print storage records
- Storage Check-in/out System
-
COMPLIANCY
- What is in the Compliancy Pack?
- How do I use a Read-only field?
- What are the FDA requirements for software to comply with GxP guidelines?
- FDA CFR21 part 11 product checklist
- ISO 17025 compliancy requirements
- How do you use versioning? v5.31 and below
- How do you use versioning? v5.4 and above
- Should I lock, archive or delete records?
-
SUPPORT
-
SETTINGS
- How to configure Apache to work with Office 2007 and higher?
- How to speed up your LabCollector? (EN/FR)
- PHP extensions needed
- Speed your local network
- TIFF Image usage
- Time stamp in the records showing incorrect time.
- How to configure SMTP to use OAuth 2.0 (Microsoft & Gmail)?
-
- LabCollector General setup
- LabCollector General setup - v5.4
- LabCollector General Setup 5.2
- LabCollector General setup-v6.0
- Login Options & php requirements for LDAP/SSO
- How to set up your LabCollector's general settings, logo & modules' names?
- How to configure your Proxy, Task Scheduler and Email options?
- How to configure your module search & form options?
- How to configure your Homepage external links?
- How to set up your News Feed?
-
- Error loading big reports in LabCollector
- Fields with scroll bar don't work with Safari, what can I do?
- I can't manage to view box scheme in Safari, why?
- I get the error: "The program can't start because MSVCR110.dll is missing from your computer. Try reinstalling the program to fix this problem" when installing or updating LabCollector for Windows
- Issue in upload file: look at your PHP configuration
- Module search fails with 404 error or request too long
- When I want to import large files, nothing happens?
- Why do I have the error “MySQL server has gone away” on file upload?
-
NEW KB OF THE MONTH
-
RECORDED PRESENTATIONS
What’s Protein Tracking System add-on? And how to use it?
![]() Protein Tracking System (PTS) is an add-on within LabCollector
Protein Tracking System (PTS) is an add-on within LabCollector ![]() , which offers a comprehensive solution for managing protein production and purification activities. With its web-based interface, users can access the system from anywhere and manage an unlimited number of projects.
, which offers a comprehensive solution for managing protein production and purification activities. With its web-based interface, users can access the system from anywhere and manage an unlimited number of projects.
The numerous management tools included in the PTS add-on make it easy for users to keep track of their protein production, transfection, purification and analysis activities. This includes tracking the progress of projects, managing resources, and monitoring results. The system also provides a centralized database where users can store information about their proteins, such as the source, amount, and purity, as well as its storage location within the lab.
The PTS add-on is suitable for both routine projects and technical platform service activities, making it a versatile solution for managing your proteins in a laboratory setting. Whether you are a researcher, scientist, or lab manager, the PTS add-on can help you work more efficiently and effectively by providing a centralized, organized, and accessible way to manage your proteins.
The Add-on also has a user-friendly interface, that is intuitive and streamlined, allowing users to quickly navigate and complete tasks.
![]()
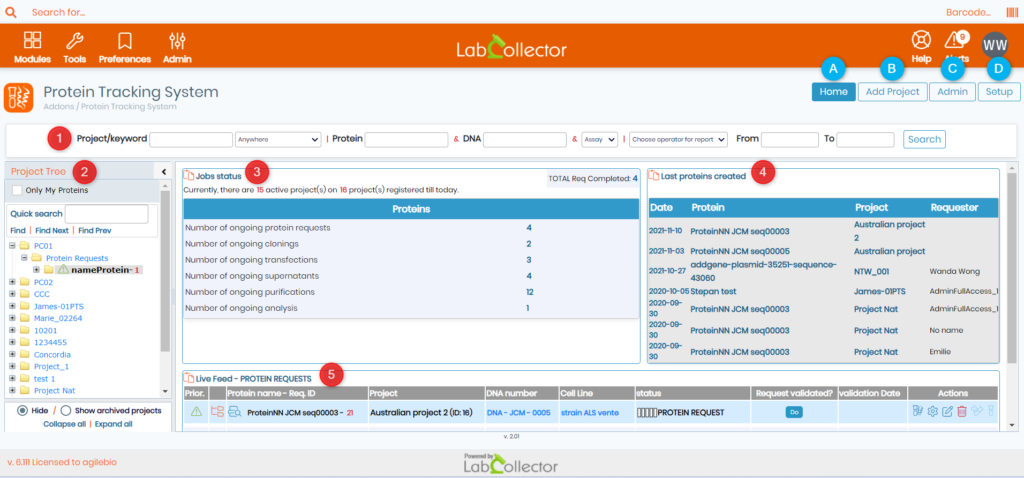
The screenshot below provides a comprehensive visual representation of the main interface of the Protein Tracking System add-on.
.
- A: When you click on the “Home” button, you’ll be taken to the main page (as shown in the screenshot above), which is our default landing page when you first access the add-on. To help you make the most of it, let’s take a closer look at each section:
- 1: Search with Ease: Looking for specific protein projects? You can search for them using the project code or keyword, the name of the protein/DNA you’re seeking, or the date the record was first created. We’ve made it easy for you to find what you’re looking for!
- 2: Project Tree: Keep track of all existing protein projects with our project tree. With a quick search function built in, you can focus on your own proteins if you like.
- 3: Job Status: Keep tabs on the status of all your jobs in one place. You’ll see the number of active projects, total projects, ongoing protein requests, clonings, transfections, purifications and more. Stay in control and stay informed!
- 4: Latest Proteins: See all the latest proteins created, alongside their details such as creation date, protein name, project name and requester.
- 5: Live Feed: For super admins and administrators, our live feed of protein requests is a game changer. You can validate or reject requests, edit or delete them, or even duplicate them for easy management.

.
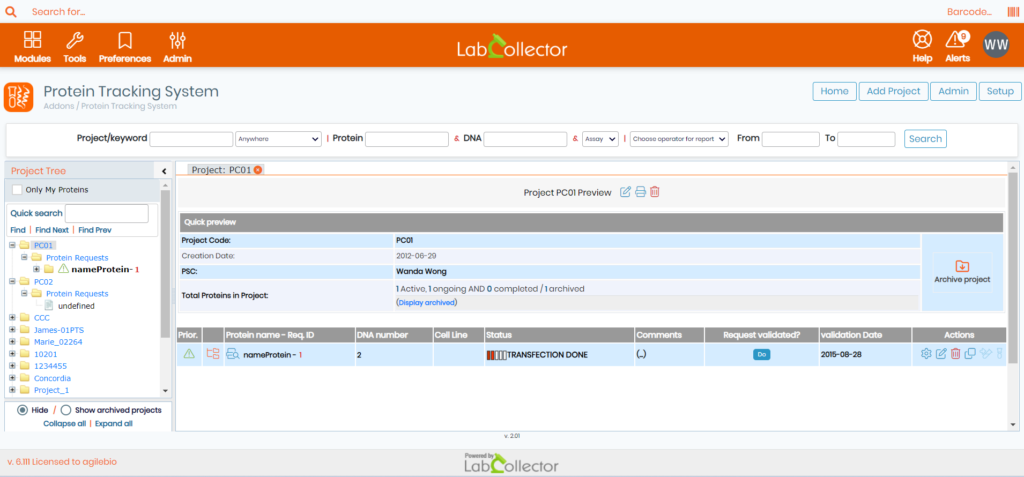
- When you click on a project from the project tree, you’ll be taken to a detailed preview page. Here, you’ll find all the information you need to know about your project – its status, creator, and more. Plus, with just a click of a button, you have the ability to archive it or make changes. Here’s what you’ll find:
- Quick preview: Get a comprehensive view of your project, including its status (for example:
 &
&  ), creator, and more. You’ll have all the information you need at your fingertips!
 - Archive
 : Need to take a project off the table for a while? No problem! With the archive feature, you can easily remove it from view and return to it later.
 - Edit
 : Make changes to your project as needed with the easy-to-use edit feature. Update information, make tweaks, and keep your project moving forward.
 - Print
 : Want to share your project details with others? With our print feature, you can print a hard copy of the project for your records or to share with your team.
 - Delete
 : No longer need a project? Delete it with ease and keep your project tree organized and up-to-date.
- Quick preview: Get a comprehensive view of your project, including its status (for example:
.
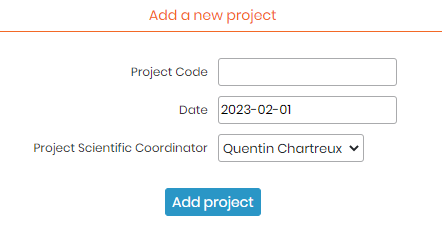
- B: The “Add Project” section allows for the creation of new projects. All you need to do is input a project code, a date and a project scientific coordinator, then click on “Add project”.
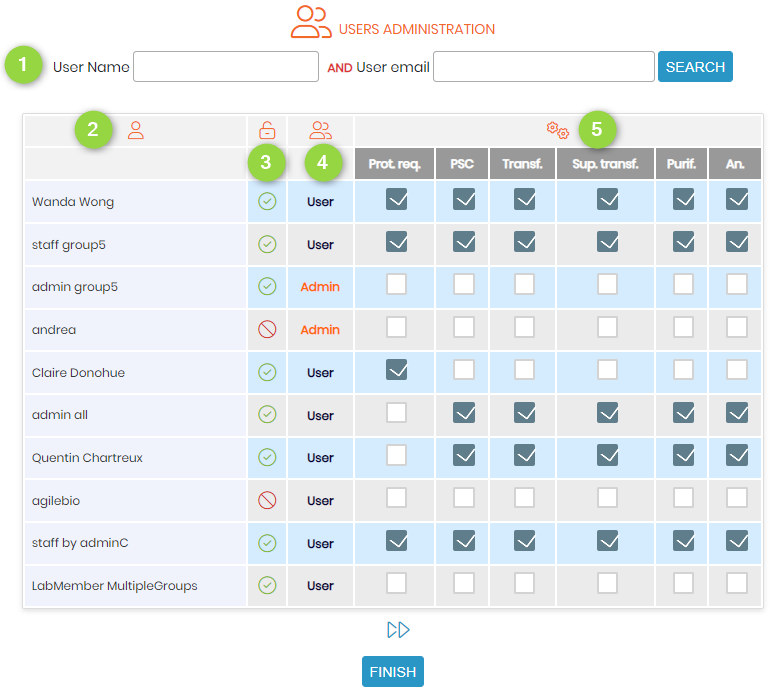
- C: As an administrator, you play a crucial role in managing and maintaining the smooth operation of the add-on. That’s why we’ve designed the “Admin” Section to be the ultimate tool for streamlining your work. Here, you can easily manage and monitor user activity, including adding new users, updating user’s role, and configuring their access.
-
- 1: In this section, you have the ability to search for specific users and modify their status. Simply enter the name and/or email of the user you’re looking for in the search bar.
- 2: The names of all the add-on users are listed in the first column.
- 3: In the second column, you can easily change the status of each user by checking the green checkmark or prohibition icon. If a user is currently active, you can click on the green checkmark to deactivate them. And if a user is inactive, you can click on the prohibition icon to activate them.
- 4: In the third column, you can view the role of each user, whether they are an administrator or just a regular user. You can also change their role by clicking on the user text to set it as “admin” or vice versa.
- 5: In the final column, you have the ability to set access rules for each user. You can select the steps that a user is allowed to access, or deselect the steps you want to restrict. For example, you may want to give an admin user access to all steps, while a regular user only has access to certain steps.
.
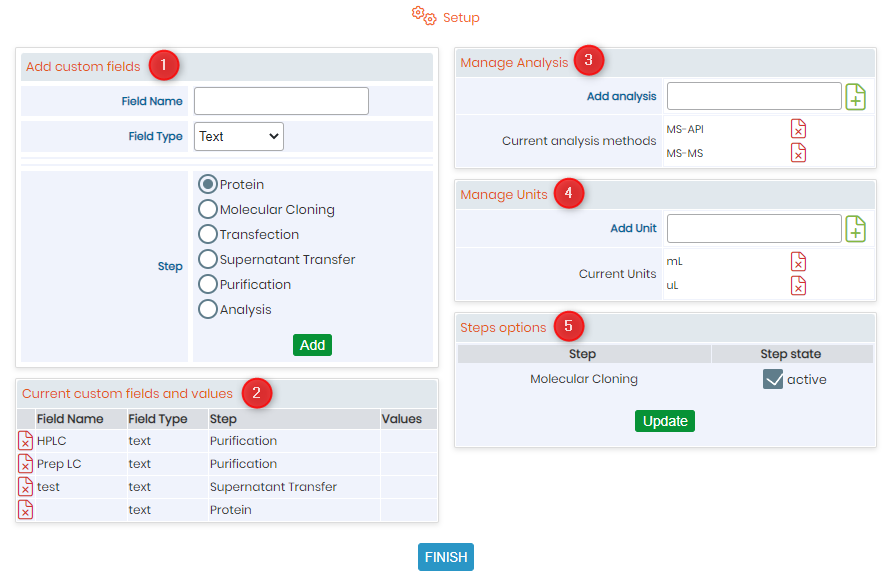
- D: The “Setup” Section provides the necessary steps for setting up the add-on. The following is included:
-
- 1: Add custom fields: Make the add-on work for you by customizing settings, such as adding new custom fields, choose the name you want for the field, its type, and the step in which you want to introduce this field.
- 2: Current custom fields and values: In this section, you will find a list of all custom fields that have been created. You will see the field’s name, type, and the step in which it is introduced. Additionally, you can delete any existing custom fields by clicking on the “Delete” button
 .
. - 3: Manage Analysis: You can add your preferred analysis methods such as MS-MS, ELISA, SPR, …etc. This way, you can ensure that your analysis needs are met.
- 4: Manage Units: In this section, you have the ability to manage your preferred units, such as ml, ul, etc. This way, you can ensure that the add-on is using the units that you are most comfortable with.
- 5: Steps Options: You can add custom steps to the add-on, and choose whether you want to keep existing ones active or deactivate them. For example, you could add a step for “Molecular Cloning” and choose to keep it active. This way, you can ensure that the add-on is tailored to meet your specific needs and requirements.
![]()
Related topics:
-
-
- Check our Protein Tracking System manual.
- Read our KB on How to change parameters in I-Collector.
- Read our KB on How to connect Parser to I-Collector.
-


