Search Knowledge Base by Keyword
Import your data (v6.0)
SUMMARY:
Prepare your LabCollector database. Before importing data, you have to configure the module you are importing data by creating the fields that you need and adding possible values where required. See our KB-Create custom field 5.2v for more information on creating custom fields.
Ensure your PHP has increased limits: max_input_vars = 10000 or more (See KB-Import large files).
To Import your data follow the below steps:-
1.Creating a CSV field for data import
- Method 1: Getting fields name
- Method 2: Getting names of default & custom fields
2. Import data to the modules
- A) Importing a custom field that links to other modules
- B) Importing data for genotype tag
- C) Importing data for Sequences
- D) Importing data for Chemical structures
- E) Importing data for Documents and R&S
- F) Importing data for Reagent & Supplies
3. Errors while importing data & their solution
![]()
- Data import only works with CSV or another text file with delimited data (Click the link to check our KB to delimit data)
- Save the CSV file in txt (Tab) or CSV (comma or semi-colon as separator). (Click the link to check our KB on how to save in CSV format)
- You can convert your data to text format (text file with DOS line break) with field delimiters of your choice from Excel or other database types.
- For Mac OS files, save them as CSV for Windows format.
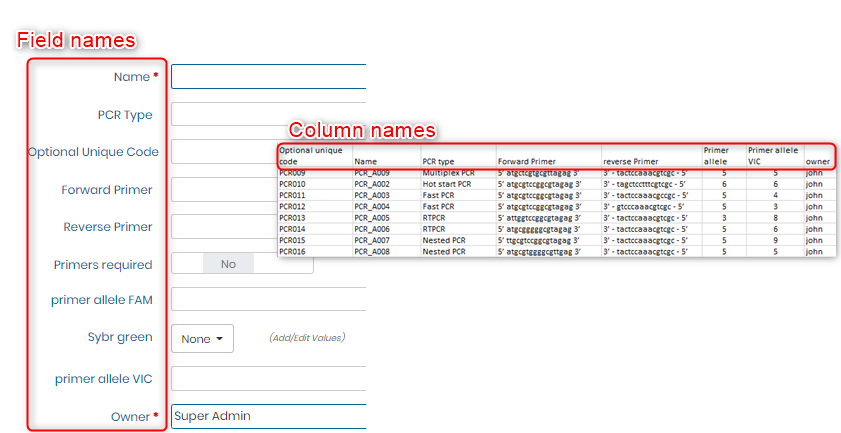
- All mandatory fields (with *) present in the module in LabCollector should be included. (See figure below under Fields Name–>Method 1)
- Do not merge cells in CSV. They will be considered as separate cells & will create error
- In your CSV file, the headings of the column (Column names) should be the same as the field names (ADMIN–>DATA–>FIELDS order and select the module you want to see or reorder fields for). [Checking/editing Field Names is described below] *Please check our KB to see what are fields in LabCollector.
- You can download the Field names to copy-paste them in your CSV file (as column headings) to be imported. (shown in Section 2-Import data into modules below).
- One field name should be one column.
- Minimum Requirements for importing: Imported data MUST CONTAIN fields related to name (if you have set up your module with Automatic naming, leave the column empty) and the owner (unless you select to overwrite imported owners in advanced options – see the second figure under section A – or the module doesn’t use the owner field as in the Reagent & Supplies module).
* to go to Automatic Naming go to ADMIN –>OTHER–>RECORD OPTIONS - Each imported record can have a project code. Each project code used must already exist in LabCollector for a correct importation. (to manage project codes go to TOOLS->MANAGE PROJECT CODES)
- Custom fields such as Database Upload and Disk Folder Upload cannot be imported. Please use the free add-on Custom field file upload.
- The date has to be formatted as yyyy-mm-dd or yy-mm-dd, for more details please read the KB-Formatting date value.
![]()
1. Creating a CSV field for data import
- To import data you must first create a CSV file.
- Note: You can create an excel file and then convert it into CSV by delimiting it.
*Please read our KB to know more about how to delimit your CSV for data import. - To create a CSV you need all the field names inside your module. *Please check our KB to see what are fields in LabCollector.
- There are 2 types of fields in LabCollector- default & custom.
- Default fields are present by default in all modules.
- Custom fields are the ones that you can create according to your requirements.
- To import data the column name in the CSV (or excel) should be the same as the field name to be imported so to check & reorder the field names, there are three methods. All of them are explained in detail below.
-
Method 1: Getting fields name
- Go to a module of your choice and click on “Add new record”.
- For example: – In the PCR custom module click on
 .
. - You will see all the field names. This you can use as the column names in CSV as shown below.
*Remember the mandatory fields are important to import.
-
-
-
Method 2: Getting names of default & custom fields
-
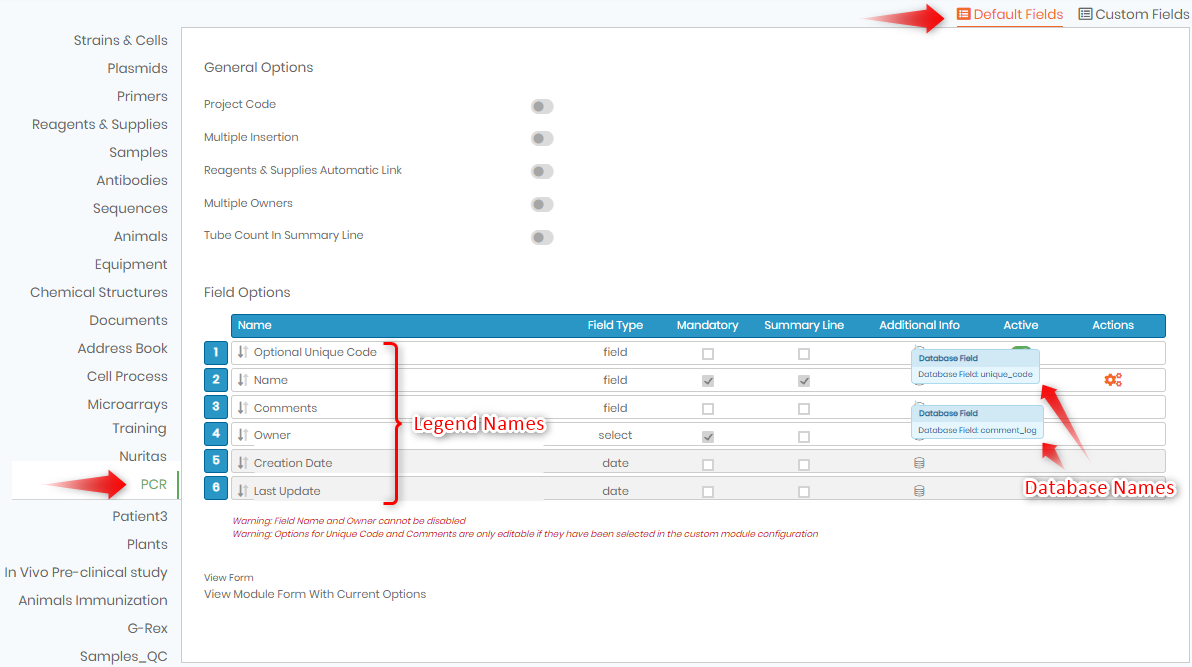
a) You can find the Default Field names by going to ADMIN -> DATA -> DEFAULT FIELDS for the module of your choice.
-
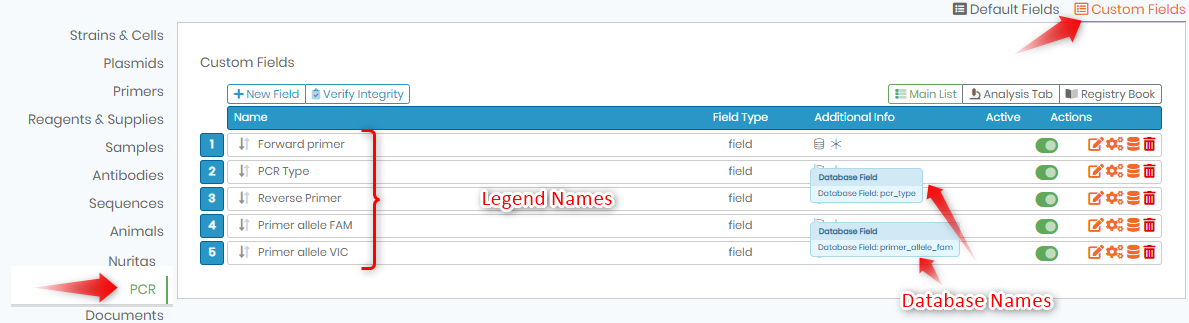
b) You can find the Custom Field names by going to ADMIN -> DATA -> CUSTOM FIELDS for the module of your choice.
– Custom fields can be created by any user. Below is an image from already created custom fields.
* Please see our KB to know more about how to create custom fields.
-
![]()
2. Import data to the modules
- You can generally import the data by creating the CSV with correct field names of the module and using the data import function.
- Below we have explained an example with a custom module called “PCR”.
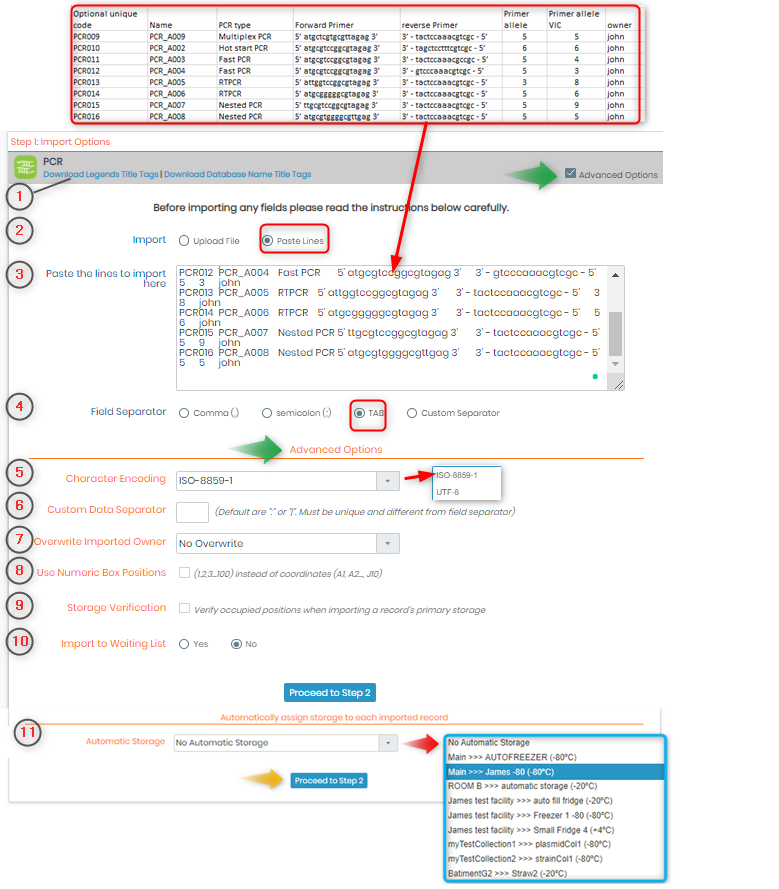
*Please check our KB on how to create a custom module. - Once you have created your CSV with all the details (in the below example the details for the PCR module), you can now go to LabCollector ADMIN–>DATA–>IMPORT
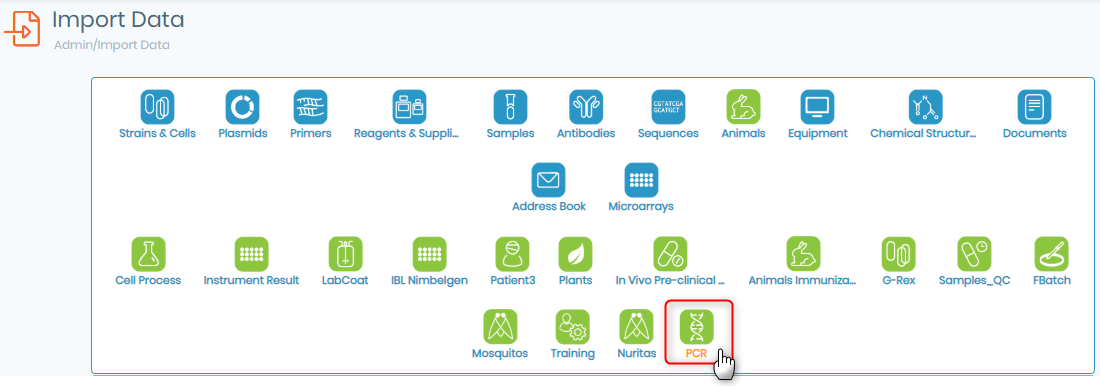
- The below page will be displayed with several options.
Do not forget to click on “Advanced Options” if you want to edit special features. (green arrows)
 This option allows you to download the field names present in either the database or in the LabCollector system.
– You can download either the Legend names or the Database names. Legend and database names are shown in images under Method 2.
– Legend name is the name of the field in the module record, form, or in the list of fields in the default/custom field areas that you give to the field.
– Database name is available in the default/custom fields areas and exempted from special characters. Either you can upload the CSV file or copy-paste the data from the CSV file.
– Upload: You have to delimit the data in your CSV another KB with the ‘comma’ (,) or a semicolon (;). For English Microsoft office its comma (,) and for French Microsoft office its semicolon (;).
– Copy Paste: Copy the area of the CSV along with the column headings and paste it. You can paste the contents of the CSV in this option.
 Choose the field separator. It is the character that we use to separate (delimit) the values from each other.
– If you copy/paste from Excel, select the TAB separator.
– If you have uploaded then it is a comma (for the English language CSV) & semi-colon (for the French language CSV).
*The advance options will be shown if on the top right the box near the “Advance option” is tick marked. (green arrows in the above image) By default, the characters are encoded with ISO-8859-1. That allows you to import most special characters such as letters with grave, acute, diaeresis, circumflex, etc.
UTF-8 has to be used for some language (e.g. Chinese, Greek…) if you use software allowing you to save in CSV with UTF-8 as an encoding (for example LibreOffice). You can select if you have separated the columns by a colon (:) or a tab (│)
 If your excel file doesn’t have Owner/Main Operator/Person in Charge/Author (depending on the module – Reagents & Supplies and Address Book modules don’t have owner fields), or if you want to overwrite this field, select one owner in the list.
Note:*Administrators can import data under any name.
Note:*Staff can import under their own name only.
* Please see our KB on different user level permissions in LabCollector.
- .
 On the template that you download in step 1, you will have columns called Box ID/Box Name,Position in Box,Volume.
Note:* In the column title/header BOX ID/BOX name, the user needs to make a choice to add information for ONLY one of them and NOT both.
Note:*This ONLY works on Main Storage. Hence, it will not work for reagent and supplies module.- Box ID: represents the ID of the storage box and
- Box Name: Represents the name of storage box.
- Position in box: represents the position of tubes in your box (using the coordinates or numerical positions)
– If you choose numeric positions 1,2,3, etc. to specify the locations of your storage box, then you need to tick the box like below.

– If you choose A1, B1, etc. to specify the locations of your storage box, then leave the box unchecked.
Note:* If you need to add multiple tubes to separate the locations by a comma, then take care to choose the correct separator of CSV during file import. (step 4 above)
 Here you can tick mark to choose to automatically detect any storage positions that are already filled in, so as to not put duplicate entries.
– Note:* This setting can also be activated by going to LABCOLLECTOR -> ADMIN -> OTHER -> SETUP GENERAL SETTINGS,LOGO,MODULE NAMES,ETC DATA -> IMPORT STORAGE VERIFICATION

 You can choose to import it into a waiting list. As for the USER level to import data, an administrator has to validate the data under the ADMIN -> DATA -> WAITING LIST before it can be uploaded.
* Please see our KB on different user level permissions in LabCollector. If you have configured your equipment with the automatic storage option, you can access this storage directly here. You don’t have the choice of the box/location, LabCollector assigns all storage automatically.
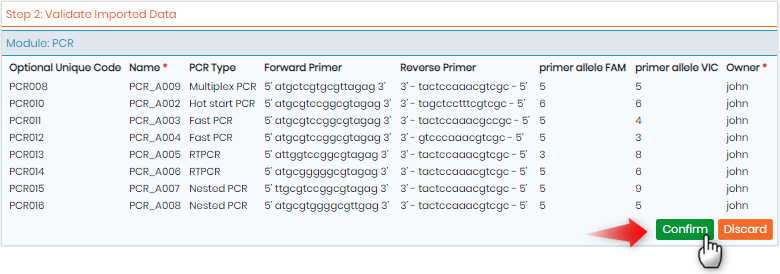
- If everything is ok click on proceed to step 2 & click on confirm.
A) Importing a custom field that links to other modules
- If you have a custom field that allows you to insert a link to any module, and you want to import data from CSV and specify the module you need to link to your record.
* Please see our KB to know more about how to create custom fields.
*Please check our KB to see what are fields in LabCollector.
*Please check our KB to see what are records in LabCollector. - When you create a custom field in a module of your choice, and you want it to connect to the other module. To give a specific example, let’s say you have a custom module called ‘Patient’ and you want to connect the patient details to their samples in the ‘Sample’ module.
- In the above scenarios, go to ADMIN -> DATA -> CUSTOM FIELDS -> NEW FIELD & you will have 2 options to create such a custom field with the field type
– 1) Link: where you can link any record

– 2) Autocomplete field: here you can link to a module using the specific record name.

- To give you an example we created both the field types and we wanted it to link to a sample called “mBRS10000000_C015” which is the specific name of the record.
– So either you can (1-Link) add a link by choosing the record or you can just (2-Autocomplete Field) type the specific record name and it will automatically create a link for you.

- Let’s say when you want to import data for such a field.
- (1-Link) In your CSV you can add the name of the record that will automatically connect your imported item to the respective module.
– For example, if you want to link your Primer records to a specific record in the Sample Module. - (2-Autocomplete Field) In your CSV you can add the name of the specific record.
B) Importing data for genotype tag
- Modules like Strains & Cells, animals have a by default field called the ‘genotype’.
- This field is generally activated by going to DEFAULT FIELDS -> GENERAL OPTIONS -> GENOTYPE TAG SYSTEM
- You only need to remember that genotype tags need to be separated by a space.
C) Importing data for Sequences
- You can import the sequences file in the fasta format. For example like below:
- >FN598458.1 Uncultured phyllopharyngid ciliate partial 18S rRNA gene, clone GM2_C8
ACCTGGTTGATCCTGCCAGTAGCATATGCTTGTCTTGGAGATTAAGCCATGCATGTCTAAGTATAAGTTA
TACAAGGCGAAACTGCGAATGGCTCATTAAAACAGTTATAATTTATTTGACGATTGCCTTATATGGATAA
CCGAGGGAAACTTCAGCTAATACATGCTTGTCATTTGACGTATTTATTAGTTCCACCGATGGCTTAGGCC
TTTTGATGATTCATGATAACTGATCGAAGCGATTTCGCTACGTCATTCAAGTTTCTGCCCTATCAGCTCT
GATTGTAGTGTATTGGACTACAATGGCTATTACGGGTAACGGAGAATTAGGGTTCGATTCCGGAGAAGGA
GCCTGAGAAACGGCTACTATGTCTACGGATAGCAGCAGGCGCGTAAATTACCCAATTGTAAATCACAGAG - Once the file is uploaded you choose DNA, RNA or Protein type. You also have to choose the owner of the import sequences (by default, the person associated with the account login).
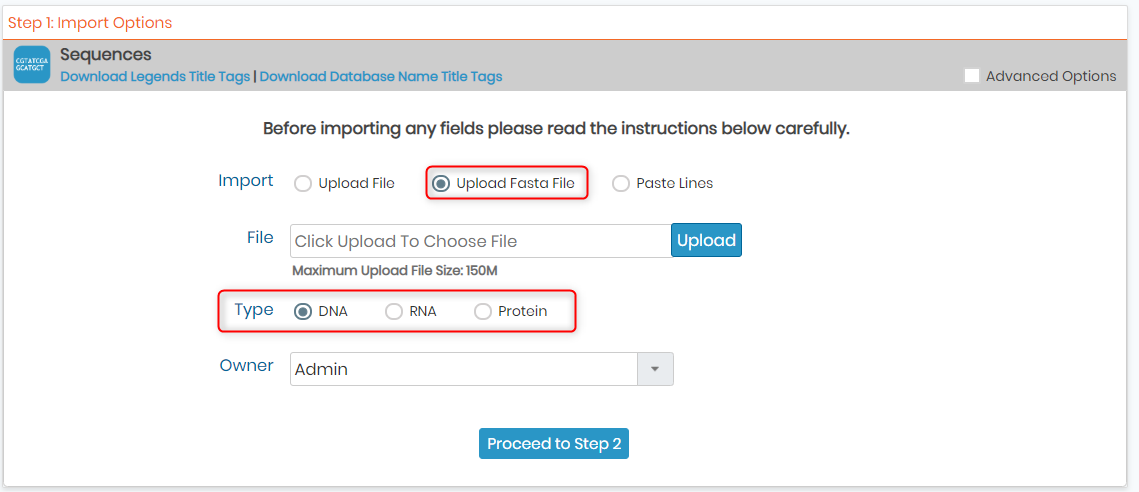
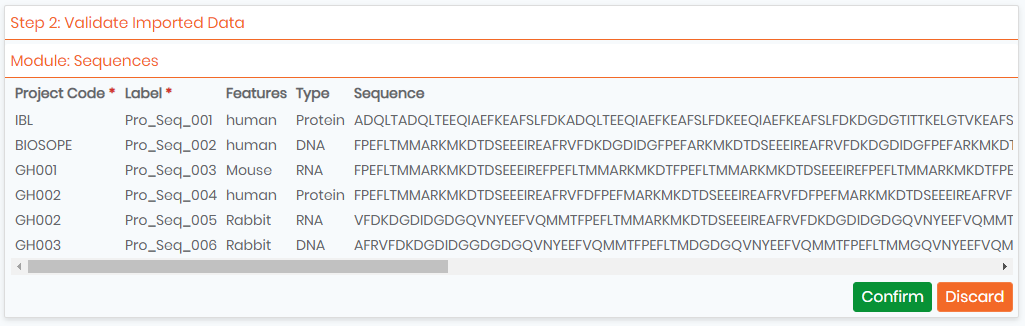
- Select to proceed to step 2 once everything is ok.
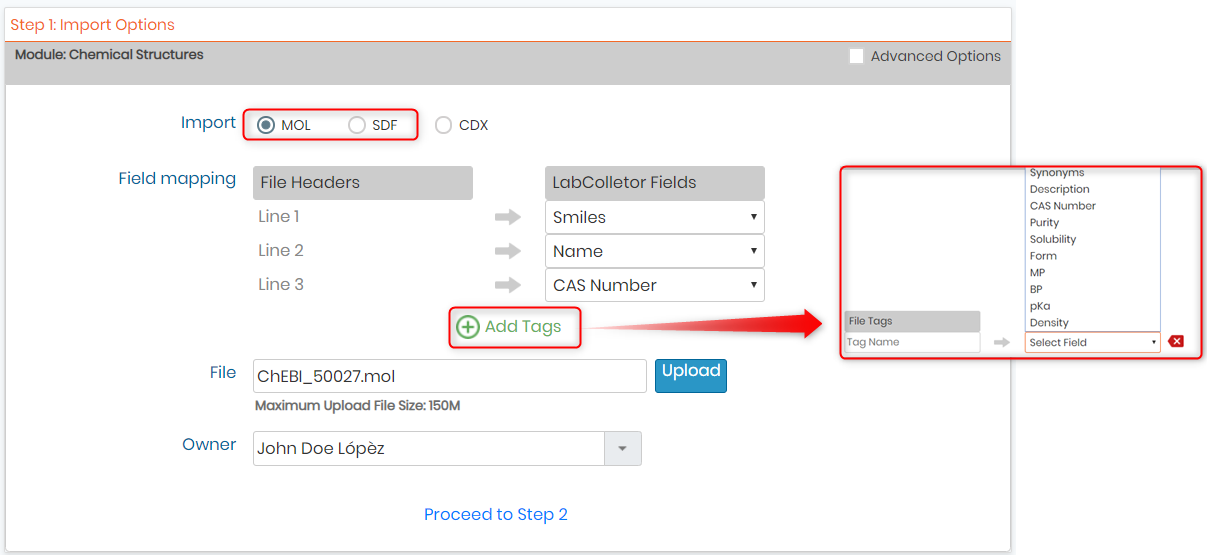
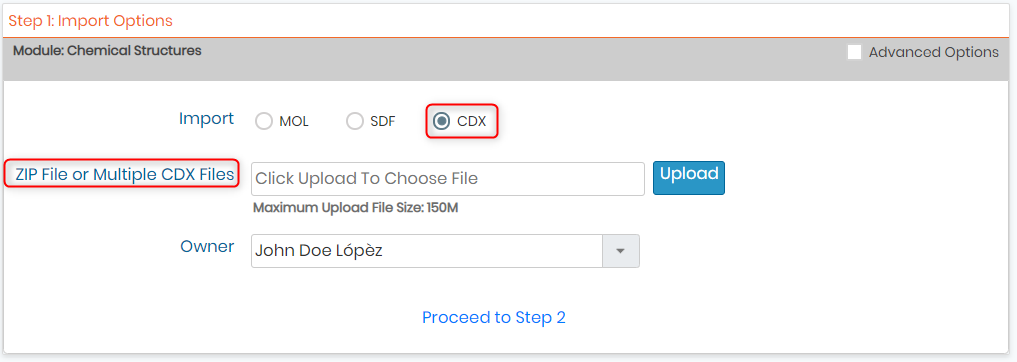
D) Importing data for Chemical Structures
- To import the chemical files, you can import them in the MOL, SDF & CDX file formatted.
- For MOL and SDF file format, your file can be formatted with header lines. You can also add tags if you require them.
- For CDX file you can upload multiple files or a ZIP file.
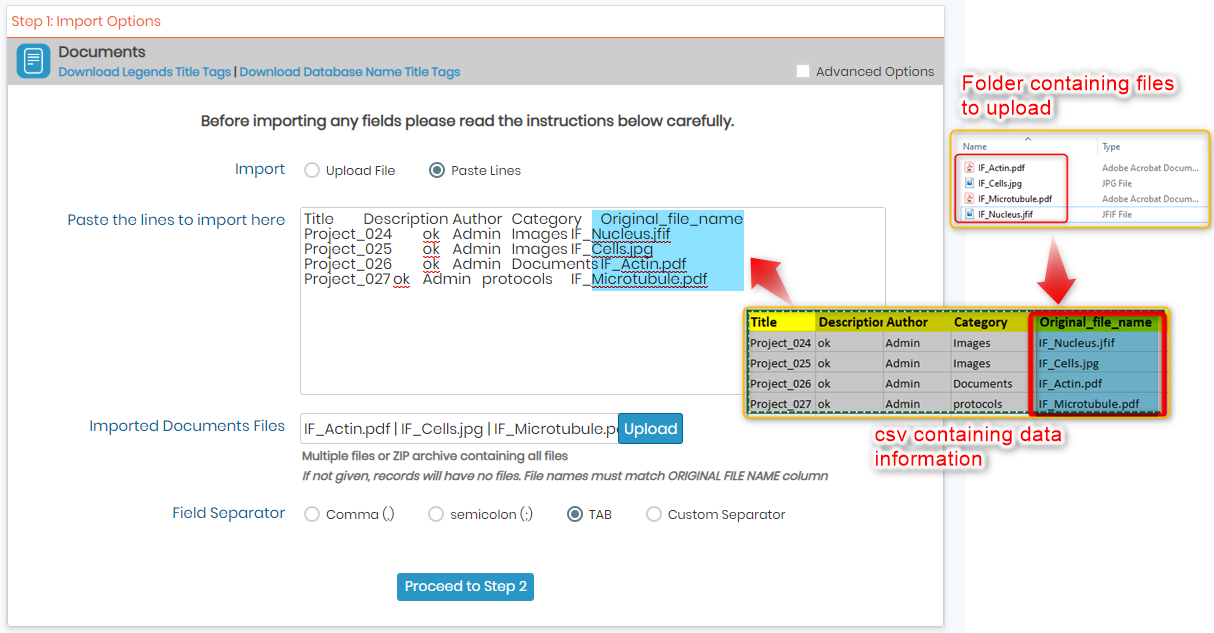
E) Importing data for Documents
- You can upload documents using a CSV as well.
- You can either upload the CSV or copy-paste the items in the CSV file.
- For copy-pasting remember to add the column original_file_name containing the exact name of the document you want to import to your import file or paste lines as in the example below.
- Remember to add the file extension also under the original_file_name as seen in the figure below (eg. if it is a pdf write under original name IF_Microtubule.pdf).
- Then, upload your import file AND all the documents you want to import (multiple files as below or a zip).
- Once everything is ok you can proceed to step 2:
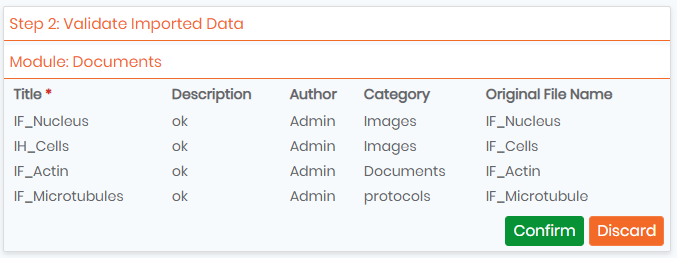
- Result in the document module after the import.

F) Importing data for Reagents & Supplies
- The reagent and supplies module is very useful to create an inventory for lab supplies and chemicals or create buffers, etc.
- Please read the KB on how to import data into the reagent and supplies module.
![]()
3. Errors while importing data & their solution
- While importing data you can come across a lot of errors.
- Please read our KB to see what errors you can encounter while importing data and how to solve these errors.
Related topics:
- See our KB-Create custom field 5.2v for more information on creating custom fields.
- Ensure your PHP has increased limits: max_input_vars = 10000or more (See KB-Import large files).
- *Please read our KB to know more about how to samples & associated storage.
- *Please read our KB to know more about how to delimit your CSV for data import.
- *Please read our KB to know more about how to solve errors during data import.
- *Please read our KB to know more about how to import and manage your reagent and supplies v5.3.
