Search Knowledge Base by Keyword
Introduction to HL7 and how to use it in LSM
SUMMARY:
1. Introduction
- 1a. What is HL7?
- 1b. HL7 Message Types
2. How to use HL7 in LSM
3. HL7 ORU (Observation result)
4. HL7 ORM (Order message)
![]()
1. Introduction
-
1a. What is HL7?
HL7 is a set of standards for transferring clinical and administrative data between hospital information systems. It’s like a language that describes you, and your medical information, to all the Hospital information systems. And the best thing is that all the systems speak the same language. So when the HL7 message is received by other computer systems it can be unpackaged and understood, and these applications in return present your information to those that need it. HL7 is designed to work with every faucet of your care, including specialized software such as Digital Dictation, Laboratory Information systems, Radiology Information Systems, and Medical Imaging equipment.
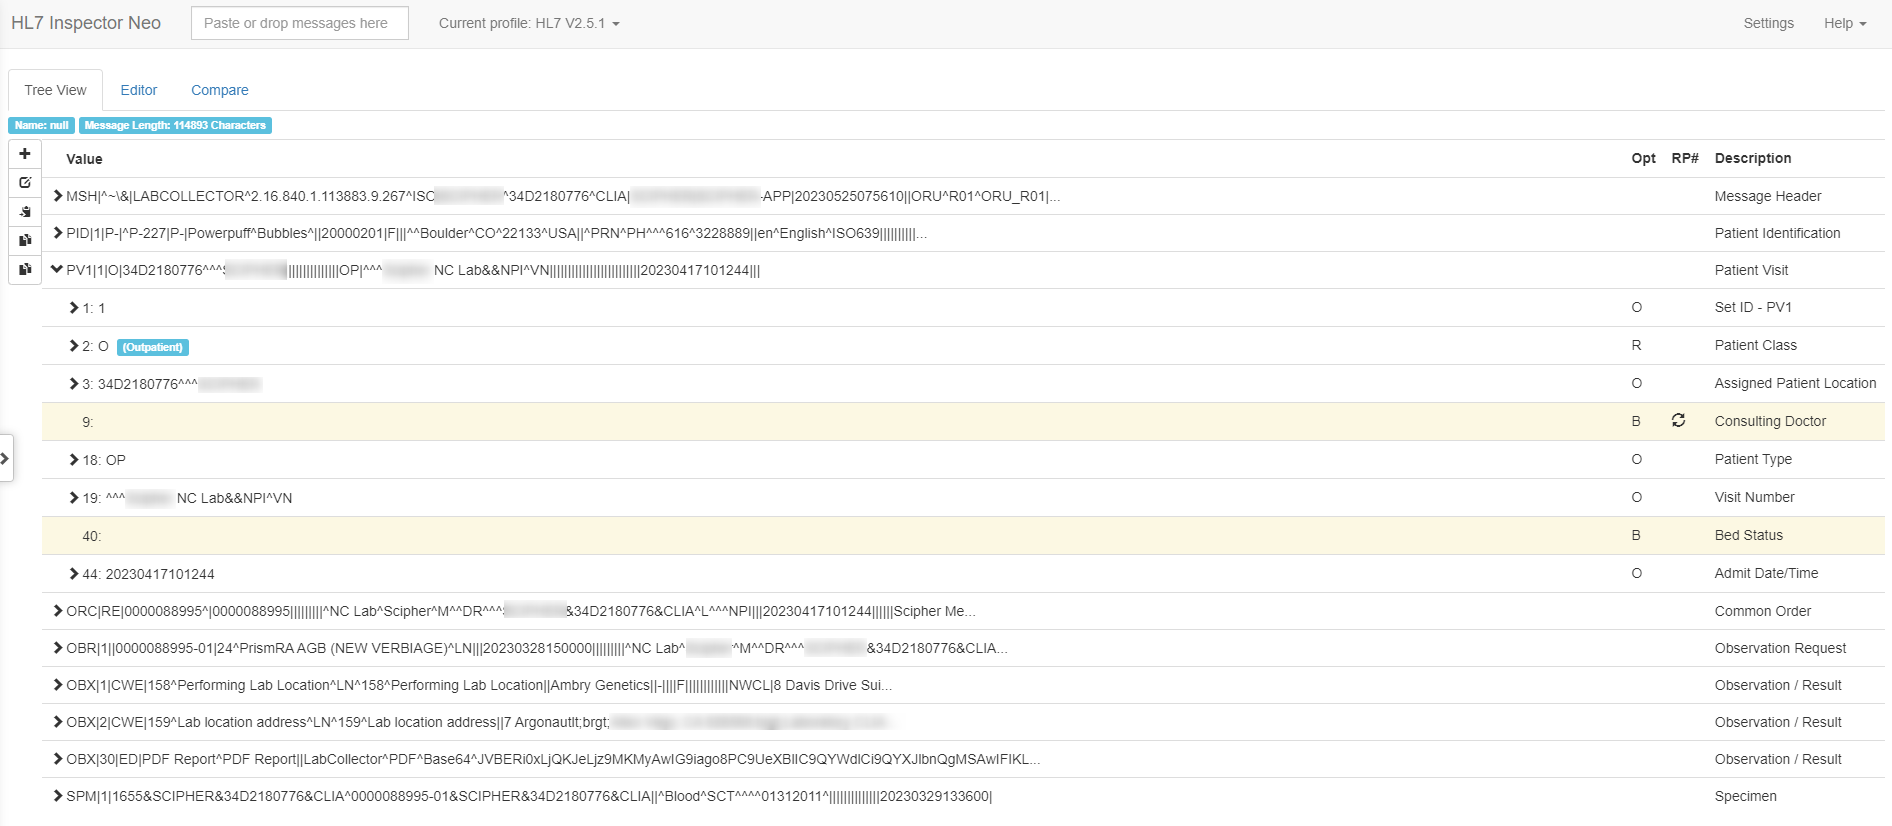
This is an example of an HL7 message:
MSH|^~\&#|LABCOLLECTOR^2.16.840.1.113883.9.267^ISO|LabCollector^12345^CLIA|test^2.16.840.1.113883.3.3551.2^ISO|Paris^2.16.840.
1.113883.3.3551.1^ISO|20220929015951||ORU^R01^ORU_R01|20201102131633153|P|2.5.1|||NE|NE|||||LabCollector^^2.16.840.1.113883.9.1
1^ISOSFT|AGILEBIO|6.1|LABCOLLECTOR|6.1|SOFTWARE|20220916
PID|1|160625^^^LabCollector&2.16.840.1.113883.9.267&ISO^MR|160625^^^LabCollector&2.16.840.1.113883.9.267&ISO^MR||Stark^Tony^||19
800101|Male||2028^White^CDCREC|^^city^ID^^USA||^PRN^PH^^^||en^English^ISO639|||||||2186-5^Not Hispanic or Latino^CDCREC
PV1|1|O|12345^^^LabCollector|||||||||||||||OP||||||||||||||||||||||||||20220916163300
-
1b. HL7 Message Types
All HL7 messages are divided up into Segments of related information, and these are always separated by a carriage return. Each of these segments are simply a separate line of the message.
The first segment in every HL7 Message is always the message header, a segment that conveys the metadata of the message like who sent it and when. The message header is indicated in the first three letters of the segment as MSH. In fact every segment has its own three letter header that identifies what the segment is about. Some common HL7 segments include:
- PID: Patient Identification.
- NK1: Contains information about the patients other related parties.
- PV1: Details of the patients visit, such as doctors and dates.
- SCH: Updating appointments in the hospitals schedule.
- OBR: Repeatable segment that transmits information about an exam, diagnostic study/observation, or assessment that is specific to an order or result.
Into the HL7 message structure we find that segments are themselves divided up into fields. These are normally separated by a pipe character, each field have an assigned value type that relates to its position in the segment, so in this greatly simplified example PID segment we might find:
- The Patients name is at PID-1
- Their date of birth at PID-2
- Details about where they live at PID-3.
Another feature of HL7 messaging is it allows some fields and components to be repeatable. For instance you might have two addresses; one for your home and another for your place of work. Well these can be done by repeating the field with a tilde character between each value.
2. How to use HL7 in LSM
First of all, you must integrate HL7 into LSM.
Go to LSM -> ADMIN -> Setup -> Integrations
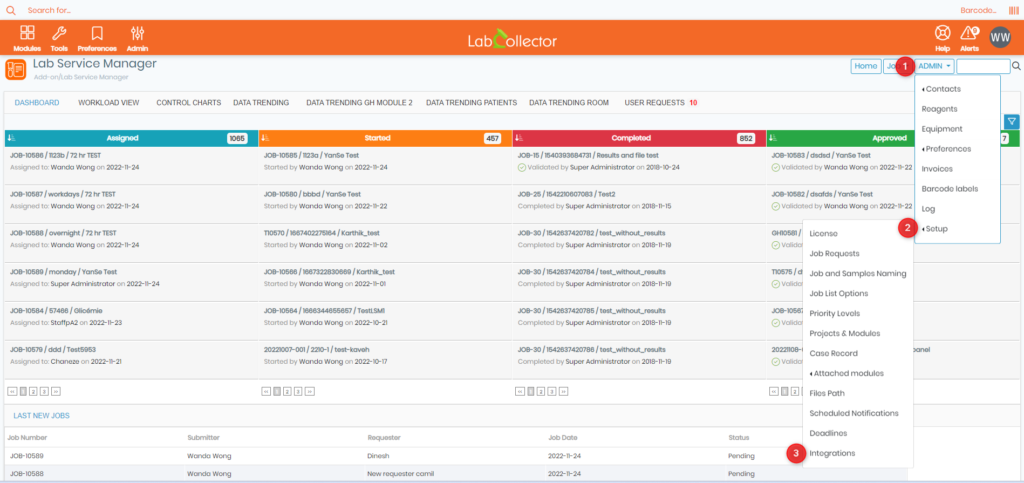
Follow these steps :
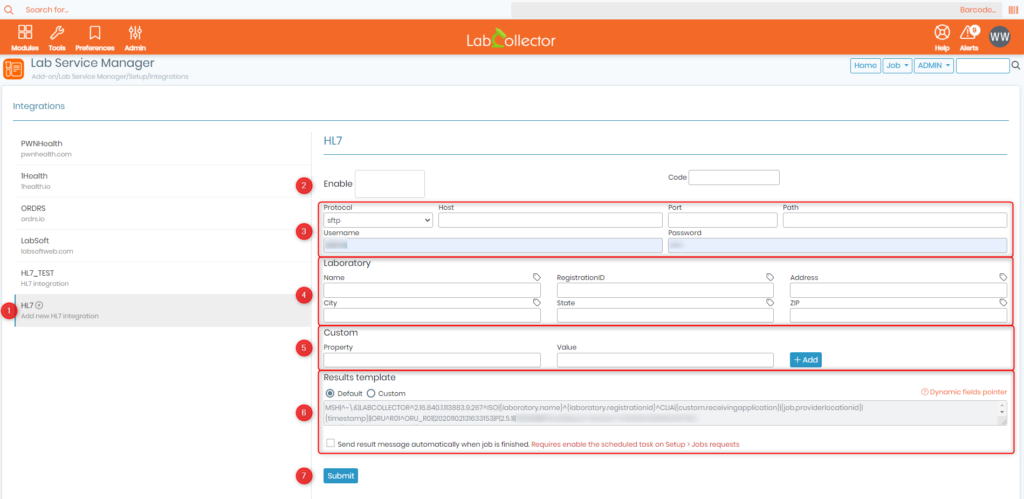
- Click on HL7+
- Put enable on “Yes”
- Complete Protocol fields: Essential information that will be used to send the HL7 file, this is where you indicate that you can retrieve the HL7 file
- Laboratory information that will appear in the HL7 file
- Custom information you can add in HL7 file: Add {custom.xxxx} where xxxx is the property field name. This tag will return the information indicated in Value field in the HL7 file. You can add more custom information by clicking on the submit button
- Results template for HL7 file: There are a default template (cannot be modified) and a custom template which you can modify at will (remember to submit when you have finished)
- Click on Submit when you have finished completing all the fields
Now, HL7 is integrated in your LSM. You can generate HL7 file for a finished job from your Job list by clicking on the gear icon, then Report and Send to ‘Name given to your HL7 integration’.
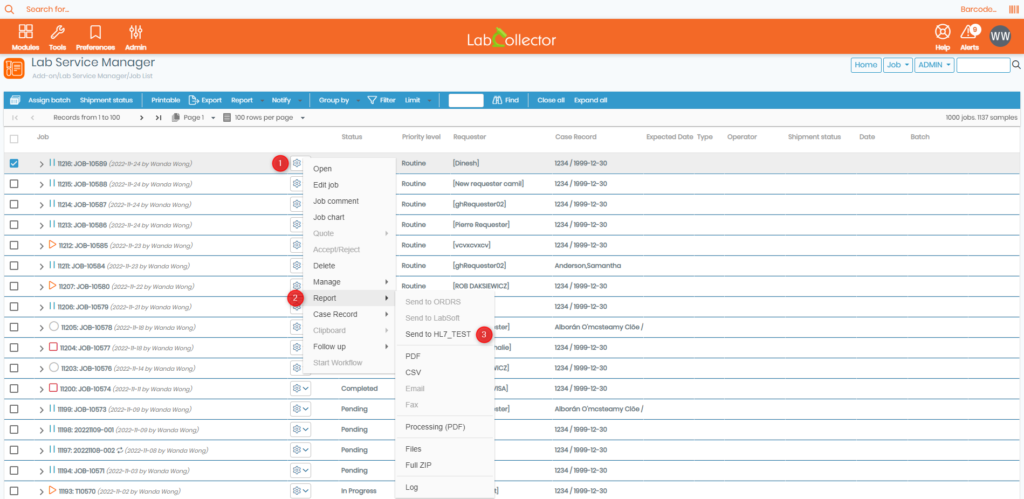
If the report is correctly sent, there will be a popup in the top right corner.

3. HL7 ORU (Observation Result)
HL7 ORU messages are used to transmit laboratory test results from LSM to other systems. LSM supports the use of ORU messages to transmit results for both individual jobs and batches. The HL7 ORU messages contain information about the patient, the test performed, and the results obtained.
When a job is completed in LSM, the HL7 result message is automatically generated if the “send result message automatically when job is finished” option is selected in the HL7 setup. If this option is not selected, the user can manually generate an HL7 result message for the corresponding job or batch.

To generate an HL7 result message, the user needs to click on the “HL7 result” button in the job or batch view. This will open a template with pre-defined tags that can be used to populate the message with the relevant data. The tags can be customized to include additional information if needed. A “Dynamic fields pointer” link is also provided, which opens a help slide with all the available tags.
When a job or batch of jobs is completed in LSM, the ORU message is generated and sent to the specified endpoint. The ORU message contains all the relevant information about the tests performed, including the patient information, the test names, and the results obtained.
![]()
4. HL7 ORM (Order Message)
LSM also allow users to receive new test orders from external systems using the ORM (Order Message) HL7 message type. This is a common message type used for transmitting information about medical orders, such as laboratory tests.
To set up the integration between LSM and an external system that sends ORM messages, you first need to configure the HL7 integration settings in LSM. This can be done by going to Admin > Integrations > HL7.
Once you have configured the integration settings, the HL7 file containing the new order information can be posted to the URL indicated in the settings.
When LSM receives the HL7 message, it will parse and process the message according to the mapping settings you have configured in LSM. Here are the key fields that LSM uses to create new test orders:
1. Provider: The provider who ordered the test is identified in the `OBR.16` field of the HL7 message. If this field does not exist in the message, LSM will automatically create a new provider record.
2. Sample name: The name of the sample to be collected is identified in the `OBR.2` field of the HL7 message.
3. Sample type: The type of sample to be collected is identified in the `OBR.15` field of the HL7 message. If this field is blank, LSM will use default sample types for the specified tests, which can be configured in the “Sample Type Mapping” section of LSM.
4. Job number: The job number is a unique identifier for the test order. It is created using a prefix that you specify in LSM, followed by the `PID.2` field of the HL7 message.
5. Tests: The specific tests to be performed are identified in the `OBR.4` field of the HL7 message. If the test ID in the HL7 message does not match with the test ID in LSM, you will need to map the test in the “Tests Mapping” section of LSM.
6. Case record, job and sample parameters: Other key parameters for the test order, such as the patient’s name, gender, and date of birth, are identified in other fields of the HL7 message. These fields need to be mapped to the appropriate fields in LSM using the “Data Mapping” section of LSM. If a case record with the same name, gender, and date of birth does not exist in LSM, LSM will automatically create a new case record.
Here are some examples of data mapping that you may need to configure in LSM for new test orders:
- Case Record: Last Name = `PID.5.1`
- Case Record: First Name = `PID.5.2`
- Case Record: Gender = `PID.8`
- Sample: Collection Date and Time = `OBR.7`
With these mapping settings configured in LSM, new test orders can be received and processed automatically via HL7 messages. This allows for seamless integration between LSM and external systems, and enables efficient management of laboratory test orders and results.
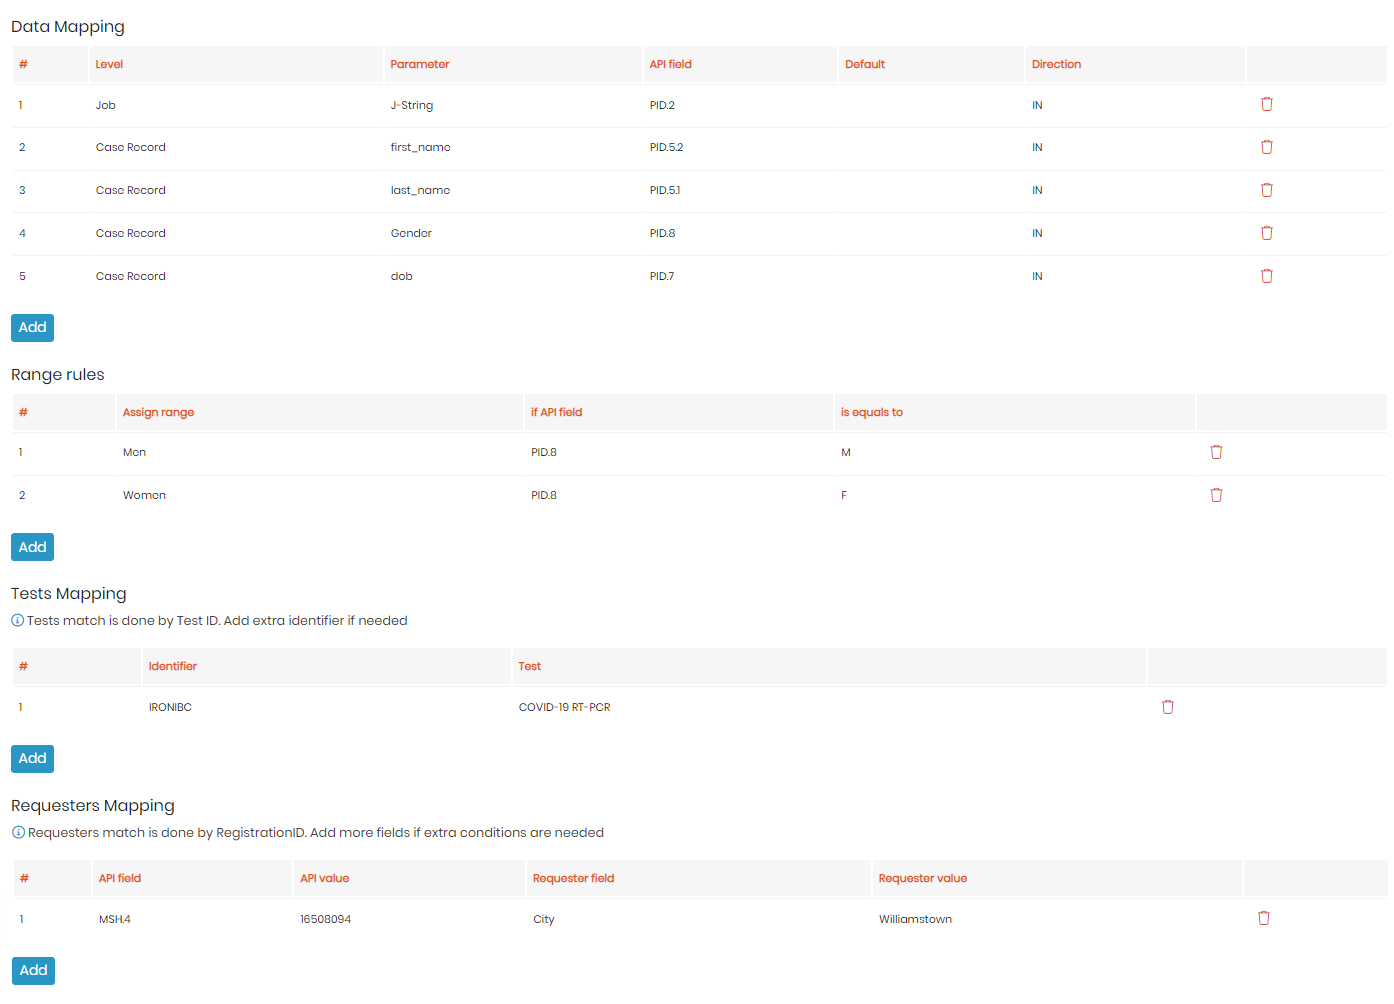
To add a parameter, follow these steps:
- Navigate to the “Admin” section and select “Preferences” from the menu.
- Click on “Parameters” to access the parameter settings.
- Fill out the required information, including the label name, parameter’s level (job, sample, or case record), data type, and any other relevant details.

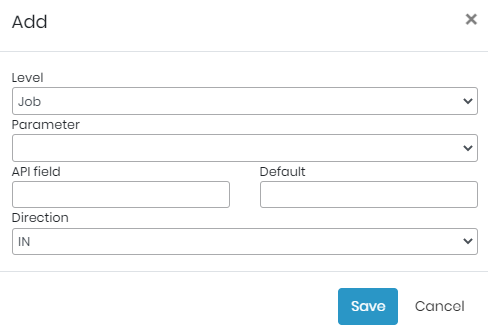
Once the parameter is added, you can proceed to the data mapping section in LSM integrations by following these instructions:
- Go to the data mapping section in LSM integrations.
- Look for the button labeled “Add” and click on it.
- A pop-up form will appear, prompting you to specify the level of the parameter you want to add. Choose the appropriate level from the drop-down menu.
- Additionally, you can indicate the API field and set a default value in case the parameter returns no value. Choose the direction of the parameter (IN or OUT) based on your requirements.
If you’re unsure about the level of a specific parameter, you can easily find it by using the search filter within the “Admin” section:
- Navigate to “Admin” and select “Preferences” from the menu.
- Click on “Parameters” to access the parameter settings.
- Use the search filter to locate the parameter you’re looking for.
- Once you find the parameter, you can view and input its level within the data mapping tab.
Please note that for job parameters, it is important to adhere to the following guidelines:
- Use lowercase letters: Ensure that all characters in the job parameter are in lowercase. Avoid using uppercase letters.
- Avoid spaces: Do not include any spaces within the job parameter. Use underscores or hyphens instead if necessary.
![]()
Related topics:
- Check our Knowledgebase on how to start with LSM.
- See how to create a version of test in LSM.
- Check how to create conditional fields in LSMRemote.
