Søg vidensbase efter søgeord
-
SÅDAN STARTER DU MED LABCOLLECTOR
- Hvordan LabCollector interface ser ud?
- Hvordan ser et modul generelt ud?
- Sådan konfigurerer du lager i LabCollector?
- Hvad er felter i LabCollector?
- Hvad er poster i LabCollector & hvordan laver man dem?
- Hvordan starter man med Antibodies-modulet?
- Hvordan starter man med modulet Kemiske strukturer?
- Hvordan starter man med dokumentmodulet?
- Sådan starter du med Electronic Lab Notebook (ELN)?
- Hvordan starter man med udstyrsmodul?
- Hvordan starter man med Plasmids-modulet?
- Hvordan starter man med Primers-modulet?
- Hvordan starter man med reagens- og forsyningsmodulet?
- Hvordan starter man med prøvemodulet?
- Hvordan starter man med Sequences-modulet?
- Hvordan starter man med Strains & Cells-modulet?
- Hvordan bruger man Webinars-tilføjelse?
- Hvordan masseopdaterer man huskede poster?
- Brugsvejledning LabCollector til COVID-19 test?
- Vis alle artikler (4) Skjul artikler
-
INSTALLATION
- Hvordan kan jeg oprette forbindelse til LabCollector fra en anden computer?
- LabCollector Installationskrav til AWS
- Sådan installeres LabCollector bruger du Docker?
-
- Hvordan flytter man en hel installation til en ny Windows-server?
- Sådan løber du LabCollector server på en 64bits Windows-maskine?
- Installer LabCollector med IIS på Windows Server
-
- Rens apache-loggen manuelt for at forbedre hastigheden.
- Skift til ServerManager v2.5 (gammel måde)
- Windows-installation ved hjælp af installationsguiden
- Sådan aktiverer du soap.dll-udvidelsen i LSMRemote ved hjælp af php-fil eller LabCollector Server Manager (Windows)?
- Sådan bruges LabCollector Server Manager?
- Sådan replikeres LabCollector i realtid med Windows Server Manager?
-
- Apache Server/Webserver kører ikke på Windows 10
- Rens apache-loggen manuelt for at forbedre hastigheden.
- Rens træstammerne manuelt for at forbedre hastigheden.
- FEJL i log: AH00052: underordnet pid 3461 udgangssignal Segmenteringsfejl (11)
- FEJL: Advarsel: mysql_connect(): Klienten understøtter ikke godkendelsesprotokol anmodet af serveren (...)
- Hvordan får man Java-applets til at fungere igen efter opgradering til Java 7U51+?
- Sådan gendanner du overskrevne dokumenter
- Jeg har meddelelsen "Kunnede ikke oprette forbindelse til mySQL-serveren. Ingen database fundet for denne laboratoriekonto". Hvad kan jeg gøre?
- My LabCollector eller Add-on er meget langsom. Hvorfor og hvordan fikser man det?
- Ukendt kolonne "auto_name_mode" i "feltliste": Fejlen opstår, når jeg vil justere eksisterende poster, lave nye poster eller importere data. Hvad kan jeg gøre?
- URL problem
- Når jeg tilføjer poster eller værdier, får jeg denne meddelelse: "forkert heltalsværdi: for kolonne 'antal' i række 1"
-
- Giv adgang til LabCollector til samarbejdspartnere uden for dit netværk
- Hvordan kan jeg oprette forbindelse til LabCollector fra en anden computer?
- Kan databasen adskilles fra systemet, hvorpå labcollector er installeret?
- Jeg har problemer med at installere PHP og/eller MySQL. Er der et alternativ?
- Mysql Server optimering af hukommelsesforbrug
- PHP-udvidelser påkrævet
- Rack scannere installation og tilslutning til ScanServer
- Systemkrav - Hostede muligheder (FR/ENG)
- Hvad er PHP og MySQL? Skal jeg have PHP og MySQL?
- Sådan migreres LabCollector til ny Linux Server?
-
GENEREL
- Hvad er LabCollector?
- Hvordan installerer jeg LabCollector? Hvor kan jeg finde filen install.exe?
- Systemkrav - Hostede muligheder (FR/ENG)
- Hvordan fungerer den eksternt hostede version?
- Kan jeg bruge LabCollector på en enkelt computer? Kan jeg installere det på en webserver?
- Hvis jeg køber EN licens, skal jeg så købe yderligere licenser til andre computere i mit laboratorienetværk?
- Kundeområde vejledning
- LabCollector support
- Hvad er FDA-kravene til, at software overholder GxP-retningslinjerne?
- Skal jeg købe alle moduler? Kan jeg kun bruge primermodulet?
- Ikoner, der betyder (EN/FR) V.6.0
- Betydning af ikoner (EN/FR)
- Hvordan søger jeg ind LabCollector?
- Kan jeg se/liste alle poster i et modul?
- Hvordan udskriver jeg poster?
- Hvordan tilføjer man paneler til LabColletor v6.0?
- Hvordan laver man rør med opbevaring og markerer deres brug? (v6.0)
- Hvordan opretter og indstiller man advarsler for rør? (v6.0)
- Mærk netværksprintere og rulletyper
- Vis alle artikler (4) Skjul artikler
-
GRUNDLÆGGENDE FUNKTIONER
- Eksporter og print modeller
- Hvordan tilføjer jeg flere poster uden dataimport
- Hvordan forbinder jeg poster og til hvilket formål?
- Hvordan opretter eller redigerer du poster? (FR/EN)
- Betydning af ikoner (EN/FR)
- Ikoner, der betyder (EN/FR) V.6.0
-
- Hvad kan jeg gøre med standardfelterne?
- Kan jeg tilføje et brugerdefineret modul, der passer til mine specifikke behov?
- Brugerdefinerede felttyper
- Hvordan opretter du et brugerdefineret felt?
- Hvordan opretter du et tilpasset felt? For version 5.2 og frem
- Brugerdefineret felt: Feltkategori option version 5.2x
- Brugerdefinerede felter: Mulighed for faneanalyse
- Hvordan tilpasser jeg optagelsesmuligheder?
- Hvordan bruger jeg et skrivebeskyttet felt?
- Sådan tilpasses LabCollector login side farver?
- Hvordan ændrer man sproget og navnet på brugerdefinerede felter?
-
- Hvad er en CSV-fil?
- Importer dine data (v6.0)
- Importer dine data (5.3 version og nyere)
- Hvordan afgrænser man data-csv til dataimport?
- Hvad er standardfeltværdierne under import af data? v6.0
- Hvordan formaterer jeg datoværdien som åååå-mm-dd eller åå-mm-dd for at importere?
- Importer dine prøver og tilhørende opbevaring i 3 trin
- Importer og administrer din Reagent & Supplies V5.3 og nyere
- Importør for BDD EndNote dans LabCollector (FR)
- Sådan løser du fejl under import af data
- Hvordan masseopdaterer man huskede poster?
-
- Hvad er tilladelser på brugerniveau?
- Hvordan bruger du versionering? v5.31 og derunder
- Hvordan bruger du versionering? v5.4 og nyere
- Sådan administrerer du brugere (v5.31 og derunder)
- Sådan administrerer du brugere (v5.4 og nyere)
- Hvordan bruger man AD eller LDAP til login-godkendelse?
- Hvad er gruppepolitikker, og hvordan bruger man dem?
- Hvad er gruppepolitikker, og hvordan bruger man dem? v5.4 og nyere
- Hvad er gruppepolitikker, og hvordan bruger man dem? v6.0 og nyere
- Hvordan administrerer man brugere? (v.6.032+)
- Hvordan konfigurerer man adgangstilladelser?
-
MODULER
-
- Artikler kommer snart
-
- Hvordan starter man med reagens- og forsyningsmodulet?
- Præferencer for reagens og forsyninger (v6.03)
- Præferencer for reagens og forsyninger
- Hvordan opretter jeg advarsler for kemikalier og udstyr?
- Hvordan opretter jeg advarsler med partier? (v6.0)
- Administrer dine reagenspartier (v6.0)
- Administrer dine reagenspartier
- Hvordan bortskaffer man en masse?
- Risikokoder
- Hvordan administrerer jeg leverandører og sælgere?
- Hvordan udskriver jeg risiko- og sikkerhedsdataoplysninger?
- Importer og administrer din Reagent & Supplies V5.3 og nyere
- Administrer lager for reagens- og forsyningsmodulet
- Administrer lager for reagens- og forsyningsmodul (v6.0)
- GHS-farepiktogrammer, obligatoriske sikkerhedsskilte og NFPA-fareklassificeringssystemet
- Hvordan bruger man SDS Maker?
- Vis alle artikler (1) Skjul artikler
-
- Artikler kommer snart
-
- Artikler kommer snart
-
- Hvordan opretter jeg advarsler for kemikalier og udstyr?
- Hvordan aktiverer og indstiller man forskellige typer udstyrsalarmer? (v6.0)
- Hvordan aktiverer og indstiller man forskellige typer udstyrsalarmer? (v5.4 og derunder)
- Hvordan tilføjer man en ny kategori og optager i udstyrsmodul? (v6.0)
- Hvordan tilføjer man en ny kategori og optager i udstyrsmodul? (v5.4 og derunder)
- Hvordan tilføjes kontrolskema til kalibreringsvedligeholdelse af udstyr?
- Hvordan tilføjer/redigerer man vedligeholdelse for udstyr? (v6.0+)
- Sådan tilføjes/redigeres vedligeholdelse af udstyr (v5.4 og derunder)
- Hvordan eksporteres udstyrsvedligeholdelsesrapport?
- Hvad er mulighederne i afsnittet "skærmvedligeholdelse" af udstyr. (v5.4 og derunder)
- Hvad er mulighederne i afsnittet "skærmvedligeholdelse" af udstyr. (v6.0)
-
- Artikler kommer snart
-
Tilføjelser
- Hvad er tilføjelser?
- Flybestyrer
- Hvad er Weight Tracker Add-On? Brugsvejledning?
- Brugerdefineret feltfil upload
- Hvad er e-catalog add-on? Og hvordan bruger man det?
-
- Hvordan starter man med LSM?
- LSM Brugsvejledning – Fra jobanmodning til resultatrapportering
- Test LSM API
- Indsæt LSMremote-applikationen på din hjemmeside
- Hvordan udfører man en faderskabs-/relationsgenetisk test ved hjælp af LSM?
- Introduktion til HL7 og hvordan man bruger den i LSM
- LSM joblisteikoner - hvad betyder de?
- LSM: Hvordan grupperer man testresultater efter speciale?
- Lot-Sample Linking i LSM til kvalitetskontrol
-
- 1. trin: Opret brugere og anmodere
- Sådan sender du prøver fra LabCollector til et LSM-job
- Hvordan forbinder man et brugerdefineret modul til LSM?
- Hvordan administrerer man sagsjournaler (patienter, dyr...) i LSM?
- Hvordan genbestilles/omarrangeres job & prøve tilpassede felter i LSM?
- Hvordan administrerer man intervaller i LSM?
- Hvordan genstarter man et job i LSM?
- Jeg er i stand til at tilføje et nyt job uden problemer, men når jeg prøver at starte det, kan jeg ikke gøre det. Følgende fejl vises: Fejl ved indlæsning af XML-dokument: data/bl/bl-job.php. Hvad er problemet?
- Hvordan accepterer man job i LSM?
- Hvordan opretter og udfører man et job i LSM?
- Hvordan opretter man en version af testen i LSM?
- Hvordan importerer man CSV med prøver og test i LSM?
-
- 5. trin: Resultat og fakturaskabelon
- Hvordan genererer man rapporter i LSM?
- Hvordan opretter man en behandlingsrapport i LSM?
- Hvordan genererer man fakturarapportskabelon i LSM?
- Hvordan opretter man en Chain Of Custody (CoC) rapport og bruger den LSM & LSMRemote?
- Hvordan bruger man teksteditor til at oprette en rapportskabelon i LSM?
- Rapportér tags i LSM for resultat/faktura/CoC/batch skabeloner?
- Rettelse/ændringshandlinger i LSM-rapport
- Hvordan udskriver og følger man flere rapporter/CoC'er i LSMRemote?
- Fejl ved indlæsning af store rapporter LabCollector
- Fejl ved indlæsning af store rapporter i LSM
- Hvordan konfigureres sidehoved og sidefod i LSM-rapport/CoC/fakturaer? (fra v4.057+)
- Hvad er formålet med rapportens unikke ID-stregkode?
-
- LSMRemote (v6.0) registrering, login og andre muligheder
- LSM Fjerninstallationstrin & Integration i hjemmesiden? (v4.0)
- Konfigurerbare muligheder for LSMFjernbetjening (v4.0)
- Hvordan konfigurerer man nye felter, indsender et job i LSMRemote og ser det i LSM?
- Hvordan søger man i LSMRemote?
- Hvordan opretter man et token til rapportadgang for patient/klient ved hjælp af LSMRemote?
- Hvordan genererer man CoC Manifest med integrerede etiketter?
- Hvordan udskriver og følger man flere rapporter/CoC'er i LSMRemote?
- Konfiguration af patientpræregistrering og LSMRemote-portalforbindelse
- Hvordan laver man jobforhåndsregistrering fra LSMRemote-portalen?
- Hvordan integrerer man aftaleplanlægning i LSMRemote?
- Sådan aktiverer du soap.dll-udvidelsen i LSMRemote ved hjælp af php-fil eller LabCollector Server Manager (Windows)?
- Hvordan importerer man job ved hjælp af LSMRemote?
- Hvordan konfigurerer man kit og aktiverer det i LSMRemote?
- Hvordan udskriver man stregkoderne i bulk ved hjælp af LSMRemote?
- Hvordan aktiverer man soap.dll-udvidelsen i LSMRemote ved hjælp af php-fil på Linux?
- Vis alle artikler (1) Skjul artikler
-
- OW-Server ENET manual
- OW-Server Hurtig startguide
- OW-Server WiFi manual
- Hurtig WiFi-konfiguration til OW-Server WiFi
- Konverteringsmetode fra mA-læsninger til specifik enhed for datalogger-sonde?
- Sådan opsætter du din datalogger LabCollector?
- Hvordan installeres sensorer på ULT frysere?
- Hvordan opsætter man advarsler i datalogger?
-
-
- Hvordan opretter man en bog, tilføjer et eksperiment og en side?
- Hvad er inde i en bog?
- Hvad er inde i et eksperiment?
- Hvad er der indeni ELN Side?
- Hvordan udskriver jeg fra ELN?
- ELN Arbejdsgange
- ELN skabeloner
- TIFF Billedbrug
- Sådan underskriver du elektronisk ELN sider?
- Sådan tilføjer du en mikroplade ELN Side?
- Sådan tilføjer du en opskrift på reagenser/opløsninger ELN?
-
- ELN - Hjælpevejledning til Zoho Spreadsheet
- Graf i fladt regneark
- Sådan ændrer du sproget i ZOHO excel i ELN?
- Sådan replikerer/importerer du dit excel i ELN?
- Hvordan bruger man regneark?
- Hvad er Flat & Zoho Spreadsheet Editor, og hvordan aktiveres det?
- Hvordan bruger man fladt regneark og formler i det?
- Hvordan laver man graf i fladt regneark?
- Hvad kan kopieres indsat fra excel til fladt regneark?
-
- Eksempler-modtagende tilføjelse: Projektkonfigurationsindstillinger
- Hvordan opretter og behandler man en pakke i prøvemodtagelsestilføjelse?
- Hvordan udfører man pooling i prøvemodtagelsestillæg?
- Hvordan behandler man plader i prøvemodtagelsestillæg?
- Hvordan får man vist prøver, der er oprettet i prøvemodtagelsestilføjelse i et modul?
- Hvordan tilføjer man prøver, der er oprettet i prøvemodtagelse, til Workflow-tilføjelsen?
- Hvordan forbindes og sendes prøver fra 'prøvemodtagelse' for at udføre tests i 'LSM'?
-
MOBIL APPS
-
- Artikler kommer snart
-
INTEGRATION
-
API
- Introduktion til LabCollector API
- API til LabCollector (V5.4 +)
- API til LSM (v2)
- API til ELN (V1)
- Sådan testes LabCollector REST API?
- API fejlmeddelelser
- API: Hvordan laver man kasser eller plader?
- Test Lab Service Manager API
- Webservice/API Apache opsætning
- Hvordan konfigurerer du din Web Services API?
- Hvad er Swagger UI? Hvordan får man adgang til det og tester API-endepunkter?
-
TOOLS
- Hvordan installerer du NCBI blast eksekverbar til brug i LabCollector?
- Sådan opsætter og bruger du Recipe Manager (gammel version)
- Hvordan håndterer man huskede elementer?
- Indkøbsordrestyring - A til Z
- Indkøbsordrestyring – A til Z (v 6.0+)
- Recipe Manager (v6.0)
- Samples batch tool (Rack scanner)
- Hvordan bruger man Mass Record Updater?
-
HJÆLPEREDE / MIDDELVARE
-
- Hvordan downloader og installeres filstik v2.2? (Labcollector v6.0)
- Hvordan installeres Fileconnector i Mac OS? (Labcollector v6.0)
- Redigering af en fil ved hjælp af File Connector
- Hvordan bruger man en specifik software til at åbne visse typer filer i fileconnector? (Labcollector v6.0)
- Hvordan bruger jeg Fileconnector i Mac OS?
-
- Sådan opsætter og konfigurerer du Scan Server med LabCollector?
- Samples batch tool (Rack scanner)
- Stregkoden øverst eller som tredje element i linjer?
- Hvordan åbner man CSV i UTF8 i Excel?
-
TRYKNING
- Sådan konfigureres printeren med LabCollector?
- Sådan tilsluttes en USB-printer LabCollector?
- Kompatible etiketprintere
- Mærk netværksprintere og rulletyper
- Generering og udskrivning af stregkodeetiketter
- Hvordan udskriver jeg stregkodeetiketter?
- Hvordan udskriver jeg kassekort?
- Hvordan udskriver jeg poster?
- Hvordan udskriver jeg risiko- og sikkerhedsdataoplysninger?
- Hvordan udskriver jeg lagerregistreringer
- Hvordan udskriver man etiketter på HTTPS-miljø?
- Sådan konfigurerer du bedst din PDA N5000 til LabCollector brug
- Hvordan kan jeg konfigurere min stregkodescanner AGB-SC1 CCD?
- Hvordan kan jeg konfigurere min stregkodescanner HR200C?
- Hvordan konfigurerer jeg FluidX til at understøtte ScanServer?
- Stregkodeprinterforbindelse Timeout
- AGB-W8X Manual til stregkodescanning
- Hvordan konfigurerer du dine printere og etiketter?
- Vis alle artikler (3) Skjul artikler
-
OPBEVARING
- Sådan konfigurerer du lager i LabCollector?
- Hvordan laver man kasser/skuffer/stativer i lagerudstyr?
- Hvordan laver man kassemodeller til opbevaring?
- Hvordan replikeres og duplikeres kasser i opbevaring?
- Hvordan opbevarer og håndterer man sugerør? (EN/FR)
- Hvordan tilføjer jeg prøver til en bestemt fryser, hylde eller anden del af opbevaringssystemet?
- Hvordan får jeg prøver fra en bestemt fryser?
- Administrer lager for reagens- og forsyningsmodulet
- Hvordan organiserer man Storage Browser?
- Hvordan udskriver jeg kassekort?
- Hvordan udskriver jeg lagerregistreringer
- Opbevaring Check-in/out System
-
OVERENSSTEMMELSE
- Hvad er der i compliancy-pakken?
- Hvordan bruger jeg et skrivebeskyttet felt?
- Hvad er FDA-kravene til, at software overholder GxP-retningslinjerne?
- FDA CFR21 del 11 produktcheckliste
- ISO 17025 overholdelseskrav
- Hvordan bruger du versionering? v5.31 og derunder
- Hvordan bruger du versionering? v5.4 og nyere
- Skal jeg låse, arkivere eller slette poster?
-
SUPPORT
-
INDSTILLINGER
- Hvordan konfigureres Apache til at arbejde med Office 2007 og nyere?
- Sådan fremskynder du din LabCollector? (EN/FR)
- PHP-udvidelser påkrævet
- Fremskynd dit lokale netværk
- TIFF Billedbrug
- Tidsstempel i journalen viser forkert tid.
- Hvordan konfigureres SMTP til at bruge OAuth 2.0 (Microsoft & Gmail)?
-
- LabCollector Generel opsætning
- LabCollector Generel opsætning - v5.4
- LabCollector Generel opsætning 5.2
- LabCollector Generel opsætning-v6.0
- Loginmuligheder og php-krav til LDAP/SSO
- Sådan opsætter du din LabCollector's generelle indstillinger, logo og modulers navne?
- Hvordan konfigurerer du dine muligheder for proxy, opgaveplanlægning og e-mail?
- Hvordan konfigurerer du dine modulsøgnings- og formularmuligheder?
- Hvordan konfigurerer du eksterne links til din hjemmeside?
- Hvordan konfigurerer du dit nyhedsfeed?
-
- Fejl ved indlæsning af store rapporter LabCollector
- Felter med rullepanel virker ikke med Safari, hvad kan jeg gøre?
- Jeg kan ikke nå at se boksskema i Safari, hvorfor?
- Jeg får fejlen: "Programmet kan ikke starte, fordi MSVCR110.dll mangler på din computer. Prøv at geninstallere programmet for at løse dette problem", når du installerer eller opdaterer LabCollector til Windows
- Problem i upload-fil: se på din PHP-konfiguration
- Modulsøgning mislykkes med 404-fejl eller for lang anmodning
- Når jeg vil importere store filer, sker der ikke noget?
- Hvorfor får jeg fejlen "MySQL-serveren er gået væk" ved filupload?
-
MÅNEDENS NYE KB
- Kundeområde vejledning
- Hvordan laver man rør med opbevaring og markerer deres brug? (v6.0)
- Hvordan uploader/importerer man data i plasmid- og sekvensmoduler?
- LabCollector Generel opsætning-v6.0
- Indkøbsordrestyring – A til Z (v 6.0+)
- Hvordan bruger man Plasmid Map Editor?
- Hvordan opsætter man advarsler i datalogger?
-
OPTAGET PRÆSENTATIONER
To a better organization you may need to link several records to each other. For example, you can link different reagents to a home-made culture media. Or, you can link sequence records to a sample. You can also link a sample to a client, or a reference manual to an equipment record. In some situations a link will automatically be made between records.
The combinations of links are endless and unlimited.
Indholdsfortegnelse:
- Generic link
- Brugerdefineret link
- Automatisk link
- Reagents & Supplies Link
1. Generic Link
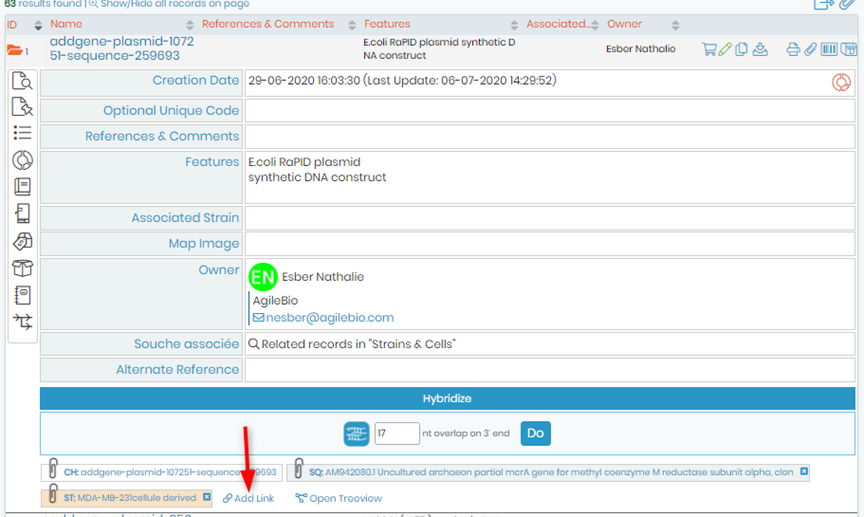
In every module you can select the record that you want from the list. Alternatively, you can also use the keyword search if needed and click on Søg button. All records are listed, select the one you need and click on Tilføj links (at the bottom or at the end of the list) to create a link.
A pop-up, like the example bellow, will appear.
- You can select which module you want to link the record from.
- You can search the record you want to link.
- You can select the record from the list by clicking in the ID checkbox.
- Finally, you can click on “Add Link” to link the selected records.

Afterwards the link will be automatically saved. The links inside a record are useful to jump to related records, by simply clink in the link(s) it will open the related record and you will be able to see the details. Then click the black cross on the top right to exit record linking.

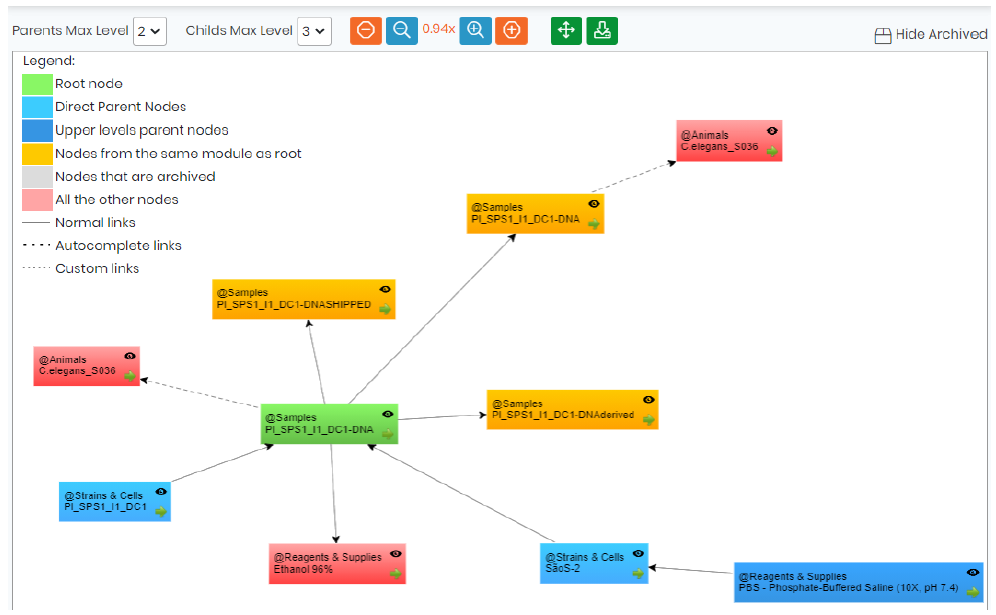
To see how the records are linked to one another, you can click on the Tree view option next to add-link option. Tree view will help you see all the connection to the records. This will open a popup which can be used to navigate between records and display the relations between records. Single clicking items will open the tree of the selected record. Double clicking will open the selected record.

This is how the Tree View will look like.
2. Custom Link
You have to first create appropriate custom fields through Admin → Data → Custom Fields. Custom fields can be set as autofuldførelse or Link.
- Link
By using the option link you can associate different records from the different modules in the custom field. When clicking in the field Link it opens a pop-up with a search engine to select the record to be linked. This list of records in the pop-up can be previously restricted with the following rules:

- You can chose the module from which you want to pick the records to link. If you don’t want to restrict the search for a specific module you can select Enhver, leaving all modules open to search.
- If you select this option you will limit the link for just one record; if this option is not select you can link an unlimited number of records.
- If you select this option you restrict the list of records to be linked. The condition to select the records can be based in a specific field of your choice.
- In this option you can define a condition for a selected field. This means that you can decide if the field is equal, not equal, lower than, greater than or contains a specific requirement.
- In this box you can write in text or numbers the specification of the field condition, restricting the record searching.
Eksempel: if you want to list all the strains with a genotype XY you will need to chose the module Strains & Cells, and for the condition you select the field Genotype equal to XY.
- autofuldførelse
Using the option link you can associate one record from a specific module in the custom field. You have the following options:
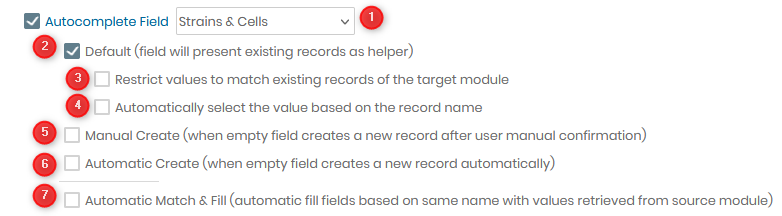
- You can chose the module from which you want to pick the record to link.
- The default type means that the field will present existing records when you start to type as an helper to chose the correct one.
- Under the default type you can restrict the values to match existing records in the chosen module.
- Under the default type you can automatically select the value based on the record name.
- The manual create means that when the field is empty it will create a new record after the use manually confirm the choice.
- The automatic create means that when the field is empty it will creates a new record automatically without need confirmation.
- The final option automatic match & fill can be selected simultaneously with the options 2 to 6. Herein the automatic fill fields based on the same with values retrieved from source module.
3. Automatic Link
When you add some records with the same derivative name, LabCollector creates an automatic link. From Stammer og celler, Prøver, Dyr, Kemiske strukturer and custom module records, you can directly create derived samples by clicking on ![]() . A form will open to create a record in the samples module derived from the record you selected. For example in below image we derive a blood sample.
. A form will open to create a record in the samples module derived from the record you selected. For example in below image we derive a blood sample.

Once this records are derived the link will appear together with the other generic link at the bottom of each record.

When you add some records with the same derivative name, LabCollector creates an automatic link. To see this link, click on ![]() .
.

4. Reagents & Supplies Link
For modules Stammer og celler, Dyr, Udstyr, Antistoffer og primere, you can link your records to Reagenser og forsyninger Module to directly have information about prices, sellers, etc. Use the tab to associate your record to an existent reagent or supply or create one choosing a category. This link called “Display Reagent & Ordering info” is unidirectional (you can’t see that a reagent is associate to an animal for example).
