Hae tietokannasta avainsanan mukaan
-
MITEN ALOITTAA LABCOLLECTOR
- Miten LabCollector miltä käyttöliittymä näyttää?
- Miltä moduuli yleensä näyttää?
- Tallennustilan määrittäminen LabCollector?
- Mihin kentät kuuluvat LabCollector?
- Missä tietueet ovat LabCollector ja miten niitä luodaan?
- Kuinka aloittaa vasta-ainemoduulilla?
- Kuinka aloittaa kemialliset rakenteet -moduuli?
- Kuinka aloittaa asiakirjamoduulin käyttö?
- Kuinka aloittaa Electronic Lab Notebookin käyttö (ELN)?
- Kuinka aloittaa laitemoduulilla?
- Kuinka aloittaa Plasmids-moduulin käyttö?
- Kuinka aloittaa Primers-moduulin käyttö?
- Kuinka aloittaa Reagenssi & Supplies -moduuli?
- Kuinka aloittaa näytemoduulilla?
- Kuinka aloittaa Sequences-moduuli?
- Kuinka aloittaa Strains & Cells -moduuli?
- Kuinka käyttää Webinaari-lisäosaa?
- Kuinka massapäivitys muistiin tallennetut tietueet?
- Kuinka käyttää LabCollector COVID-19-testaukseen?
- Näytä kaikki artikkelit (4) Kutista artikkeleita
-
ASENNUS
- Kuinka voin muodostaa yhteyden LabCollector toisesta tietokoneesta?
- LabCollector AWS:n asennusvaatimukset
- Kuinka asentaa LabCollector käytätkö Dockeria?
-
- Kuinka siirtää koko asennus uudelle Windows-palvelimelle?
- Miten ajaa LabCollector palvelin 64-bittisessä Windows-koneessa?
- install LabCollector IIS:n kanssa Windows Serverissä
-
- Puhdista apache-loki manuaalisesti nopeuden parantamiseksi.
- Siirtyminen ServerManager v2.5:een (vanha tapa)
- Windowsin asennus ohjatun asennustoiminnon avulla
- Soap.dll-laajennuksen ottaminen käyttöön LSMRemotessa käyttämällä php-tiedostoa tai LabCollector Palvelimenhallinta (Windows)?
- Kuinka käyttää LabCollector Palvelimen johtaja?
- Kuinka kopioida LabCollector reaaliajassa Windows Server Managerin avulla?
-
- Apache-palvelin/verkkopalvelin ei toimi Windows 10:ssä
- Puhdista apache-loki manuaalisesti nopeuden parantamiseksi.
- Puhdista tukit manuaalisesti nopeuden parantamiseksi.
- VIRHE lokissa: AH00052: lapsi pid 3461 -poistumissignaali Segmentointivika (11)
- VIRHE: Varoitus: mysql_connect(): Asiakas ei tue palvelimen pyytämää todennusprotokollaa (…)
- Kuinka saada Java-sovelmat toimimaan uudelleen Java 7U51+:ksi päivityksen jälkeen?
- Kuinka palauttaa päällekirjoitetut asiakirjat
- Minulla on viesti "Yhteyden muodostaminen mySQL-palvelimeen epäonnistui. Tietokantaa ei löytynyt tälle lab-tilille". Mitä voin tehdä?
- My LabCollector tai Lisäosa on erittäin hidas. Miksi ja miten se korjataan?
- Tuntematon sarake "auto_name_mode" "kenttäluettelossa": Virhe ilmenee, kun haluan muokata olemassa olevia tietueita, tehdä uusia tietueita tai tuoda tietoja. Mitä voin tehdä?
- URL-ongelma
- Kun lisään tietueita tai arvoja, minulla on tämä viesti: "virheellinen kokonaislukuarvo: sarakkeelle "count" rivillä 1"
-
- Anna pääsy LabCollector verkostosi ulkopuolisille yhteistyökumppaneille
- Kuinka voin muodostaa yhteyden LabCollector toisesta tietokoneesta?
- Voidaanko tietokanta erottaa järjestelmästä, jossa labcollector on asennettu?
- Minulla on ongelmia PHP:n ja/tai MySQL:n asennuksessa. Onko vaihtoehtoa?
- Mysql Server -muistin käytön optimointi
- PHP-laajennuksia tarvitaan
- Telineskannerien asennus ja liittäminen ScanServeriin
- Järjestelmävaatimukset – Hosted-asetukset (FR/ENG)
- Mitä ovat PHP ja MySQL? Pitääkö minulla olla PHP ja MySQL?
- Kuinka muuttaa LabCollector uuteen Linux-palvelimeen?
-
YLEINEN
- Mikä on LabCollector?
- Miten asennan LabCollector? Mistä löydän install.exe-tiedoston?
- Järjestelmävaatimukset – Hosted-asetukset (FR/ENG)
- Miten etäisännöity versio toimii?
- Voinko käyttää LabCollector yhdellä tietokoneella? Voinko asentaa sen web-palvelimelle?
- Jos ostan YHDEN lisenssin, tarvitseeko minun ostaa lisää lisenssejä muille laboratorioverkkoni tietokoneille?
- Asiakasalueen opetusohjelma
- LabCollector tuki
- Mitkä ovat FDA:n vaatimukset ohjelmistoille GxP-ohjeiden noudattamiseksi?
- Pitääkö minun ostaa kaikki moduulit? Voinko käyttää vain primers-moduulia?
- Kuvakkeiden merkitys (EN/FR) V.6.0
- Kuvakkeiden merkitys (EN/FR)
- Miten haen sisään LabCollector?
- Voinko nähdä/listata kaikki moduulin tietueet?
- Kuinka tulostan tietueita?
- Kuinka lisätä paneeleja LabColletor v6.0:aan?
- Kuinka luoda putkia, joissa on säilytystilaa ja merkitä niiden käyttötarkoitus? (v6.0)
- Kuinka luoda ja asettaa hälytyksiä putkille? (v6.0)
- Merkitse verkkotulostimet ja rullatyypit
- Näytä kaikki artikkelit (4) Kutista artikkeleita
-
PERUSOMINAISUUDET
- Vie ja tulosta malleja
- Kuinka lisään useita tietueita ilman tietojen tuontia
- Miten linkitän tietueita ja mihin tarkoitukseen?
- Kuinka luot tai muokkaat tietueita? (FR/EN)
- Kuvakkeiden merkitys (EN/FR)
- Kuvakkeiden merkitys (EN/FR) V.6.0
-
- Mitä voin tehdä oletuskentillä?
- Voinko lisätä mukautetun moduulin erityistarpeideni mukaan?
- Mukautetut kenttätyypit
- Kuinka luot mukautetun kentän?
- Kuinka luot mukautetun kentän? Versio 5.2 alkaen
- Mukautettu kenttä: Kenttäluokkavaihtoehdon versio 5.2x
- Mukautetut kentät: Välilehtianalyysivaihtoehto
- Kuinka voin mukauttaa tallennusasetuksia?
- Kuinka käytän vain luku -kenttää?
- Kuinka mukauttaa LabCollector kirjautumissivun värit?
- Kuinka muuttaa mukautettujen kenttien kieltä ja nimeä?
-
- Mikä on CSV-tiedosto?
- Tuo tietosi (v6.0)
- Tuo tietosi (versio 5.3 tai uudempi)
- Kuinka rajata data csv tietojen tuontia varten?
- Mitkä ovat oletuskenttien arvot tietoja tuottaessa? v6.0
- Kuinka muotoilen päivämäärän arvoksi vvvv-kk-pp tai vv-kk-pp tuontia varten?
- Tuo näytteesi ja niihin liittyvä tallennustila kolmessa vaiheessa
- Tuo ja hallitse Reagenssit ja tarvikkeet V5.3 ja uudemmat
- Maahantuoja on BDD EndNote dans LabCollector (FR)
- Virheiden ratkaiseminen tietojen tuonnissa
- Kuinka massapäivitys muistiin tallennetut tietueet?
-
- Mitä käyttäjätason käyttöoikeudet ovat?
- Miten käytät versiointia? v5.31 ja uudemmat
- Miten käytät versiointia? v5.4 ja uudemmat
- Käyttäjien hallinta (v5.31 ja vanhempi)
- Käyttäjien hallinta (v5.4 ja uudemmat)
- Kuinka käyttää AD- tai LDAP-protokollaa kirjautumisen todentamiseen?
- Mitä ovat ryhmäkäytännöt ja miten niitä käytetään?
- Mitä ovat ryhmäkäytännöt ja miten niitä käytetään? v5.4 ja uudemmat
- Mitä ovat ryhmäkäytännöt ja miten niitä käytetään? v6.0 ja uudemmat
- Kuinka hallita käyttäjiä? (v.6.032+)
- Kuinka määrittää käyttöoikeudet?
-
MODUULIT
-
- Artikkelit tulossa pian
-
- Kuinka aloittaa Reagenssi & Supplies -moduuli?
- Reagenssi- ja tarvikeasetukset (v6.03)
- Reagenssien ja tarvikkeiden asetukset
- Kuinka luon hälytyksiä kemikaaleista ja laitteista?
- Kuinka luon hälytyksiä, joissa on paljon? (v6.0)
- Hallinnoi reagenssieriä (v6.0)
- Hallitse reagenssieriäsi
- Kuinka hävittää paljon?
- Riskikoodit
- Kuinka hallitsen myyjiä ja myyjiä?
- Kuinka tulostan riski- ja turvallisuustiedot?
- Tuo ja hallitse Reagenssit ja tarvikkeet V5.3 ja uudemmat
- Hallitse Reagenssi- ja tarvikkeet -moduulin tallennustilaa
- Hallitse Reagenssi- ja tarvikkeet -moduulin tallennustilaa (v6.0)
- GHS-varoitusmerkit, pakolliset turvamerkit ja NFPA:n vaaraluokitusjärjestelmä
- Kuinka käyttää SDS Makeria?
- Näytä kaikki artikkelit (1) Kutista artikkeleita
-
- Artikkelit tulossa pian
-
- Artikkelit tulossa pian
-
- Kuinka luon hälytyksiä kemikaaleista ja laitteista?
- Kuinka aktivoida ja asettaa erityyppisiä laitehälytyksiä? (v6.0)
- Kuinka aktivoida ja asettaa erityyppisiä laitehälytyksiä? (v5.4 ja vanhempi)
- Kuinka lisätä uusi luokka ja tallentaa laitemoduuliin? (v6.0)
- Kuinka lisätä uusi luokka ja tallentaa laitemoduuliin? (v5.4 ja vanhempi)
- Kuinka lisätä ohjauskaavio laitteiden kalibrointihuoltoon?
- Kuinka lisätä/muokata laitteiden ylläpitoa? (v6.0+)
- Laitteiden ylläpidon lisääminen/muokkaus (v5.4 ja vanhempi)
- Kuinka viedä laitteiden huoltoraportti?
- Mitä vaihtoehtoja on laitteiden "näytön huolto" -osiossa. (v5.4 ja vanhempi)
- Mitä vaihtoehtoja on laitteiden "näytön huolto" -osiossa. (v6.0)
-
- Artikkelit tulossa pian
-
Lisäosat
- Mitä ovat lisäosat?
- Fly Stock Manager
- Mikä on Weight Tracker -lisäosa? Kuinka käyttää sitä?
- Mukautetun kentän tiedoston lataus
- Mikä on e-catalog-lisäosa? Ja miten sitä käytetään?
-
- Kuinka aloittaa LSM?
- LSM-käyttöopas – Työpyynnöstä tulosraportointiin
- Testaa LSM-sovellusliittymää
- Lisää LSMremote-sovellus verkkosivustollesi
- Kuinka tehdä isyys-/suhdegeenitesti LSM:n avulla?
- HL7:n esittely ja sen käyttö LSM:ssä
- LSM-työluettelon kuvakkeet - mitä ne tarkoittavat?
- LSM: Kuinka ryhmitellä testitulokset erikoisalojen mukaan?
- Lot-Sample Linking LSM:ssä laadunvalvontaa varten
-
- 1. vaihe: Luo käyttäjiä ja pyytäjiä
- Kuinka lähettää näytteitä osoitteesta LabCollector LSM-työhön
- Kuinka liittää mukautetun moduulin LSM:ään?
- Kuinka hallita tapaustietoja (potilaat, eläimet...) LSM:ssä?
- Kuinka tilata/järjestää työtehtävät ja näytteitä mukautettuja kenttiä LSM:ssä?
- Kuinka hallita alueita LSM:ssä?
- Kuinka aloittaa työ uudelleen LSM:ssä?
- Pystyn lisäämään uuden työn ilman ongelmia, mutta kun yritän aloittaa sen, en pysty siihen. Näyttöön tulee seuraava virheilmoitus: Virhe ladattaessa XML-asiakirjaa: data/bl/bl-job.php. Mikä on ongelma?
- Kuinka ottaa vastaan työpaikkoja LSM:ssä?
- Kuinka luoda ja suorittaa työpaikka LSM:ssä?
- Kuinka luoda testin versio LSM:ssä?
- Kuinka tuoda CSV näytteitä ja testejä LSM:ään?
-
- 5. vaihe: Tulos- ja laskumalli
- Kuinka luoda raportteja LSM:ssä?
- Kuinka luoda käsittelyraportti LSM:ssä?
- Kuinka luoda laskuraporttimalli LSM:ssä?
- Kuinka luoda Chain Of Custody (CoC) -raportti ja käyttää sitä LSM & LSMRemote?
- Kuinka käyttää tekstieditoria raporttimallin luomiseen LSM:ssä?
- Raportoidaanko tulos/lasku/CoC/erämallien tunnisteet LSM:ssä?
- Korjaus/muutostoimenpiteet LSM-raportissa
- Kuinka tulostaa ja seurata useita raportteja/CoC:itä LSMRemotessa?
- Virhe ladattaessa suuria raportteja LabCollector
- Virhe ladattaessa suuria raportteja LSM:ään
- Kuinka määrittää ylä- ja alatunniste LSM-raportissa/CoC/laskuissa? (versiosta 4.057+)
- Mikä on raportin yksilöllisen tunnuksen viivakoodin tarkoitus?
-
- LSMRemote (v6.0) rekisteröinti, kirjautuminen ja muut vaihtoehdot
- LSMRemote-asennusvaiheet ja integrointi verkkosivustoon ? (v4.0)
- LSMRemote-konfiguroitavat asetukset (v4.0)
- Kuinka määrittää uusia kenttiä, lähettää työ LSMRemotessa ja tarkastella sitä LSM:ssä?
- Kuinka etsiä LSMRemotessa?
- Kuinka luodaan potilaan/asiakkaan raportin käyttöoikeus LSMRemoten avulla?
- Kuinka luoda CoC Manifest integroiduilla tarroilla?
- Kuinka tulostaa ja seurata useita raportteja/CoC:itä LSMRemotessa?
- Potilaan ennakkorekisteröintimääritys ja LSMRemote-portaaliyhteys
- Kuinka tehdä työn ennakkoilmoittautuminen LSMRemote-portaalista?
- Kuinka integroida tapaamisten ajoitus LSMRemotessa?
- Soap.dll-laajennuksen ottaminen käyttöön LSMRemotessa käyttämällä php-tiedostoa tai LabCollector Palvelimenhallinta (Windows)?
- Kuinka tuoda töitä LSMRemoten avulla?
- Kuinka konfiguroida ja aktivoida se LSMRemotessa?
- Kuinka tulostaa viivakoodit joukkona LSMRemoten avulla?
- Kuinka ottaa soap.dll-laajennus käyttöön LSMRemotessa käyttämällä php-tiedostoa Linuxissa?
- Näytä kaikki artikkelit (1) Kutista artikkeleita
-
-
- Kuinka luoda kirja, lisätä kokeilu ja sivu?
- Mitä kirjan sisällä on?
- Mitä kokeen sisällä on?
- Mitä on sisällä ELN Sivu?
- Miten tulostan ELN?
- ELN työnkulkuja
- ELN malleja
- TIFF-kuvan käyttö
- Kuinka allekirjoittaa sähköisesti ELN sivuja?
- Kuinka lisätä mikrolevy sisään ELN Sivu?
- Kuinka lisätä reagenssien/liuosresepti ELN?
-
- ELN - Zoho Spreadsheet -ohjeopas
- Kaavio tasaisessa laskentataulukossa
- Kuinka vaihtaa ZOHO excelin kieli ELN?
- Kuinka kopioida/tuoda excel ELN?
- Kuinka käyttää laskentataulukoita?
- Mikä on Flat & Zoho Spreadsheet Editor ja kuinka se otetaan käyttöön?
- Kuinka käyttää tasaista laskentataulukkoa ja kaavoja siinä?
- Kuinka tehdä kaavio Flat Spreadsheetissä?
- Mitä voidaan kopioida excelistä tasaiseen laskentataulukkoon?
-
- Näytteen vastaanottava lisäosa: Projektin kokoonpanoasetukset
- Kuinka luoda ja käsitellä paketti Sample vastaanottava -lisäosassa?
- Kuinka suorittaa poolaus näytteiden vastaanottamisessa?
- Kuinka käsitellä levyjä näytevastaanottolisäosassa?
- Kuinka tarkastella näytteiden vastaanotto-lisäosassa luotuja näytteitä moduuliksi?
- Miten näytteiden vastaanotossa luotuja näytteitä lisätään Workflow-lisäosaan?
- Kuinka yhdistää ja lähettää näytteitä "näytteen vastaanottamisesta" testaamaan "LSM":ssä?
-
MOBIILISovellukset
-
- Artikkelit tulossa pian
-
LIITTÄMINEN
-
API
- Johdatus LabCollector API
- API for LabCollector (v5.4 +)
- API LSM:lle (v2)
- API for ELN (V1)
- Kuinka testata LabCollector REST API?
- API-virheilmoitukset
- API: Kuinka luoda laatikoita tai levyjä?
- Testaa Lab Service Manager -sovellusliittymää
- Verkkopalvelu/API Apache-asetukset
- Kuinka määrittää Web Services API?
- Mikä Swagger UI on? Kuinka käyttää sitä ja testata API-päätepisteitä?
-
TYÖKALUT
- Kuinka asennat NCBI blast -suoritettavan tiedoston käytettäväksi LabCollector?
- Reseptienhallinnan määrittäminen ja käyttö (vanha versio)
- Kuinka hallita ulkoa tallennettuja kohteita?
- Ostotilausten hallinta - A–Z
- Ostotilausten hallinta – A–Z (v 6.0+)
- Reseptien hallinta (v6.0)
- Näytteiden erätyökalu (telineskanneri)
- Kuinka käyttää Mass Record Updateria?
-
APUOHJEET / VÄLIOHJELMAT
-
- Kuinka ladata ja asentaa File connector v2.2? (Labcollector v6.0 )
- Kuinka asentaa Fileconnector Mac OS:ään? (Labcollector v6.0 )
- Tiedoston muokkaaminen File Connectorilla
- Kuinka käyttää tiettyä ohjelmistoa tietyntyyppisten tiedostojen avaamiseen fileconnectorissa? (Labcollector v6.0 )
- Kuinka käyttää Fileconnectoria Mac OS:ssä?
-
- Scan Serverin asetukset ja asetukset LabCollector?
- Näytteiden erätyökalu (telineskanneri)
- Telineen viivakoodi päällä vai kolmantena elementtinä riveissä?
- Kuinka avata CSV UTF8:ssa Excelissä?
-
PRINTING
- Kuinka konfiguroida tulostin LabCollector?
- Kuinka kytkeä USB-tulostin LabCollector?
- Yhteensopivat tarratulostimet
- Merkitse verkkotulostimet ja rullatyypit
- Viivakooditarrojen luominen ja tulostus
- Kuinka tulostan viivakooditarroja?
- Kuinka tulostan laatikkokartat?
- Kuinka tulostan tietueita?
- Kuinka tulostan riski- ja turvallisuustiedot?
- Kuinka tulostan tallennustietueita
- Kuinka tulostaa tarroja HTTPS-ympäristössä?
- Kuinka määrittää PDA N5000 parhaiten LabCollector käyttää
- Kuinka voin määrittää viivakoodilukijani AGB-SC1 CCD?
- Kuinka voin määrittää viivakoodilukijani HR200C?
- Kuinka määritän FluidX:n tukemaan ScanServeriä?
- Viivakooditulostimen yhteyden aikakatkaisu
- AGB-W8X Manuaali viivakoodin skannaukseen
- Kuinka määrittää tulostimet ja tarrat?
- Näytä kaikki artikkelit (3) Kutista artikkeleita
-
VARASTOINTI
- Tallennustilan määrittäminen LabCollector?
- Kuinka luoda laatikoita/laatikoita/telineitä säilytyslaitteisiin?
- Kuinka luoda laatikkomalleja varastointia varten?
- Kuinka monistaa ja monistaa laatikoita varastossa?
- Kuinka säilyttää ja käsitellä olkia? (EN/FR)
- Kuinka lisään näytteitä tiettyyn pakastimeen, hyllyyn tai muuhun säilytysjärjestelmän osaan?
- Kuinka saan näytteitä tietystä pakastimesta?
- Hallitse Reagenssi- ja tarvikkeet -moduulin tallennustilaa
- Kuinka järjestää tallennusselain?
- Kuinka tulostan laatikkokartat?
- Kuinka tulostan tallennustietueita
- Varastointi Check-in/out System
-
VAATIMUSTENMUKAISUUS
- Mitä Compliancy Pack sisältää?
- Kuinka käytän vain luku -kenttää?
- Mitkä ovat FDA:n vaatimukset ohjelmistoille GxP-ohjeiden noudattamiseksi?
- FDA CFR21, osa 11 tuotteiden tarkistuslista
- ISO 17025 -yhteensopivuusvaatimukset
- Miten käytät versiointia? v5.31 ja uudemmat
- Miten käytät versiointia? v5.4 ja uudemmat
- Pitäisikö minun lukita, arkistoida tai poistaa tietueita?
-
TUKI
-
ASETUKSET
- Kuinka määrittää Apache toimimaan Office 2007:n ja uudempien kanssa?
- Kuinka nopeuttaa LabCollector? (EN/FR)
- PHP-laajennuksia tarvitaan
- Nopeuta paikallisverkkoasi
- TIFF-kuvan käyttö
- Tietueissa aikaleima, joka näyttää väärän ajan.
- Kuinka määrittää SMTP käyttämään OAuth 2.0:aa (Microsoft ja Gmail)?
-
- LabCollector Yleiset asetukset
- LabCollector Yleiset asetukset - v5.4
- LabCollector Yleiset asetukset 5.2
- LabCollector Yleiset asetukset-v6.0
- Kirjautumisasetukset ja php-vaatimukset LDAP/SSO:lle
- Kuinka määrittää oma LabCollectorYleiset asetukset, logo ja moduulien nimet?
- Kuinka määrittää välityspalvelin-, tehtäväajoitus- ja sähköpostiasetukset?
- Kuinka määrittää moduulihaku- ja lomakeasetukset?
- Kuinka määrittää etusivusi ulkoiset linkit?
- Kuinka perustaa uutissyöte?
-
- Kuinka käyttää AD- tai LDAP-protokollaa kirjautumisen todentamiseen?
- Kuinka käyttää LDAP:tä ja OpenSSL:ää Windows 64-bittisissä käyttöjärjestelmissä?
- Kuinka määrittää kirjautumis- ja LDAP/SSO-asetukset?
- Määritetään SSO:lle LabCollector Azure Active Directoryn kanssa
- Määritetään SSO:lle LabCollector JumpCloudin kanssa
-
- Virhe ladattaessa suuria raportteja LabCollector
- Vierityspalkilla varustetut kentät eivät toimi Safarin kanssa, mitä voin tehdä?
- En pysty katsomaan laatikkokaaviota Safarissa, miksi?
- Saan virheilmoituksen: "Ohjelma ei voi käynnistyä, koska MSVCR110.dll puuttuu tietokoneeltasi. Yritä asentaa ohjelma uudelleen korjataksesi ongelman" asennuksen tai päivityksen aikana. LabCollector Windows
- Ongelma lähetystiedostossa: katso PHP-kokoonpanosi
- Moduulin haku epäonnistuu 404-virheen vuoksi tai pyyntö on liian pitkä
- Kun haluan tuoda suuria tiedostoja, mitään ei tapahdu?
- Miksi minulla on virheilmoitus "MySQL-palvelin on poistunut" tiedoston latauksen yhteydessä?
-
KUUKAUDEN UUSI KB
- Asiakasalueen opetusohjelma
- Kuinka luoda putkia, joissa on säilytystilaa ja merkitä niiden käyttötarkoitus? (v6.0)
- Kuinka ladata/tuoda tietoja plasmidi- ja sekvenssimoduuleissa?
- LabCollector Yleiset asetukset-v6.0
- Ostotilausten hallinta – A–Z (v 6.0+)
- Kuinka käyttää Plasmid Map Editoria?
- Kuinka määrittää hälytykset Data Loggerissa?
-
TALLENNETUT ESITTELYT
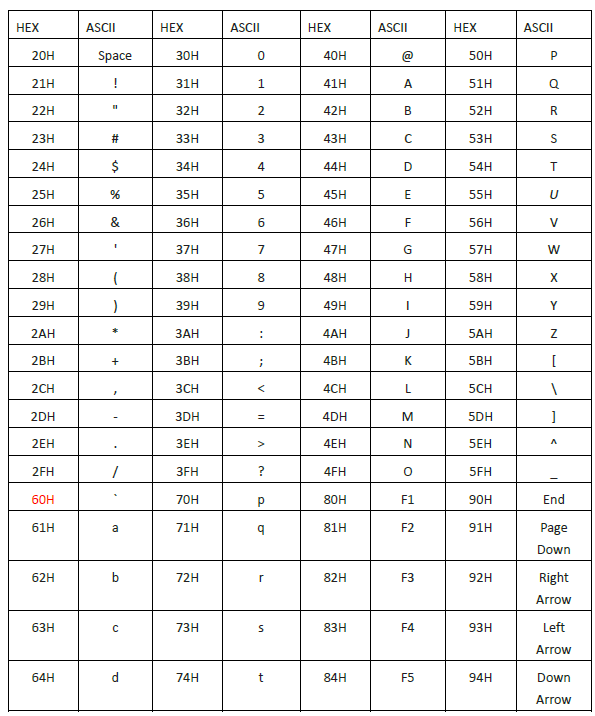
Laiteversio:
Lue alla oleva komentoviivakoodi tarkistaaksesi skannerin laiteohjelmiston version.

Alla olevia ohjelmointiviivakoodeja sovelletaan vähintään B009NT_RFBTWCDE9220_W-versioon
Tehdaspalautus:

Viivakoodin ohjelmointi
Netumin viivakoodilukijat on tehtaalla ohjelmoitu yleisimmille pääte- ja tietoliikenneasetuksille. Jos sinun on muutettava näitä asetuksia, ohjelmointi suoritetaan skannaamalla tämän oppaan viivakoodit. Tähti (*) vaihtoehdon vieressä osoittaa oletusasetuksen.
Yhteystapa:
Toimii USB-kaapelin kautta
Aloita: Liitä skanneri laitteeseesi USB-kaapelilla. Jos käytät yhdysvaltalaista näppäimistöä, se on plug and play. Jos käytät muun tyyppistä näppäimistöä, katso "näppäimistön kieli" määrittääksesi näppäimistön kieli ennen sen käyttöä.
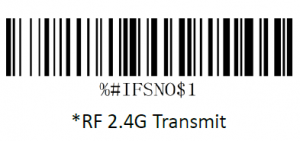
Working via 2.4G receiver
Get Started: Plug the USB receiver on your computer. If you use US keyboard, it’s plug and play. If you use other type of keyboard , please refer to “keyboard language” to configure the keyboard language before use it.
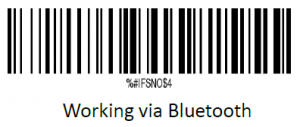
Työskentely Bluetoothin kautta
Get Started: Please refer to the “bluetooth pairing”. Once you’ve paired the bluetooth, locate the cursor on the place where you want to upload the codes than you can start to work.US Keyboard by default if you use other types of keyboard please configure keyboard language before you use it.
Command barcodes apply for all working mode.
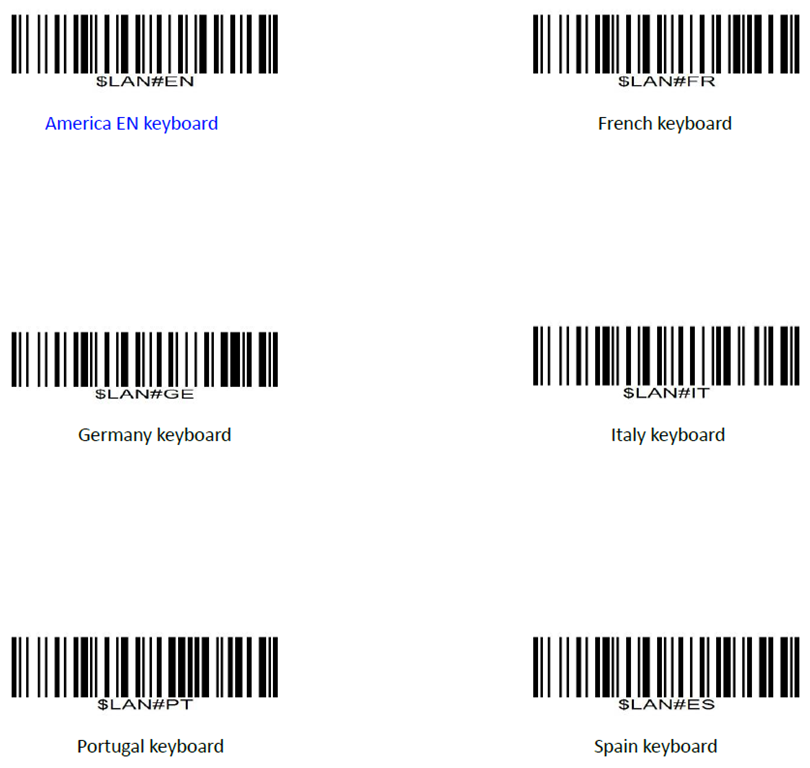
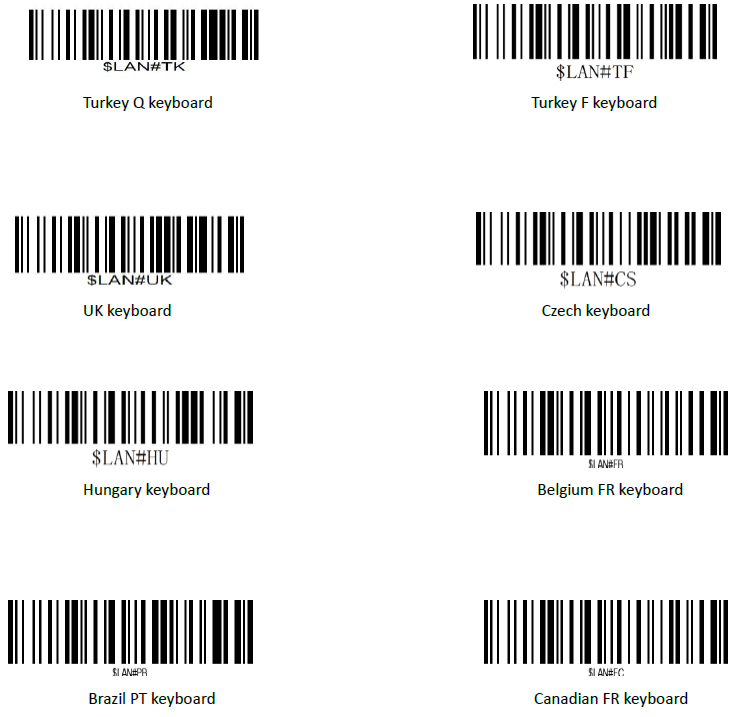
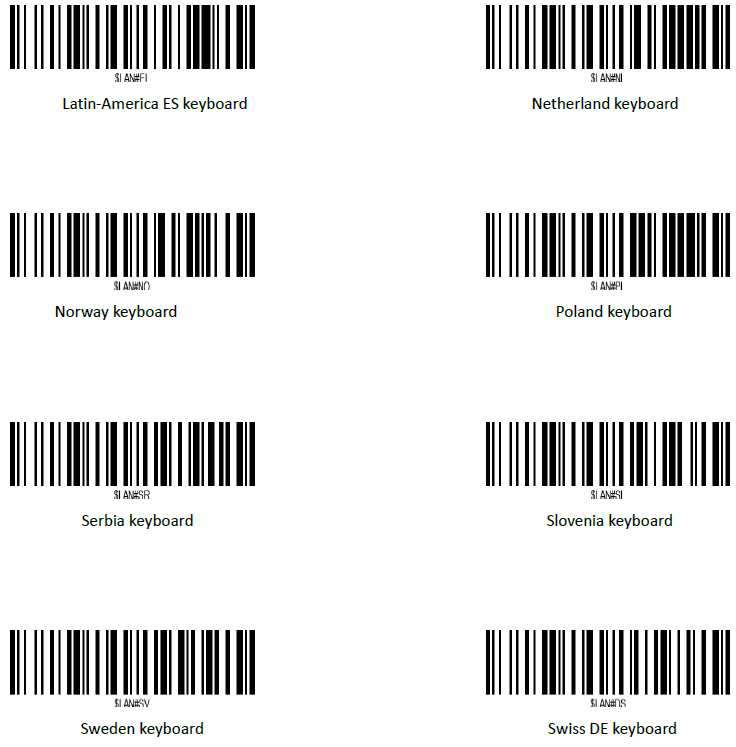
Näppäimistön kieli
For example If you use French Keyboard, scan command barcode of “French keyboard ”. If you use a US keyboard you can ignore this step.

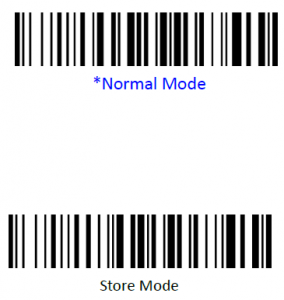
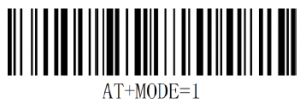
Working tila
Jos olet menossa työalueelle, joka on Bluetooth-signaalin kantaman ulkopuolella, voit aktivoida skannerin tallennustilan alla kuvattujen vaiheiden mukaisesti. Tässä tilassa kaikki skannatut tiedot tallennetaan suoraan laitteen puskurimuistiin. Lisäksi tiedot tallennetaan pysyvästi puskurimuistiin ennen manuaalista siirtoa työasemaan, jotta voit ladata ne ollessasi lähellä työlaitettasi.

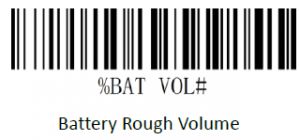
Hanki akun tilavuus
Skannaa alla oleva komentoviivakoodi saadaksesi akun karkean äänenvoimakkuuden
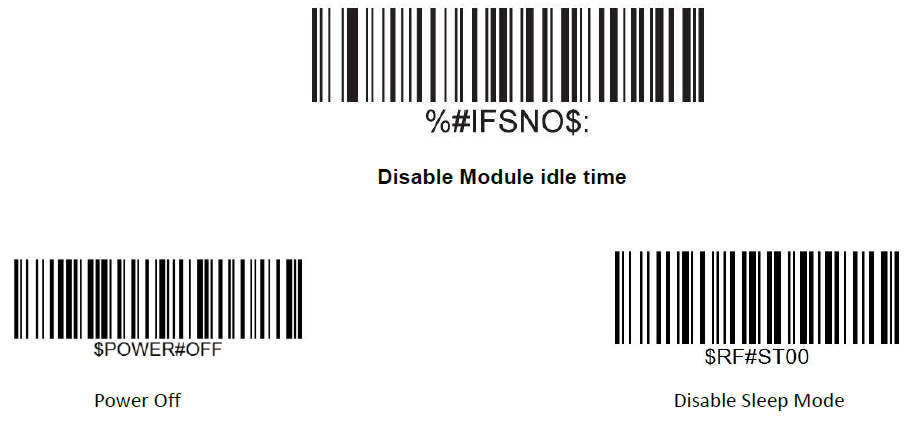
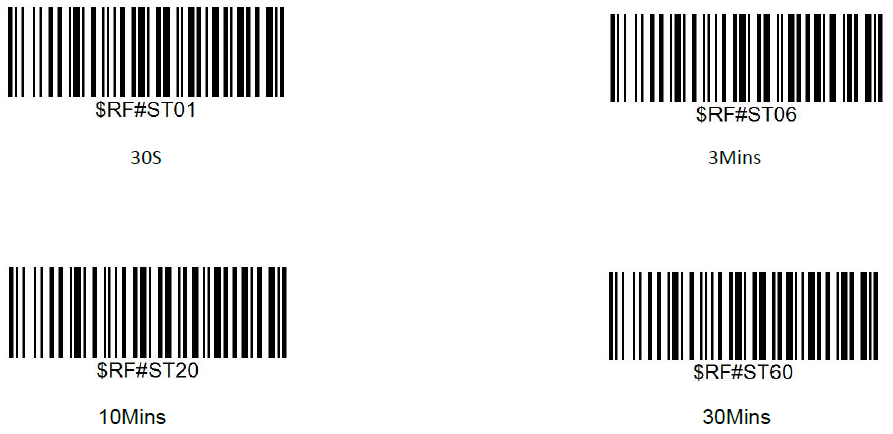
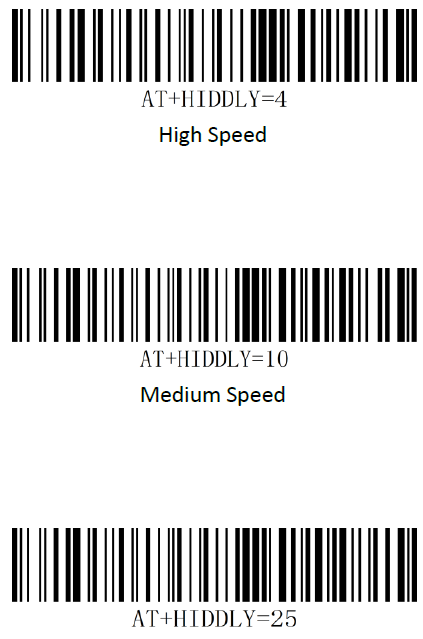
Luppoaika
Scanner will turn to sleep after idle/inactive for 1min
Scan “Disable module Idle time” before you doing any other setup from this section.
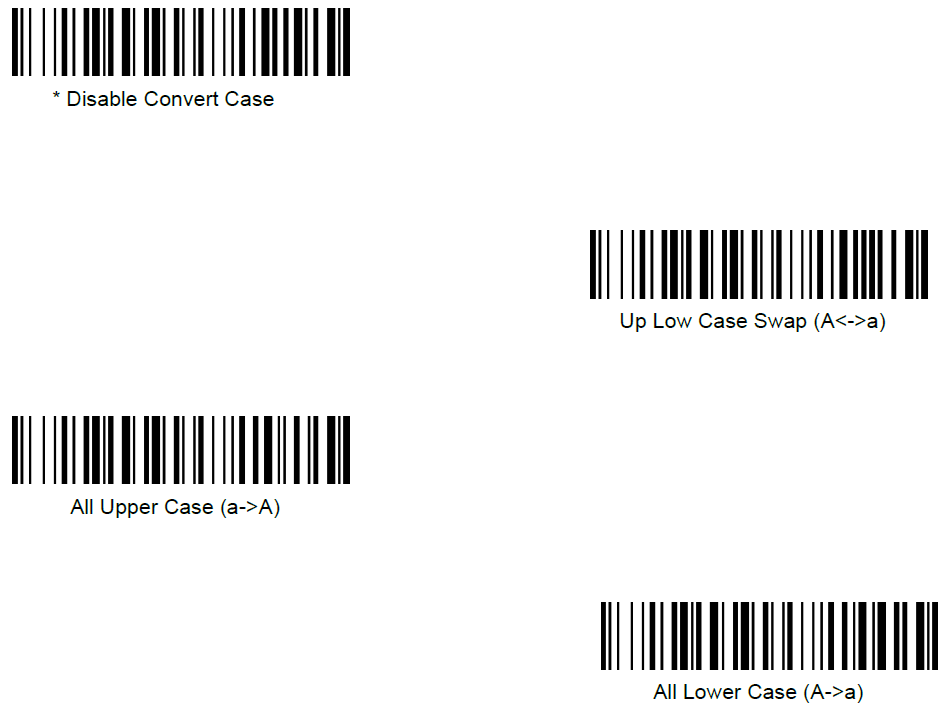
Muunna tapaus
Bluetooth -yhteystila
Perustila (HID) (oletus)
Määrittää skannerin Human Interface Device (HID) -tilaan. Skanneri on löydettävissä näppäimistönä muille Bluetooth-laitteille.

BLE for for Apple Devices (a software was required to work under this mode)

SPP Mode for for Windows or Android (a software was required to work under this mode)
Tärkeä huomautus:
Jos haluat siirtyä HID:stä SPP:hen tai BLE:hen, skannaa vain vastaava komentoviivakoodi.
If you want to shift from SPP or BLE to HID mode, please ignore (or delete) “Netum
turn off bluetooth scan command barcode of HID Open the bluetooth repair it.
Bluetooth-näppäimistön latausnopeus
Langallinen yhteystila
USB-näppäimistö ja virtuaalinen COM-sarja
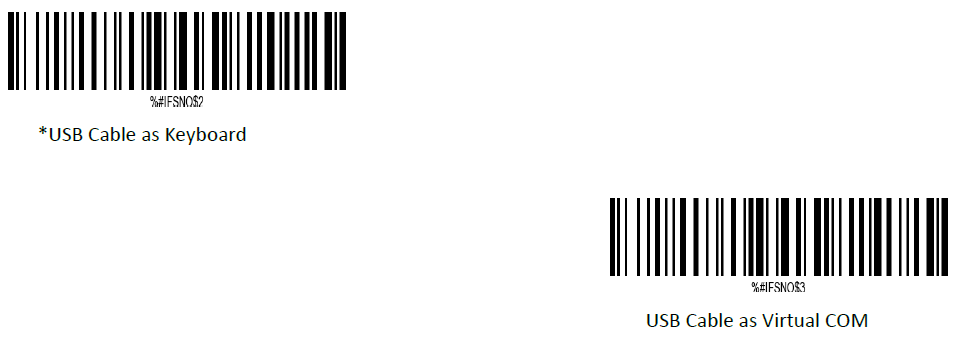
Huomautus: Langallinen ja langaton yhteystapa valitaan automaattisesti, langallinen tapa on tärkeä.
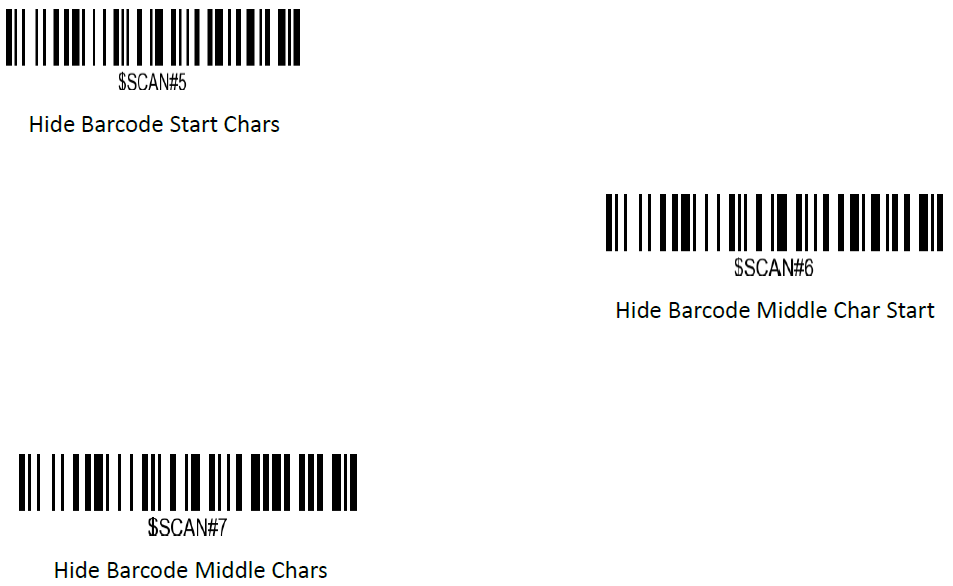
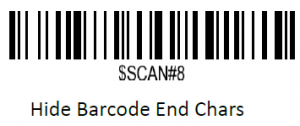
Piilota etuliitteen tai jälkiliitteen numerot
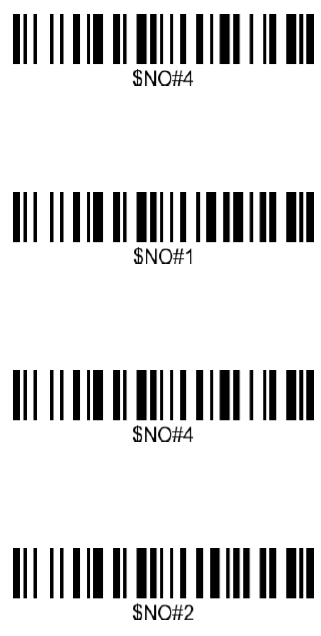
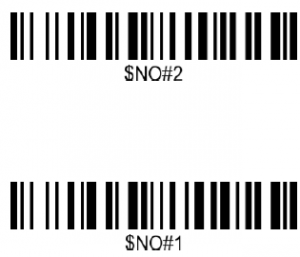
Viivakoodimerkkien alku/keski/loppu voidaan piilottaa. Kun olet skannattu alla piilottaa asetettu viivakoodi, skannaa kaksinumeroinen heksadesimaaliluku, jonka haluat piilottaa merkin pituus (00~FF esim. piilota pituus 4, skannaus 0, 4).
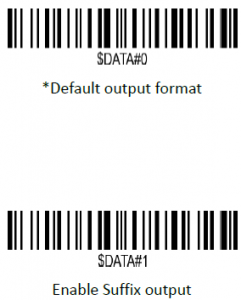
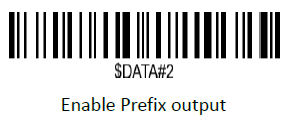
Esitysmuoto
Jos haluat muuttaa skannaustiedonsiirtomuotoa, skannaa jokin kahdeksasta haluttua muotoa vastaavasta viivakoodista.
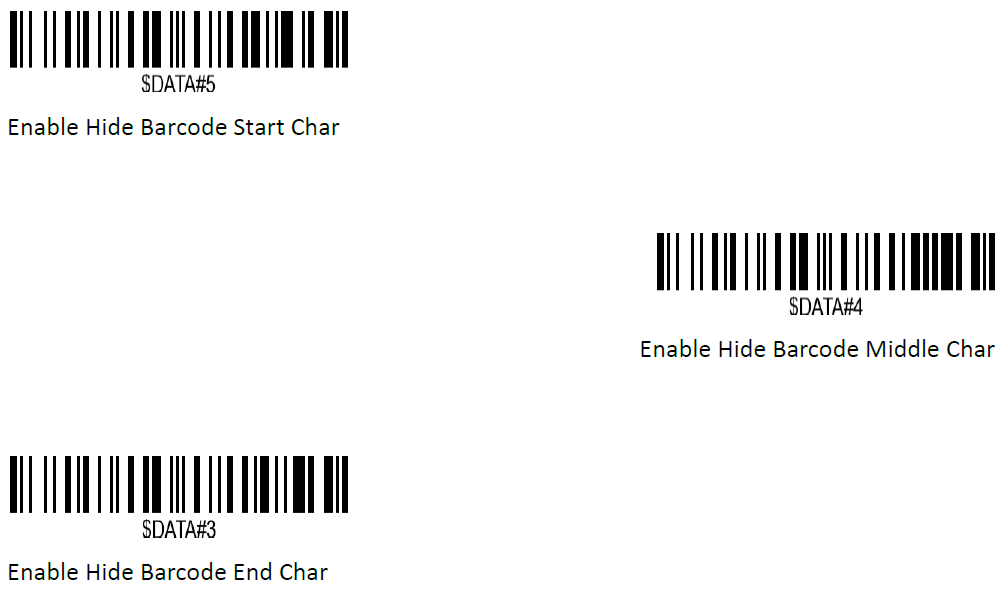
Viivakoodin alku-/keski-/loppumerkkien piilottaminen:
Menettelyt
1. Scan the Hide Barcode Start / Middle Start / Middle length / End Chars symbol.
2. Determine the hex value for the length you wish to enter(hide 4 chars, scan 0,4; hide 12 chars, scan 0,C).
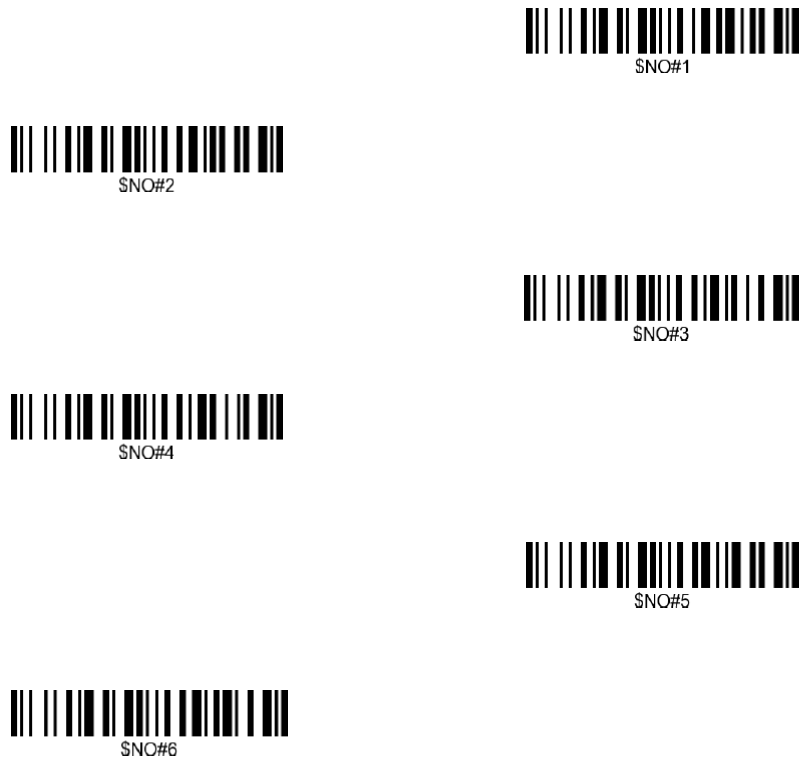
3. Scan the 2 digit hex value from the Numeric Bar Codes
4. Scan the output format to enable or cancel hide char function.
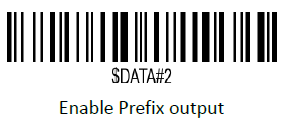
Mukautettu etuliite ja pääte
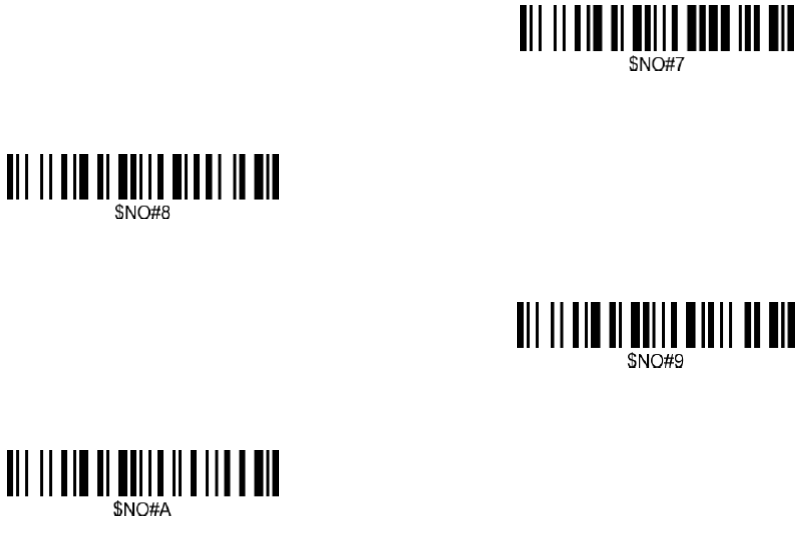
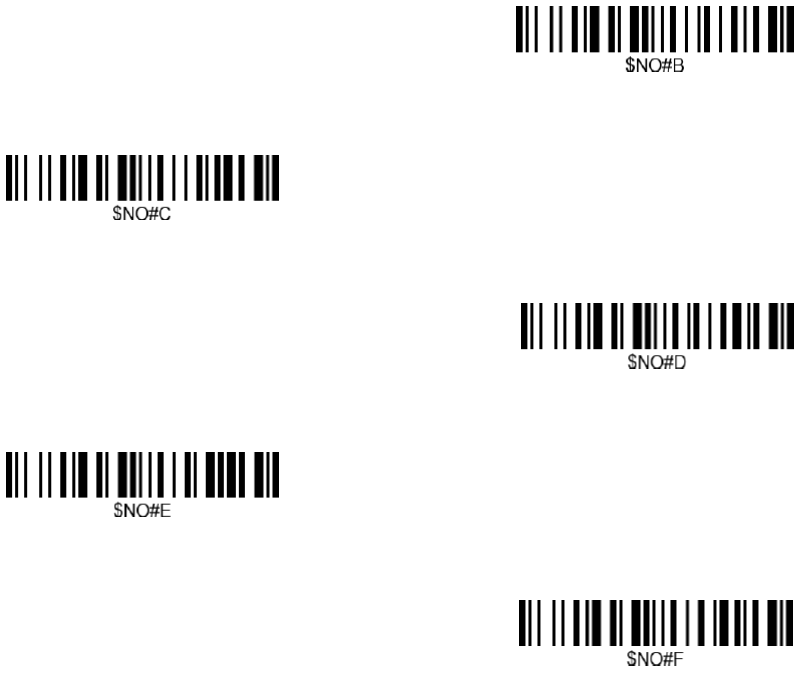
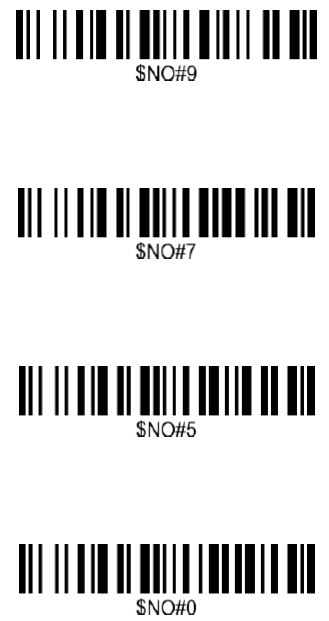
Enimmäismäärä 20 prefixes and 20 suffixes can be added to scan data for use in data editing. To set these values, scan a double-digit hexadecimal number (i.e. two bar codes) that corresponds to ASCII values. See the Table 1 and Numeric Bar Codes in appendix.
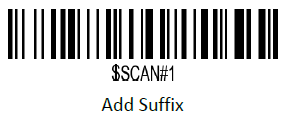
Etuliitteen tai jälkiliitteen lisääminen:
1. Scan command barcode of ” Add Prefix” or” Add Suffix “.
2. Check the prefix or suffix hex value from the ASCII Chart.
3. Scan the 2 digit hex value from the Numeric Bar Codes
4. Repeat Steps 2 and 3 for all the prefix or suffix that you want to add.
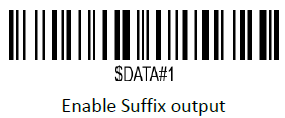
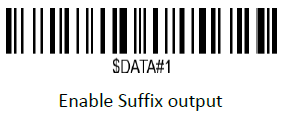
5. Scan the output format to enable or disable prefix/suffix output.
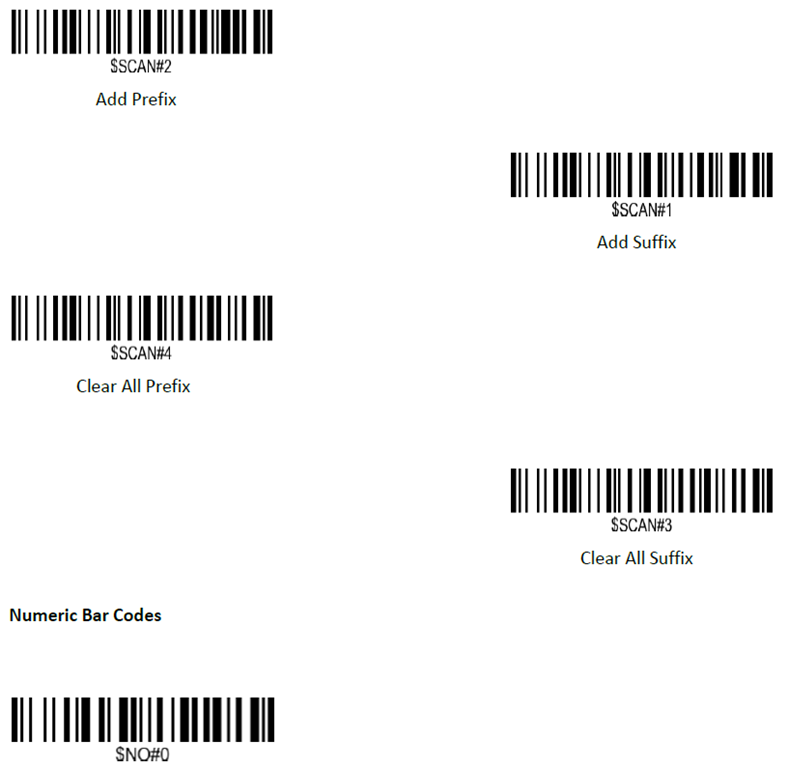
Esitysmuoto
To change the Scan Data Transmission Format, scan one of the eight bar codes corresponding to
the desired format.
Example on how to add normal prefix or suffix on barcode “123456789”

Lisää "A" ja "B" etuliitteiksi ja "!" jälkiliitteenä
1. Scan command barcode of ” Add Prefix”

2. Check the prefix hex value from the ASCII Chart. A- “4”,”1″; B-“4” “2”;
3. Scan the 2 digit hex value from the Numeric Bar Codes
4. Scan the output format to enable prefix output.
5. Scan command barcode of ” Add Suffix” to add “!” as suffix.
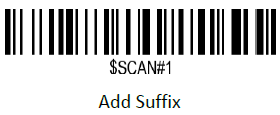
6. Check the suffix hex value from the ASCII Chart. !- “2” “1”
7. Scan the 2 digit hex value from the Numeric Bar Codes.
8. Scan the output format to enable suffix output.
9. Scan the barcode then you will get AB123456789!
Example on how to add Combination Key suffix for barcode “123456789”

Lisää "Ctrl+P" kohtaan "123456789" jälkiliitteenä
1.Scan command barcode of ” Add Suffix” to add “Ctrl+P” as suffix.
2. Check the suffix hex value from the ASCII Chart. Ctrl+P – “9” “7” “5” “0”
3. Scan the 4 digits hex value from the Numeric Bar Codes.
4. Scan the output format to enable suffix output.
5. Scan the barcode 123456789. (test it on Excel)
Taulukko 1. ASCII-merkkiekvivalentit