Leitaðu í þekkingargrunni eftir lykilorði
-
HVERNIG Á AÐ BYRJA MEÐ LABCOLLECTOR
- Hvernig virkar LabCollector viðmót líta út?
- Hvernig lítur eining almennt út?
- Hvernig á að setja upp geymslu í LabCollector?
- Í hverju eru reitir LabCollector?
- Hvað eru skrár í LabCollector & hvernig á að búa þær til?
- Hvernig á að byrja með mótefniseiningunni?
- Hvernig á að byrja með efnafræðilega byggingareiningu?
- Hvernig á að byrja með Document Module?
- Hvernig á að byrja með Electronic Lab Notebook (ELN)?
- Hvernig á að byrja með búnaðareiningu?
- Hvernig á að byrja með Plasmids mát?
- Hvernig á að byrja með Primers mát?
- Hvernig á að byrja með Reagent & Supplies mát?
- Hvernig á að byrja með sýniseiningu?
- Hvernig á að byrja með Sequences einingunni?
- Hvernig á að byrja með Strains & Cells einingu?
- Hvernig á að nota Webinars viðbót?
- Hvernig á að fjöldauppfæra skráðar færslur á minnið?
- Hvernig á að nota LabCollector fyrir COVID-19 próf?
- Sýna allar greinar (4) Fella greinar saman
-
UPPSETNING
- Hvernig get ég tengst LabCollector úr annarri tölvu?
- LabCollector Uppsetningarkröfur fyrir AWS
- Hvernig á að setja upp LabCollector nota Docker?
-
- Hvernig á að færa heila uppsetningu á nýjan Windows netþjón?
- Hvernig á að hlaupa LabCollector server á 64bita Windows vél?
- setja LabCollector með IIS á Windows Server
-
- Hreinsaðu apache-skrána handvirkt til að bæta hraðann.
- Skipt yfir í ServerManager v2.5 (gamall háttur)
- Windows uppsetning með uppsetningarhjálp
- Hvernig á að virkja soap.dll viðbótina í LSMRemote með því að nota php skrá eða LabCollector Server Manager (Windows)?
- Hvernig á að nota LabCollector Server Manager?
- Hvernig á að endurtaka LabCollector í rauntíma með Windows Server Manager?
-
- Apache þjónn/vefþjónn keyrir ekki á Windows 10
- Hreinsaðu apache-skrána handvirkt til að bæta hraðann.
- Hreinsaðu stokkana handvirkt til að bæta hraðann.
- VILLA í log: AH00052: barn pid 3461 útgangsmerki Segmentunarvilla (11)
- VILLA: Viðvörun: mysql_connect(): Viðskiptavinur styður ekki auðkenningarsamskiptareglur sem þjónn biður um (...)
- Hvernig á að láta Java smáforrit virka aftur eftir uppfærslu í Java 7U51+?
- Hvernig á að endurheimta yfirskrifuð skjöl
- Ég er með skilaboðin "Mistókst að tengjast mySQL þjóninum. Enginn gagnagrunnur fannst fyrir þennan rannsóknarstofureikning". Hvað get ég gert?
- My LabCollector eða viðbótin er mjög hæg. Hvers vegna og hvernig á að laga það?
- Óþekktur dálkur „auto_name_mode“ í „field list“: Villan kemur upp þegar ég vil breyta núverandi færslum, búa til nýjar færslur eða flytja inn gögn. Hvað get ég gert?
- Vefslóð vandamál
- Þegar ég bæti við skrám eða hvaða gildum sem er þá fæ ég þessi skilaboð: "rangt heiltölugildi: fyrir dálk 'count' í röð 1"
-
- Veittu aðgang að LabCollector til samstarfsaðila utan netkerfisins þíns
- Hvernig get ég tengst LabCollector úr annarri tölvu?
- Getur gagnagrunnurinn verið aðskilinn frá kerfinu sem labcollector er uppsett?
- Ég á í vandræðum með að setja upp PHP og/eða MySQL. Er einhver valkostur?
- Fínstilling á minnisnotkun Mysql Server
- PHP viðbætur nauðsynlegar
- Rack skannar uppsetning og tenging við ScanServer
- Kerfiskröfur - Hýst valkostir (FR/ENG)
- Hvað eru PHP og MySQL? Þarf ég að hafa PHP og MySQL?
- Hvernig á að flytja LabCollector á nýjan Linux Server?
-
ALMENNT
- Hvað er LabCollector?
- Hvernig set ég upp LabCollector? Hvar get ég fundið install.exe skrána?
- Kerfiskröfur - Hýst valkostir (FR/ENG)
- Hvernig virkar fjarhýst útgáfan?
- Get ég notað LabCollector á einni tölvu? Get ég sett það upp á vefþjóni?
- Ef ég kaupi EITT leyfi, þarf ég að kaupa viðbótarleyfi fyrir aðrar tölvur á rannsóknarstofunetinu mínu?
- Kennsla um viðskiptavinasvæði
- LabCollector styðja
- Hverjar eru kröfur FDA til að hugbúnaður uppfylli GxP leiðbeiningar?
- Þarf ég að kaupa allar einingar? Get ég notað aðeins grunneininguna?
- Tákn merkingu (EN/FR) V.6.0
- Merking tákna (EN/FR)
- Hvernig leita ég inn LabCollector?
- Get ég séð/lista allar færslur í einingu?
- Hvernig prenta ég færslur?
- Hvernig á að bæta spjöldum við LabColletor v6.0?
- Hvernig á að búa til rör með geymslu og merkja notkun þeirra? (v6.0)
- Hvernig á að búa til og stilla viðvaranir fyrir rör? (v6.0)
- Merktu netprentara og rúllugerðir
- Sýna allar greinar (4) Fella greinar saman
-
Grunnatriði
- Flytja út og prenta módel
- Hvernig bæti ég við mörgum skrám án gagnainnflutnings
- Hvernig tengi ég færslur og í hvaða tilgangi?
- Hvernig býrðu til eða breytir færslum? (FR/EN)
- Merking tákna (EN/FR)
- Tákn merkingu (EN/FR) V.6.0
-
- Hvað get ég gert við sjálfgefna reiti?
- Get ég bætt við sérsniðinni einingu til að passa sérstakar þarfir mínar?
- Sérsniðnar svæðisgerðir
- Hvernig býrðu til sérsniðna reit?
- Hvernig býrðu til sérsniðna reit? Fyrir útgáfu 5.2 og áfram
- Sérsniðinn reitur: Valkostur reitaflokka, útgáfa 5.2x
- Sérsniðnir reitir: Valmöguleiki flipagreiningar
- Hvernig sérsnið ég upptökuvalkosti?
- Hvernig nota ég skrifvarinn reit?
- Hvernig á að aðlaga LabCollector litir innskráningarsíðunnar?
- Hvernig á að breyta tungumáli og heiti sérsniðinna reita?
-
- Hvað er CSV skrá?
- Flyttu inn gögnin þín (v6.0)
- Flyttu inn gögnin þín (5.3 útgáfa og nýrri)
- Hvernig á að afmarka gögn csv fyrir gagnainnflutning?
- Hvaða gildi eru sjálfgefin reiti við innflutning á gögnum? v6.0
- Hvernig forsníða ég dagsetningargildið sem yyyy-mm-dd eða yy-mm-dd til að flytja inn?
- Flyttu inn sýnin þín og tengda geymslu í 3 skrefum
- Flyttu inn og stjórnaðu hvarfefninu og birgðum þínum V5.3 og nýrri
- Innflytjandi ma BDD EndNote dans LabCollector (FR)
- Hvernig á að leysa villur við innflutning gagna
- Hvernig á að fjöldauppfæra skráðar færslur á minnið?
-
- Hver eru heimildir notendastigs?
- Hvernig notarðu útgáfu? v5.31 og neðar
- Hvernig notarðu útgáfu? v5.4 og nýrri
- Hvernig á að stjórna notendum (v5.31 og hér að neðan)
- Hvernig á að stjórna notendum (v5.4 og nýrri)
- Hvernig á að nota AD eða LDAP til að staðfesta innskráningu?
- Hvað eru hópstefnur og hvernig á að nota þær?
- Hvað eru hópstefnur og hvernig á að nota þær? v5.4 og nýrri
- Hvað eru hópstefnur og hvernig á að nota þær? v6.0 og nýrri
- Hvernig á að stjórna notendum? (v.6.032+)
- Hvernig á að stilla aðgangsheimildir?
-
MODULES
-
- Greinar væntanlegar
-
- Hvernig á að byrja með Reagent & Supplies mát?
- Kjörstillingar hvarfefnis og birgða (v6.03)
- Kjörstillingar hvarfefnis og birgða
- Hvernig bý ég til viðvaranir fyrir efni og búnað?
- Hvernig bý ég til tilkynningar með lotum? (v6.0)
- Stjórnaðu hvarfefnalotunum þínum (v6.0)
- Stjórnaðu hvarfefnalotunum þínum
- Hvernig á að farga miklu?
- Áhættukóðar
- Hvernig stjórna ég söluaðilum og seljendum?
- Hvernig prenta ég áhættu- og öryggisupplýsingar?
- Flyttu inn og stjórnaðu hvarfefninu og birgðum þínum V5.3 og nýrri
- Hafa umsjón með geymslu fyrir hvarfefnis- og birgðaeiningu
- Hafa umsjón með geymslu fyrir hvarfefnis- og birgðaeiningu (v6.0)
- GHS hættutáknmyndir, lögboðin öryggismerki og NFPA hættumatskerfið
- Hvernig á að nota SDS Maker?
- Sýna allar greinar (1) Fella greinar saman
-
- Greinar væntanlegar
-
- Greinar væntanlegar
-
- Hvernig bý ég til viðvaranir fyrir efni og búnað?
- Hvernig á að virkja og stilla mismunandi tegundir búnaðarviðvarana? (v6.0)
- Hvernig á að virkja og stilla mismunandi tegundir búnaðarviðvarana? (v5.4 og neðar)
- Hvernig á að bæta við nýjum flokki og skrá í búnaðareiningu? (v6.0)
- Hvernig á að bæta við nýjum flokki og skrá í búnaðareiningu? (v5.4 og neðar)
- Hvernig á að bæta við stjórntöflu fyrir kvörðunarviðhald búnaðar?
- Hvernig á að bæta við / breyta viðhaldi fyrir búnað? (v6.0+)
- Hvernig á að bæta við/breyta viðhaldi fyrir búnað (v5.4 og hér að neðan)
- Hvernig á að flytja út viðhaldsskýrslu búnaðar?
- Hverjir eru valmöguleikarnir í hlutanum „viðhald sýna“ búnaðar. (v5.4 og neðar)
- Hverjir eru valmöguleikarnir í hlutanum „viðhald sýna“ búnaðar. (v6.0)
-
- Greinar væntanlegar
-
Bæta við
- Hvað eru viðbætur?
- Flugubirgðastjóri
- Hvað er Weight Tracker viðbót? Hvernig á að nota það?
- Upphleðsla sérsniðinna reitaskráa
- Hvað er e-catalog add-on? Og hvernig á að nota það?
-
- Hvernig á að byrja með LSM?
- Notkunarleiðbeiningar LSM – Frá starfsbeiðni til niðurstöðuskýrslu
- Prófaðu LSM API
- Settu LSMremote forritið inn á vefsíðuna þína
- Hvernig á að framkvæma faðernispróf með því að nota LSM?
- Kynning á HL7 og hvernig á að nota hann í LSM
- Tákn LSM starfslista - hvað þýða þau?
- LSM: Hvernig á að flokka niðurstöður úr prófum eftir sérgrein?
- Lot-Sample Linking í LSM fyrir gæðaeftirlit
-
- 1. skref: Búðu til notendur og beiðendur
- Hvernig á að senda sýnishorn frá LabCollector í LSM starf
- Hvernig á að tengja sérsniðna einingu við LSM?
- Hvernig á að halda utan um málaskrár (sjúklinga, dýr...) í LSM?
- Hvernig á að endurraða/endurraða verkum og sýna sérsniðna reiti í LSM?
- Hvernig á að stjórna sviðum í LSM?
- Hvernig á að endurræsa starf í LSM?
- Ég get bætt við nýju starfi án vandræða en þegar ég reyni að byrja á því get ég það ekki. Eftirfarandi villa birtist: Villa við að hlaða XML skjal: data/bl/bl-job.php. Hvað er vandamálið?
- Hvernig á að taka við störfum í LSM?
- Hvernig á að búa til og framkvæma starf í LSM?
- Hvernig á að búa til útgáfu af prófi í LSM?
- Hvernig á að flytja inn CSV með sýnum og prófum í LSM?
-
- 5. skref: Niðurstaða og reikningssniðmát
- Hvernig á að búa til skýrslur í LSM?
- Hvernig á að búa til vinnsluskýrslu í LSM?
- Hvernig á að búa til skýrslusniðmát fyrir reikninga í LSM?
- Hvernig á að búa til Chain Of Custody (CoC) skýrslu og nota hana LSM & LSMRemote?
- Hvernig á að nota textaritil til að búa til skýrslusniðmát í LSM?
- Tilkynna merki í LSM fyrir niðurstöðu/reikning/CoC/lotu sniðmát?
- Leiðréttingar-/breytingaaðgerðir í skýrslu LSM
- Hvernig á að prenta og fylgja mörgum skýrslum/CoC í LSMRemote?
- Villa við að hlaða stórar skýrslur inn LabCollector
- Villa við að hlaða stórar skýrslur í LSM
- Hvernig á að stilla haus og fót í LSM skýrslu/CoC/reikningum? (frá v4.057+)
- Hver er tilgangurinn með einkvæmu auðkenni strikamerkis skýrslunnar?
-
- LSMRemote (v6.0) skráning, innskráning og aðrir valkostir
- LSM Remote uppsetningarskref og samþætting inn á vefsíðuna? (v4.0)
- Stillanlegir valkostir LSRemote (v4.0)
- Hvernig á að stilla nýja reiti, senda inn vinnu í LSMRemote og skoða það í LSM?
- Hvernig á að leita í LSMRemote?
- Hvernig á að búa til tákn fyrir skýrsluaðgang fyrir sjúkling/viðskiptavin með því að nota LSMRemote?
- Hvernig á að búa til CoC Manifest með samþættum merkimiðum?
- Hvernig á að prenta og fylgja mörgum skýrslum/CoC í LSMRemote?
- Stillingar fyrir forskráningu sjúklinga og LSMRemote vefgáttartengingu
- Hvernig á að gera forskráningu starf frá LSMRemote vefsíðunni?
- Hvernig á að samþætta tímaáætlun í LSMRemote?
- Hvernig á að virkja soap.dll viðbótina í LSMRemote með því að nota php skrá eða LabCollector Server Manager (Windows)?
- Hvernig á að flytja inn störf með LSMRemote?
- Hvernig á að stilla settið og virkjað það í LSMRemote?
- Hvernig á að prenta strikamerkin í lausu með því að nota LSMRemote?
- Hvernig á að virkja soap.dll viðbótina í LSMRemote með php skrá á Linux?
- Sýna allar greinar (1) Fella greinar saman
-
- OW-Server ENET handbók
- OW-Server Flýtileiðarvísir
- OW-Server WiFi handbók
- Fljótleg WiFi stillingar fyrir OW-Server WiFi
- Umbreytingaraðferð frá mA lestri yfir í tiltekna einingu fyrir gagnaskrárrannsakanda?
- Hvernig á að setja upp Data Logger inn LabCollector?
- Hvernig á að setja upp skynjara á ULT frystum?
- Hvernig á að setja upp viðvaranir í Data Logger?
-
-
- Hvernig á að búa til bók, bæta við tilraun og síðu?
- Hvað er inni í bók?
- Hvað er inni í tilraun?
- Hvað er inni ELN Síða?
- Hvernig prenta ég frá ELN?
- ELN Vinnuflæði
- ELN sniðmát
- TIFF Myndanotkun
- Hvernig á að undirrita rafrænt ELN síður?
- Hvernig á að bæta örplötu í ELN Síða?
- Hvernig á að bæta hvarfefna/lausnum uppskrift í ELN?
-
- ELN - Hjálparleiðbeiningar fyrir Zoho töflureikni
- Línurit í Flat töflureikni
- Hvernig á að breyta tungumáli ZOHO Excel í ELN?
- Hvernig á að endurtaka / flytja inn excel þitt inn ELN?
- Hvernig á að nota töflureikna?
- Hvað er Flat & Zoho töflureikni ritstjóri og hvernig á að virkja það?
- Hvernig á að nota Flat töflureikni og formúlur í það?
- Hvernig á að búa til línurit í flatt töflureikni?
- Hvað er hægt að copy paste frá excel í Flat töflureikni?
-
- Viðbót fyrir móttöku sýnis: Verkstillingarstillingar
- Hvernig á að búa til og vinna úr pakka í Sample receiving add-on?
- Hvernig á að framkvæma sameiningu í sýnishornsmóttökuviðbót?
- Hvernig á að vinna plötur í sýnishorn móttöku viðbót?
- Hvernig á að skoða sýnishorn sem eru búin til í sýnishorn móttöku viðbót í einingu?
- Hvernig á að bæta við sýnishornum sem eru búin til í sýnishornsmóttöku í Workflow viðbót?
- Hvernig á að tengja og senda sýni úr 'sýnishornsmóttöku' til að gera próf í 'LSM'?
-
Farsímar
-
- Greinar væntanlegar
-
Samþætting
-
API
- Inngangur að LabCollector API
- API fyrir LabCollector (v5.4 +)
- API fyrir LSM (v2)
- API fyrir ELN (v1)
- Hvernig á að prófa LabCollector REST API?
- API villuboð
- API: Hvernig á að búa til kassa eða plötur?
- Prófaðu Lab Service Manager API
- Webservice/API Apache uppsetning
- Hvernig á að setja upp Web Services API?
- Hvað er Swagger UI? Hvernig á að fá aðgang að því og prófa API endapunkta?
-
Verkfæri
- Hvernig seturðu upp NCBI sprengja keyrslu til að nota í LabCollector?
- Hvernig á að setja upp og nota Uppskriftastjórnun (gamla útgáfan)
- Hvernig á að halda utan um hluti?
- Innkaupapöntunarstjórnun - A til Ö
- Innkaupapöntunarstjórnun – A til Ö (v 6.0+)
- Uppskriftastjóri (v6.0)
- Sýnishorn af lotuverkfæri (Rack skanni)
- Hvernig á að nota Mass Record Updater?
-
HEITI / MIÐVÆÐUR
-
- Hvernig á að hlaða niður og setja upp skráartengi v2.2? (Labcollector v6.0)
- Hvernig á að setja upp Fileconnector í Mac OS? (Labcollector v6.0)
- Að breyta skrá með File Connector
- Hvernig á að nota ákveðinn hugbúnað til að opna ákveðnar tegundir skráa í skráartengi? (Labcollector v6.0)
- Hvernig á að nota Fileconnector í Mac OS?
-
- Hvernig á að setja upp og stilla Scan Server með LabCollector?
- Sýnishorn af lotuverkfæri (Rack skanni)
- Strikamerki rekki ofan á eða sem þriðja þáttur í línum?
- Hvernig á að opna CSV í UTF8 í Excel?
-
PRENTING
- Hvernig á að stilla prentara með LabCollector?
- Hvernig á að tengja USB prentara við LabCollector?
- Samhæfðir merkimiðaprentarar
- Merktu netprentara og rúllugerðir
- Strikamerkisgerð og prentun
- Hvernig prenta ég strikamerkjamerki?
- Hvernig prenta ég kassakort?
- Hvernig prenta ég færslur?
- Hvernig prenta ég áhættu- og öryggisupplýsingar?
- Hvernig prenta ég geymsluskrár
- Hvernig á að prenta merki á HTTPS umhverfi?
- Hvernig á að stilla PDA N5000 best fyrir LabCollector nota
- Hvernig get ég stillt strikamerkjaskanna AGB-SC1 CCD?
- Hvernig get ég stillt strikamerkjaskannann minn HR200C?
- Hvernig stilli ég FluidX til að styðja ScanServer?
- Tími fyrir tengingu strikamerkisprentara
- AGB-W8X Handbók fyrir strikamerkjaskönnun
- Hvernig á að setja upp prentara og merkimiða?
- Sýna allar greinar (3) Fella greinar saman
-
Geymsla
- Hvernig á að setja upp geymslu í LabCollector?
- Hvernig á að búa til kassa/skúffur/rekki í geymslubúnaði?
- Hvernig á að búa til kassalíkön til geymslu?
- Hvernig á að endurtaka og afrita kassa í geymslu?
- Hvernig á að geyma og stjórna stráum? (EN/FR)
- Hvernig bæti ég sýnum við tiltekna frysti, hillu eða annan hluta geymslukerfisins?
- Hvernig fæ ég sýni úr tilteknum frysti?
- Hafa umsjón með geymslu fyrir hvarfefnis- og birgðaeiningu
- Hvernig á að skipuleggja geymsluvafra?
- Hvernig prenta ég kassakort?
- Hvernig prenta ég geymsluskrár
- Geymsla Innritunar-/útritunarkerfi
-
FYRIRHÆFNI
- Hvað er í samræmispakkanum?
- Hvernig nota ég skrifvarinn reit?
- Hverjar eru kröfur FDA til að hugbúnaður uppfylli GxP leiðbeiningar?
- FDA CFR21 hluti 11 vörugátlisti
- ISO 17025 samræmiskröfur
- Hvernig notarðu útgáfu? v5.31 og neðar
- Hvernig notarðu útgáfu? v5.4 og nýrri
- Ætti ég að læsa, setja í geymslu eða eyða skrám?
-
STUÐNINGUR
-
Stillingar
- Hvernig á að stilla Apache til að vinna með Office 2007 og nýrri?
- Hvernig á að flýta fyrir LabCollector? (EN/FR)
- PHP viðbætur nauðsynlegar
- Flýttu staðarnetinu þínu
- TIFF Myndanotkun
- Tímastimpill í skrám sem sýnir rangan tíma.
- Hvernig á að stilla SMTP til að nota OAuth 2.0 (Microsoft og Gmail)?
-
- LabCollector Almenn uppsetning
- LabCollector Almenn uppsetning - v5.4
- LabCollector Almenn uppsetning 5.2
- LabCollector Almenn uppsetning-v6.0
- Innskráningarvalkostir og php kröfur fyrir LDAP/SSO
- Hvernig á að setja upp þitt LabCollectornöfn almennra stillinga, lógó og eininga?
- Hvernig á að stilla umboð, verkefnaáætlun og tölvupóstvalkosti?
- Hvernig á að stilla einingarleitar- og formvalkosti?
- Hvernig á að stilla ytri tengla á heimasíðunni þinni?
- Hvernig á að setja upp fréttastrauminn þinn?
-
- Villa við að hlaða stórar skýrslur inn LabCollector
- Reitir með skrunstiku virka ekki með Safari, hvað get ég gert?
- Ég get ekki séð kassakerfi í Safari, hvers vegna?
- Ég fæ villuna: "Forritið getur ekki ræst vegna þess að MSVCR110.dll vantar í tölvuna þína. Prófaðu að setja forritið upp aftur til að laga þetta vandamál" þegar þú setur upp eða uppfærir LabCollector fyrir Windows
- Vandamál í upphleðsluskrá: skoðaðu PHP stillingarnar þínar
- Einingaleit mistekst með 404 villu eða beiðni of langa
- Þegar ég vil flytja inn stórar skrár gerist ekkert?
- Af hverju fæ ég villuna „MySQL server has gone away“ við upphleðslu skráar?
-
NÝTT KB MÁNAÐARINS
- Kennsla um viðskiptavinasvæði
- Hvernig á að búa til rör með geymslu og merkja notkun þeirra? (v6.0)
- Hvernig á að hlaða inn / flytja inn gögn í plasmíð- og raðeiningar?
- LabCollector Almenn uppsetning-v6.0
- Innkaupapöntunarstjórnun – A til Ö (v 6.0+)
- Hvernig á að nota Plasmid Map Editor?
- Hvernig á að setja upp viðvaranir í Data Logger?
-
SKRÁÐAR KYNNINGAR
LabCollector ![]() offers the possibility to automatically import data files from your Windows computer into your instance with the help of Win2Parser middleware.
offers the possibility to automatically import data files from your Windows computer into your instance with the help of Win2Parser middleware.
Win2Parser ![]() er Windows miðvararforrit sem leyfir sjálfvirkni við öflun hrágagnaskráa frá mörgum stöðum inn LabCollector. Each instance can monitor multiple folders allowing dedicated parsing logic. It connects to the Parser add-on
er Windows miðvararforrit sem leyfir sjálfvirkni við öflun hrágagnaskráa frá mörgum stöðum inn LabCollector. Each instance can monitor multiple folders allowing dedicated parsing logic. It connects to the Parser add-on ![]() or to any customized parsing script hosted on LabCollector miðlari.
or to any customized parsing script hosted on LabCollector miðlari.
Win2Parser provides an interface to select a folder from your windows computer for LabCollector to parse files from. Data is extracted from various electronic file types such as txt, csv, and others. For example, Win2Parser can be used in a test lab to extract a list of samples data (.csv file) and import it directly into the Samples module ![]() . LabCollector will parse (split & extract) data from the excel file to import individually, sample IDs, patient names, tests and other parameters to insert them in the fields created inside the module.
. LabCollector will parse (split & extract) data from the excel file to import individually, sample IDs, patient names, tests and other parameters to insert them in the fields created inside the module.
Follow the bellow steps to learn how to use Win2Parser and the Parser add-on.
1. Win2Parser
2. Parser add-on
3. Link Win2Parser to the Parser add-on
1. Win2Parser ![]()
Win2Parser provides an interface to select a folder to parse files from and options to indicate which parser model is associated to which folder. The Parsing actions can be started or stopped, logs may be viewed, and folder details can be created, edited or deleted.
Down below is a screenshot of the Win2Parser Heimasíða.
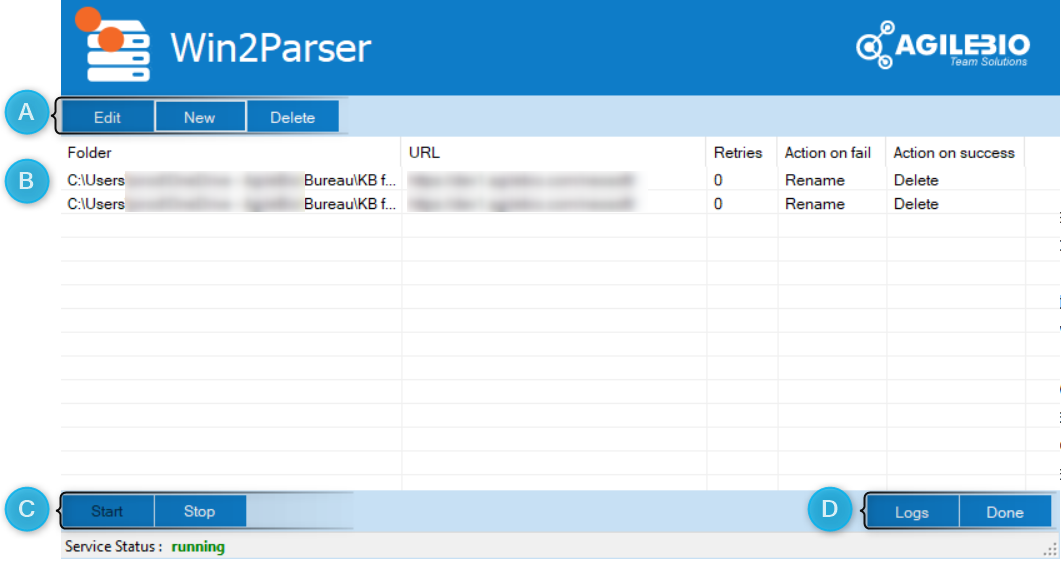
A: Hér getur þú bæta við new folders to parse, breyta or eyða already added ones.
B: Here you will see the full list of all folders you added to Win2Parser and their corresponding details.
C: You can choose whether you want to Home or Hætta sending your folder(s) to the specified URL. If you click on Start, the service status below will display gangi. And when you click on Stop, it will display hætt.
D: Win2Parser allows you to see logs containing changes done to your files, here you can see a history of all messages, timestamps and their status. Once you finish, you can click on “Lokið".
Down below is a screenshot of the Win2Parser Configuration page, which you can access by clicking on the “New” button on the Homepage.
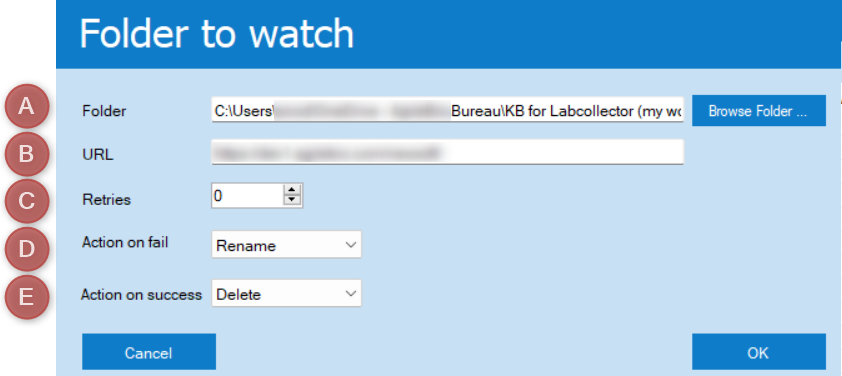
A: Here you can choose and select the folder you want to parse by clicking on “Skoða möppu".
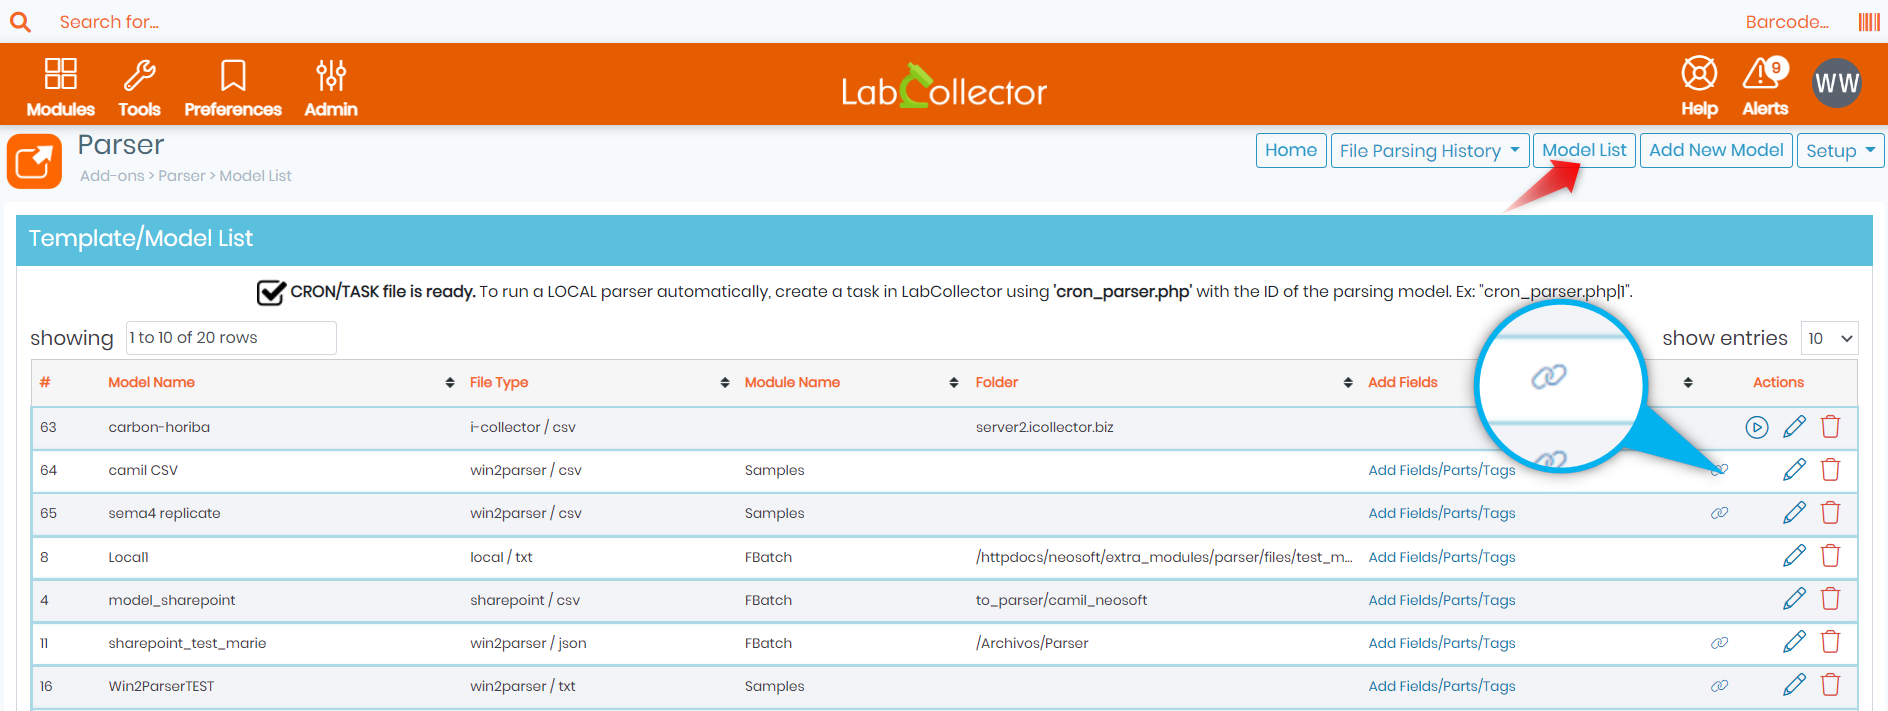
B: Here you need to define the URL to which your folder and all added documents will be sent, you can find this URL by clicking on Fyrirmyndalisti inside the Parser add-on, and then click on the following icon ![]() fannst í Aðgerðir column (as shown in the screenshot below).
fannst í Aðgerðir column (as shown in the screenshot below).
C: Define the number of reynir aftur, which corresponds to the number of parsing attempts that will be done.
D: Select the action you want to get executed in case your folder failed to upload to the specified URL, whether you want to endurnefna það, eyða it, or move it to failed folder.
E: Select the action you want to get executed once your folder get successfully uploaded, whether you want it to get eytt, or moved to the success folder.
2. Parser add-on ![]()
To input your Parser license number, all you have to do is click on Skipulag, þá License. You will get the following page.
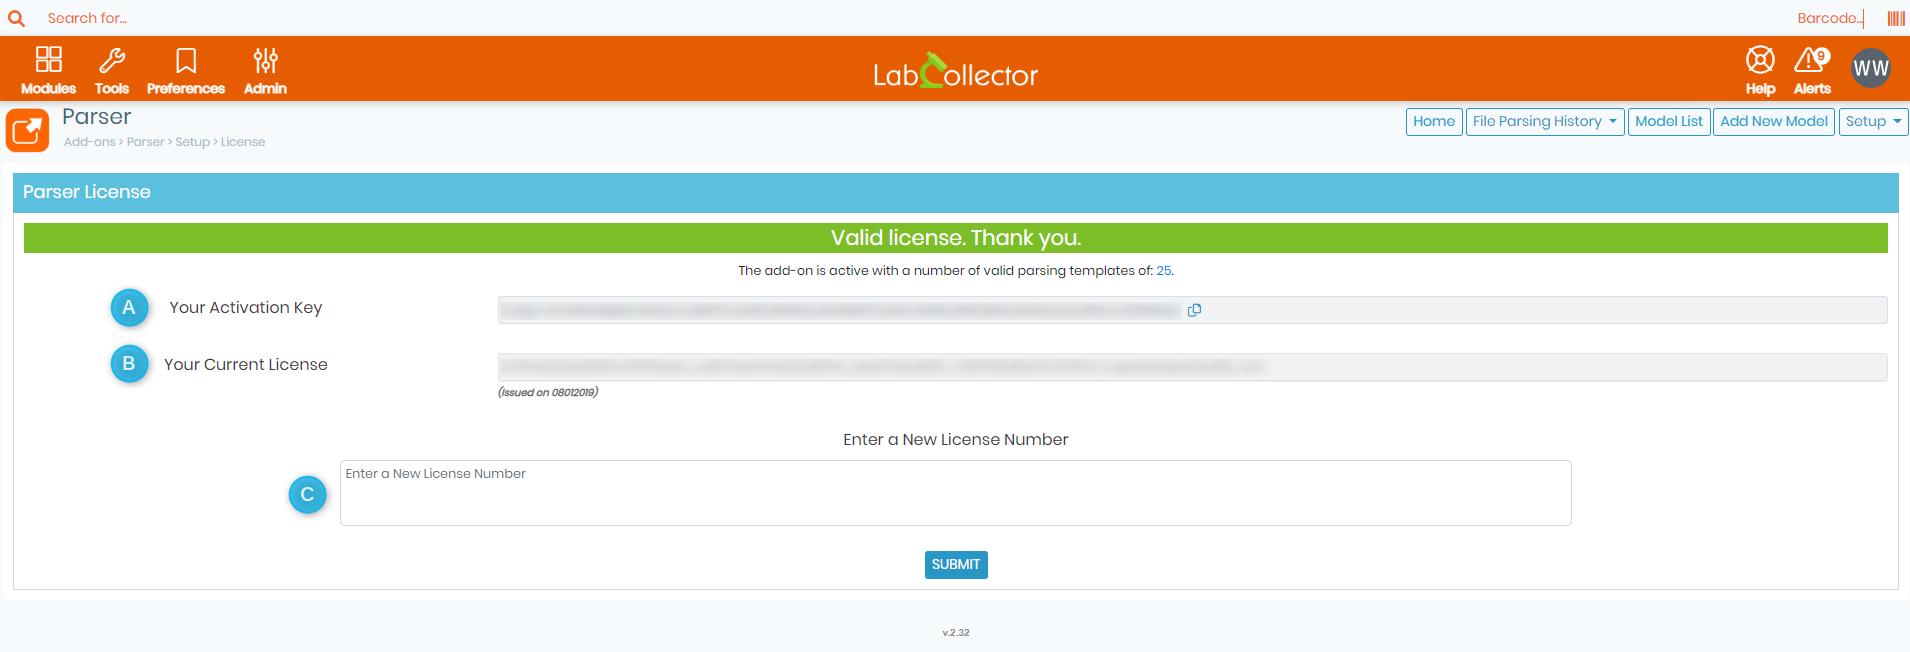
A: Here you can see your activation key.
B: Your current License will be displayed in this box (if you already have one).
C: Here you can input a new license number, once finished click on Senda.
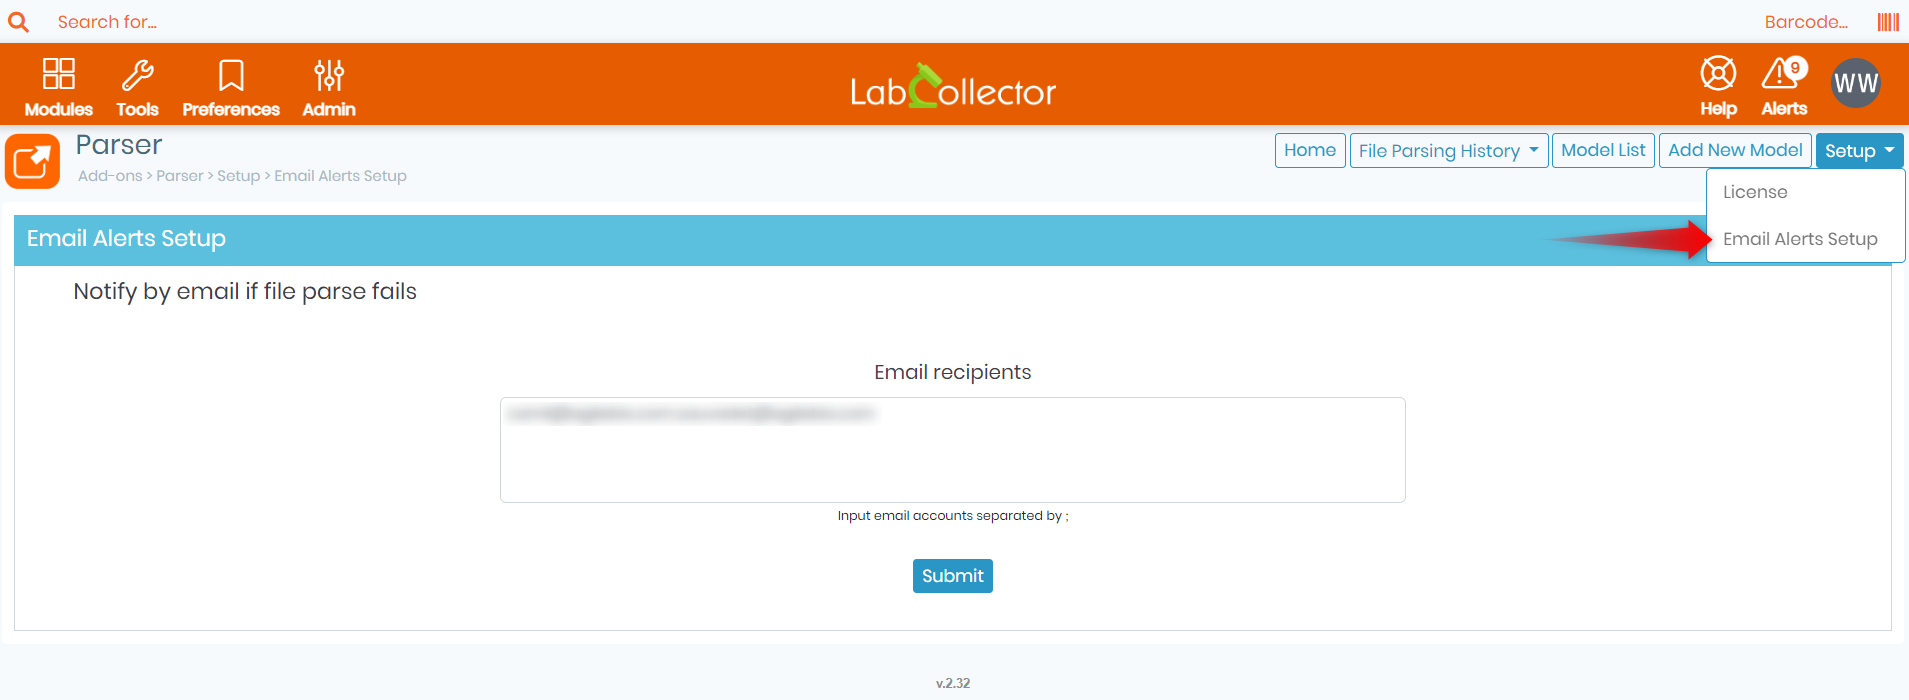
You can also set-up email alerts, this will help you receive notifications in case a file parse fails. To do so, click on Setup, then Email Alerts Setup. You will get the following page.
You can also view the whole file parsing history containing all files, their status and the corresponding remarks. To do so, click on “File Parsing History".

If you decide to perform a Manual Execution, click on the button on the top right corner, you will then get the following page.
You can then click on any folder and upload the files manually.

You can also view the List of Templates/Models that are already used. To do so, click on “Fyrirmyndalisti” located in the top right corner, here you will see a list of all parsing models. Plus, users with an authorized permission level will be able to edit existing ones.
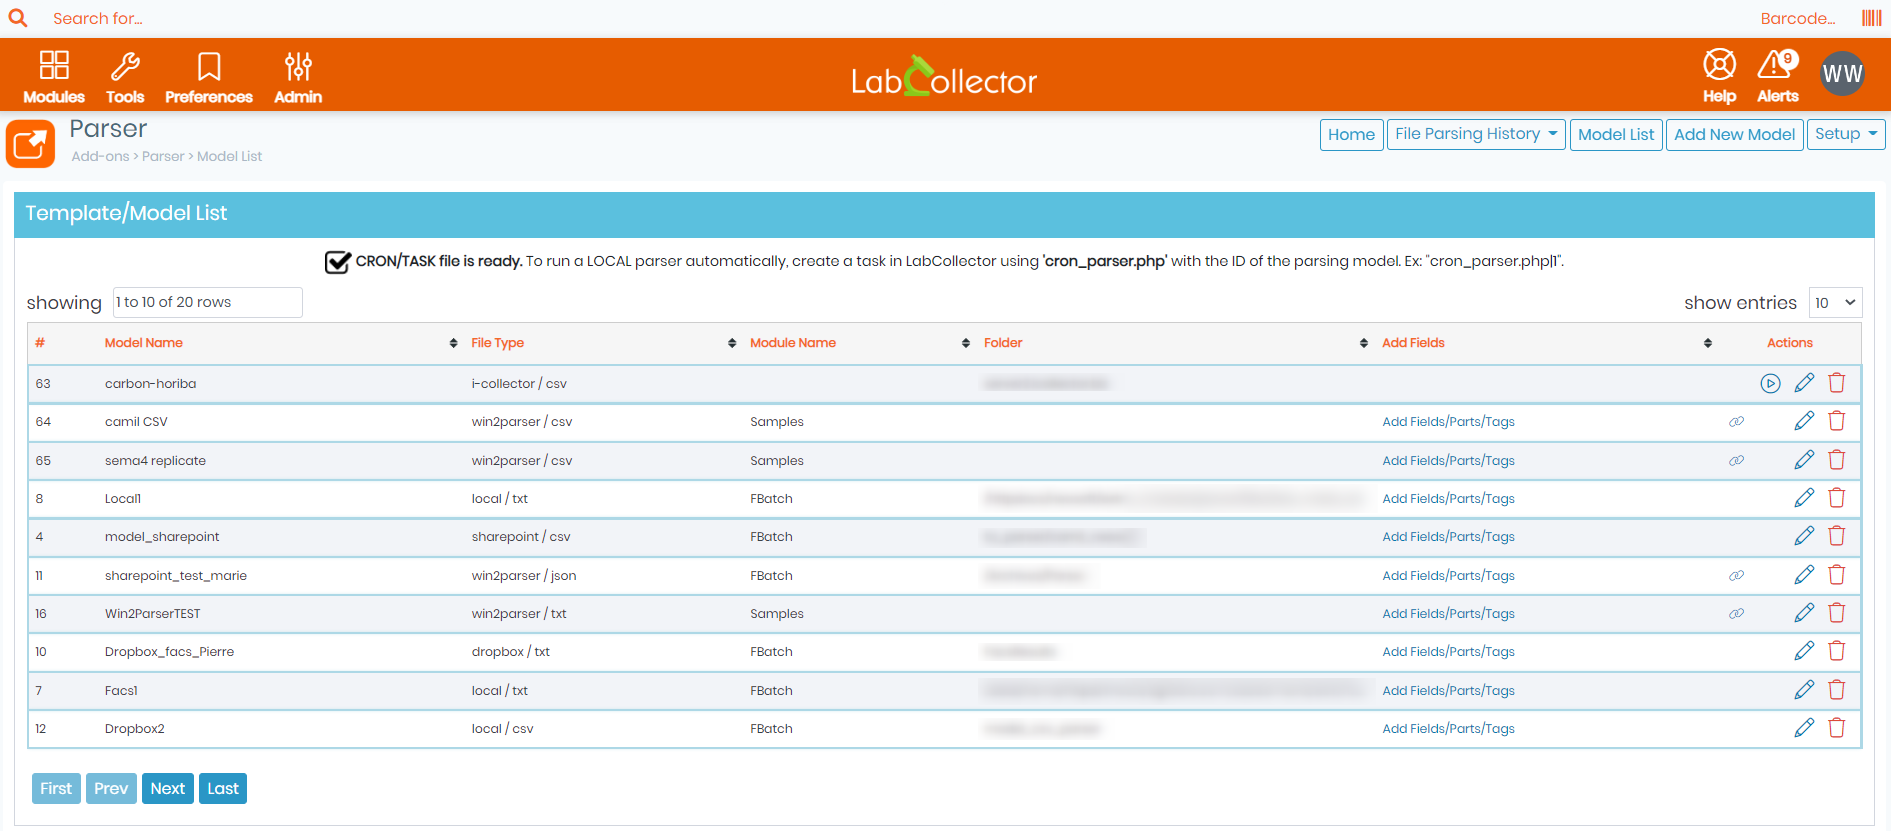
![]()
3. Link Win2Parser to the Parser add-on
In order to Add or edit a new model, you will have to click on “Add new model” located on the top right corner. Once done, you will get the following page.
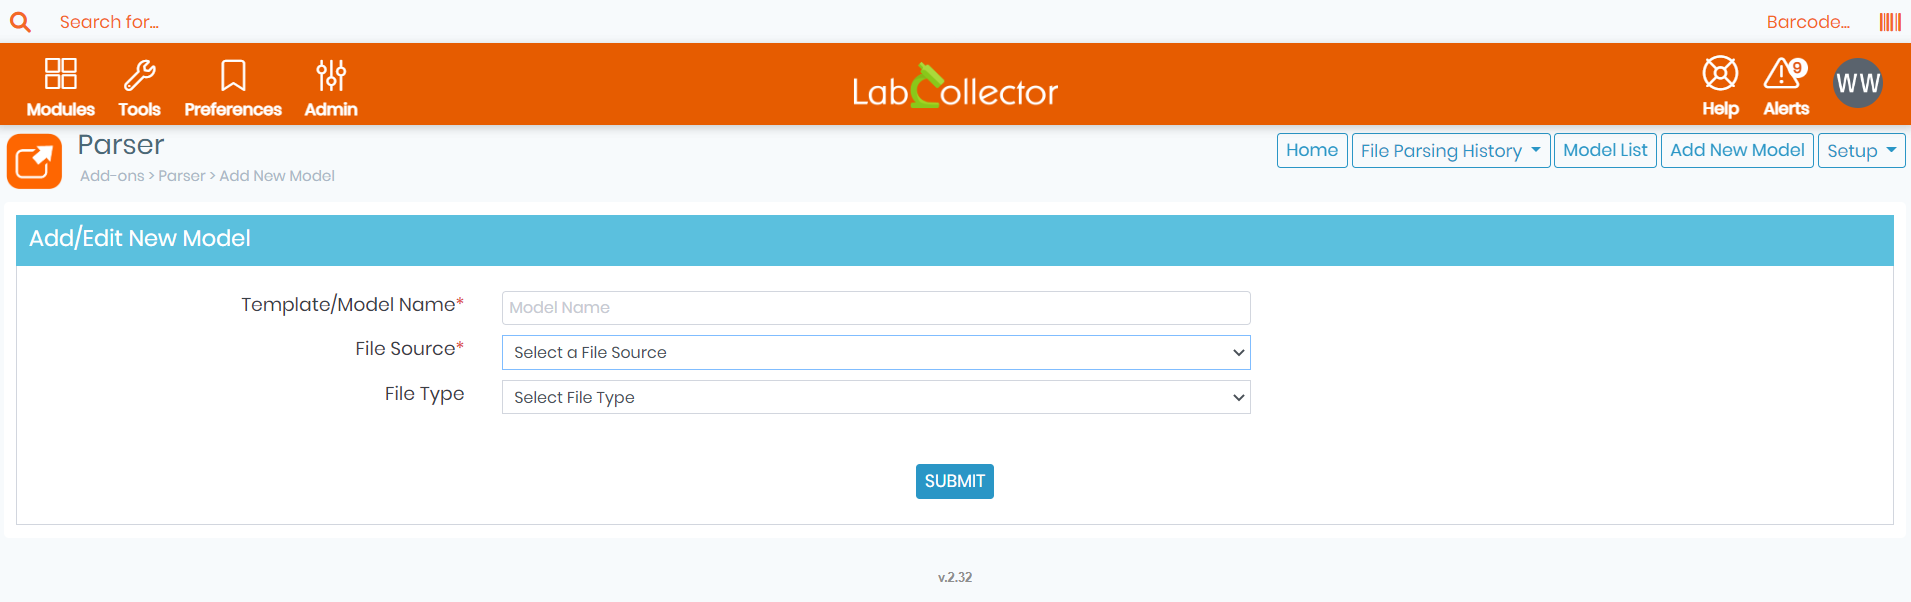
After giving your template/model a name, you can now select Win2Parser amongst other options as your file source. (See screenshot below for the full list of file sources that you can select).
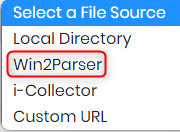
Þegar þú velur Win2Parser as your File Source, other options will appear in the list. (As shown in the screenshot below).
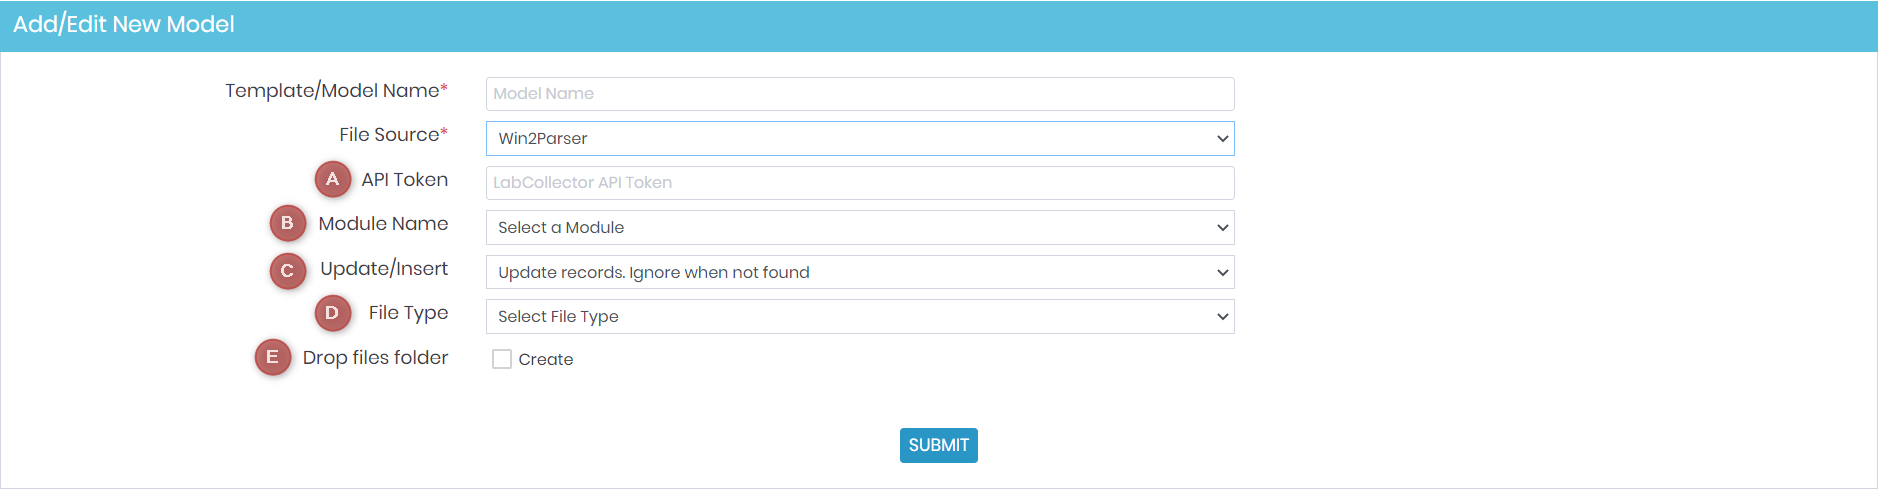
A: Settu inn þitt LabCollector API tákn.
B: Veldu mát to which you want the files to be sent.
C: Here you can choose to uppfærsla already existing records and bæta við new ones or hunsa them if they weren’t found inside the module.
D: Þú getur líka valið skráargerð you want to parse, down below is a screenshot will all available options.
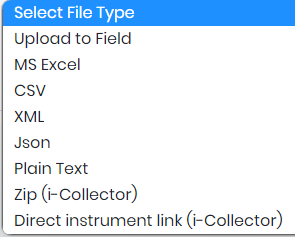
E: Choose whether or not you want to create a drop files mappa.
Svipuð efni:
- Athugaðu KB okkar á how to connect Parser to I-collector.
- Lesa okkar manual on Parser.
- athuga how to install add-ons.
- Lesa okkar handbók á LSM.
