7.3.14 Regulations compliance & validation
If you need security or regulation compliance, you can activate this function. By default the value is OFF. You need to activate it according to your lab requirements. It helps to activate options for validations of tests/jobs, activation of accreditation logo, enhance security measures, password protection to view reports, etc.
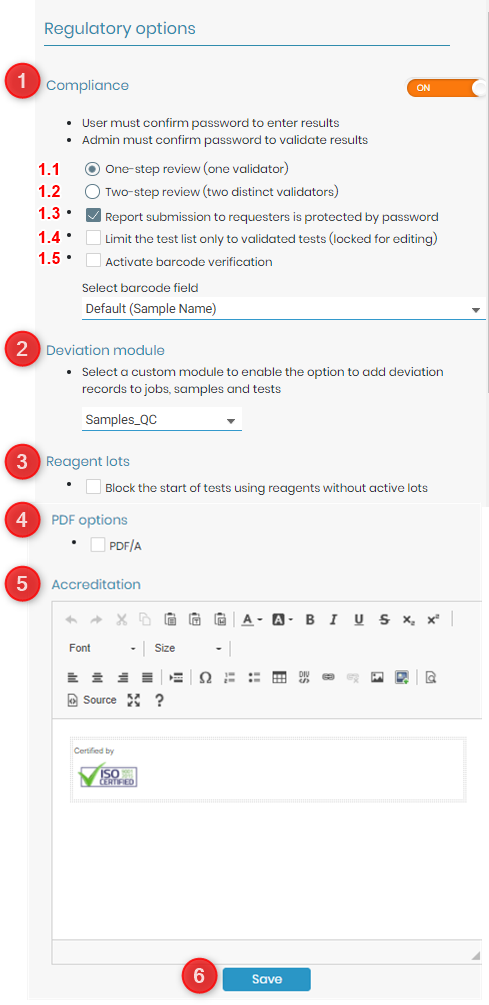
1. Compliance
1.1) One step review: You can choose this option if you want your jobs to be validated by the supervisor of the lab. The jobs will reach finished status only when they are validated by supervisor.
1.2) Two step review: You can choose this option if you want to validate your jobs with two distinct supervisors in lab. The jobs will reach finished status only when they are validated by two different supervisors.
1.3) You can activate this option to send result reports to requested in a password protected manner.
1.4) While creating tests in Admin 🡪 Preferences 🡪 Tests you can validate the test by locking the editing feature. After this when you choose limit only to validated tests, then only locked tests will be seen, when you create a job.
1.5) While creating a job, you need to add sample name. By activating this barcode verification, you need to just scan the barcode of the sample and the name (number) will be automatically entered. By default the sample name will be selected for barcode verification. However, you can also activate this option for any parameter that you have created at job, sample or test level. (refer to  section 3.4.2.1)
If this function is activated, when users perform validation actions (single sample or batch), the system asks the user to confirm their password. Only the super- administrator or users defined with Administrator role within the LSM can validate results. The validator and timestamp of validation will be automatically added to reports. The number of validations needed can also be configured (one or two).
2. Deviation module
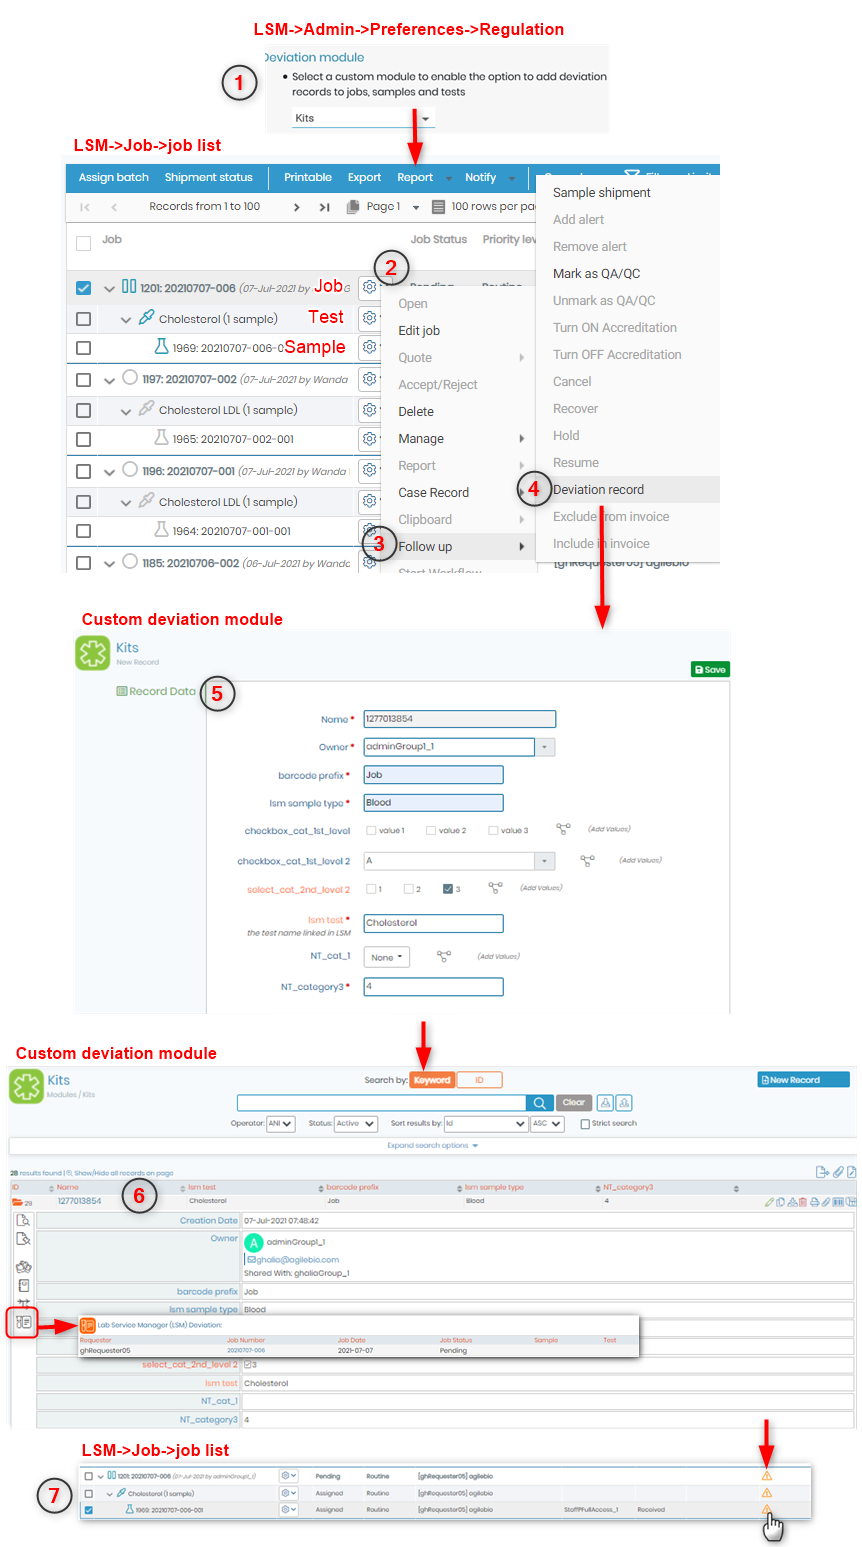
On the job, test, assay level you can add record in the choice of your module.
1) You need to select the module for the deviation. The deviation module will be a custom module only and not default modules.
2) When you create a job by going to Job 🡪 Add job and when you start the job by going to Job 🡪 Job list , you can click on options button.
3) In options click on follow-up
4) Select Deviation record option
5) You will see a pop-up to create a record in the deviation custom module you selected. You can fill the fields accordingly and
6) Once the record is created you can see it by going directly in the custom module.
7) In the LSM the job, sample or test will have a small deviation icon. When you click on it you will see a popup of the deviation record you created.
3. Reagents lots
Here you can block the use of reagents which do not contain active lots or have only expired lots.
|
|
|
Active lots means a lot which is not expired or the expiration date is either 00.00.0000 (no expiration date) OR greater date than today OR is not disposed off. Please read the knowledgebase |

4. PDF options
PDF/A is an ISO standardized version for PDF, for long time preservation, avoid tampering of results, etc. LSM offers to protect the result reports pdf by activating this option in the regulation tab.
5. Accreditation
You can put a logo for accreditated tests in the result reports. Please read the knowledgebase  KB: how to accreditate results.