Search Knowledge Base by Keyword
How to Setup Alerts in Data Logger?
Data Logger ![]() is one of LabCollector’s
is one of LabCollector’s ![]() powerful add-ons, a network-based application that allows you to monitor and control your storage temperature, humidity and CO2 levels or any other data from a centralized location.
powerful add-ons, a network-based application that allows you to monitor and control your storage temperature, humidity and CO2 levels or any other data from a centralized location.
Data Logger provides you with the ability to setup alerts for an equipment via both Email and SMS.
By default, the Data Logger sends alerts via email. However, you can also set up SMS alerts to receive notifications directly to your mobile device. This allows you to receive alerts in real-time, even when you’re not in the lab.
.
In this knowledge base, we’ll guide you through the process of setting up SMS and email alerts in the Data Logger. With these alerts, you can ensure that you’re always aware of any potential issues with your laboratory equipment, even when you’re away from the lab.
We will also walk you through each step of the process, from configuring the SMS gateway to defining the alert thresholds. We’ll also provide you with tips and tricks for optimizing your SMS alerts to ensure that you receive timely and accurate notifications.
1. Data Logger Setting
2. General Alerts Setup
3. SMS Alerts Setup
4. Email Alerts Setup
![]()
1. Data Logger Setting
When you start using Data Logger, the initial steps involve configuring loggers and probes. Access to the Setup menu is available only to super-administrators, administrators with no groups, and super-administrators. Super-administrators can view, create, and edit loggers of the group(s) they manage or general loggers.
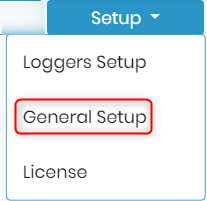
a. Loggers Setup
To manage your loggers, go to the Setup tab on the home page:
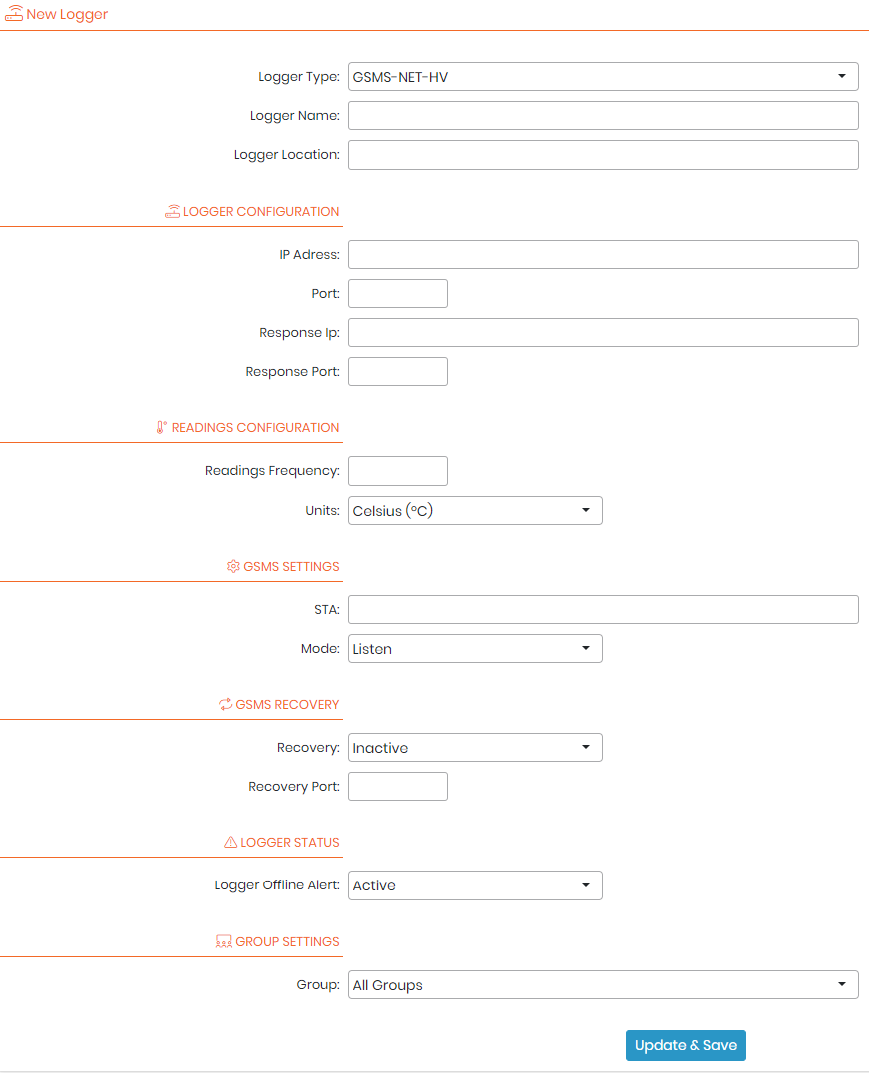
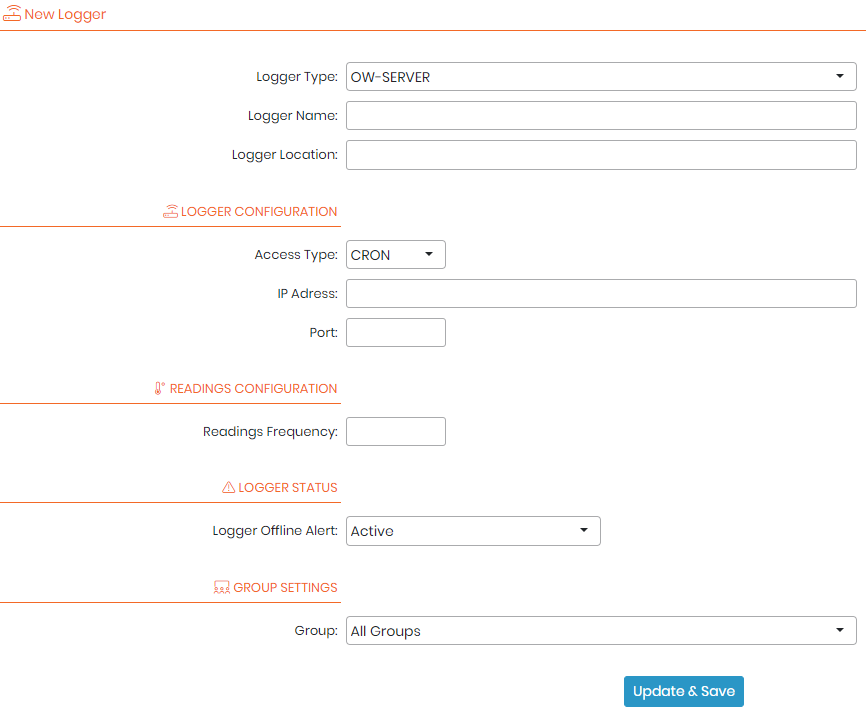
Add a new hardware logger by clicking on the “Add New Logger” link. In the main page section, select the appropriate logger type from the list based on the installed plugin. Then, enter the IP address and port.
– For GSMS-NET-HV logger, use the settings defined in the hardware setup.
– For OW-SERVER, use port 80 (default).
– For RMONI-TCP, use port 6001 (default).
For GSMS-NET-HV logger, additional network configuration information is required, which can be obtained from the logger setup software.
For OW-SERVER, depending on the type of data, you need to fill in either the IP address or MAC address. Use the IP address for CRON data and the MAC address for POST data. If you want to receive alerts, provide the IP and port information.
Alternatively, for OW-SERVER, you can use the “Import Loggers” link. In the main page section, select the logger type from the list and upload a CSV file with the format: Logger Name, Logger IP or MAC Address, Logger Port (if applicable), Logger Location.
If you have other types of loggers that you would like to integrate with the Data Logger Add-on, please contact [email protected] or [email protected] for assistance.
You can manually set the reading frequency in minutes and restrict the logger to a specific group.
Once your logger is installed, you can edit its setup by clicking on the [+] icon next to the logger name. You can also archive a logger using the button ![]()

- By Tasks
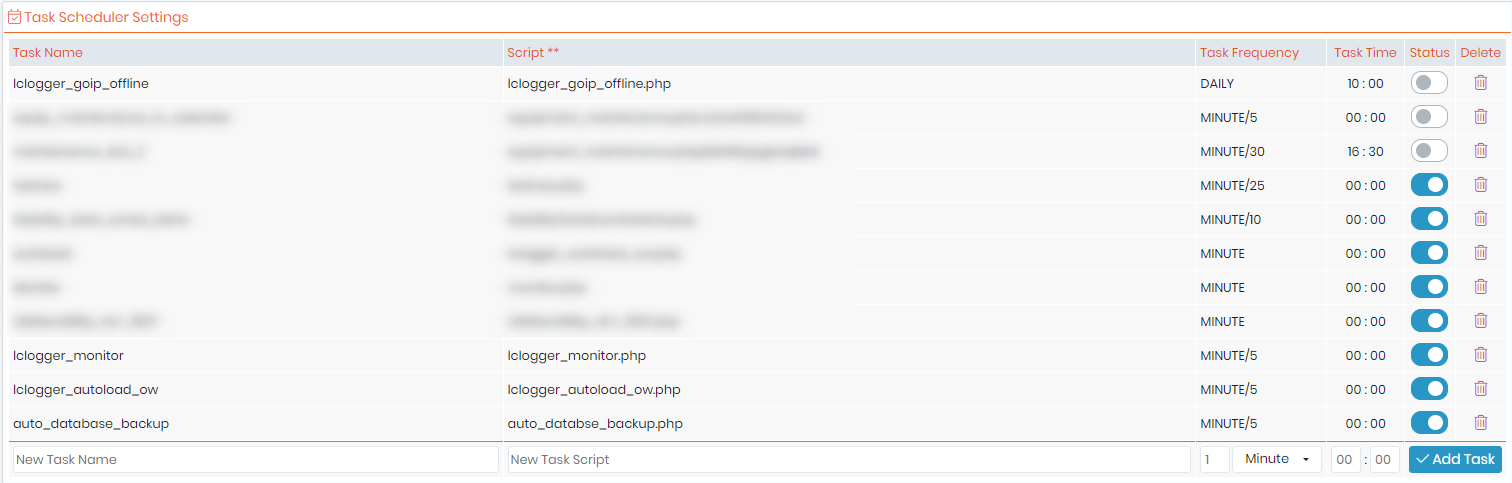
To configure LabCollector tasks, you can access the ADMIN > Setup > Proxy, Tasks Scheduler, and Email section. Follow these steps:
1. Add a new task by filling out the form with the task name, script file name, and task frequency. Use the “Add This Task” and “Update Settings” buttons.
2. Use the following information to fill out the form based on your logger type:
– For GSMS-NET-HV:
– Task name: lclogger_autoload_gsms
– Script: lclogger_autoload_gsms.php
– For OW-SERVER:
– Task name: lclogger_autoload_ow
– Script: lclogger_autoload_ow.php
– For RMONI-TCP:
– Task name: lclogger_autoload_rm
– Script: lclogger_autoload_rm.php
It is recommended to set the task frequency to 5 minutes.
- By Logger Data Sending
The OW-SERVER can directly send information to LabCollector. Follow these steps to configure the data sending process:
1. Copy and paste the OW-Server MAC address into your internet browser.
2. Go to System Configuration > Post Client to specify the URL where the OW-Server can send data at regular intervals.
3. Select the options “Enable Client” and “POST Header.”
4. Choose the data type from the select list and enter the URL that provides access to the file “lclogger_autoload_ow.php.”
5. You can adjust the period to 300 seconds and click on the Save button.
If needed, you can also enable the Proxy based on your server configuration. Please consult your IT department for the Proxy URL.
b. Probes Setup
For each logger, you can configure different types of probes such as temperature, humidity, gas, pressure, light, etc. The probes are displayed based on loggers, types, or locations. Follow these steps:
- Click on the probe ID to configure a probe. Specify the probe name, equipment (corresponding to equipment available in the storage browser or Equipment module of LabCollector), expected temperature, and tolerance.
- Select the status of the probe as Online/Offline and indicate if the probe should trigger an alert.
- Configure a probe offset for manual calibration if necessary. Use the dot (.) for decimal temperature values and “-x” if the probe temperature is higher than the expected temperature.
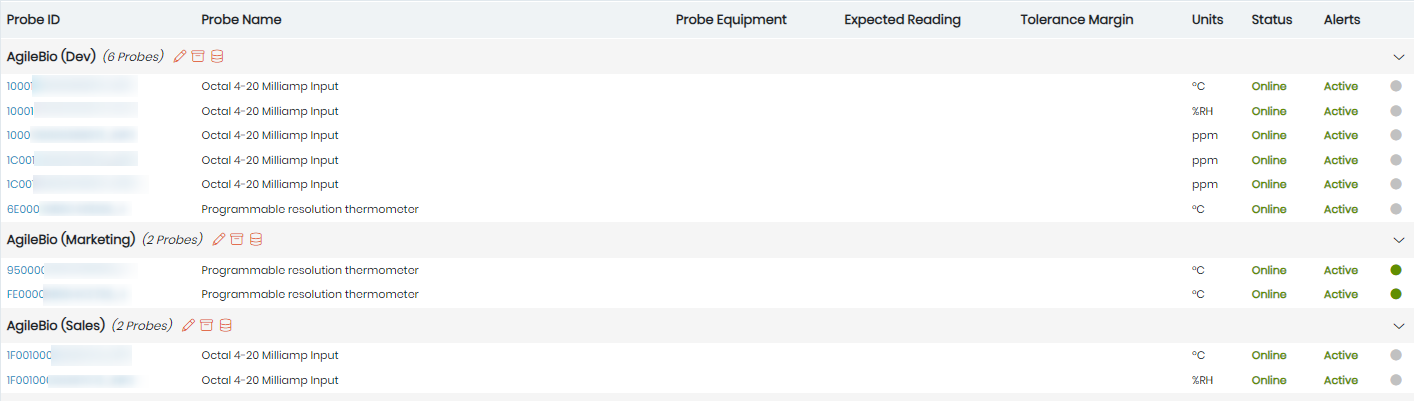
In the probe list, you can also monitor the status of the probe’s reading:
-
- Green: Probe’s readings are up to date.
- Grey: Probe is in stand-by mode (last reading over 24 hours ago).
- Orange: The last value received was over 10 minutes ago.
- Red: Recorded values are outside the tolerance limits set for the probe.
To determine if a probe switches from green to orange, you can provide a logger reading frequency for a more accurate interval calculation (3 times the reading frequency).
When a probe goes outside the selected range once, it is internally flagged. If it returns to normal values, the flag is canceled. However, if the values remain outside the range, an alert will be sent via email or SMS, depending on the selected notification method. This feature prevents immediate alerts when, for example, the temperature briefly increases due to opening a freezer door.
By setting up loggers and probes in the Data Logger, you can effectively monitor and manage your equipment and receive timely alerts when necessary.
![]()
2. General Alerts Setup
You can also configure your alerts by navigating directly to Setup -> General Setup -> Alerts.
The below page will appear (please refer to the numbers displayed in the screenshot).

1. Confirmation URL: This URL should be a valid endpoint that can receive HTTP requests. When an alert is triggered, the Data Logger will send a notification to this URL, which will then process the alert and send it to the appropriate recipients.
2. Alerts Delivery System: This section allows you to choose your notification preferences. You can select which types of alerts you want to receive (either email or SMS) for different scenarios, such as when the logger is offline, when the probe is offline, or when the reading is out of range. You can also choose not to receive any alerts for these scenarios by leaving the checkboxes empty.
For example: You may choose to receive SMS alerts when the logger is offline, but only receive email alerts when the probe is offline.
3. SMS Alerts Delivery System: In this section, you can choose whether you want to use an integrated or GOIP delivery system for SMS alerts. The integrated system allows you to send SMS alerts through an internet-based SMS provider, while the GOIP system uses a GSM over IP device to send SMS alerts.
4. This section allows you to enable or disable alerts for when a probe appears frozen. A frozen probe is one that is not sending readings or is sending readings that are out of range. When this feature is enabled, you will receive alerts to notify you of the issue.
5. Once you finish, click on “Update & Save” to save your changes.
![]()
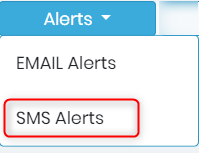
3. SMS Alerts Setup
To set up SMS alerts, you’ll need to tailor the settings to your specific requirements. This involves configuring the SMS gateway, setting up the phone number to receive the alerts, and defining the alert thresholds for each piece of equipment.
To do so, you will first need to go to the Data-logger add-on ![]() and follow the below steps:
and follow the below steps:
- Navigate to Alerts -> SMS Alerts

To configure task alert, go to ADMIN > Setup > Proxy, Tasks Scheduler and Email
Add a new task with these parameters:
- Task name = lclogger_monitor
- Script = lclogger_monitor.php
- Task frequency: we recommend 10 to 20 minutes (adjust in order to reduce false alerts)
.
- You will then get redirected to the SMS alerts configuration page, which looks like the following (please refer to the numbers displayed in the screenshot below):
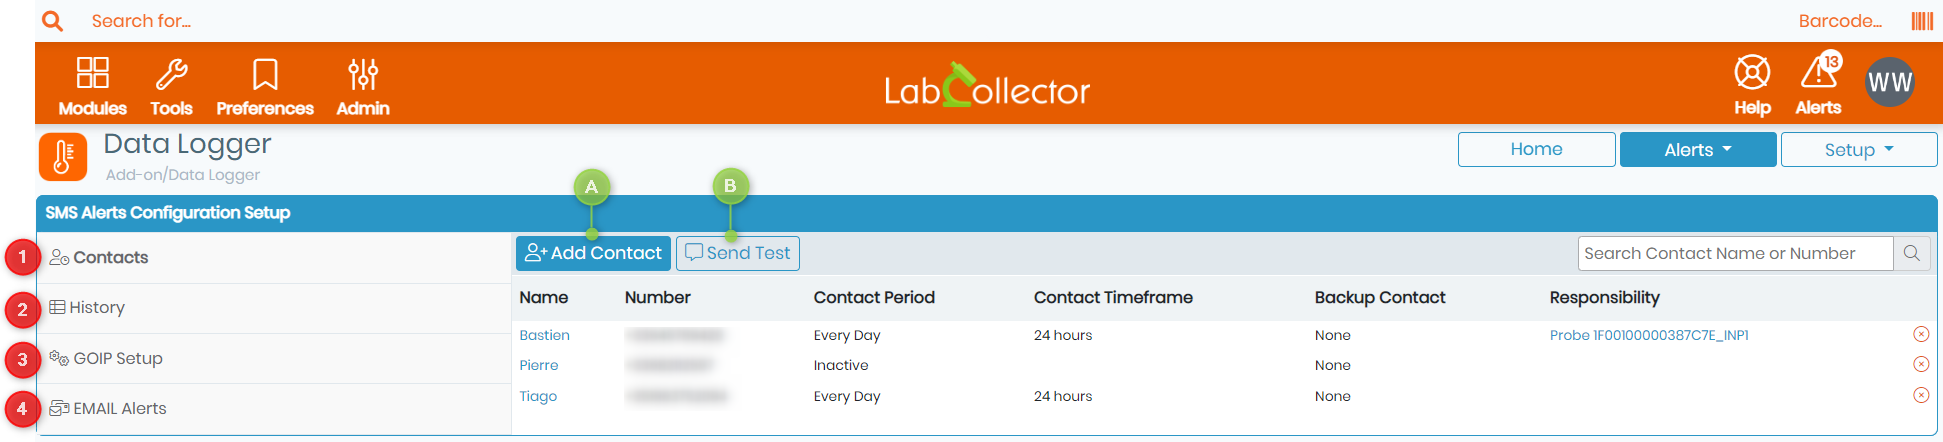
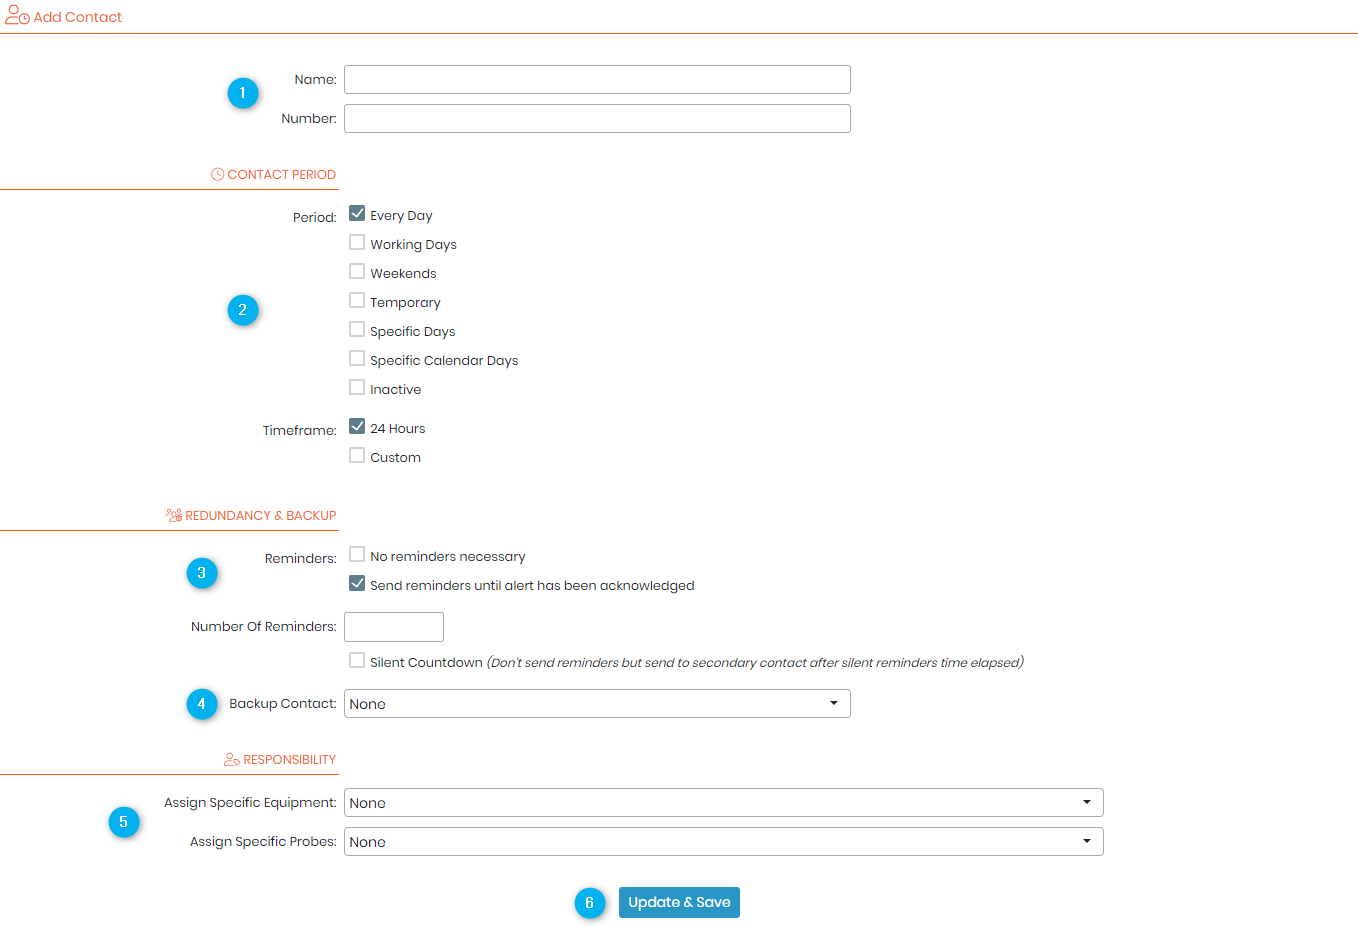
1. In this section you will find, a list of all contacts for whom the SMS alerts are already set-up.
-
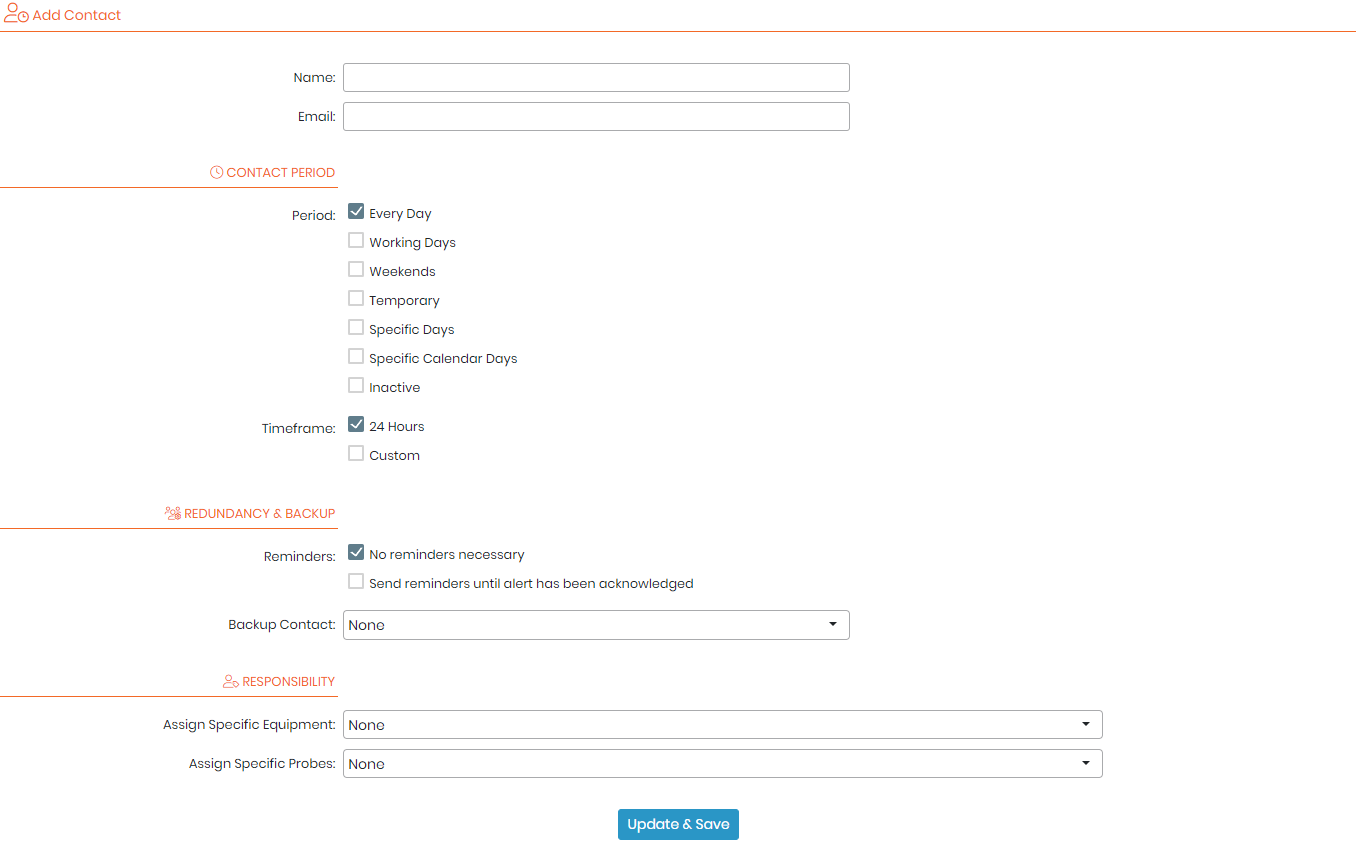
- A: To add a contact that will receive the SMS alerts, simply click on the “Add Contact” button
 , the below pop-up page will appear.
- A: To add a contact that will receive the SMS alerts, simply click on the “Add Contact” button
-
-
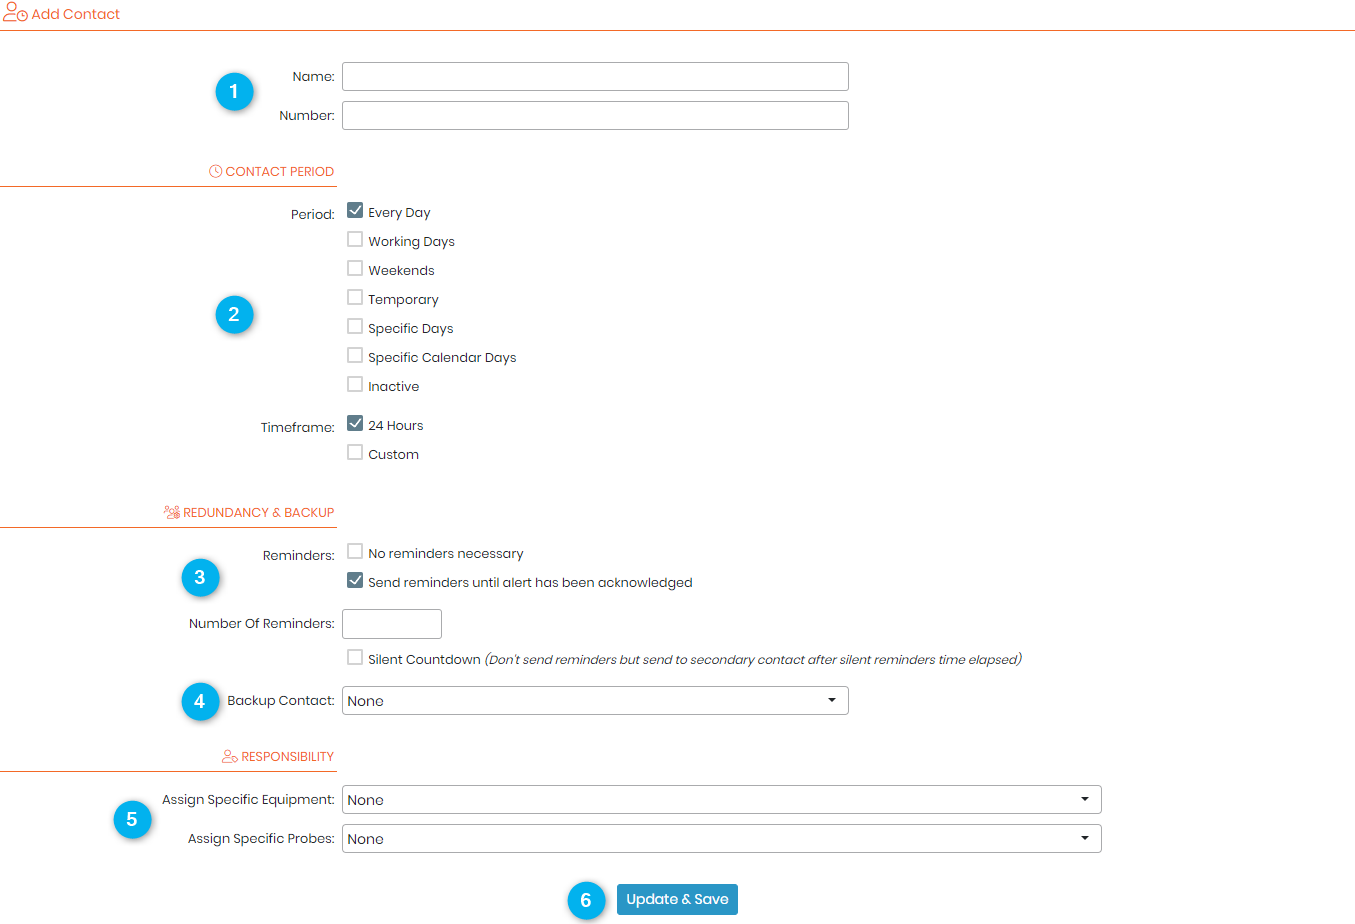
- 1. Here you need to input the name and number of the person who wants to receive the alerts.
-
The phone number must start with the country code. For example, France code is +33, India +91, etc., followed by the phone number.
-
-
- 2. The “Contact period” option gives you choices on when you want to receive the SMS alerts.
- You can either receive an alert every day.
- You can also receive them on weekdays only (Monday-Friday) or on weekends (Saturday and Sunday).
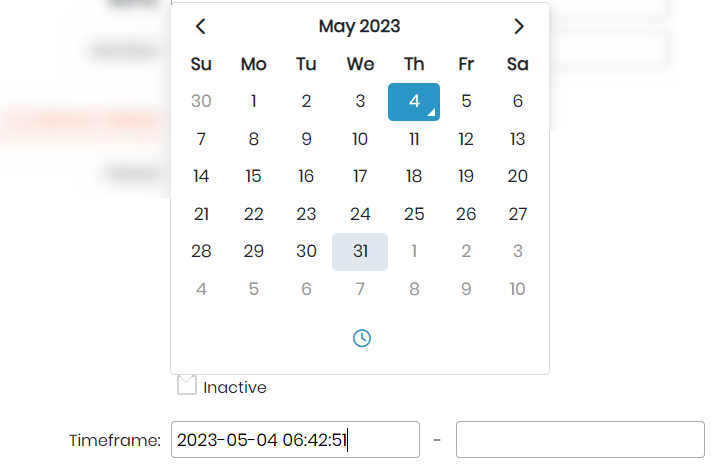
- Or simply choose a temporary period to receive an alert. if you select this option, you will see the below pop-up. Click on the clock icon
 to select the specific time in which you want them to be sent.
- 2. The “Contact period” option gives you choices on when you want to receive the SMS alerts.
-
-
-
-
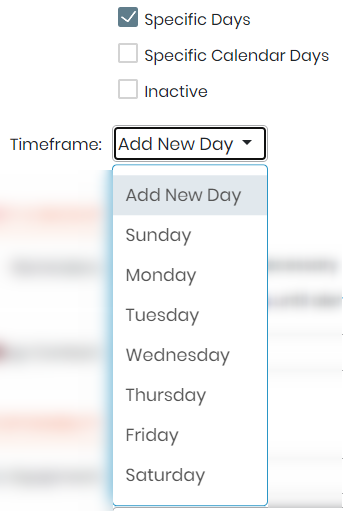
- You can also opt for Specific days of the week.
-
-
-
-
-
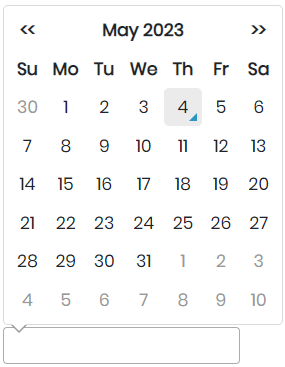
- Or a specific day from the calendar days.
-
-
-
-
- 3. The “Redundancy & Backup” section allows you to send reminders until the SMS alert has been acknowledged. You can also choose the numbers of reminders you want to be sent.
-
.
-
-
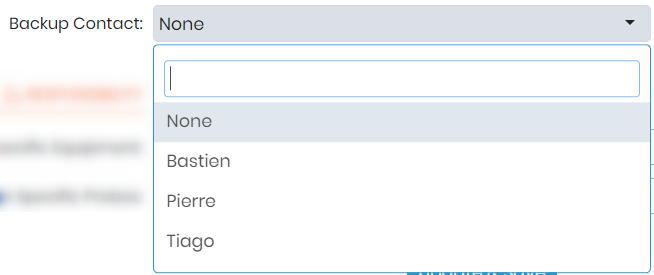
- 4. Backup Contact option will allow you to put a secondary contact. This is helpful, especially if you miss seeing the reminders for alerts, the secondary contact will also get an SMS alert.
- 4. Backup Contact option will allow you to put a secondary contact. This is helpful, especially if you miss seeing the reminders for alerts, the secondary contact will also get an SMS alert.
-
First, you will need to create the contact, by filling out this exact same form. Then, once the contact has been created, he/she will appear in the drop-down list from which you can select the one you require.
-
-
- 5. The “Responsibility” section allows you to select either the equipment or probe you want to receive an alert for. You have the possibility to select multiple equipment and probes, which you can select directly from the drop-down list.
-
-
-
- 6. Once you have finished, click on the button
 , the contact will then appear directly on the list.
- 6. Once you have finished, click on the button
-

-
-
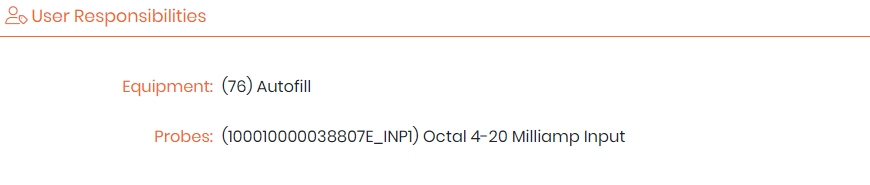
- If you click on one of the contact’s responsibilities, a pop-up page will appear listing all the user’s responsibilities in terms of equipment and probes (as shown in the screenshot below).
-
-
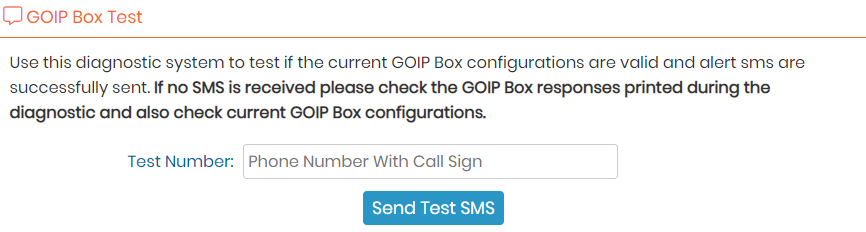
- B: You can send a test to make sure that everything is working well, simply click on the following button
 , and the below pop-up page will appear, you can then input a phone number and click on the button “Send Test SMS“.
- B: You can send a test to make sure that everything is working well, simply click on the following button
2. The “SMS history” section allows you to view the whole SMS alerts log (whether the alerts were sent, closed or not yet acknowledged).
You can also check the status (highlighted in yellow) to see whether the alert was resolved or closed by clicking on ![]()
You can click on this icon ![]() to view all the details about the probe.
to view all the details about the probe.
On the Alert column, this icon ![]() indicates that the probe is offline or the reading might be out of range. Whereas this icon
indicates that the probe is offline or the reading might be out of range. Whereas this icon ![]() corresponds to a logger.
corresponds to a logger.
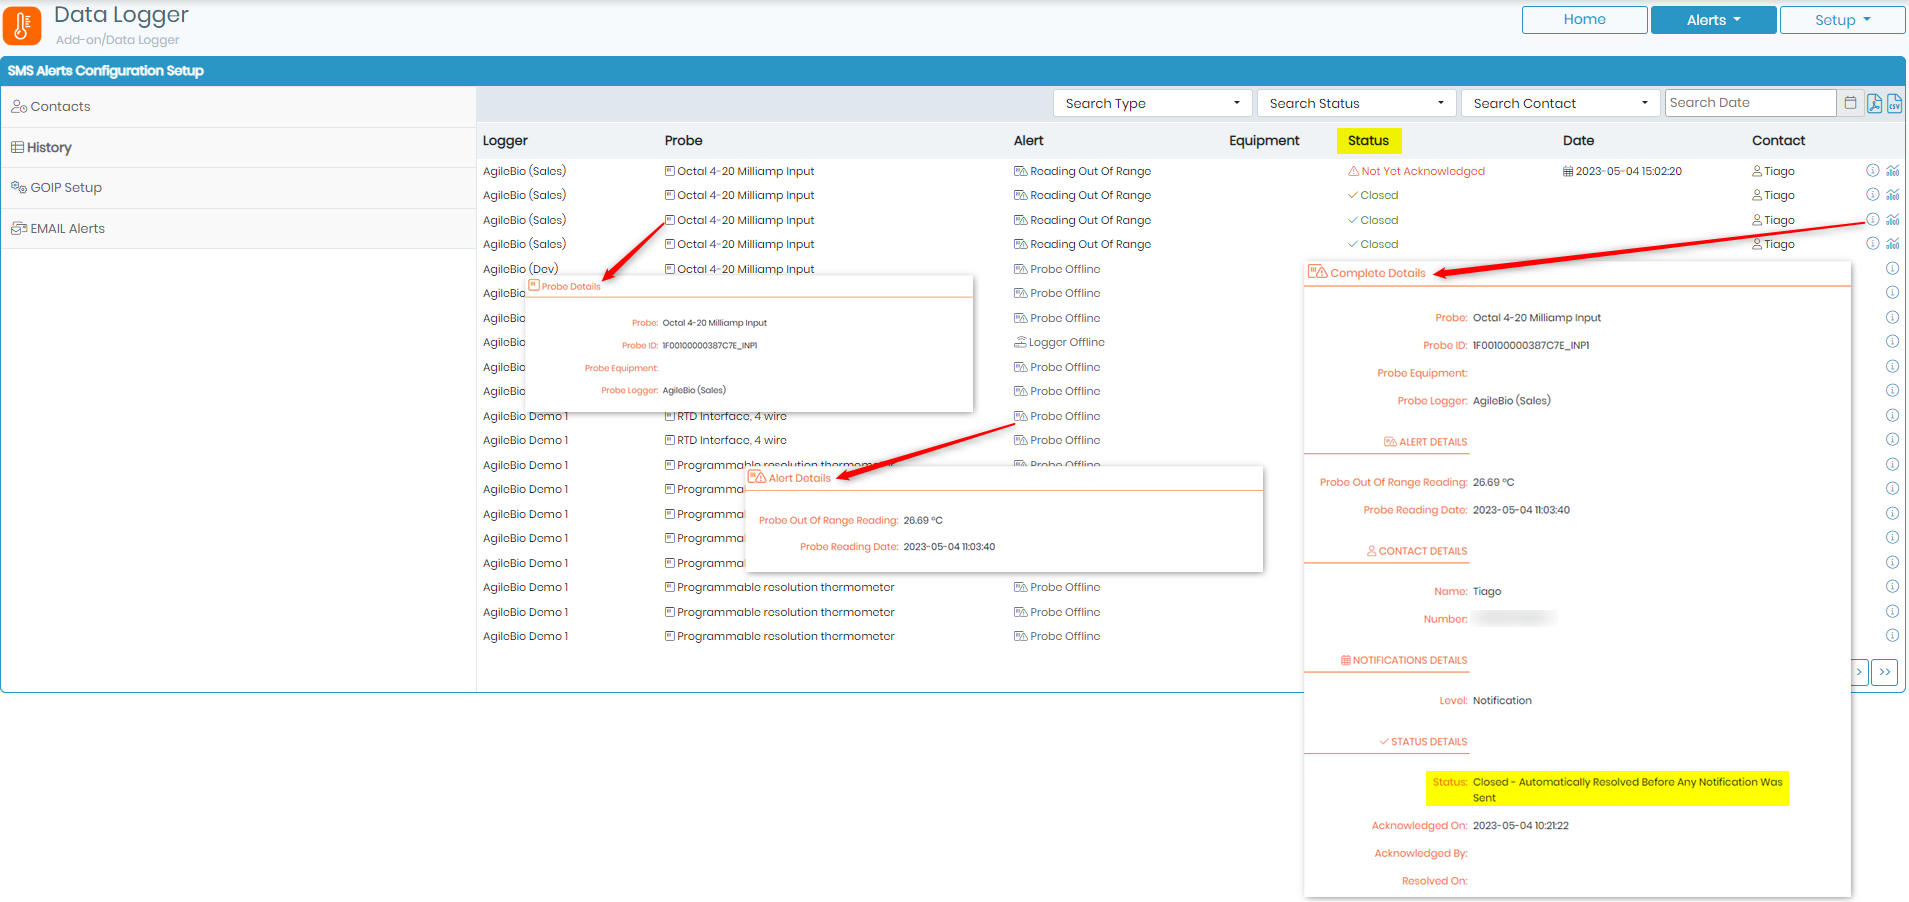
- You have the option to search for specific loggers using the filter located on the top right corner, you can also download the search result as a PDF or CSV file format by clicking on the corresponding icon.
![]()
3. You will also need to configure a GOIP device (GSM Over IP) which allows you to send SMS messages over the internet. By configuring the GOIP device, you can set up SMS alerts to receive notifications directly to your mobile device.
- To do so, navigate to the “GOIP Setup” section, the below page will appear, in which you can view the IP address, port number, alongside the response IP and response port of already added GOIP devices.

- To configure a GOIP device, simply click on the corresponding button
 , upon clicking on it, a pop-up page will appear (as shown in the screenshot below). This page will contain several fields that you need to fill out in order to successfully configure your GOIP device:
- IP address: This is the IP address of the GOIP device. You need to input its IP address to enable its communication with the Data Logger.
- Port: This is the port number that the GOIP device is listening on.
- Response IP: This is the IP address that the GOIP device will use to send a response back to the Data Logger.
- Response Port: This is the port number that the GOIP device will use to send a response back to the Data Logger.
- Once you’ve inputted the required information, click the “Update & Save” button to save your GOIP configuration.

Please remember to setup your firewall so that it allows packets to go through the port and redirect to the correct GOIP IP.
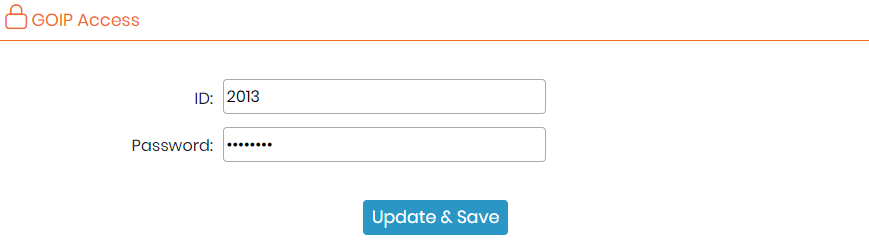
- To set up the credentials needed to access your GOIP device, simply click on the following button
 , upon clicking on it, a pop-up page will appear, in which you will need to input the ID number and password that correspond to your GOIP device. This information should be provided by the manufacturer or administrator of your GOIP device. Once you’ve inputted the required information, click the “Update & Save” button to confirm your changes. This helps to prevent unauthorized access and maintain the security of your laboratory data.
4. By clicking on![]() , you can access the Email alerts setup page (explained below).
, you can access the Email alerts setup page (explained below).![]()
4. Email Alerts Setup

Add a new task with these parameters:
.
1. In this section you will find, a list of all contacts for whom the email alerts are already set-up.
- A: To add a contact that will receive email alerts, simply click on the “Add Contact” button , and the below pop-up page will appear (same fields are required, just like in the SMS setup page, but instead of the phone number, you will need to input an email address).
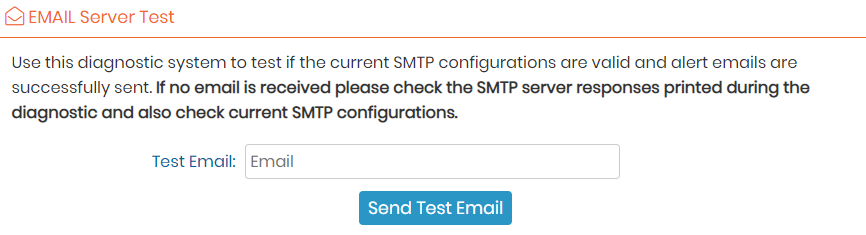
- B: You can also send a test and make sure that everything is working well, simply click on the following button , and the below pop-up page will appear, you can then input an email address and click the button “Send Test Email“.
2. The “Email history” section allows you to view the whole Email alerts log (whether the alerts were sent, closed or not yet acknowledged), and just like the SMS history section, you can view the alert status, notification details, the date on which they were sent, …etc.
3. By clicking on ![]() , you can access the SMS alerts setup page.
, you can access the SMS alerts setup page.
![]()
-
-
- Check how you can set up your Web Services API.
- Read our KB on how to generate a token to link to API services.
- Check out our Introduction to LabCollector API.
-
