Search Knowledge Base by Keyword
LabCollector General setup – v5.4
The Setup Menu is only accessible by the super-administrator
The LabCollector system comes with a ready-to-use environment (insofar as is possible), but some setup and configurations are needed to adapt it to your lab scheme.
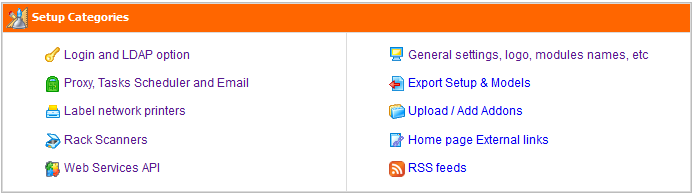
From the setup page, located on Admin > Other > Setup, you can define several setups for the general functioning and interface of LabCollector.
![]()
Login and LDAP options
There are two access modes, defined in Admin > Setup > Login and LDAP option.
- Semi-open: In this configuration, data browsing are open to anyone accessing LabCollector. However, administration tasks are always password protected.
- Fully locked: In this configuration, any access to LabCollector requires login authentication.
Managing authentication and login:
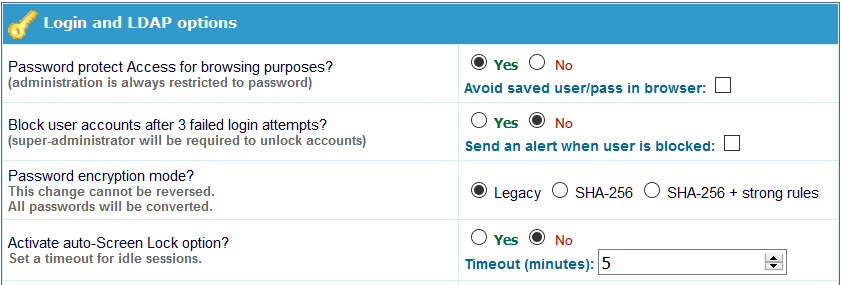
– Password protect Access for browsing purposes option: with YES, you define total login protection, with NO you indicate a semi-open system in which data browsing and search is unrestricted. The administration is always password protected.
NEW! You can also force internet browsers to not save login and password information.
– Block user accounts after 3 failed login attempts option: with YES, if a user enters the wrong password three times, their account will be blocked and the super-administrator will be required to unlock it. You can also choose to have an alert sent to the super-administrator when a user is blocked.
– Password Encryption mode: You can choose between three password encryption modes: legacy (old one), SHA-256 or SHA-256 + strong rules. With legacy mode, you can only use the following characters: 0..9, a..z, A..Z and % . : / | _ – &
With the last two SHA modes, all characters are available and a double password confirmation on super-administrator and new users is requested.
“Strong rules” means that the password must contain:
– at least 1 lowercase
– at least 1 uppercase
– at least 1 digit
– at least 1 special character
Since version 5.42, in case of SHA-256 + strong rules, super-administrator gives a temporary password to the user. During the first log in, the new user has to change his password following the strong rules.
– Automatic screen lock: You now also have the option to activate the automatic lock option and set the number of minutes of idleness before locking occurs.
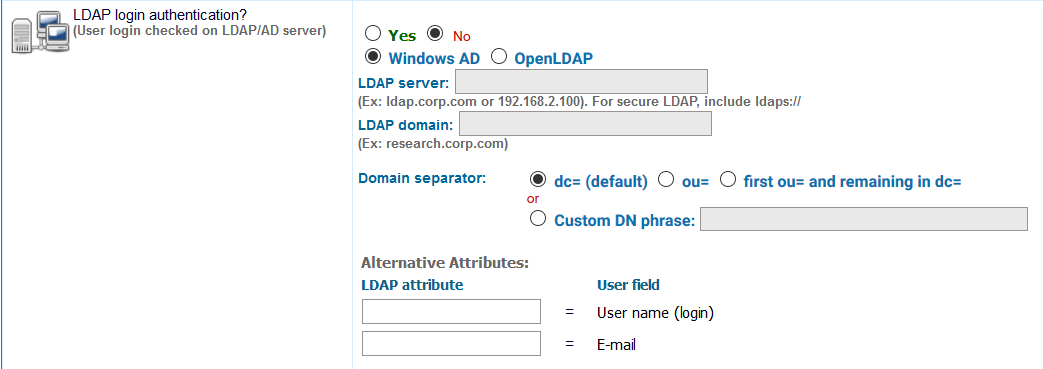
– LDAP system: If you have a network using LDAP or Active Directory (AD) for users profile management, you can use it in LabCollector also. LabCollector login process will then check login/password validity on the LDAP or AD server. It works with standard LDAP protocol and only uses LDAP server and domain. If you use LDAP system, you will not have to enter passwords in users’ profiles as those are managed on the LDAP/AD server.
Users and Staff LDAP/AD can be directly imported: Admin > Users & Staff > Import from LDAP/AD.
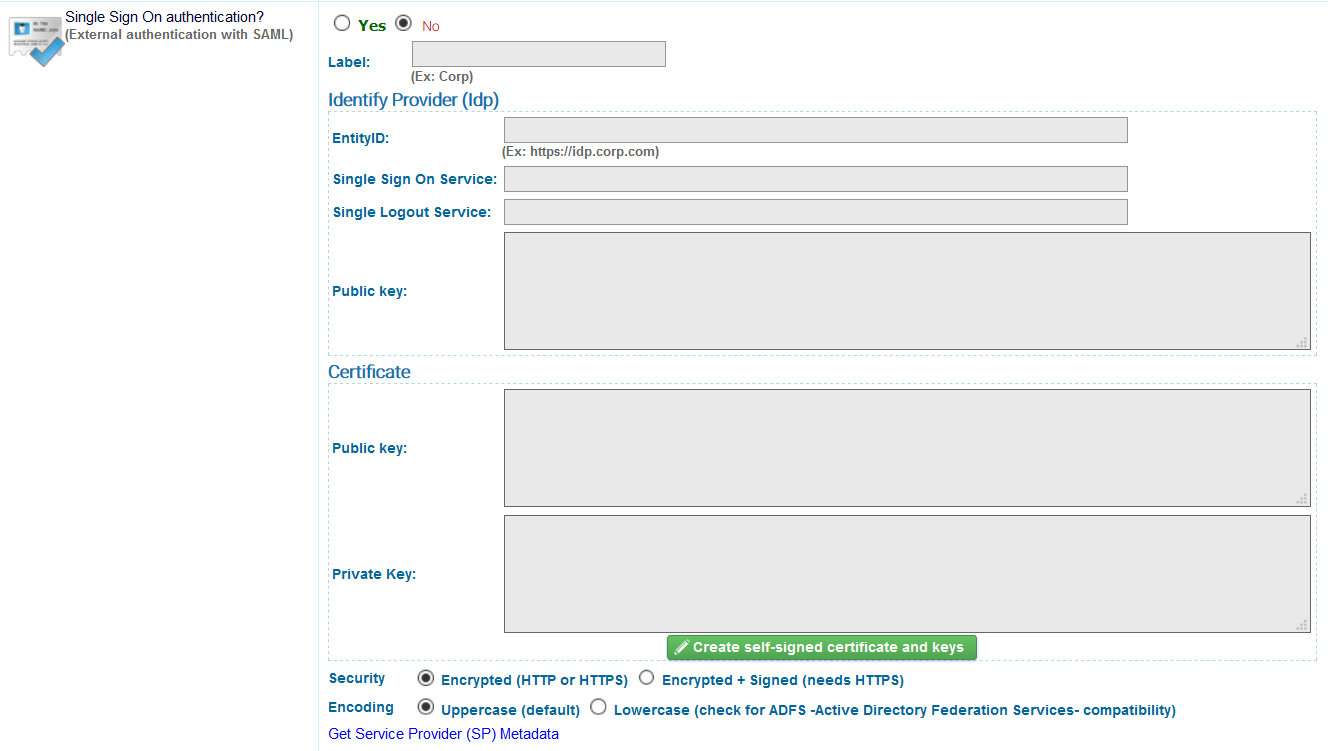
– Single Sign On Authentication: This allows your lab to use SAML authentication for signing in. SAML provides a single point of authentication, which happens at a secure identity provider. SAML uses secure tokens which are digitally signed and encrypted messages with authentication and authorization data. These tokens are passed from an identity provider to LabCollector with an established trust relationship. As in the case of LDAP, passwords (except for that of the super administrator) are managed outside of LabCollector.
![]() Proxy, Tasks Scheduler and Email alert settings
Proxy, Tasks Scheduler and Email alert settings
Proxy:
If your internet access is protected by a cache or proxy server, you need to configure this option in LabCollector if you want to benefit from external tools like the RSS feeds reader or the NCBI GenBank importer.
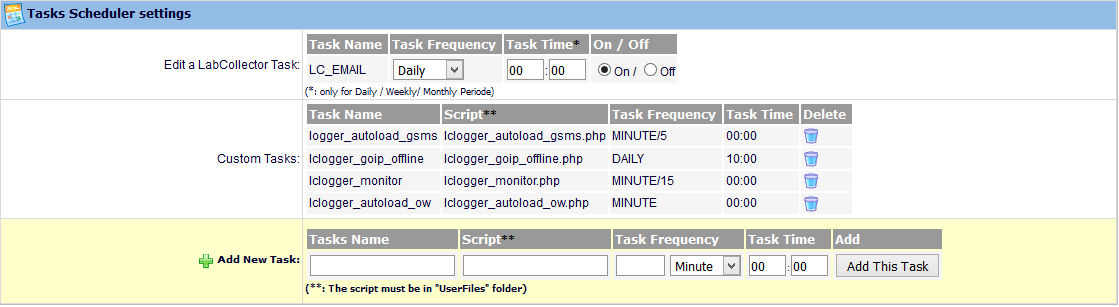
Tasks Scheduler (for Linux and Windows):
CRON is an automatic task system on Linux used for executing some tasks at specific intervals without your intervention every time (We use the Windows schtasks engine on Windows servers). For example, you can create a task to send your email alerts every day at 11:00 pm. If you do that, the CRON manager sends emails every day at 11:00 pm until all the emails will be finished. If you want to send them monthly, you can schedule it. You can schedule any script making it easy to automatically import data, automatic reporting, etc. This task system is also used by our DATA LOGGER add-on.
CRON info > tasks hour: only for daily, weekly and monthly period.
Weekly: on each Monday. Monthly: on each first day of the month.
Email alerts settings:
LabCollector has an internal alert system for minimum lots quantities, lots validity, and equipment maintenance (See general manual for more information). This can help your lab maintain routine tasks on time.
If you want alerts to be sent by email, you need to define email alerts settings here:
– FROM: A valid email from the administrator that is used on the from field of the email header.
– TO: All email addresses to which alerts should be sent. One address per line.
– SMTP: On windows servers, you need to indicate a valid SMTP server (outgoing email server) that will be used to send the emails. The SMTP server must accept emails from your LabCollector server or sender email address (the one set it FROM field). Usually, on Linux servers, you don’t need to set this if you have a mail server setup (like Sendmail or qmail) which is mostly the case.
Use the tasks scheduler to define the frequency of sending emails and to automate this task.
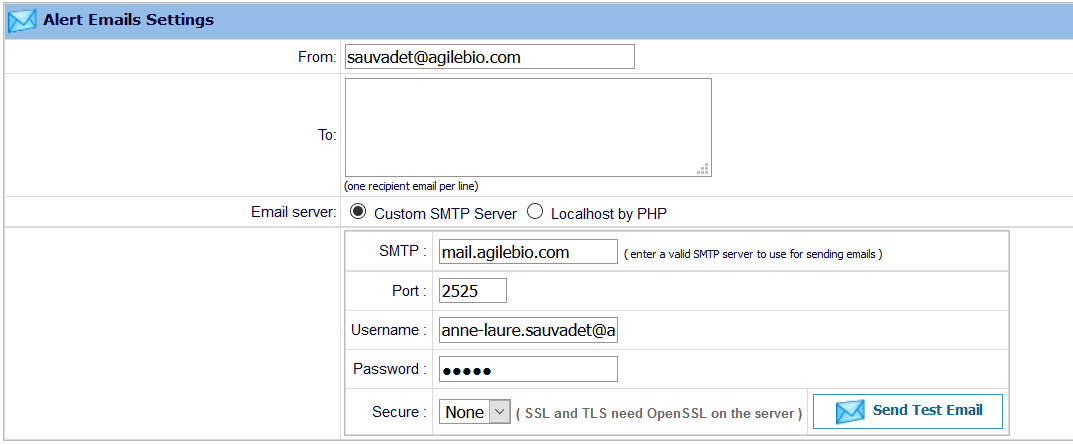
If your server is configured to use this function, you can also send email from localhost by PHP. You have to set up the PHP.INI section [mail function].
![]()
![]() Printers and Labels
Printers and Labels
If you are using a DYMO Printer you can add your own label templates – see this KB for a step-by-step guide on customizing a template.
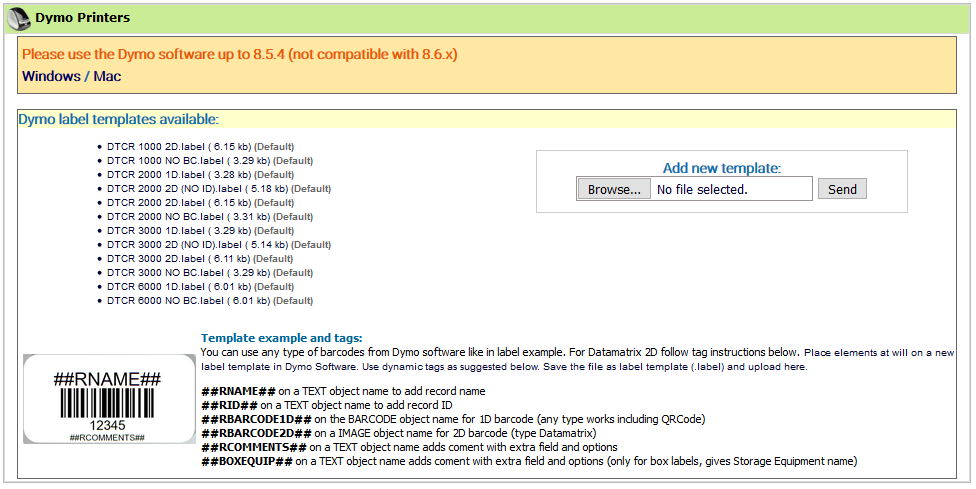
LabCollector is capable of printing barcode labels easily (see chapter 7-6 from the general manual). On this page, you can define printers with EPL and JSCRIPT language like Zebra, Brady or CAB and label roll types.
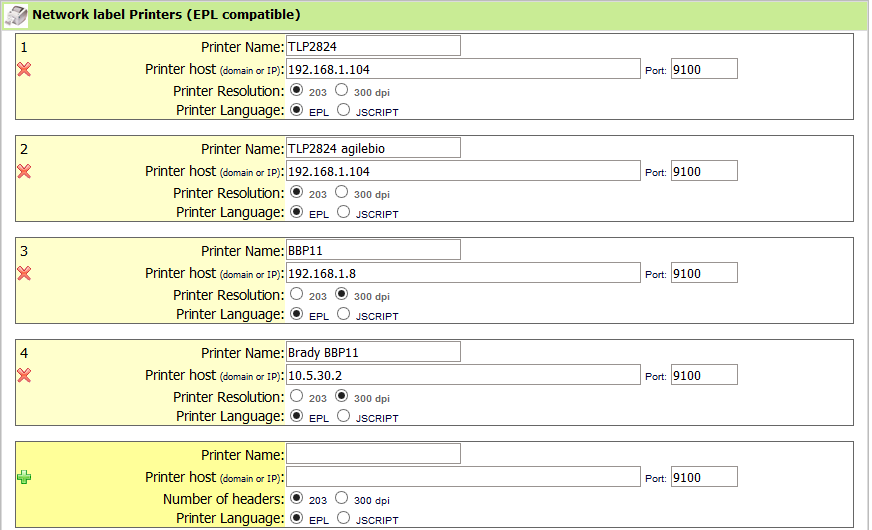
To add a label roll type, you have to fill out the form with the required information: roll name and label size (use the size format indicated). If you want to define this roll type as a default you need to check the default box.
You can indicate that a label roll has 2 columns with the W2 parameter (width 2). A positive size will be considered as a left position and a negative will indicate a right position. W2 size will add to W width of the main label.
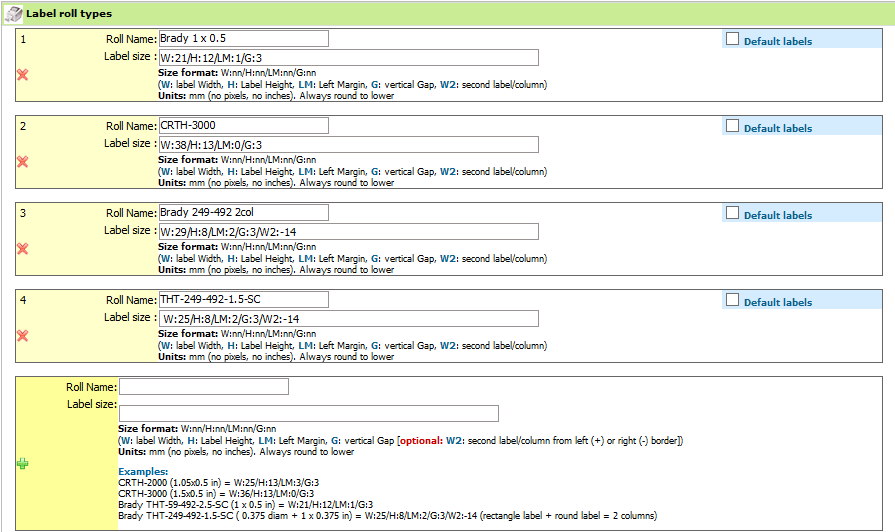
Parameters:
Size format: W:nn/H:nn/LM:nn/G:nn
(W: label Width, H: Label Height, LM: Left Margin, G: vertical Gap [optional: W2: second label/column from left (+) or right (-) border])
Units: mm (no pixels, no inches). Always round to lower.
![]()
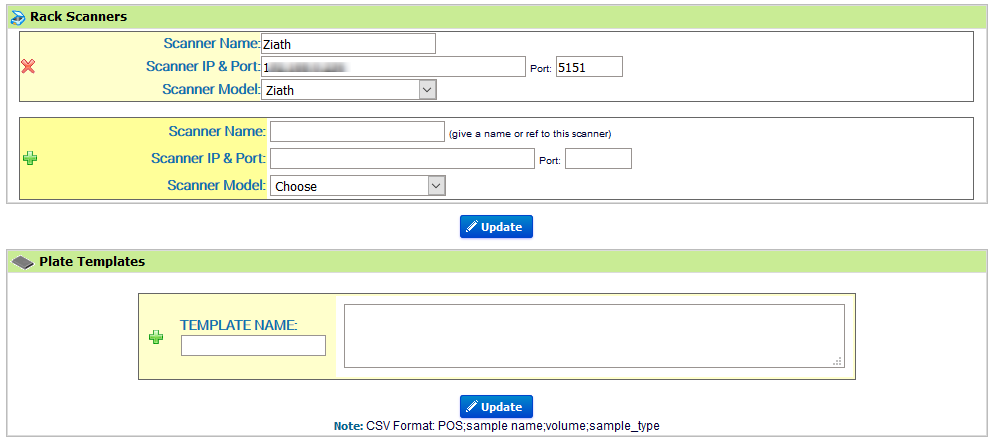
![]() Rack Scanners
Rack Scanners
For Sample batch tools users, a scanner has to be registered.
You have to fill out the form with the required information. To find the IP address of the PC connected to the scanner, launch the command prompt, type ipconfig/all. The IP number is listed under IPv4 Address. By default, the port is 5151.
For more information refer to the KB-Rack scanner installation.
You can also add Plate Templates in this section.
![]()
![]() Web Services API
Web Services API
A new range of applications based on your LabCollector can be imagined and developed. Using LabCollector as a backend database, the laboratory can provide remote information in external catalogs, biological resources, etc. Web or mobile tools can be turned to reality. For more information please refer to this page and manual.
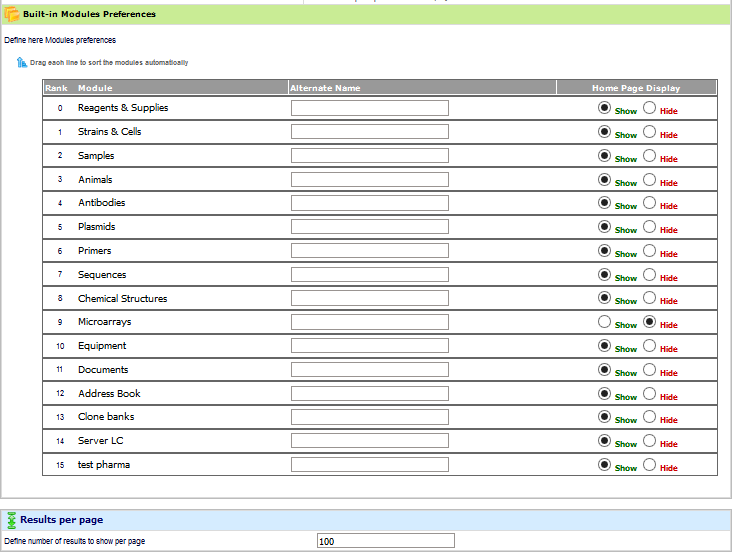
![]() Lab name, logo, modules name, google translation
Lab name, logo, modules name, google translation
In this section, you can change Lab name and logo.
Language options are also possible as the Google automatic translation option for multilingual interface to use LabCollector with a selected language. To do that, just tick the box “Google interface translation”. The LabCollector interface will be translated by Google.
If you use special characters in your data, thick the box to have the possibility to export them in CSV.
You can also organize and rename modules icons on the home page. Module icons can be rearranged by clicking and dragging them up or down. You can also hide modules that you don’t need.
The number of search results shown per page can also be changed.
![]()
![]() Export Setup & Models
Export Setup & Models
Models can be created to export data from the different modules. Give a name to your model; choose fields that you want to export and the file format. You can choose between HTML, CSV, XML, Excel, and pdf. Use these models to export your result search in each module.
a. Export models
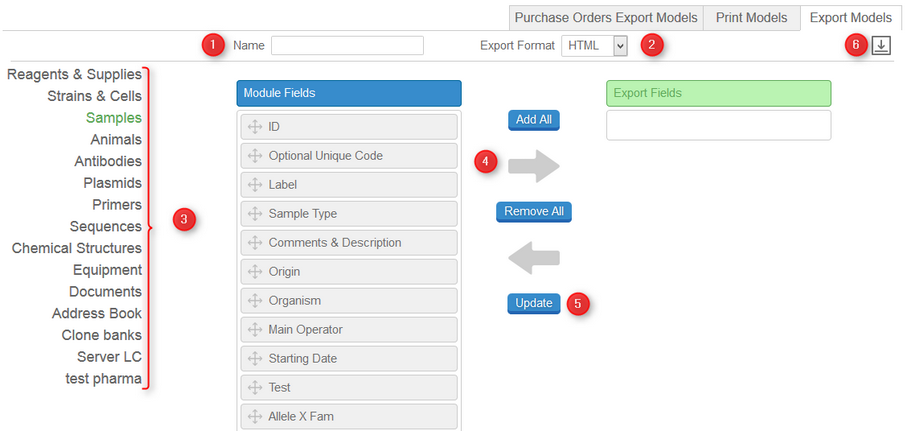
2. Choose between HTML, CSV, XML, Excel and pdf format in the select list
3. Choose the module where you want to create the export model
4. Choose fields that you want to export by drag and drop or using the buttons Add All and Remove All.
5. Update (Save) this model
6. If you need to modify a model, use this button to upload and update it.
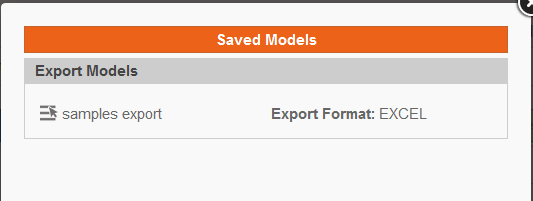
Use these models to export your result search in each module.
To export current and past orders, following a specific model each time, use the tab Purchase Orders Export Models. Repeat the same steps than above.
b. Print models

2. If you need a space to sign your print record, select YES.
3. Choose the module where you want to create the print model
4. Choose fields that you want to export by drag and drop or using the buttons Add All and Remove All.
5. Update (Save) this model
6. If you need to modify a print model, use this button to upload and update it.
Use these models to print your result search in each module.
![]()
![]() Upload / Add Add-ons
Upload / Add Add-ons
Download add-ons that you need on LabCollector, and simply upload the zip file on this page. Go in the add-on from home page and continue the installation.
![]()
![]() Homepage links
Homepage links
Unlimited external links positions on the home page can be defined in this section. They are like bookmarks for which you can define an icon. It is useful for intranet or websites that your lab commonly uses.
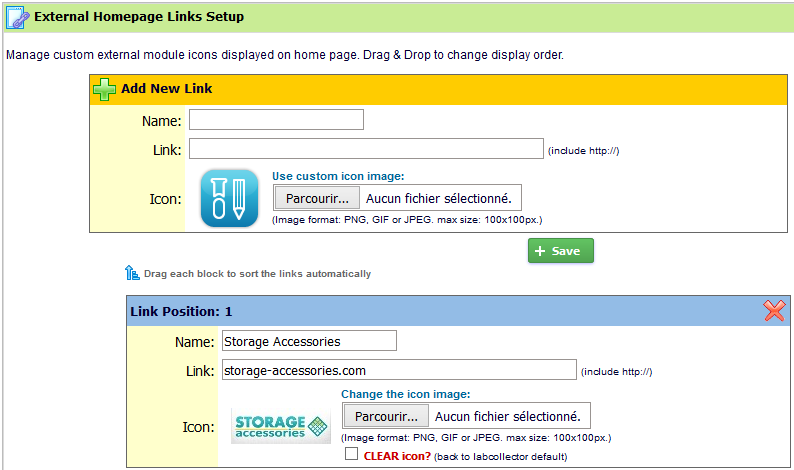
You can also create favorite site links through Tools > Lab Bookmarks > Add new bookmarks.
RSS feeds reader
RSS feeds are now widely used on internet Portals. They are URLs pointing to XML-based content. Generally used for news, they allow insertion of those contents on third party websites. With LabCollector you can keep informed of actualities in your lab interests directly from home page. For example, scientific journals can provide current contents headlines or you can list biotechnology news lines or last equipment promotions from your sellers, etc.

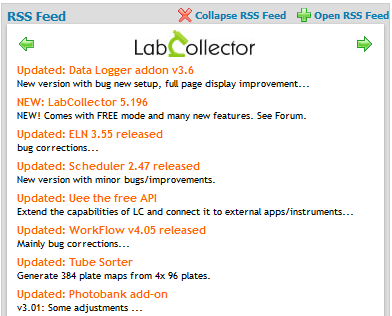
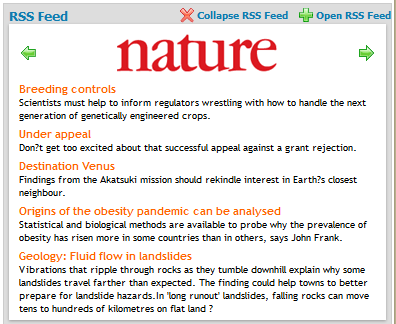
By default, we publish LabCollector’s news topics (to keep you informed of our news and suggestions). But once you define RSS entries, you can change default RSS feed.