Search Knowledge Base by Keyword
How to manage ranges in LSM?
Ranges in LSM ![]() refer to the minimum and maximum values for a particular test, such as cholesterol, diabetes, or WBC count, which are essential for understanding and interpreting the results. It’s important to note that these ranges can vary depending on several factors, including age, gender, species, and other individual characteristics.
refer to the minimum and maximum values for a particular test, such as cholesterol, diabetes, or WBC count, which are essential for understanding and interpreting the results. It’s important to note that these ranges can vary depending on several factors, including age, gender, species, and other individual characteristics.
With the LabCollector ![]() add-on in LSM, you can now easily create and use these ranges for your tests, ensuring that your results are as accurate as possible.
add-on in LSM, you can now easily create and use these ranges for your tests, ensuring that your results are as accurate as possible.
In the following Knoweldge Base, we will show you all the steps you need to follow, starting from their creation to finally observing them in your test report:
- Creating the ranges
- Adding ranges in the Test
- Adding ranges in the Job
- Adding ranges in the Test report
As an example, we will focus on WBC count, a common blood test that requires a specific range to accurately interpret the results. By following the steps outlined in this Knowledge Base, you will have a better understanding on how to utilize LSM and its ranges to improve the accuracy and interpretation of your test results.
![]()
1. Creating the ranges
To manage ranges in LSM, you will first need to navigate to ADMIN -> Preferences -> Ranges
Then, click on the button “Add” (as shown in the screenshot below).
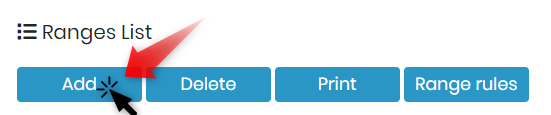
A pop-up will then appear, in which you will have to fill all your range details.

White blood cells (WBCs) are an essential component of our immune system, and their levels in the blood can provide valuable information about an individual’s health status. However, it’s important to note that the normal range of WBC levels can differ depending on several factors, including age and gender.
For instance, let’s consider the normal range for total WBC levels in a blood test:
- For men, it should be between 5,000 and 10,000 white blood cells per μl of blood.
- For women, it should be between 4,500 and 11,000 per μl of blood.
- For children, it should be between 5,000 and 10,000 per μl of blood.
As you can see, the normal range for WBC levels can differ significantly depending on the gender and age of the individual. Therefore, it’s essential to create specific ranges for each group to ensure accurate interpretation of the results.
To create a range for WBC levels for men, follow the below steps (please, refer to the numbers on the screenshot above):
- 1. The label is where you can give a name to the range. This is a crucial step as it allows you to easily identify the range later when you are adding it to your test or job. For example, you may want to label your range as “Adult male WBC count”.
- 2. Description: In the description, you can add more details or a summary for the range. This is where you can specify the range’s purpose and provide any additional information that may be useful to the user. For instance, you can add information on how the range was determined or any factors that may have influenced it.
- 3. Gender: This option allows you to add gender for a person or animal used for the test study. Adding gender to the range is essential, as different genders may have different normal ranges. For example, the normal range for a male’s WBC count may be slightly higher than that of a female.
- 4. Age: Adding age to the range is crucial, as the normal range for a test can vary depending on the organism’s age. For instance, newborns may have a different range than adults due to their developing immune system.
- 5. Species: If you are performing experiments with different species of an organism, then this option helps you to create ranges specific to a particular type of species. For example, the normal range for a WBC count in a human may differ from that of a dog, and thus creating species-specific ranges can ensure accurate interpretation of test results.
You can also create ranges for females and children using the same method, the list will then look like below.

![]()
2. Adding ranges in the Tests
Once you have successfully added your ranges alongside their details, they will then appear in the tests section.
In order to access your LSM’s tests list, you will need to navigate to Admin -> Preferences -> Test
Also, to create a test, you will first need to define its parameters.
- Check our KB on how to create parameters for a test in LSM.
- Check our KB to read more about creating tests in LSM.
Below is a screenshot for when you click on Range when adding or editing a test. Here, you will find all the ranges you have already created.
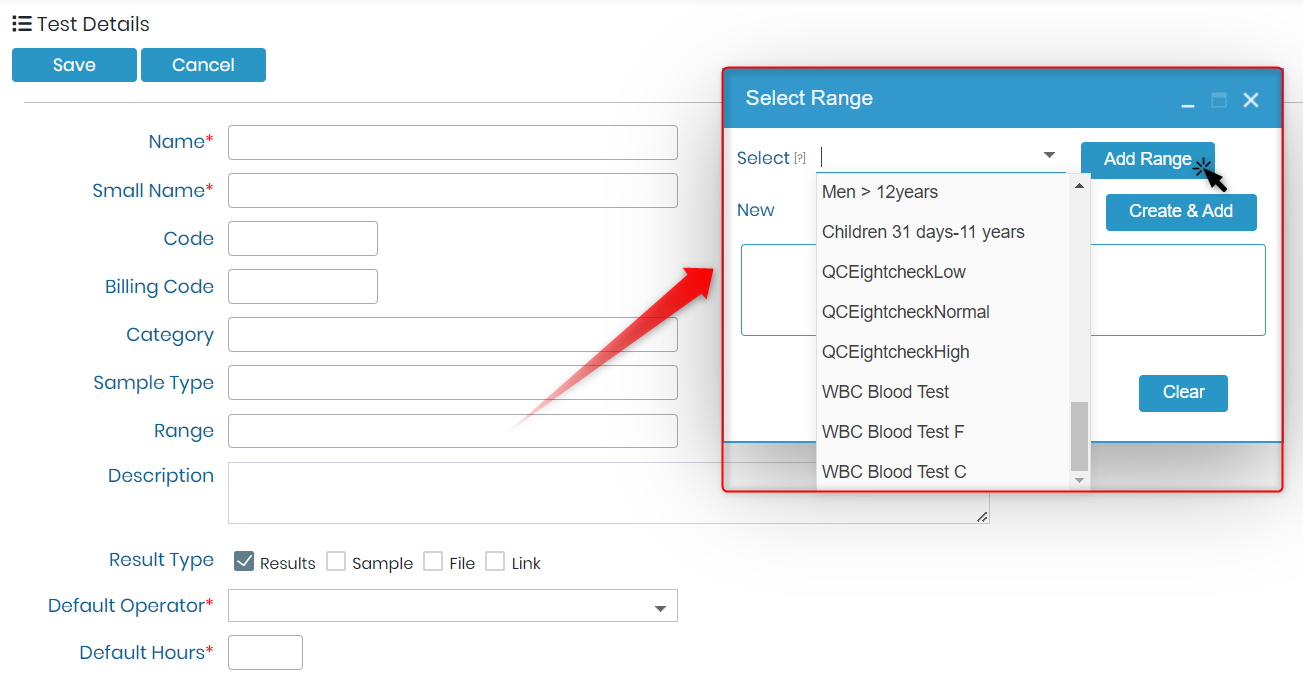
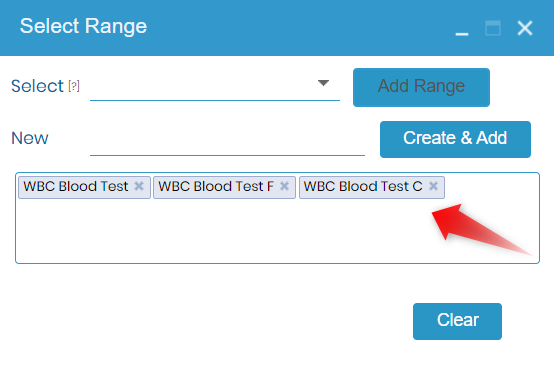
You can then select them accordingly. For our WBC blood test example, you can select all the ranges we created earlier.
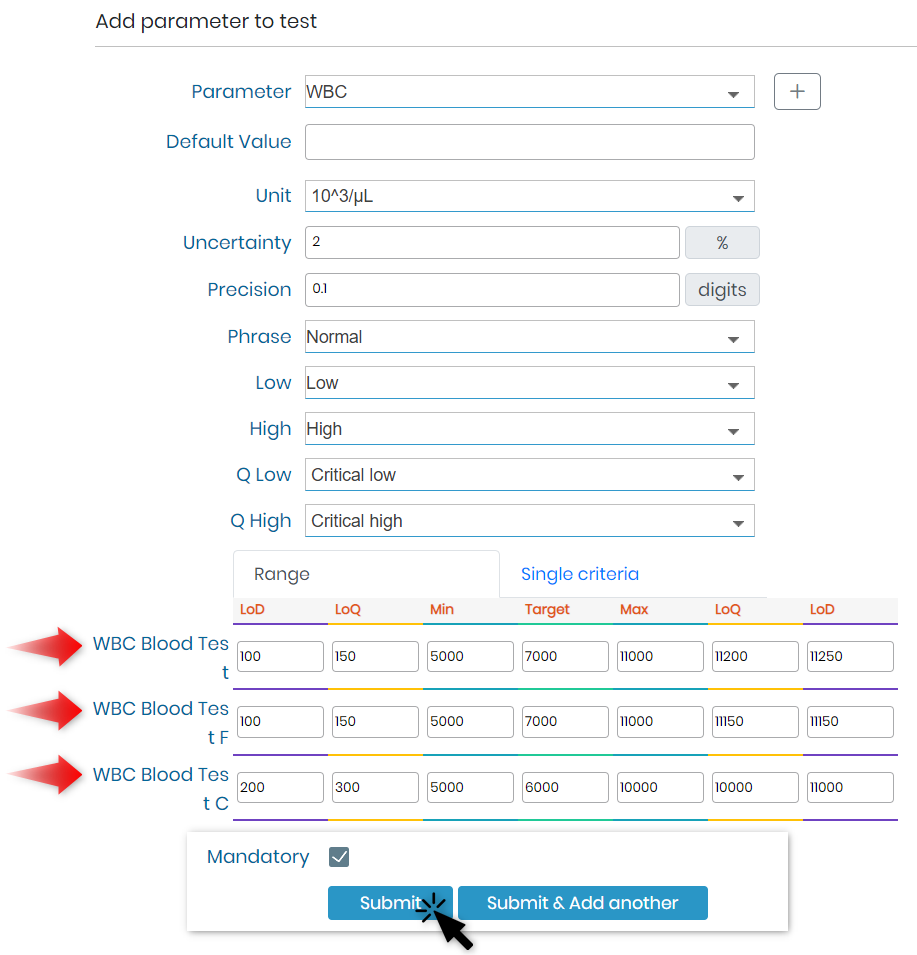
Once you enter your test information, click on Results Parameters (as shown in the screenshot below).
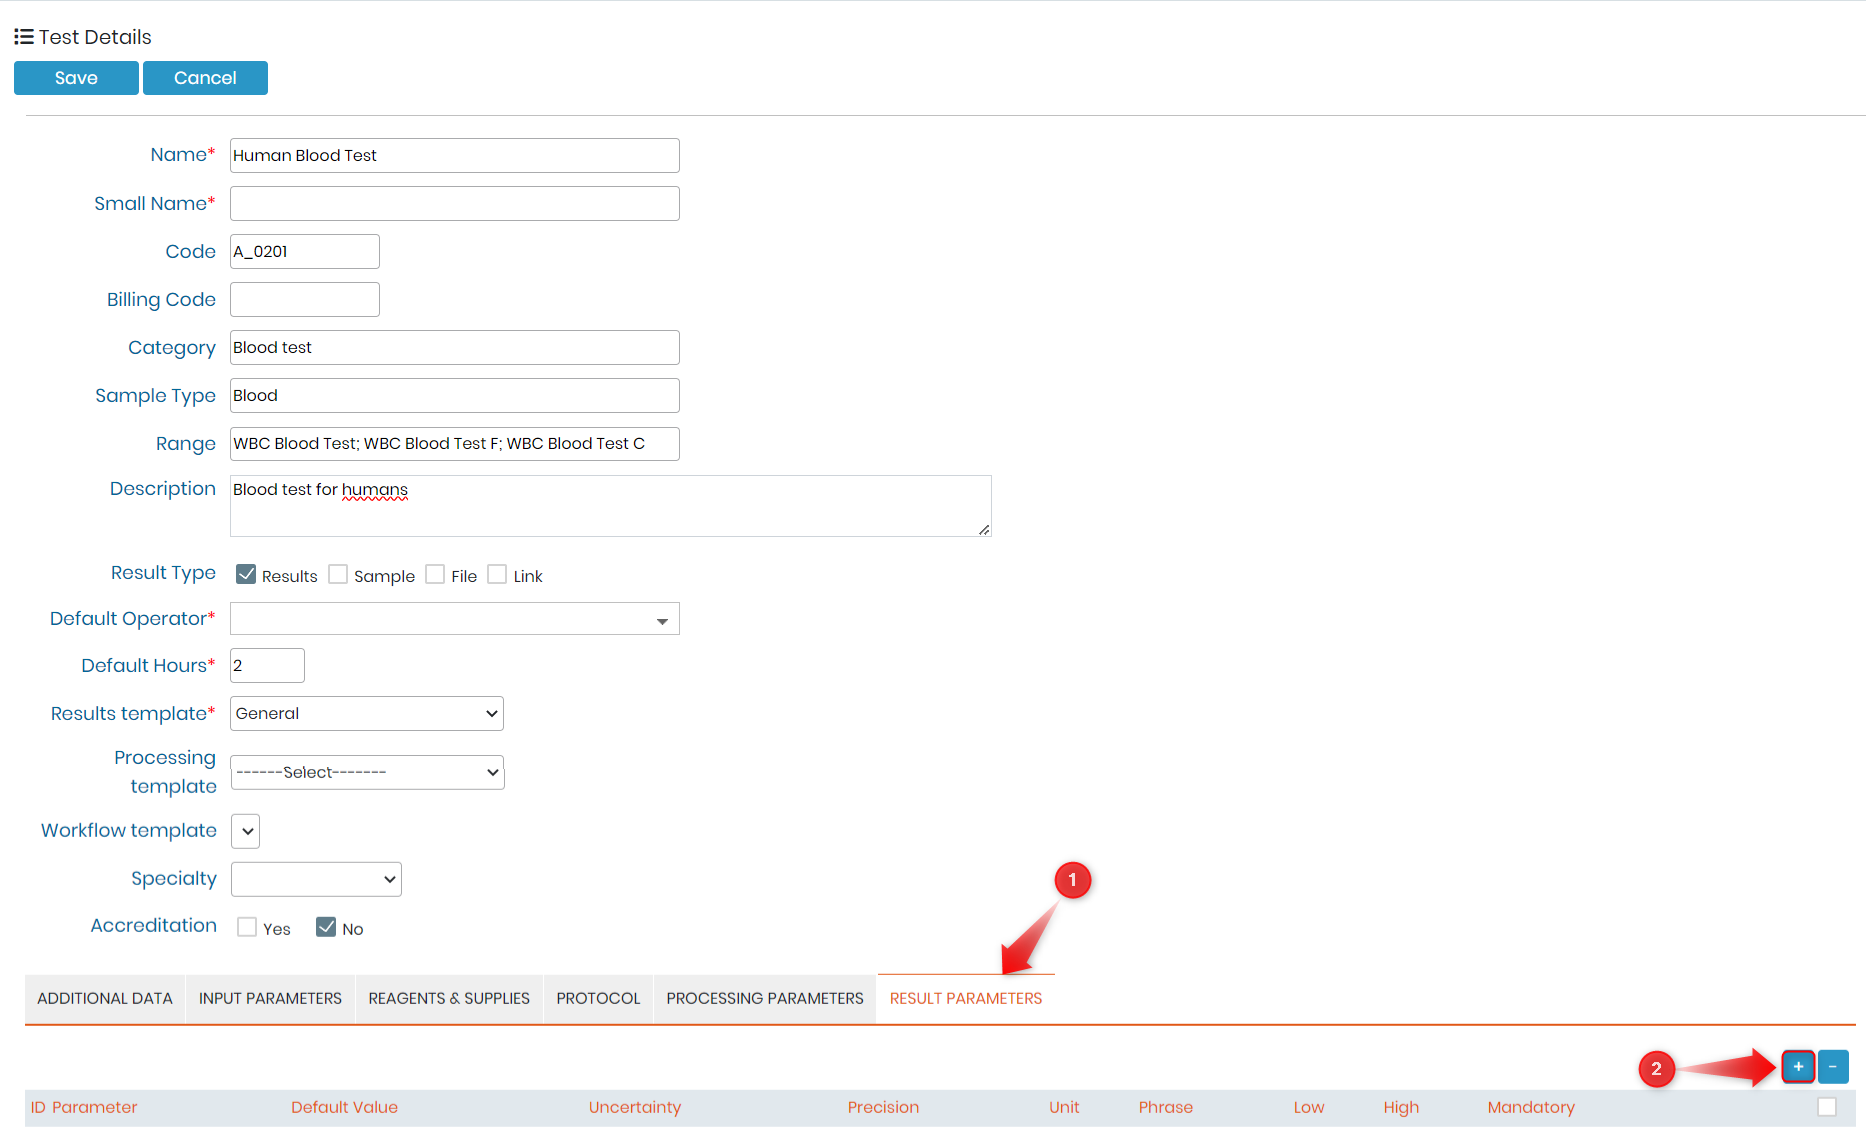
Then, click on the plus sign under Result Parameters, another pop-up will appear, in which you can input the minimum and maximum values, alongside other details, such as your results interpretation, LoQ and LoD, …etc.
- LoQ stands for Limit of Quantitation, which is the lowest concentration of an analyte that can be accurately measured and quantified by a particular assay or instrument.
- LoD stands for Limit of Detection, which is the lowest concentration of an analyte that can be reliably detected by a particular assay or instrument.
- Target value refers to the desired or expected concentration of an analyte in a particular sample or assay. This value is often determined based on established reference ranges or clinical guidelines.
- Minimum value refers to the lowest acceptable concentration of an analyte in a particular sample or assay.
- Maximum value refers to the highest acceptable concentration of an analyte in a particular sample or assay.
![]()
3. Adding ranges in the Job
To add a Job in LSM, click on Job -> Add Job
When you start a Job with the above test and execute it, you will be prompted to fill out the values of the range that you have already selected while starting the job.
- Check our KB on how to create and execute a job in LSM.
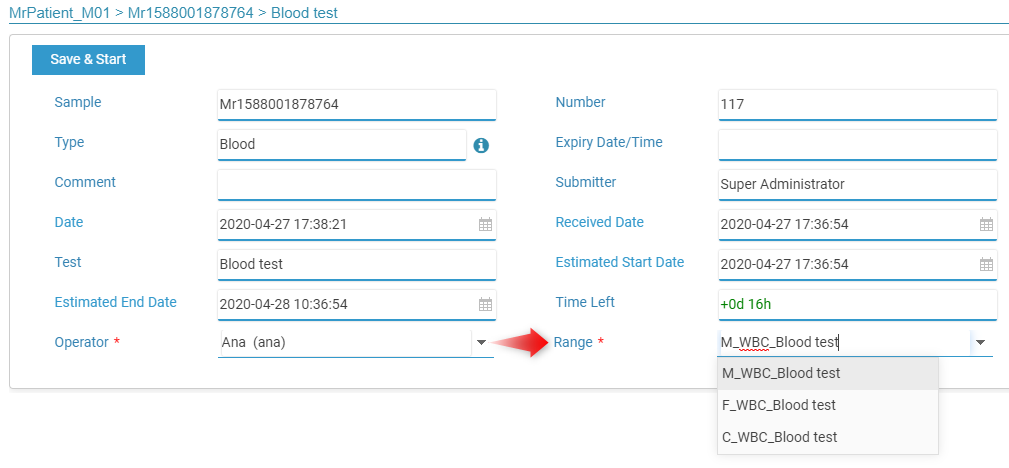
Once you save and start your LSM job and advance in the test (Check our KB on how to execute a job), you will then be prompted to fill the range after you have performed the test.
There could be two possible scenarios when you input WBC count results
A) WBC count result falls within the defined range:
If the WBC count result falls within the minimum and maximum range value that you have set, you can simply input the value in the designated field. Additionally, you can also add any relevant comments or interpretations of the results if needed.

B) WBC count result falls outside the range
If the WBC count result falls outside the set range, the LSM will automatically flag the result as either “high” or “low” depending on whether the value is above or below the defined range. This is a useful feature that quickly highlights any results that are outside the expected range, which may require further investigation or follow-up testing. In such cases, you can review the range and make necessary adjustments to ensure that it is applicable and accurate for your tests.

![]()
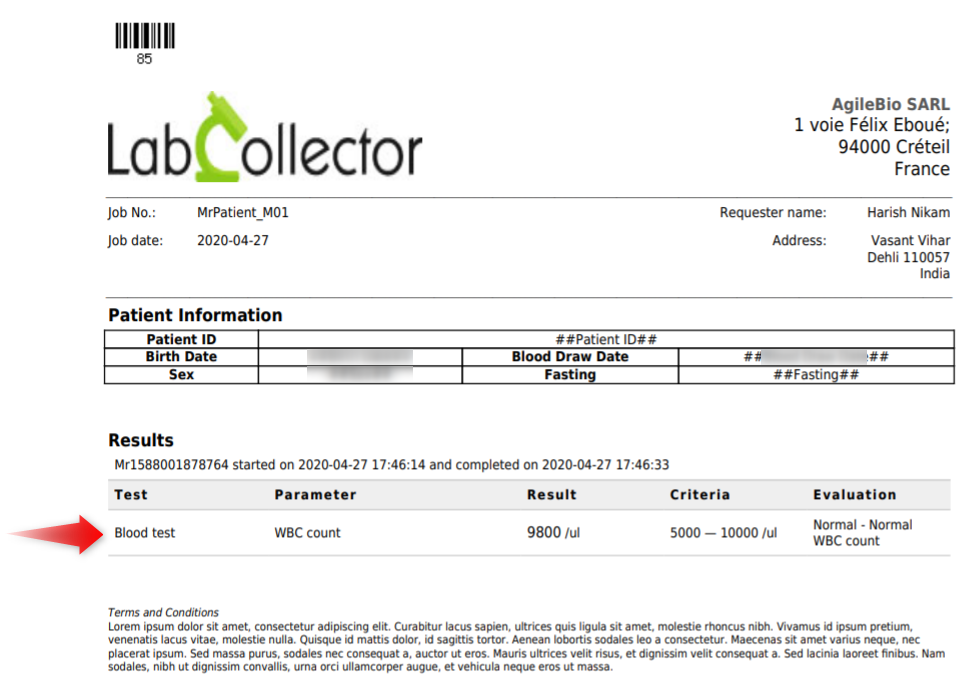
4. Adding ranges in the test report
Once you have completed the job in LSM and have input the WBC count results, you can generate a comprehensive result report that includes the range value. This report can then be given to the patient or healthcare provider for further analysis and interpretation.
To create a report with the range value, you can create a template and use the dynamic field ##results_extended## under the result section. This field will display the WBC count value alongside the defined range values, providing a quick and easy way to interpret the results.
Additionally, you can customize the report format and layout to include any other relevant information, such as the patient’s name, date of the test, and any additional notes or comments.
![]()
Related topics:
- Read our manual on LSM.
- Read our KB on how to generate reports in LSM.
- Check our KB on how to create Invoices in LSM.
