Search Knowledge Base by Keyword
How to import samples and their associated storage? v6.0
SUMMARY:
In LabCollector you can easily import your samples and their storage location.
You can follow the same process for reagents or supplies or any other things along with their storage location.
Check our another KB on how to import data in LabCollector modules.
In order to import your data with the location of the respective tubes or samples or reagents, you need to follow the steps below.
1. Import your samples data
- Errors during data import
2. Create a location in storage browser
3. Import your storage (connect samples to storage location)
![]()
1. Import your samples data
Go to ADMIN > DATA > IMPORT >SAMPLE MODULE
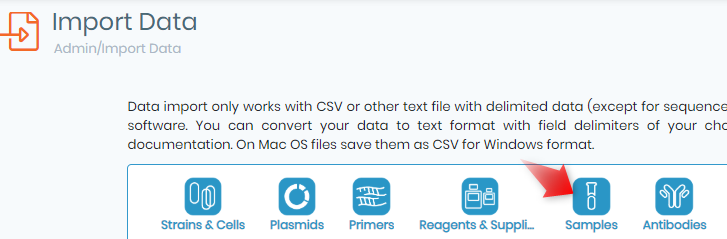
The page below will be displayed with several options.
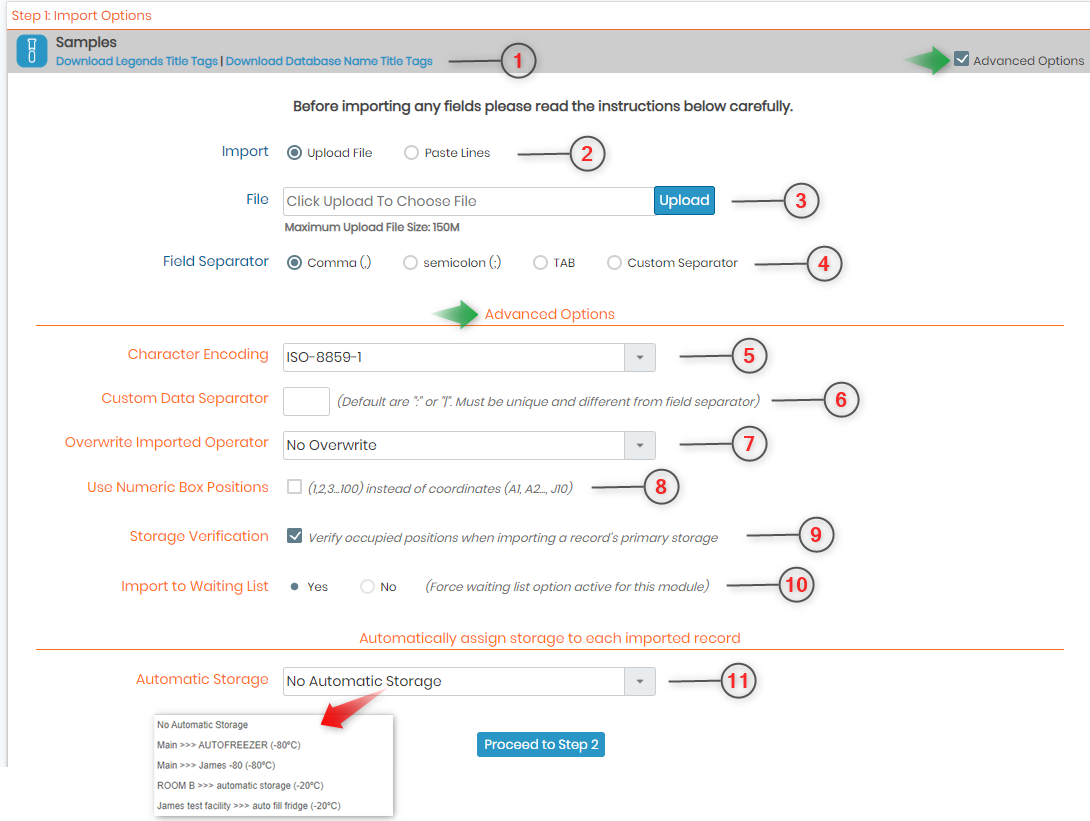
- 1. This option allows you to download the field names which are present inside the specific selected.
 TIPS:
TIPS:
- You can download either the Legend names or the Database names.
- You need to organize your excel file to have each column as indicated in the format section in the given order.
- One field by column. If you don’t need a field, leave the column empty.
- Save this file in txt (TAB), or CSV (comma or semi-colon as separator).
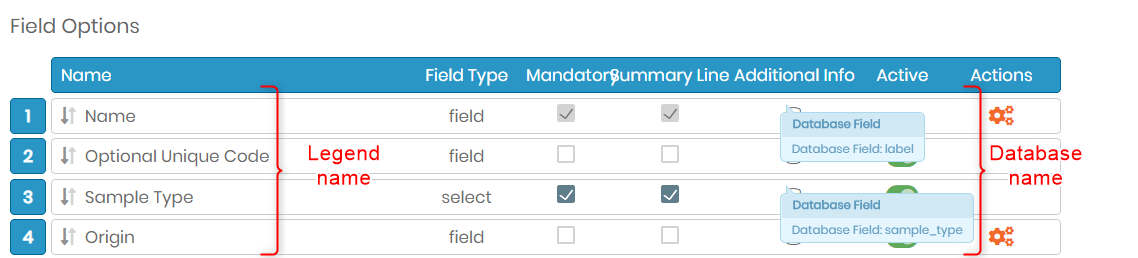
- Legend name is the name of the field in the module record, form, or in the list of fields in the default/custom field areas that you give to the field.
- The database name is available in the default/custom fields areas and exempted from special characters.
For example, go to ADMIN > DATA > DEFAULT FIELDS/CUSTOM FIELDS > CHECK FOR ANY MODULE (example, samples)
.
1. Prepare the LabCollector database. Before importing data, you have to configure the module you chose creating the fields that you need. See our KB-creating custom field.
2. For the fields marked with an asterisk* (Select list), values must exactly match options defined in LabCollector.
3. Some field types cannot be imported, for example, the type Checkbox. If you want to import data in this type of field, temporarily change the type in Text, import your data, and then change again from Text to Checkbox type. Be careful that your data are well-formatted (e.g. identical values)
- 2. Either you can upload the CSV file or copy-paste the data from the CSV file.
-Upload: You have to delimit the data in your CSV another KB with the ‘comma’ (,) or a semicolon (;). For English Microsoft office its comma (,) and for French Microsoft office its semicolon (;).
-Copy Paste: copy the area of the CSV along with the column headings and paste it.
- 3. Upload the CSV file containing all the relevant details.
- 4. Put the appropriate field separator for the CSV file which can be comma or semicolon. (checkpoint 2)
**The advance options will be displayed if, in the upper right corner, the box next to the “advance option” is checked. (red arrows in the image above)
- 5. By default, the characters are encoded with ISO-8859-1. That allows you to import most special characters such as letters with grave, acute, diaeresis, circumflex, etc.
UTF-8 has to be used for some language (e.g. Chinese, Greek…) if you use software allowing you to save in CSV with UTF-8 as an encoding (for example LibreOffice).
- 6. You can select if you have separated the columns by a colon (:) or a tab (│).
- 7. If your excel file doesn’t have Owner/Main Operator/Person in Charge/Author (depending on the module – Reagents & Supplies and Address Book modules don’t have owner fields), or if you want to overwrite this field, select one owner in the list.
*Administrators can import data under any name.
*Staff can import under their own name only.
- 8. CSV columns are positioned according to the top as A1, B1, C1….and so on. If you are using a numeric position for your CSV file, which means that the column A1= 1, B1=2…and so on. In this case, you can tick mark this option for “Use Numeric Box position”.
- 9. Tick this option in case you need to verify if the primary position (you are importing your sample storage into) is occupied or free.
- 10. You can choose to import it into a waiting list. As for the mode user, an administrator has to validate the data under the ADMIN > Data > Waiting list.
- 11. Optional: If you configured your equipment with the automatic storage option, you can have access directly to this storage here. You don’t have the choice of the box/location, LabCollector attributes all automatically.
- 12. Once you click on proceed to step two, the CSV file will be updated and if you have any errors you will be prompted about them.
If you don’t have any errors you can proceed to import. NOTE: You can ignore this error if you are going to import the storage of all samples later after creating storage like in section 2 and section 3.

-
Errors during data import:
You can get various errors while importing the data file.
To see the errors you can encounter and how to rectify them, check our KB on errors during data import.
![]()
2. Create a location in storage browser
The above sample data that you imported can either be automatically assigned to storage (point 11 above in section 1) or you can create a batch (group) of import locations where you can import the storage location specifically if you have not opted for the automatic storage location.
-After the configuration of the storage system and the creation of facilities and equipment by the super-administrator and the administrators, you can create batch racks and boxes.
-You can create equipment if you require by going to ADMIN > STORAGE > MANAGE STORAGE > STORAGE EQUIPMENT > ADD NEW STORAGE EQUIPMENT.
-Once you have created new equipment for storage or if you want to choose from the already existing ones, go to TOOLS > STORAGE BROWSER
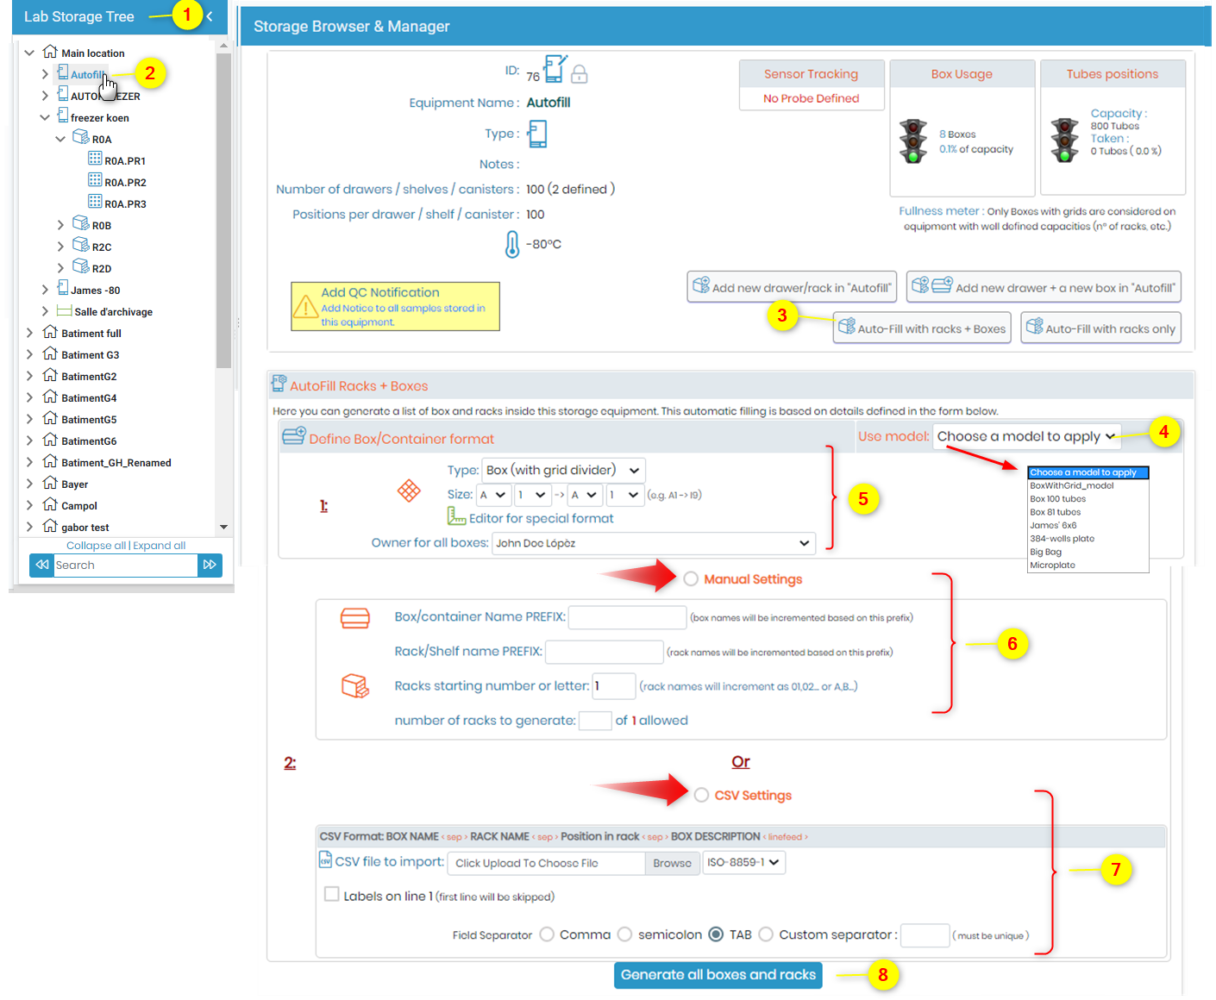
- 1. Choose from the “Lab Storage Tree”, a location where you want to import your files. For example, the main location.
- 2. Select the location in the equipment for storage. For example, storing cell lines in -80 deg celsius freezer.
- 3. When you click on “Autofill” you will see the page in the image on the right-hand side. Here you need to choose “Autofill with racks+boxes”.
- 4. To define the box format you can choose from pre-defined models to easily recreate them. For example, to create boxes with grids having 100 places
- 5. If you don’t have a template to choose from, you can create your own storage box here and define the storage of the box.
- 6. Manual settings. Fill the box name prefix, the rack name prefix, and the number of racks to generate (depends on the equipment capacity). In the image, it shows “number of boxes =1 allowed” but you can create more depending on the storage capacity.
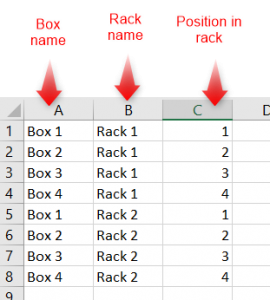
- 7. CSV settings. Create your file following the format BOX NAME <> RACK NAME <> POSITION in the rack.
For example, The CSV below (Delimited by comma) containing racks and boxes.
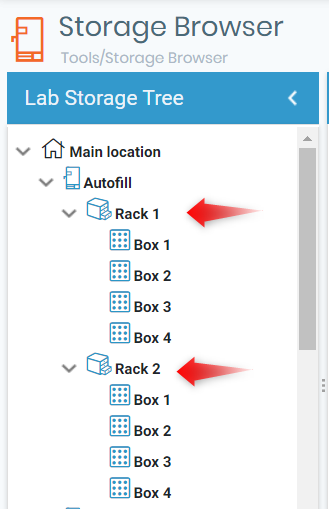
- 8. For example, after you choose the CSV import option with field separator as a comma. You should click on “generate all the boxes and racks”.
You will see the racks below like this.
![]()
3. Import your Storage (connect samples to storage location)
Now in-
- Step 1, you have your samples imported
- Step 2 you have your storage made.
All you need to do is connect the samples to their respective storage.
For explanation sake, we have given the example of Samples in step 1 and Storage made in Step 2.,
To import storage location, go to Admin–> Import Storage
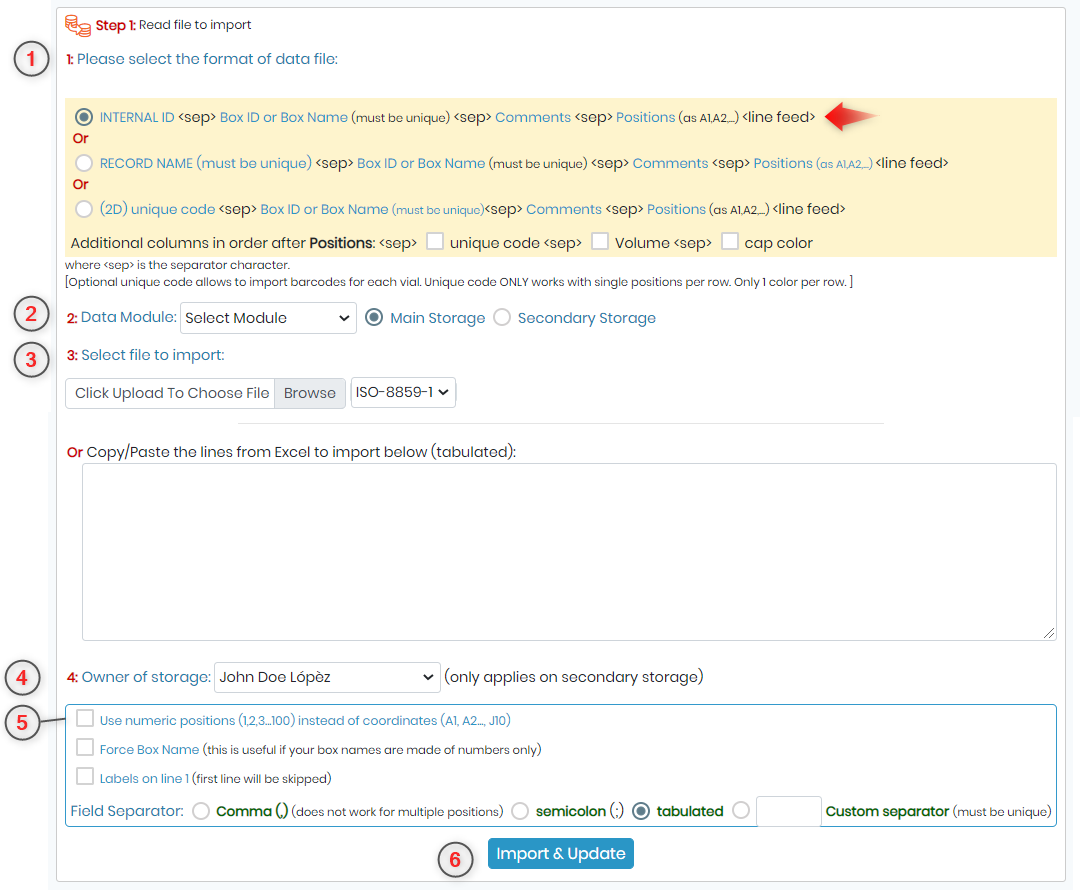
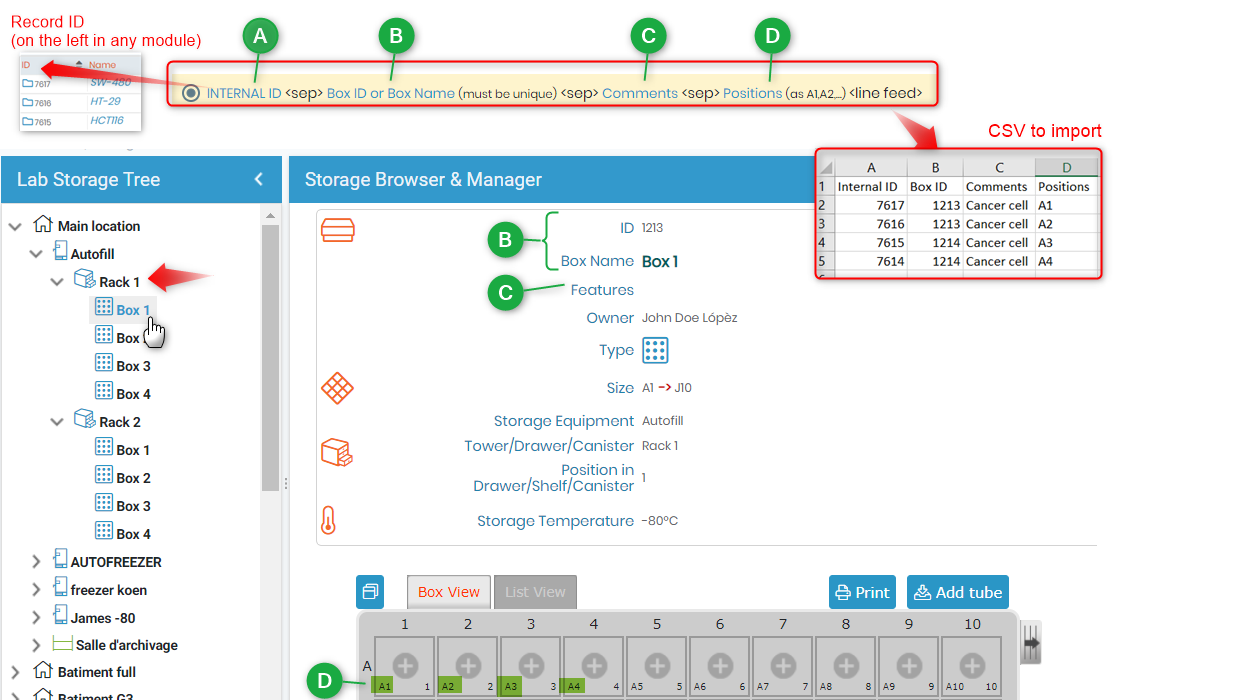
- 1. This option is to select the format for the CSV file that you will be either uploading or copy/pasting. If more than one tube is defined for the same sample, separate the corresponding position with a comma.
NOTE: We recommend choosing Internal LabCollector ID (of your samples) and Box ID to avoid identical names, so format 1.

- 2. Select the module you want to import the storage location for. In our example, we have chosen the Sample module to import storage location for cancer cell lines. You can also choose if your storage location is in the main storage or secondary storage
- 3. Here you can upload the CSV that you save with all the details (Like in point 1 above) OR you can just copy-paste the CSV data in the box.
- 4. This only applies to secondary storage where you can define the owner of the storage.
- 5. This option gives you the flexibility to use numbers in place of position like A1 or A2, etc. This is especially helpful when you are importing storage in a box without grids or any storage location other than a defined box with grids.
You can force to create a box name when the boxes you have created only have numbers as their name.
You can click the checkbox if the first line in your CSV or in your copy-paste contains the labels. For example, in the above image, where it is written ‘Internal ID, box ID’, etc in the first row of CSV.
You need to define the filed separator. This can be seen when saving your CSV file on your computer. For example like in image below “Comma delimited”.

- 6. Once you have selected all the options, you can do Import and update.
You will see the next step like below.
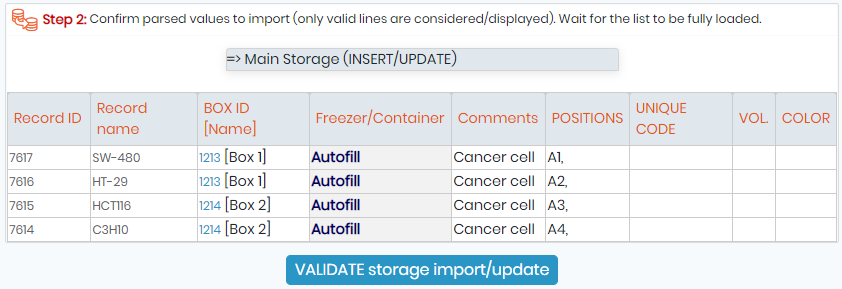
- Once you validate the storage/update, you will see the pop-up. If you are sure about the information and everything is correct select “OK”.

- When you select “OK” you will see the final step, verifying your storage import.

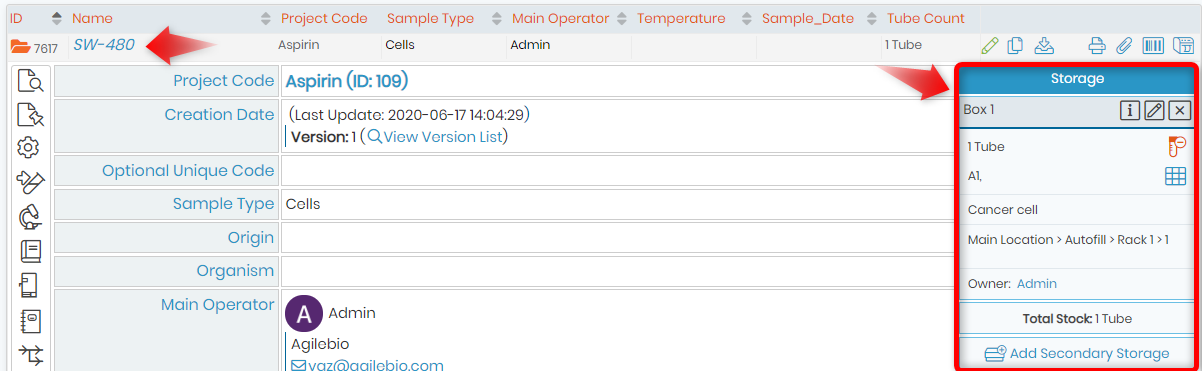
- You can finally see the storage information will be displayed next to your imported data. For example, we imported cell lines, SW480 in sample modules. If we click on the record we will see the associated storage.
Related topics:
- Check our Knowledgebase on how to import your data in LabCollector v6.0
- See how to delimit your CSV for uploading data in LabCollector
- Check how to correct errors occurring during data import
